The use of soldering for stained glass has been going on for many years, but it is only fairly recently that it has grown as a hobby, especially for the construction of terrariums.
Whilst it is possible to use pre -shaped lead strip which you cut to size and then solder together at the joints, the most favored type of construction involves the use of copper foil strips which are bent around the edges of the glass and then soldered together.
Unfortunately, a large number of these otherwise vex)/ attractive items are seriously flawed because of the soldering and the flux that is used.
It is very important to take notice of two factors in this application of soldering:
(i) The solder joint must be done quickly to prevent the glass overheating and consequently cracking.
(ii) The flux used must not corrode away the copper foil, as without this there is nothing left to hold the solder together, thus causing the joint to fall apart.
Unfortunately not enough care is taken in these areas, because most people who attempt this hobby think that soldering is easy. Many a terrarium in the shops is showing the tell -tale green stain along the solder joints. This is the copper foil corroding away because active rather than inert flux has been used, and is therefore continuing to work on the copper foil. Remember that the thickness of copper foil used is probably the same as that on an electronic printed circuit board, and it will therefore be rotted away in a very short time. The likely result when you put your pot plant in the terrarium is that the bottom will fall out.
My recommendations for this type of work are a soldering iron of over 70 watts, fitted with a bit size at least 9.5mm in diameter. The solder should be 60/40 or "Savbit" no thicker than 16 swg, and for a flux, any suitable inert type.
You could test the flux you are going to use by leaving some on the copper foil overnight to see how deep (if not all the way through) it has etched. Again, if you can avoid active fluxes then do so. They should not be necessary and will only spoil your work in the long term.
The technique for soldering with this application is as follows:
(i) Clean the copper foil strip to remove all the grease and dirt from the surface, using a very fine emery cloth or similar.
(ii) Using a pair of clean rubber, or similar, gloves place the copper foil around the edges of the glass. Once the copper foil has been cleaned you must not touch it with your fingers. As has previously been mentioned, the grease on your fingers, however often you wash them, will act as a solder repellant.
(iii) Mechanically set up the two (or more) pieces of glass to be soldered.
(iv) Apply the soldering iron bit to the step you wish to solder, starting at the end furthest away from you.
With the front point on the foil, the rear of the soldering iron bit should be slightly off the foil, to allow the solder to be fed in at this point (Figure 12.1).
(v) Apply the solder as above.
(vi) As soon as the solder has melted move the iron towards you, continuing to feed solder under the bit.
It should take about 1 minute to complete about a foot of work. Faster than this is good, but if it takes substantially longer then the soldering iron bit is too small.
(vii) Continue soldering the remainder of the work, remembering that you will also have to solder the insides of the joint. If you can get the solder to flow through the crack between the two copper foil edges and attach itself to the solder on the other side then this will give you a much stronger joint.
It would be very wise to keep the whole item solidly physically set up until all soldering work has been completed and all joints have fully hardened before removing it from its support. This will avoid putting strain on any single joint, and will give a much more solid final result.
One final tip with terrariums. If possible, thread one or more pieces of copper wire through some of the joints and around the bottom before soldering. This will have the effect of supporting the base of the item and preventing the bottom falling out with the weight of the plant.
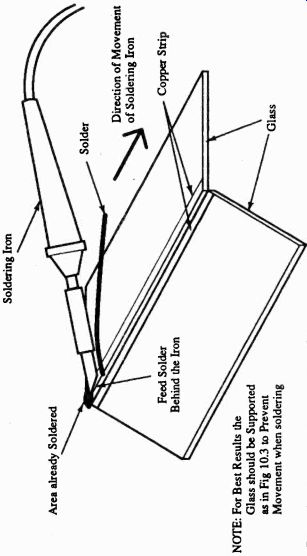
Fig. 12.1 Soldering glass using copper strip --- NOTE: For Best Results the
Glass should be Supported as in Fig 10.3 to Prevent Movement when soldering.