Regardless of the items you are going to solder, there are several steps which must be observed to enable you to get the best results.
The watchword of soldering is cleanliness. The more time you spend paying attention to the cleanliness of the joint then the more likely you are to get a good joint. The most common reason for a failed (dry) joint is that the parts to be soldered have not been cleaned properly. The other main reason why joints fail is because the size of soldering iron or solder chosen is wrong for the work to be done. If the iron is too small then the soldered joint will not be heated sufficiently for good adhesion to take place. The same effect will apply if the solder is too thick and therefore draining too much heat out of the soldering iron.
At this point I must explain the difference between heat and temperature. This is usually the most misunderstood area of soldering.
Temperature: Most soldering irons of good design will run at about the same temperature, usually between 350°C and 500°C. Soldering irons that run at temperatures greater than 500°C should be avoided or controlled as the bit will quickly oxidize and cause poor soldering and excessive bit wear.
Heat: This is a much better indicator of the power of the soldering iron. Unfortunately there is not an accepted unit to indicate the heat of the soldering iron. Needless to say the theory is that the bigger the bit then the greater the heat content. The only limitation to this is the capability of the soldering iron element to replace the heat that the work has taken out. One mistake that is regularly made when choosing the size of soldering iron and its bit is to look at the size of the bit without taking into consideration the area of material around the joint.
The example which crops up more than any is the repair of the pin-hole in the car radiator. Many people cannot understand why, when the hole is only very small, their small soldering iron with say a 1.5mm or 3mm bit will not make the repair. The simple answer is that the area of metal around the repair must be heated up to at least the melting point of the solder used. My experience is that a soldering iron of at least 500 watts would be needed but that a blow torch would be better.
Preparing to Solder
A common mistake when first starting work with a new soldering iron or new soldering bit is the failure to properly tin the surface of the bit as it heats up. Many people complain that they cannot get their new iron to melt the solder even though the iron appears to be hot enough. The answer is very simple.
Unless the bit is tinned successfully when new and at regular intervals an oxidizing surface will cover the bit. This will reject the solder and give the impression that the soldering iron is not hot enough to melt the solder. Sometimes you can turn the soldering iron off and then wipe the surface with a damp sponge and try again. However, this seldom works and the soldering iron bit can only be recovered by using an abrasive on the surface and then starting again.
It must be remembered that the life of the soldering iron bit is only as good as its coating. If you file or sand through that coating to enable you to re-tin the bit then it will only last as long as one of the standard copper variety. It is no use complaining to the manufacturer that his expensive long -life bit has lasted only a short time because the fault is entirely yours.
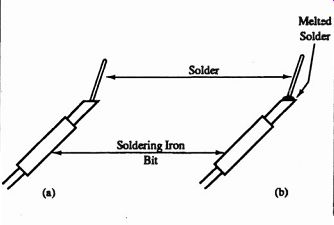
Fig. 6.1 Tinning the Bit
Tinning the Bit
A considerable amount of patience is required here as the bit must be tinned exactly at the moment that the bit tempera ture reaches the melting point of your solder (Figure 6.1(a)).
The method adopted is very simple as follows:
(i) Turn your soldering iron on to heat up.
(ii) If you are using flux-free solder then apply flux to the end of the soldering iron bit. If the solder you are using contains flux then this step is not necessary.
(iii) Hold the solder against the flat face of the bit and wait and be patient.
(iv) After a short time the solder should be seen to start melting. As soon as this happens move the solder around the flat face of the bit, ensuring that it is well covered (Figure 6.1(b)).
(v) Wipe the solder off with a damp sponge. You should see that the flat surface of the bit is now evenly coated with a thin layer of solder.
(vi) If you have successfully achieved (v) then reapply solder to the bit and you are ready to start soldering.
Having achieved successful tinning then it is essential to keep this appearance a: the end of the bit at all times.
Never allow flux to build up and then leave the soldering iron switched on for long periods when not in use. This will cause an un-solderable build-up on the end of the bit which can only be overcome by filing it and destroying the coating.
It is essential that the bit is regularly wiped with a damp sponge and re-tinned as in (v) and (vi) above. The more you look after your soldering iron bit the longer it will last. If you are using flux -free solder, remember that the tip of the soldering iron bit must be dipped in flux before reapplying the solder.
A bit that is properly cared for may last a year or more, but one that is neglected or abused may last little more than a day.
Changing the Bit
The time will come when you either wear out your existing bit or want to change to a different size. This can be quite a dangerous time for your soldering iron, and the success of the operation may depend on how you have looked after it in the past.
The main danger is that the bit may have seized onto the shaft or inside the element. To avoid this happening the soldering bit should be removed at regular intervals and care fully refitted. Never clamp the iron or the bit. In any way to remove the bit and always pull the bit directly off. If you try to twist or bend the bit to get it off, there is a very high chance of destroying the element of the soldering iron.
With the type of soldering iron where the bit slides inside the element, a seized bit is often fatal. The only recourse you have is to file the bit every time it oxidizes until it is too short to work with, at which time the soldering iron will have to be discarded. It is therefore very important that the bit on this type of soldering iron is removed regularly to prevent seizure.
With the type where the bit screws onto the element, it is again essential that the bit be removed regularly and refitted with a coating of anti-seize grease on the thread. Once again seizure of the bit will mean the premature disposal of the soldering iron.
Finally, with the type where the bit slides over the element, seizure is not usually a problem as the shaft is usually made of stainless steel and therefore the bit can be carefully removed. Before replacing the bit on this type of iron, you may find it helps to re-polish the stainless steel shaft using very fine wet-and-dry abrasive paper in its wet state. This will remove any scale that may have built up and make the shaft of the soldering iron smooth and shiny again. Before re-fitting the bit, ensure that it fits snugly over the shaft, and that tae clip holds the bit tightly onto the shaft. If the clip is loose then replace it unless by reshaping it you can get it tight again. Think what could happen if the bit falls off onto your lap when it is hot!