AMAZON multi-meters discounts AMAZON oscilloscope discounts
Table of Contents
Overview:
Computer Troubleshooting Using Troubleshooter Making a Backup Copy of Troubleshooter Setting Up Your Computer CD-ROM Testing Computer Troubleshooting Computer Won't Start Computer Will Not Boot Computer Runs Slow Examination Questions
Lesson Objectives
After you complete this training unit you will be able to:
• Explain the use of loop-back plugs.
• Describe the testing procedures for CD-ROM drives and sound cards using Troubleshooter.
• Describe the steps of a typical troubleshooting procedure.
• List the values of the voltages provided to the mother board from the power supply.
• Describe the effects of an IRQ conflict.
Overview:
• Servicing microcomputers can be a long, tedious process. Often one has no idea where to start when confronted with a completely "dead" machine. In other cases, an intermittent problem that occurs randomly can take a great deal of time and patience to track down. To add to these problems, the physical construction and layout of the various computers available is far from "standard," which means that knowing the layout and construction of one machine will not help when dealing with an other machine.
Even with the use of expensive and sophisticated test equipment, it can be quite difficult to pinpoint troubles that develop in computers.
Oftentimes, diagnostic software or diagnostic cards are of little use if the computer is not functioning enough to get the diagnostic equipment running on the computer. These situations require a more basic approach to troubleshooting.
If the computer will turn on, and begin to boot, diagnostic software is the best bet to find the problem. The better software packages on the market have their own operating system.
By booting from the diagnostic software diskette, problems caused by software and hard ware conflicts are eliminated.
Diagnostic software can also be of great value in "burning in" a new computer for delivery to a customer. Diagnostic software can test the RAM and other circuits that are prone to early failure. Running a variety of tests over a 24 to 48-hour period can often identify marginal parts and avoid early failure in the customer's location. Frequently, such software also is used after a computer has been repaired, in order to gain some assurance that additional break downs will not occur after the machine is returned to its owner. Diagnostic software is also useful for isolating and identifying problems associated with peripheral devices, such as serial and parallel ports, display adapters, and disk drives, as well as special-purpose devices.
In this training unit, we have supplied you with the Troubleshooter diagnostic software package. It has all the features you need to thoroughly analyze and test computers that are at least minimally operational. It is an excellent tool for checking almost every component in a computer. Troubleshooter will prove invaluable to you when you service computers.
Computer Troubleshooting
Troubleshooting is a logical step-by-step procedure used by a technician to solve problems. This applies to auto mechanics, air conditioning technicians, telephone repairmen, or computer technicians The procedure used by the technician has been developed over time into a system that works best for that technician. To solve computer problems, you'll need to develop your own systematic troubleshooting procedure. In this manual, well give you some ideas or steps to follow; however, the procedure you use will evolve as you gain experience solving computer problems.
All troubleshooting procedures have common elements. For example, a generic trouble shooting procedure is shown below. This generic procedure can be adapted to auto repair, air-conditioning service, or computer servicing.
• Talk to the user
• Confirm the problem
• Diagnose the problem
• Repair the problem
• Verify repairs
Talk to the user: In order to establish a starting point in your troubleshooting, you will need to talk to the user. Often, the computer technician will receive a service call from an office manager or other contact person, rather than the actual user. The information provided to you may not be complete. Talking to the actual user will provide you with a starting point for your troubleshooting. For example, suppose that the service call was for a computer that locks up. When you talk to the user, you will find that the actual complaint is that the mouse does not work in DOS application on a Windows 95 machine.
As you can see, the problem varies greatly depending on who's reporting it. Also, the solution has been changed from a hardware repair to simply loading the mouse driver in the AUTOEXEC.BAT file of the computer.
Confirm the problem: Any problem reported by a user must be confirmed by the technician.
This step may give you some insight to the cause of the problem. Also, you could spend hours trying to fix a problem with the computer only to find out that the actual problem is operator error or caused by something other than the computer.
Diagnose the problem: This is where the troubleshooting becomes very personalized and complaint-specific. The steps you take to locate the source of the problem will depend on the type of complaint. Also, the steps you follow may not be the same as those used by another technician. For a computer that will not boot, for example, you may start by measuring the power supply output voltage, while another technician may start with the hard drive.
Repair the problem: Fixing computer problems can be anything from replacing the power supply, motherboard, or other hardware to in stalling and/or reconfiguring software.
Verify repairs: Once the previous step is complete, you need to make sure that the problem is, in fact, fixed. Sometimes, you'll find that the initial repair caused another problem, or hid additional problems. Checking the operation of the computer after the repairs is an essential part of the complete troubleshooting procedure.
Now, let's take a look at the use of Troubleshooter. Then, we will discuss some of the most common computer complaints.
Using Troubleshooter
ForeFront's Troubleshooter is a self-booting computer diagnostic software package. Since the software is self-booting, it does not rely on the operating system of the computer to boot. This eliminates conflicts from hardware drivers and tests the components directly for true accuracy.
In this training unit, we'll look at some of the features of Troubleshooter. As you will see, the software is easy to use and understand, and comes with an extensive user's manual.
Making a Backup Copy of Troubleshooter
As this manual is written, the Troubleshooter software is provided in two ways: on a single 5 1/4 " 360K diskette and on a single 3 1/2 " 720K diskette. These diskettes are not copy protected, so you will need to back up the original for safety and use the backup copy for all your experiments. You also should use the backups for testing unknown computers. That way, even if some flaw should destroy the data on your working diskettes, you can replace them with fresh backups and continue your tests.
Turn on your computer, if it's not already running. Once your computer completely boots, insert the 3 1/2 " Troubleshooter diskette in drive A. Double click on the My Computer icon.
This will display the devices that are available within, or connected to your computer. Single click the left mouse button on the icon for the A: drive.
With the A: drive icon highlighted, single click the right mouse button. From the menu shown in Figure 1, left click Copy Disk. The window shown in Figure 2 will be displayed.
As you can see, the information in this window tells you how the copy procedure will be per formed. Click Start.
The information on the diskette will be read into memory. At some point during the procedure, you will be asked to insert the destination diskette. Remove the Troubleshooter diskette and insert a blank 3 1 / 2 " diskette into your A: drive and click OK. This diskette does not need to be formatted; the Copy Disk procedure will format the diskette before any information is written to the disk.
While the diskette is copying, fill out a disk label for your backup copy of the Trouble shooter diskette. When the copying is complete, remove the diskette and affix the label. Place the original diskette in a safe place.
Also, if you have not already done so, now is a good time to register your software. Once the registration is complete, you will have access to technical support from the manufacturer.
The software manufacturer will also inform you of any updates to the software package.
Generally, software registration places you on the company's mailing list so you'll also receive offers to purchase other products from the manufacturer, often at a discount from the retail price. As you can see, it's a good idea to register any software you purchase.
Once your Troubleshooter software is copied, you are ready to begin troubleshooting computer problems.
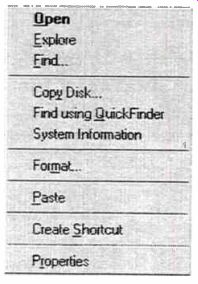
Figure 1. When you right click on the A: drive icon, you will see this
menu.
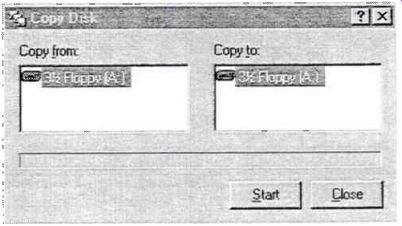
Figure 2. The Copy Disk window allows you to select a source drive and
a destination drive.
Setting Up Your Computer
Close all Windows 95 applications and shut down your computer in the normal manner.
When directed, turn off the power to your computer. Once the computer is off, disconnect any peripheral devices such as the printer, the mouse, and the joystick.
With the Troubleshooter, you received three loop-back plugs. These loop-back plugs are attached to the serial and parallel port of your computer. These plugs provide an input/output path for testing the operation of these ports.
In the package, you received a 25-pin male plug which is connected to the parallel port; a 25-pin female plug, which is connected to 25-pin serial connectors (typically used for external modems), and a 9-pin female plug which is connected to 9-pin serial connectors (typically used for the mouse). Remove these plugs from the package and connect them to the correct ports on the back of the computer.
NOTE: Your computer may not have a 25-pin serial port Also, many of the computers you'll service in the field will not have all three connectors.
When the loop-back plugs are in place, turn on your computer and insert the Troubleshooter diskette (your backup copy) in the A: drive. (As you probably noticed. Troubleshooter is provided in both 3 1 / 2 " and 5 1 / 4" formats.
This way, you can use the software on computers that have a 5 1 / 4" floppy as the A: drive.) Once the computer boots, you will be at the MAIN MENU of the Troubleshooter software, shown in Figure 3, on the following page.

Figure 3. From the Main Menu of Troubleshooter you can get system information,
go to the diagnostic menu, or select any of the features of Troubleshooter.
NOTE: If the computer you are testing boots to the normal operating system, Windows 95 or MS-DOS, you will need to change the boot sequence of the system bios. Reboot the computer and press the DEL key during the startup sequence. Depending on the brand of bios, the boot sequence is set under the Advanced CMOS Setup option. Set the boot sequence to A:,C:. After the sequence has been set, save the settings and exit to the operating system.
The computer should now boot from the A: drive. If there is no diskette in the A: drive, the computer will look to the C: drive.
As you can see on the bottom of the screen, the up and down arrow keys move the bar through the menu options. The ENTER key selects the highlighted option. With the System Information Menu option highlighted, press ENTER. The options from the System Information menu will cause the software to examine the computer configuration and produce a report of the results of the examination. This will often give you a starting point for your diagnosis.
With the arrow keys, select the option from the menu and observe the reports displayed on the screen. As you make your selections, you can skip the Device Driver Information option, since, without MS-DOS being loaded, no drivers are available. We'll show you how to check the driver later. When you have seen the results for all of the options, press ESC until you return to the MAIN MENU. From the main menu, select Advanced Diagnostic Tests and press ENTER. You will receive the menu shown in Figure 4. Some of the options from this menu activate a test directly; others, such as the memory test, bring up another menu where you can select options for the test.
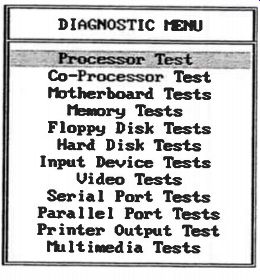
Figure 4. From the Advanced Diagnostic Menu, you can select a type of
testing you wish to perform.
Select all of the options from this menu so that you are familiar with the testing performed.
Some of the tests, such as the memory test, will take several minutes to complete. Also, some of the tests, such as the mouse and Multimedia test, will not operate without the drivers loaded. Refer to the Troubleshooter User's Manual before you perform the Non Destructive Write Test. In some circumstances, this test may result in corruption of data.
During the tests, you may find that some of the tests failed on your computer. For in stance, your computer may have failed the Turbo Switch Test under the Input Device Menu, or it may have failed the Handshaking Test when testing COM2 under the Serial Port Test Menu. Don't be concerned about the test results at this time. Your computer may not have a turbo switch, or your modem (COM2) may not be connected to the phone line and therefore cannot provide a handshake signal for this test.
When you have tried all of the Advanced Diagnostic Tests, press ESC until you return to the main menu.
Now, move the highlight bar to the Continuous Burn-In Tests option and press ENTER The Burn-In menu, shown in Figure 5, will be displayed. From this menu, you can select the test that will be performed during burn-in. For the purpose of this experiment, select only the first three tests. When you've selected the tests, press F10 to continue.
The next screen, shown in Figure 6, on the next page, gives you a listing of the tests selected.
On this screen, the duration of the burn-in tests are selected. You can select the number of passes (from 1 to 9999) or the length of time (from 00:01 to 99:59) the burn-in tests will run on the computer. However, you cannot enter both the number of passes and the length of time. For this demonstration, enter 5 in the Passes column for each of the tests listed.
When you are finished, press F10 to start the burn-in process.
The burn-in process will start with the first test listed and continue through the listed tests in order. When all of the tests are completed, the process will start from the first test again, and continue until all of the tests have run the selected number of passes or for the length of time entered. When the burn-in process is completed, a summary of the results will be displayed on the screen. Look through the summary of the results for your computer, when finished, press ESC until you return to the MAIN MENU. The Low Level Format Utility is used to correct problems in the sectors of a hard drive.
DO NOT RUN THIS UTILITY NOW. You should only run the utility when all other tests and repairs to a hard drive have been attempted.
This utility will reformat the hard drive. There is no way to recover the data from the drive once it has been low-level formatted.
The remaining options on the MAIN MENU are self-explanatory, or are fully covered in the User's Manual. Select Exit to Operating System.
Be sure to read through the instructions in the manual, and be sure that you are familiar with all of the testing procedures before you take Troubleshooter to the field.
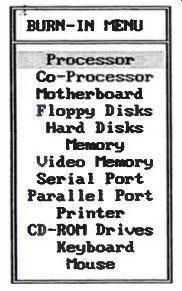
Figure 5. From the Burn-In Menu, you can select the tests you wish to
perform during the bum-in process. It is also a good idea to run these
tests as part of regular maintenance on the computer.
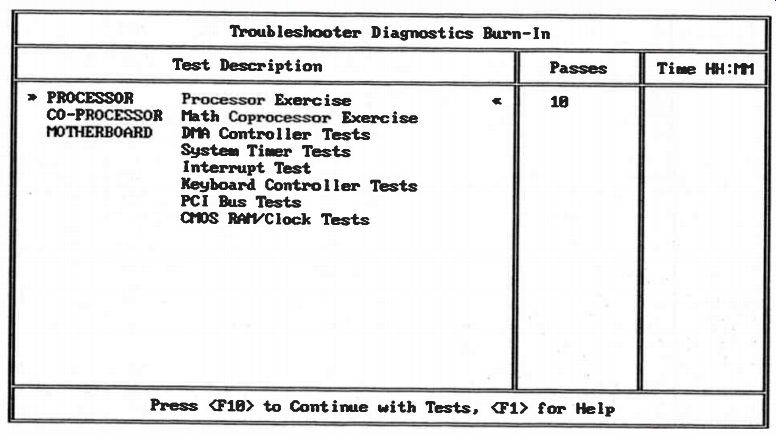
Figure 6. Once the tests have been selected, you'll need to set the number
of passes or the length of time each test is run. New computers should
have the burn-in tests run for a minimum of 24 hours.
One of the many advantages of Troubleshooter over other forms of diagnostic software is the fact that it is self-booting and eliminates problems caused by driver conflicts. However, Troubleshooter will also operate under MS DOS so that you can check the sound card and CD-ROM drives. Just start the computer in the normal fashion. From the Windows 95 desktop, click START Click "Shut Down", and select "Restart the computer" in MS-DOS mode.
Insert the Troubleshooter diskette in drive A:, type A:TS and press ENTER. Troubleshooter will now be able to test any devices whose drivers are loaded in the AUTOEXEC.BAT file.
NOTE: Windows 95 does not automatically load drivers into the AUTOEXEC.BAT file. If you are going to test the mouse, sound card, and CD-ROM drive with Troubleshooter, you will need to add a line to the AUTOEXEC.BAT file so that these drivers are loaded. Refer to the manual that came with the device for the correct procedure to load these drivers.
CD-ROM
Testing The Troubleshooter software package comes with two CD-ROMs which are used to test CD-ROM drives. The first is the Troubleshooter CD-ROM Test Disc. This CD is used in con junction with the Troubleshooter diagnostic software. The other CD is the CD Trouble shooter Pro. This CD works independently of the Troubleshooter software and will operate under the MS-DOS, Windows 3.1, or Windows 95 operating system.
To use the CD-ROM test disc, insert this CD into the CD-ROM drive. From a DOS prompt type "A:TS" and press the ENTER key. From the MAIN MENU, select Advanced Diagnostic Tests. From the DIAGNOSTIC MENU, select Multimedia Tests. Here, you can test the PC speaker, sound card, and CD-ROM drive. These tests will only work provided that the drivers for the CD-ROM and sound card have been loaded.
The CD Troubleshooter Pro operates independently of the Troubleshooter software. The CD Troubleshooter Pro was designed to give an impression of the speed of CD-ROM drives in a simple way. It also contains advanced diagnostic procedures as well as detailed information about the hardware and software used.
The CD Troubleshooter Pro can run under either Windows (3.1 or 95) or MS-DOS. To run the DOS version, log onto the CD-ROM drive (usually d:), and type CDTS from the D:CDTS\DOS directory To run the Windows 95 version of the software, click Start. From the Start menu, click Run and enter "D:\CDTS\ WINDOWS\CDTSWIN.EXE" and click OK Both versions have extensive on-line help files to help you use the CD Troubleshooter Pro.
For the purpose of this discussion, we will be using the Windows 95 version of the software.
The CD Troubleshooter Pro starts with a typical Windows style interface, as shown in Figure 7. Each item on the taskbar activates a pull-down menu. As we did with the Trouble shooter software, we'll only discuss a few of the most common features of the CD Trouble shooter Pro. You can experiment with the various features of the software, and refer to the on-line help for features not covered here.
File: From this menu, you can close the current window, save the contents of a window, set up your printer, print the contents of the current window, and exit CD Troubleshooter.
If any of the actions cannot be performed, the menu item will appear gray.
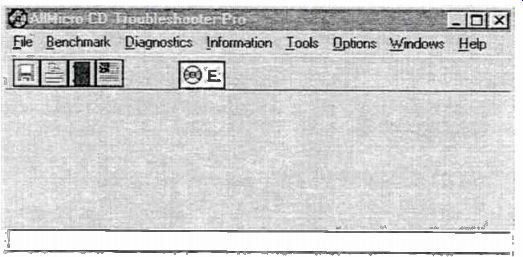
Figure 7. The CD Troubleshooter Pro has its features listed on the taskbar.
Each listing on the taskbar activates a pull-down menu.
Benchmark: Like hard drives, CD-ROM drives are quite different with respect to the amount of time needed to access specific data in the space a compact disc offers. Usually, CD-ROM drives are classified in a similar way as hard drives. The speed for finding data on the disc and the time required to transfer that data to the main memory are measured.
The CD-ROM benchmark of CD Troubleshooter measures the performance of your CD-ROM subsystem and gives you individual results for each parameter as well as an over all performance index called ROMarks. Most manufacturers use different technologies to measure the performance of their CD-ROM drives, and this information is not usually easy to use. One major benefit of CD Trouble shooter is that it provides information that can be compared. To ease this comparison between different drives, in addition to measured results, the program combines the individual results into a single number which identifies the speed of the drive. CD Troubleshooter is distributed on a special CD called a Reference CD. This CD contains special data used by the program to ensure accurate and reliable performance measurements. Although you could use other CD-ROMs with CD Troubleshooter, the manufacturing process is different and could produce results that are not accurate.
The Benchmark feature of the CD Trouble shooter tests the data transfer rate and data access time of the CD-ROM drive. Trouble shooter then compares the test results against the data on the reference CD. The results of this comparison are then displayed on the screen, as shown in Figure 8. To start the Benchmark feature, click on Benchmark and select CD-ROM Benchmark from the pull down menu or press F6. This test takes some time to complete, so be patient.
Diagnostics: The diagnostic functions of CD Troubleshooter Pro will detect errors in CD-ROM drives and media errors on the CD. The diagnostic functions include:
• Sequential Read: The entire CD is read from beginning to end. This is the fastest way to test a CD-ROM for defects.
• Random Read: The entire CD is read in small blocks using random positions. Since the drive has to seek blocks at different positions on the disk. the mechanical parts of the drive are being tested. The time required to run this test depends mainly on the average access time of the drive.
• Reverse Read: The entire CD is read from end to beginning. Since CD-ROM technology was not designed to work this way, the mechanical parts of the drive are stressed.
As with the random read test, the time required to run this test depends mainly on the average access time of the drive.
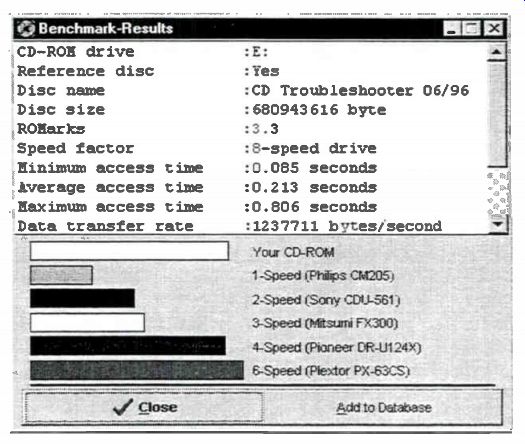
Figure 8. When the Benchmark is complete, you will receive a report on
the performance of the CD-ROM drive.
Butterfly Read: The entire disk is read in small blocks alternating from the beginning and from the end. This test may last a long time because the drive is always repositioning itself. The mechanical parts of the drive are thoroughly tested.
Since a typical CD-ROM contains a large amount of data, these tests take a long time to complete. During the tests, you will receive a display, as shown in Figure 9, showing the status of the test.
Each diagnostic function produces a detailed analysis of all data contained on a CD-ROM. Any error reported shows a problem with either the drive or the CD. Since the tests are designed to read the entire CD, you can repeat the tests with a different CD. If the error does recur with another CD, try cleaning the lens of the drive with a standard CD cleaner.
If this does not solve the problem, your CD ROM drive is probably defective and should be replaced.
The CD-Troubleshooter has many operational options. Read the help files to learn how to customize the operation to fit your needs.
Now, let's move on to solving some of the most common computer problems.
6.5 Certifying drive E:
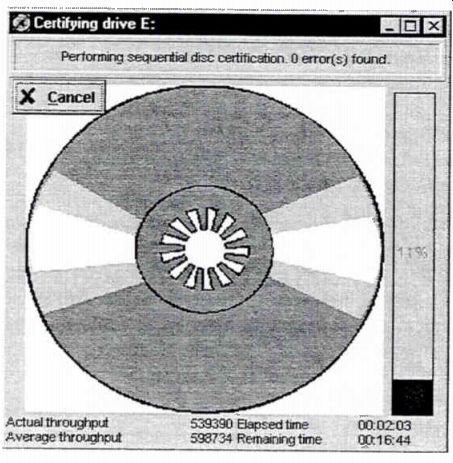
Figure 9. During the diagnostic tests on the CD-ROM drive, you will receive
a status screen to show you how much of the test is completed.
--------------
Computer Troubleshooting
In this section, we'll discuss some of the most common computer problems. We'll discuss the steps used to find the cause of these problems and the necessary repairs.
This section is by no means a complete computer troubleshooting manual, because it does not cover all possible computer problems, or all of the possible causes of any problem - only the most common. As you gain experience in computer repair, you will develop your own troubleshooting procedures that will allow you to solve computer problems efficiently.
One thing to remember: With today's computers, you will not troubleshoot to the component level--you will only troubleshoot to the board level. Once the problem has been isolated to a particular board, that board will be replaced. This also applies to the mother board, with the exception of the processor and the memory (both system RAM and cache). Computer Won't Start As with any problem, always check the simple solution first. For a computer that won't turn on, always check the power to the computer before you begin troubleshooting the computer. Often, computers are plugged into power strips which have been known to fail.
Check the power strip with a multimeter to be sure that the correct voltage is available at the outlets of the power strip. If the correct voltage is present, check the power cord to the computer. If not, the problem is either the power strip or the AC receptacle that the power strip is plugged into. In either case, this is not a problem for a computer technician.
Once you have determined that power reaches the computer, you are left with three possible faults--power supply, power switch, or motherboard. To locate the problem, you will need to remove the case of the computer.
(Note: Some newer computers such as the Monorail and the Compaq Presario are not serviceable. They must be returned to the manufacturer for service. Do not attempt to remove the cover from these computers.) Once the cover has been removed, turn the computer on and observe the operation of the cooling fan on the power supply. Power for this fan is provided from the power supply.
If the fan is operational, it indicates that at least part of the power supply is working.
Now, measure the voltage output of the power supply at the motherboard. The power supply connects to the motherboard by way of two connectors as shown in Figure 10.
Measure the voltage at all of the connectors from the power supply and compare your readings with those shown in Figure 10. If the voltages are correct, replace the motherboard.
If you have no voltage on any of the wires, replace the power supply. If you measured voltages but the voltages are not correct, turn off the switch and disconnect the two connectors. Turn on the computer and repeat the voltage measurements. Again, if the voltages are correct, replace the motherboard. If the voltages are still not correct, reconnect the power supply to the motherboard. Be sure that the connectors are positioned correctly.
Now, disconnect the power supply connectors to all floppy drives, hard drives, and CD-ROM drives. Repeat the voltage measurements. If the voltages are still not correct, replace the power supply. If the voltages are correct, one of the drives is loading down the power supply. Reconnect the power supply to the drives, one at a time, and repeat the voltage measurement When you have located the drive that is loading the power supply, replace that drive.
Do not disconnect all of the power supply connectors from the drives and the mother board. The power supply needs a load connected to the output in order to operate properly.
Without this load, either from the drives or the motherboard, your voltage readings will not be correct.
Computer Will Not Boot
The computer starts, displays the startup sequence on the screen, and then either stops or gives an error message. This problem is typical of a hard drive crash, but could be caused by other problems as well. Before removing the case of the computer, try to isolate the problem first. To do this, reset the computer and insert a bootable diskette (such as your Troubleshooter diskette) into the A: drive. The computer should try to read the A: drive (the light on the drive should turn on). If the computer boots from the A: drive, the problem is in the hard drive. Run Trouble shooter to determine the problem with the hard drive.
Figure 10. The power supply is connected to the motherboard via two connectors. The orientation of the connectors can be different on different motherboards. However, the black or ground wires from the connectors will always be next to each other.
If the computer still does not boot, and the light on the A: drive does not light, reboot the computer and press the Delete key during the boot process. This will give you access to the BIOS setting of the computer. Select the STANDARD CMOS SETUP from the menu.
This will display the types of drives that are set for A, B, and C. Make sure that the A: and B: drives are set correctly and make a note of the parameters that are set for the C: drive.
When you are ready, press Esc to return to the main menu.
Next, select BIOS FEATURE SETUP from the main menu. The only item on this screen that you should be concerned with at this time is the BOOT SEQUENCE. Make sure that the boot sequence is set to A:,C:. Setting the sequence establishes the order that the computer will look for boot information. With the sequence set A,C, the computer will first look at the A: drive. If no system disk is present, the computer then looks at the C: drive. When the boot sequence is set, press Esc to return to the main menu.
From the main menu, select SAVE AND EXIT and answer Yes to any questions displayed. When the computer starts its boot process, insert your Troubleshooter diskette into the A: drive. If the computer boots, run Troubleshooter to determine the problem with your hard drive. If the computer does not boot, remove any diskettes from the drives, and turn off the computer.
With the computer turned off, remove the case and check the connection to the drives. Be sure to check both the data cable and the power connections to the hard and floppy drives.
Also, check the connection of the data cables to the controller card. (If you have a Pentium computer, the IDE and floppy controller are built into the motherboard.) Be sure that the cables are fully seated. If you find any loose connection, try to start up the computer after the connection has been secured. If the computer still does not boot from either drive, you are faced with the prospect of replacing the controller card or motherboard. Since the controller is the easiest to replace, try it first.
If the computer boots from one drive but not from the other, the problem could be caused by the drive or the cable, with the controller card or the motherboard being much less likely since only one drive is affected.
Computer Runs Slow
This problem is becoming more common with the use of Windows 95 and is often not caused by the computer itself. Windows 95 and applications written specifically for Windows 95 require more system RAM than applications written for Windows 3.1. Although the mini mum system requirement of the software is 8 Meg of RAM, the application runs extremely slow with only 8 Meg of RAM. Increasing the system memory to 16 Meg will usually correct the problem.
Another factor in overall computer speed is the hard drive. As hard drives reach their capacity, the access time of the drive slows. The system must search through more information to locate the data requested. Also, the data on a hard drive can become fragmented - this also slows the access time of the drive. The use of disk compression software such as Defrag or Norton's Speedisk will compress the information on the disk and increase the access time.
The actual operating speed of the computer can be checked with Troubleshooter, and is displayed in the System Information section of Troubleshooter. If there is any question about the actual operational speed, run the Advanced Diagnostic test on the processor, coprocessor (if applicable), and the motherboard using Troubleshooter. Any problem reported by this test could affect the operational speed of the computer.
In addition to the tests listed above, some of the common complaints from computer users are:
• Can't read disk (floppy, hard, or CD)
• No sound from sound card
• Computer locks up
• Memory errors
All of these problems can be pinpointed using Troubleshooter. This diagnostic software will test the drives and interfaces, sound card and driver, and the memory (both RAM and cache). If the computer locks up, it is usually caused by a conflict between the IRQ or DMA channels of devices such as the sound card and bus mouse. Troubleshooter will also provide information on the IRQ, DMA, and addresses used by various parts of the computer. This information is displayed in both the Interrupt Vector Information and the IRQ Information screens under the System Information menu.
Any conflict can be resolved by resetting the device either by software provided with the device, or by jumpers or switches on the device.
---------------
Examination Questions
This is Examination Number 6133.
Make sure you print your name, student number, and examination number in the space provided on the Answer Form. Be sure to fill in the circles beneath your student number and examination number.
Reminder: A properly completed Answer Form allows us to evaluate your answer and speed the results and additional study material to you as soon as possible. Do not hold your Answer Forms to send several at one time. You may run out of study material if you do not send your answers for evaluation promptly.
1. Why is it desirable to boot the computer being tested from the Troubleshooter diskette?
a. Because the computer being tested may not be able to boot.
b. To eliminate hardware and software conflicts.
c. This is the only way to correctly start Troubleshooter.
d. Because Troubleshooter will not operate under an MS-DOS operating system.
2. Why would Troubleshooter be started from an MS-DOS prompt when it uses its own operating system?
a. To test the operation of the hard drive.
b. To test the operation of the sound card.
c. To test the operation of printers.
d. You should never start Troubleshooter from MS-DOS.
3. In order to test the operation of the serial port, you must:
a. Run Troubleshooter from MS-DOS.
b. Run Troubleshooter for the operating system on the diskette.
c. Have a printer or mouse connected.
d. Connect a loop-back plug to the serial port.
4. After you have talked to the user, what is the next step in a troubleshooting procedure?
a. Diagnose the problem.
b. Remove the cover of the computer.
c. Verify the problem.
d. Run Troubleshooter.
5. When checking the voltage from the power supply to the motherboard, all of the following voltages should be present except:
a. +10 volts.
b. +5 volts.
c. -12 volts.
d. +12 volts.
6. All of the following could cause slow computer operation except:
a. Insufficient RAM.
b. IRQ conflicts.
c. Fragmented data on the hard drive.
d. A full hard drive.
7. IRQ conflicts will most likely cause:
a. The computer to run slowly.
b. Lines on the display.
c. Printer errors.
d. The computer to lock up.
8. During the burn-in testing, you can set the number of passes for each test any where from:
a. 1 to 99.
b. 1 to 999.
c. 1 to 9999.
d. 1 to 1000.
9. If the computer boots from the floppy drive but not from the hard drive, which of the following is the most likely cause?
a. The hard drive.
b. The motherboard.
c. The controller card.
d. The power supply.
10. On a Pentium computer, the IDE and floppy drive controllers are:
a. On a separate card attached to the PC1 bus.
b. On a separate card attached to the local bus.
c. Part of the motherboard.
d. Part of the drive.
------------------------
NRI Graduates Say... "The NRI training I received greatly broadened my horizons. My father once showed me a magazine advertisement for your course and I just up and enrolled. Now I see all the good it has done for me! Thanks to everyone at NRI for your continued support for the 'little guy' "
-Vincent R. Salvaterra; Freelend, Pennsylvania
---------------------------