Many home TVs and monitors -- such as rectangular HDTV 16x9 displays -- can automatically or manually perform the "squeeze" necessary to pump out the extra resolution from anamorphic ("enhanced for 16x9") program material -- an option many DVDs use. Even many better-quality 4x3 (square-shaped) television sets can perform automatic or manual voltage-based squeeze. On Sony and Toshiba TVs, for example, this may be referred to as "16x9 mode".
In our experience, however, no software-based PC DVD player (e.g. WinDVD or PowerDVD), thus far, has a feature where it "communicates" with monitor to perform a voltage-based anamorphic (16x9) squeeze on 4x3 computer monitors or even 16x9 monitors (the squeeze is necessary on 16x9 monitors for programs wider than 1.78:1 -- example: Star Wars, Lord of the Rings and most Hollywood films).
Questions & Answers:
Q: Why is 16x9 enhanced or anamorphic video superior to non-anamorphic video?
A: A 16x9 enhanced DVD's horizontal resolution is almost 30% greater than a non-16x9 enhanced DVD. When a DVD is made, it can be made to fit natively on a regular 4x3 (almost square) TV or computer monitor or a rectangular 16x9 widescreen TV or monitor (such as HDTV sets). The 4x3 mode (sometimes wrongly called the "letterbox" mode) only has 640x480 pixels of resolution. The 16x9 enhanced DVD has 720 x 480 resolution, with the extra pixels going to the total horizontal image resolution. When a DVD player plays a 16x9 DVD on a 4x3 set it may go through an extra, digital-conversion process that properly displays the right aspect ratio or your TV. This process is done in the players electronics and/or software (or firmware). Often, this reduces the quality of the picture or creates artifacts (little jagged distortions on flat surfaces) or a softer, less detailed picture. But when this 16x9 enhanced DVD is played on a widescreen display or a 4x3 display capable of performing a voltage-based size adjustment, it is played at full resolution. This article is about the latter case: adjusting the vertical image size on a 4x3 display so that we can squeeze out as much resolution -- or detail -- as possible from a 16x9 anamorphic image.
Q: When I watch a widescreen movie on my PC, it looks great. Why do I need to mess with it?
A: If your monitor has the proper controls, the image can look even better. Also, doing this little experiment will give you hands-on experience into the "workings" of anamorphic video. It's a fun, learning experience.
Q: When I watch a 16x9 DVD, it looks fine -- is my player/monitor already "enhancing" it?
A: Here's a test to answer this question. While the DVD is playing, move the mouse so that it is in the black "matted" area, either under or over the letterboxed image. Move the mouse so that the cursor moves towards either the top or bottom of the screen. In most cases, the cursor will disappear at the very bottom or very top of the screen: at the CRT (picture tube) / plastic chassis interface -- i.e. where you would normally expect the cursor to go off screen. Unfortunately, this means the DVD software is performing "in-player" letterboxing. And this feature is a compromise: it is not a true "enhanced widescreen" image. Once you successfully complete the squeeze modification below, the cursor will disappear -- go off screen -- about about 1/3 up or down from either the top or bottom widescreen mattes (black bars).
Fortunately, most computer monitors have picture-adjustment controls conveniently on their front panel. One parameter in particular, called "Size" on Samsung monitors, is the only one needed to perform an anamorphic squeeze.
You'll need the following tools:
- Avia or Video Essentials audio/video calibration DVD.
- A ruler (preferably a small, flexible steel or plastic rule) or measuring tape.
- Pen/pencil and notepad. Or you may have Excel or Notepad running in the background, keying in data as you adjust.
Here's the procedure:
- Let you monitor warm up for at least 1/2 hour (it's okay for the screen saver to be running)
- Bring up a 4:3 (aka 4x3) test pattern or grid from the calibration DVD (see Fig 1 and Fig 2). In Avia, video test patterns are in Chapter 7. Access your monitor's picture-adjustment menu (usually on the front panel), and then bring up the "Size" control. Hopefully, you monitors Size control has numerical graduations. It may also use graduated "tick" marks. Using the ruler, calibrate for 4:3 geometry (again, see Fig 1 and Fig 2). If the test pattern has circles, each circle's diameter must be equal -- or as close as possible -- when measured vertically and horizontally. For squares, remember basic geometry: height = width. Important note: do not adjust the size too long or too wide so that the picture gets cropped from the top/bottom and/or the sides; keep an eye on the top/bottom and sides carefully throughout the adjustment procedure. It may be necessary to open the main desktop on your computer, making sure none of the screen is cropped. When everything finally looks good, record you measurements on paper, or Excel, Notepad, etc.
- Bring up a 16:9 (aka "16x9", "anamorphic" or "enhanced") test pattern or grid from the calibration DVD (see Fig 3 and Fig 4). In Avia, widescreen enhanced patterns are in Chapter 7. Adjust the Size controls again: you will have to reduce Vertical size quite a bit this time (see Fig 3 and Fig 4). Since you already fine-tuned the horizontal size in step 2, you will probably not need to touch it for the 16:9 calibration. In any case, make sure none of the sides are cropped. If the test pattern has circles, each circle's diameter must be equal -- or as close as possible -- when measured vertically and horizontally. For squares, remember basic geometry: height = width.
- Play a 16x9 DVD and make sure the image looks okay: not squashed or flattened. If they appear squashed, you may need to select options on your computer's DVD player program so it doesn't letterbox for you: For WinDVD player, right-click screen, then select Setup > Video and make sure "Fixed aspect ratio" is unselected. For PowerDVD, right click on the screen, then select Configuration > Video > Advanced > Aspect Ratio and select "Always keep video aspect ratio".
- When you need use your monitor's full screen, refer to your notes and revert Size settings back to 4:3. You can keep Size info conveniently in front of you by using a Post-It and stick it on to your monitor's front panel.
You should see a notable improvement in clarity and resolution when watching 16x9 content in the squeezed mode. The image is better because (a) it is not being processed into "letterbox" by the player software; (b) the squeeze, by its very nature, compresses in more detail; and (c) the CRT scan rate is more efficient because the reduced vertical size does not waste scanning on unused areas of the 4x3 screen. If you have any questions or comments, please contact us.
We don't have much experience with LCD monitors. On our EIZO L367 LCD, we noted no adjustment for vertical/horizontal size adjustment. Please inform us of your results.
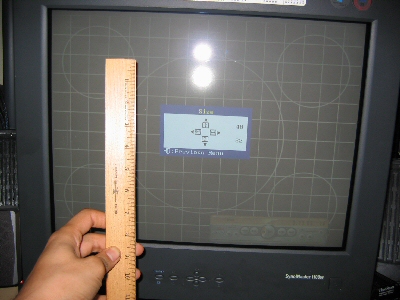
Above: Fig 1: A standard (4x3) grid-with-circles pattern, on the Avia home-theater
calibration DVD, is being used here to assess (and hopefully, then, correct)
picture geometry. Here, on this 19" Samsung SyncMaster 1100DF, the monitor's
own vertical and horizontal "Size" controls are being used to adjust
geometry. The a circle's diameter must be equal when measured vertically and horizontally.
For squares, remember basic geometry: height = width. Important note:
do not adjust the size too long or too wide so that the picture gets cropped
from the top/bottom and/or the sides. Keep an eye on the top/bottom and sides
carefully throughout the adjustment procedure.

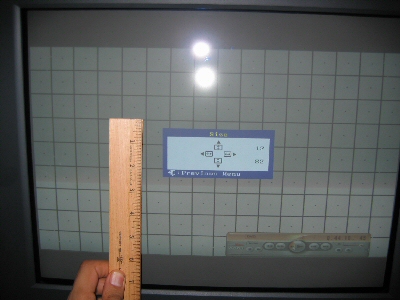
Above: Fig 2: A close-up of the monitor menu's: this is the
Size adjustment mode. It is being used to fine tune 4x3 geometry. After
the geometry is corrected, the size numbers are then recorded
for future reference (use a spreadsheet or Notepad, and time/date the
entries).

Above: Fig 3: Accessing 16x9 test patterns on Avia,
we can now adjust and record the proper anamorphic squeeze settings.
Above: Fig 4: Use both the vertical and horizontal Size controls interactively to adjust anamorphic geometry. This means squares are squares (height = width). Important note: do not adjust the size too wide so that the picture gets cropped from the sides. Keep an eye on the sides carefully throughout the adjustment procedure. Record final settings on paper, Excel, Notepad, etc.
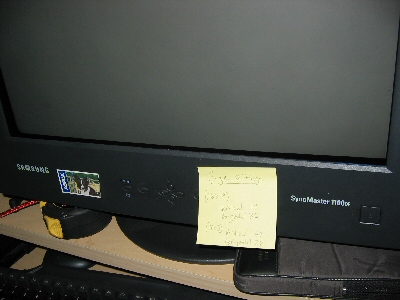
Above: Fig 5: Aspect Ratio Size information, written on a Post-It
and stuck to the front of the monitor, is convenient when you must switch
back and forth between 16x9 and 4x3.