AMAZON multi-meters discounts AMAZON oscilloscope discounts
"Every long journey starts with the first step." This section deals with the first steps in developing a new and fascinating activity in your life.
Our goal is to make the journey a comfortable, entertaining, and rewarding experience. If you will supply a little time, effort, and patience, you can accomplish your goal.
Establishing Reasonable Goals
All successful individuals achieve their varying degrees of success by establishing and accomplishing goals. Many people establish goals without even realizing it. In many cases, these goals can be classified as dreams, aspirations, or concepts. Reflect back to the last time that you were really pleased with some accomplishment in your life. This accomplishment required personal motivation, planning, effort, success, and the satisfaction brought on by that success. The actual goal was determined during the planning stage, but it was not achieved until the success stage. Between these stages occurred all of the work and effort.
Take these concepts one step further. Assume that an unobtainable goal has been established. An indefinite amount of work and effort might be invested in this elusive goal, but the end result will be discouragement and defeat. To make matters worse, the individual who established this unreasonable goal might become hesitant to set new goals, because of the fear of a similarly wasted effort and failure.
In our opinion, the establishment of unreasonable goals is the most significant obstacle that you must face in your journey toward becoming proficient in the field of electronics.
What Is Unreasonable?
For the sake of illustration, assume for the moment that this guide is entitled Building Your Own Automobiles. Few people would "get it"--only those motivated by the desire to build their own car from scratch. Such an idea is ludicrous for several reasons. For one, it isn't practical. The cost of buying the individual pieces and parts to build a finished car would cost 5 to 10 times as much as a new car that has been factory built and tested. The builder would have to be very knowledgeable, and experienced in a wide variety of the specialized skills existing within the automobile industry, such as diagnostic alignment, automobile electrical systems, and bodywork and finishing techniques. In addition, it staggers the mind to imagine the vast array of the specialized shop tools that would be required for such a project! There are similar circumstances in the electronics field. Even electronic geniuses don't build their own television sets from thousands of tiny parts that they pick up at their local electronics dealer. It is also helpful to understand that most electronic systems are not invented, designed, and built by single individuals. For example, the consumer electronic products that we all enjoy every day (TVs, radios, CD players, VCRs, etc.) are actually evolutionary products. They have been redesigned and improved over a period of many years, by many different design engineers.
Generally, goals involving the from-scratch building of complex electronic systems are usually unreasonable. Also, from a conceptual point of view, the field of electronics is vast, and divided into many specialized fields. If your goal is to understand everything about electronics, we wish you a very long life. We believe you may need more than one lifetime to accomplish a goal of that magnitude!
What Is Reasonable?
This is the exciting part in regard to the electrical and electronics fields, because the possibilities are limited only by your ingenuity and imagination. We have known many people who got started in electronics as a rewarding hobby, only to find themselves in a high-paying career before they knew it! For example, a good friend of ours became interested in home computers as a hobby. As he continued to expand his computer system, his personal financial situation forced him to locate the most inexpensive places to purchase the pieces for his system. As he began to impress his friends and relatives with his computer system, they decided to buy their own systems. One day, almost by accident, he discovered that he could supply them with systems identical to his own for substantially less money than the local computer store; even after he added in a healthy profit for himself. As a result, he changed his career in the midstream of life (he was an investment counselor), and opened a very successful computer store. We know this story very well, because we bought our first computer from him! We have had many friends and acquaintances who began tinkering with electronics in their homes as a hobby. Eventually, they found themselves deluged with friends, neighbors, and relatives bringing them every thing from portable television sets to computer monitors, all harping the same request, "When you get a few minutes, would you please take a look at this. We think it's a simple problem because it worked just fine yesterday." This leaves the besieged electronics tinkerer with one of two choices: either begin charging for repair services, or become a candidate for the "Good Person of the Year Award." Of those who began to charge for their services, many have found lucrative and rewarding careers.
Many people have the mistaken belief that a career in electronics is not possible without a formal degree from an accredited college or technical institution. A formal degree will certainly enhance and accelerate your career progress, but there are many career pathways for non degreed individuals as well. For example, many electronic salespersons do not have a deep, intricate knowledge of the products they sell; a functional and applicative understanding is all that is required. The consumer electronics repair field is loaded with people who were called tube jockeys back in the 1950s. As the field of electronics evolved from vacuum tubes to solid-state technology, they advanced right along with it by reading the various electronic periodicals published within their field. Many younger people who are successful in these same fields received their education from correspondence or vocational schools.
Non-degreed electronic hobbyists often find careers within their hobby. For example, the hobbyist who collects a large parts inventory for personal use may begin to sell these parts at substantial profits. Many local electronics stores have had their beginnings in this manner; not to mention some large national parts distribution chains.
Your personal interests will play a big role in discovering and opening doors to possible career opportunities. A hobbyist who likes to tinker with automotive sound systems may start a part-time business installing these systems in the local community. A little effort, perseverance, and dedication to performing quality work can convert it to a full-time lucrative career.
Non-degreed electrical and/or electronic career opportunities are common in most industrial manufacturing facilities. The majority of electrical maintenance personnel we have trained over the years have had little or no formal classroom training in the electrical or electronics fields. Within the industrial manufacturing community, any prior experience in this area (even at the hobbyist level) is usually given weighty consideration in hiring and job promotions.
The list of possibilities goes on and on. Don't expect to go around designing sentient robots, or building laboratories that look like they're out of an old Boris Karloff movie. However, don't stumble over the diamonds, while you are looking for the gold! It is always reasonable to expect to go as far as your effort and perseverance will take you.
Obtaining the Informational Tools
The informational tools you will need for a successful hobby or career in the various electrical and electronics fields can be broken down into four categories: textbooks, data books, periodicals, and catalogs.
Textbooks
Textbooks are generally self-explanatory as to their usefulness to any specific individual. As your experience grows, you will probably collect a reasonable library, according to your needs and interests. For the novice, we would recommend an electronics dictionary and a beginning level electronics math book.
Data Books and Datasheets
The manufacturers and distributors of electronic components publish data books, containing cross-referencing information and individual component specifications. A few examples of such books are NTE Semi conductors, The GE Semiconductor Replacement Guide, and SK Replacement Cross-Reference Directory. As you can see, the data book titles are self explanatory.
Your first project in the field of electronics is to obtain all of the electronics data books that you can get your hands on. The reason, for having included this section at the beginning of this book, is to give you ample time to order and receive a fair quantity of data books before you start your first projects. They are that essential. Many electronics manufacturers will supply their data books free of charge, if you simply call and ask them. This is especially true if you have started a small part time or full-time business. Try this approach first; then, if you are not successful, they can be purchased from many different electronics sup ply companies.
Manufacturers' data books can be general or specific in nature. Try to acquire the general or broad-based data books in the beginning. As your interests begin to lean toward certain specific areas, you can obtain what you need at a later date.
Data books provide needed information in two critical areas: cross referencing and parts specifications. Back in the days of vacuum tubes, the tube manufacturers would identify their tubes with certain generic numbers. In other words, a 12AU7 tube would always be labeled 12AU7, regardless of the manufacturer. Unfortunately, this tradition did not carry over into the solid-state field. Although there are generic numbers for solid-state components, they are only used occasionally. Instead, you must rely on the manufacturer's cross-references, which are supplied in their data books. For example, suppose you needed to replace a defective transistor labeled NTE 130. If you had some NTE 130s in your personal stock, or if your local electronics shop carried the NTE line of components, you would simply use another NTE 130 as a replacement. But, if you didn't have one and the local parts store only carried the SK line of components, you would have to cross-reference the NTE 130 to its SK equivalent. In this case, it would be an SK3027. When you consider that there are dozens of major parts manufacturers, each using their own unique part numbers, you begin to appreciate the usefulness of an exhaustive cross-reference library.
Cross-referencing will also play an important role in acquiring a respectable parts inventory. All of the large surplus and wholesale electronics houses offer many electronic components at buy-out or whole sale prices. In most cases, you will have to cross-reference these parts to know if you can use them. In addition, if you salvage parts from used equipment to place in an inventory, you will have to cross-reference the used parts to know what they are.
One final word on cross-referencing electronic parts-it is not as difficult as it may seem from just reading this guide. On receipt of your first few data books, spend a few minutes scanning through the cross reference section. You should easily recognize how the parts are arranged according to sequential numbers and letters.
Electronics data books also provide the detailed specifications for electronic parts. When you begin to build or design electronics projects, you will need a working knowledge of the specifics of the various parts you intend to use. For example, the device parameters will define the electrical conditions for reliable operation (breakdown voltage, power dissipation, maximum current, etc.), and the pictorial diagrams will provide the necessary mechanical information (case style, lead designation, pin definitions, etc.).
If you have not understood some of the terms we have used in describing and explaining data books, don't worry. When you have a chance to skim through one, much of what is written here will become clear. The rest will be understood as you begin to build a few of the projects covered in the following sections. The important thing to do right now is to get them! A list of the sources, from which to obtain electronic data books, is on Google (just Google data sheet).
Periodicals
Periodicals are very important to anyone involved in the electrical or electronics fields for a variety of reasons. First, they keep the electronics enthusiast current and up-to-date in the latest technology. It has been said that a college-degreed electrical engineer will become obsolete in 5 years without a strong personal effort to stay current with technological advances. We do not necessarily agree with that statement; we believe it may take less than 5 years! Consider this; the IRS allows a business owner to totally depreciate a computer system in 3 years. The advancements in digital technology are so rapid that a typical computer system could be outdated in only 1 or 2 years after it has been purchased. The majority of electronic textbooks are either revised, or taken off the market in 3 to 5 years. Although this may seem to imply that a proficient electronics person must become a chronic bookworm, you actually stay current by reading periodicals.
Most periodicals and electronics magazines are constructed in such a way that they are enjoyable and entertaining to read. The general-interest periodicals will always contain something of interest to almost everyone and they will motivate the reader with new ideas and perspectives. The newest innovations in the industry are covered, along with their practical aspects. In many cases, the reader is provided with home-brew projects to utilize these innovations. Periodicals also make great wish books, with their large variety of product advertisements. The publishers of these magazines also recognize that all of their readers are not at the same technical level; thus, the home projects will vary from easy to difficult, and from practical to just plain fun. Without even realizing it, you can stay up-to-date and have a great time doing it. Periodicals also keep you up-to-date on the most current book releases.
We recommend that you subscribe to several of the general-interest electronic periodicals. By the time you finish this textbook, you should be able to understand and build most of the projects provided in these magazines, especially those that are of special interest to you. In addition, you will pick up little bits of information here and there that will help your progress, and spur your interest. One word of caution: Do not become discouraged if you experience some degree of confusion as you read through these magazines for the first time. Electricity and electronics are, generally, not that difficult to understand. Simply be content with what you do understand, and the rest will follow in time as you progress toward your goal.
Setting up a Lab
While you are waiting for your first few data books and electronics periodicals to arrive in the mail, it would be prudent to turn your attention to setting up an electronics lab. The lab is the room or area in your home or business where you will build, test, or repair electronic equipment. It is also the place where you will probably spend considerable time studying, experimenting, sorting parts, jumping for joy, and stewing in frustration. The lab is a dangerous place for novices and children, an eyesore to visiting guests, a probable aggravation to your spouse, a collection area for a large volume of "yet to be salvaged" electronic junk, and a secure area for all of your expensive tools and test equipment. The environment in the lab should be quiet, comfortable, and well lighted.
With all of these considerations in mind, it is wise to put a little fore thought into the best location to set up shop.
We highly recommend choosing a room with a door that can be locked to keep out children, pets, and the overly curious. In addition to the possibility of personal injury to the uninvited, you will probably be working with equipment or projects that are easily damaged or tampered with. Frequently, you will want to leave your work in progress overnight, or even for days at a time, so it must not be disturbed.
Garages are usually not the best place for a lab because of the difficulty in keeping a controlled environment. In addition to your personal discomfort from temperature extremes, most electronic equipment is very sensitive to the moisture that will condense on it in a cold, damp environment. A damp environment is hard on tools and test equipment because of corrosion problems. If you plan on setting up your lab in a basement, a dehumidifier would be a wise investment. A spare bedroom or den is an excellent choice for a lab. Keep in mind that a lab does not have to be an enormously large place. It need only contain a workbench (about 3 x 6 feet), a three- or four-level bookshelf, a bare wall or shelving unit for small-parts cabinets, and a closet or floor area for storage. A nice luxury would be a desk for studying, reading, drawing schematics, and miscellaneous paperwork.
The Workbench
A good size for an electronics lab workbench is about 3 x 6 feet. Of course, this can greatly vary according to your needs and what you might already have available. In most instances, it should be sturdy enough to hold about 80 pounds, stable enough to not be easily shaken (very annoying when trying to solder small or intricate parts), devoid of any cracks (small parts have a way of finding them), and of the correct height for comfortable use.
Various community organizations and churches often sell heavy-duty, fold-up tables, used for group meetings and meals, at very affordable prices. These same tables can be purchased at office supply stores. They make excellent electronics workbenches, and we personally use two of them for our office and lab. The Formica tops are very durable, resistant to heat, and aesthetically pleasing.
If you prefer, building a lab workbench is a simple project. Particle board or plywood makes a good top, and 2 x 4s are adequate for legs.
An old hollow-core (or solid-core) door also makes an excellent top with 2 x 4s or saw horses for legs. Commercial electronics workbenches, pro viding many convenient features, are also available, but they are very expensive.
Hand Tools
If you are any kind of do-it-yourselfer, you probably already have the majority of hand tools you will need for working in electronics. However, in the event that your forté has been working on diesel trucks, keep in mind that the majority of your work will be with small items. A good electronics toolbox will consist of small to medium sizes of the following common tools : needle-nose pliers, side cutters, wire strippers, screwdrivers (both flat and phillips), nut drivers, socket sets, wrenches, tack hammers, files, and hack saws. In regard to powered hand tools, a 1/4-inch drill and a scroll saw are a good beginning for most work. A high-speed, hand-held grinder, with a variety of attachments, (such as the Dremel MotoTool) will be extremely handy for any fabrication project.
A nibbling tool does a great job of cutting printed circuit board material, chassis material, and various types of metal or plastic enclosure boxes.
Of course, there are specialized tools intended exclusively for use in the electronics industry. Most electronics parts suppliers will carry a fair selection of these.
It is best not to go overboard spending a small fortune on a great variety of hand-held tools in the beginning. The tools mentioned so far are only suggestions. You will probably save a great deal of money by adding tools only as you need them.
One of the most important tools to the electronics enthusiast is the soldering iron. Do not get a soldering iron confused with a soldering gun. Soldering guns have a pistol grip, and are intended primarily for heavy-duty soldering applications. Their usefulness in the electronics field is very limited because they can easily damage printed circuit boards and electronic components. A soldering iron is straight like a pencil, with a very small point or tip. A typical soldering iron with stand is shown in Fig. 1.
The critical variable, with a soldering iron, is its tip temperature. If the tip temperature is too high, it could destroy heat-sensitive electronic components. If the tip temperature is too low, the solder might not flow or adhere properly to the joint and a poor electrical connection might result.
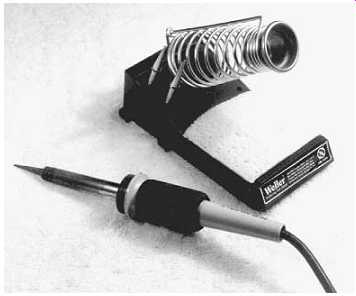
FIG. 1--A typical soldering iron with stand and extra tips.
If the load on a soldering iron always remained constant, it would be fairly easy to maintain a constant tip temperature. But in actual use, the load will vary depending on the size of the joint and the amount of solder used. In other words, a large solder joint will conduct more heat away from the soldering iron tip, than will a smaller joint, causing the tip temperature to fall to a lower level. If the wattage (or heating power) to the tip were increased to compensate for this temperature drop, the tip might then become too hot when the iron is not in use, and potential destruction of components could result. Because of performance-versus-price reasons, there are four commonly available types of soldering irons on the marketplace:
1. Nonadjustable--Specified by wattage.
2. Regulated--Specified by wattage and tip temperature.
3. Adjustable--Wattage (power) control.
4. Adjustable--Temperature control.
The most common and least expensive type of soldering iron is the first type listed. It is nonadjustable, and is rated (or specified) by its wattage.
This is an acceptable type with which to start out, or to throw into the tool box for emergency repairs when away from the lab. The disadvantage with this type of iron is the variation in tip temperature relative to the load. For general-purpose electronic work, try to find one that is rated at about 30 watts.
The second type of soldering iron listed is the type that We use most of the time. The tip of this iron contains a special thermostatic switch that will maintain the tip temperature reasonably close to a specified point.
The third type of soldering iron incorporates a light-dimmer circuit to vary the amount of wattage the soldering iron is allowed to dissipate.
For bigger jobs, the wattage can be increased to facilitate easier soldering. For smaller jobs, the wattage can be decreased for a lower tip temperature. The wattage control is manual with this type of iron, and the user must use caution not to get the tip temperature too hot when soldering smaller components.
The fourth type of soldering iron is the most versatile, and it is the most expensive. A heat-sensing device is implanted close to the tip, so that the tip temperature can be continuously monitored and controlled by an electronic controller located in the holding stand for the soldering iron. These soldering stations have an adjustment control in their bases; thus the exact tip temperature can be set and maintained, regard less of the load placed on the iron itself.
In addition to the soldering iron, you will need some accessories to perform quality soldering jobs. If your soldering iron doesn't come with a stand, buy one! We ended up burning our table, an expensive pair of pants, and our hand before we finally learned this lesson. Also, be sure the stand has a sponge holder. This essential tip-cleaning convenience is well worth the small additional expense. Pick up a few extra sponges, too.
A quality soldering iron will have a variety of different-size tips avail able for it. If it doesn't, look for another soldering iron. You should choose a couple of small tips for intricate work, and some medium-size tips for general-purpose work.
When purchasing solder, buy only the 60/40 rosin-core type. Acid-core solder should never be used on electronic equipment. If the need arises to remove a soldered-in component (or to correct a mistake), you will need a desoldering tool. Most desoldering tools consist of a spring-loaded plunger-in-a-tube housing with a hollow tip at one end. To remove unwanted solder, melt the solder with a soldering iron, place the desoldering tool tip close to the molten solder, and press the trigger. The trigger releases the spring-loaded plunger, thus creating a vacuum in the tube and causing the molten solder to be sucked up into the tube. When purchasing the desoldering tool, be sure that replacement tips are available. The Teflon tips will flare out with use, decreasing the effectiveness of the desoldering tool. A typical desoldering tool is shown in Fig. 2.
Soldering is a learned skill, but certainly not a difficult one to master.
A little practice, coupled with a conscientious attitude, is all that is required. The actual techniques to soldering are covered in Section 3 of this guide.
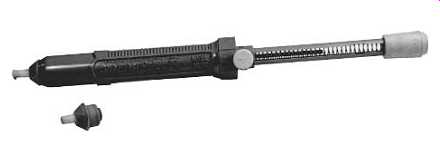
FIG. 2--A common type of desoldering tool with an extra tip.
Miscellaneous Supplies
For the most part, the miscellaneous supplies that you will accumulate over a period of time will be a matter of common sense. This section lists a few items to help you get started.
For making temporary connections and setting up certain tests, you will need a number of alligator clip leads. These consist of a short length of insulated wire (usually 10 to 15 inches) with a spring-loaded alligator clip at each end. We recommend purchasing (or fabricating) about a dozen.
A variety of sizes and colors of wire will be needed to build various projects. Some electronics supply stores offer a variety pack, which would be ideal for starting a new lab. The minimum you will probably need is a spool of medium hook-up wire (stranded, insulated, about 18 to 22 gauge), a spool of small hook-up wire (stranded, insulated, about 26 to 28 gauge), and a small spool of shielded, coaxial cable.
A few helpful cleaning supplies would be cotton swabs, isopropyl alcohol, some very fine sandpaper or emory paper, a can of flux remover, and a variety of small brushes (save your old toothbrushes for the lab).
Electrical Lab Power
The area you have chosen for your lab will hopefully have a sufficient number of 120-volt AC wall outlets to accommodate your needs. If, by any chance, you live in an older home that does not have grounded out lets (three holes for each plug: hot, neutral, and ground), they should be upgraded to the grounded type in your lab. If you have any questions on how to do this, it would be wise to have a professional do it for you. Ungrounded or incorrectly wired outlets are dangerous!
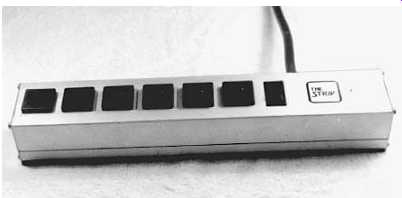
FIG. 3 Multiple-outlet AC power strip.
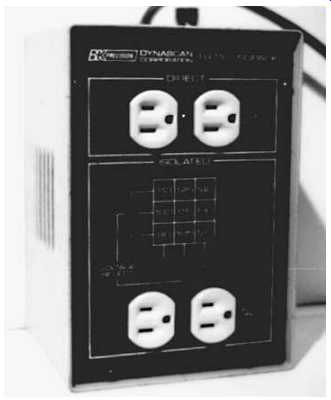
FIG. 4 An isolation trans former specifically designed for an electronics
test bench.
You will find it very convenient to install an outlet strip (a rectangular enclosure with multiple outlets, as in Fig. 3) somewhere within easy access on your workbench. Try to find one with a lighted on-off switch, a plastic (or nonconductive) housing, and a 15-amp circuit breaker. It is best to find some way of mounting it securely to the workbench so that you can easily remove plugs with only one hand.
Whenever the need arises to service or repair line-powered electronic equipment (the term line-powered means that the equipment must be plugged into a standard 120-volt AC outlet), you will probably want to purchase an isolation transformer to power it (Fig. 4). This will become critically important if you are also using line-powered test equipment to perform tests and measurements. It will not be necessary to purchase an isolation transformer for any of the projects in this guide, but you might want to keep your eyes open for a good bargain for future needs. The theory and purpose of isolation transformers are covered in a later section.
If your interests lie in the industrial electronics field, you might find a need to provide 220-volt AC power to your lab. This is easily accomplished with a step-up power transformer. As in the case of isolation transformers, an appropriate step-up transformer can be added on at any time in the future if the need arises.
Basic Test Equipment
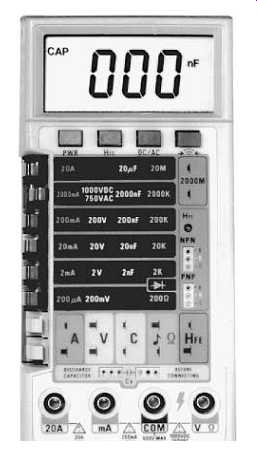
FIG. 5 A versatile, multifunction digital voltmeter (DVM).
The most frequently used (and most important) piece of test equipment to the electrical or electronics enthusiast is commonly called the digital voltmeter (DVM), which is used to measure and display voltage, current, and resistance. A typical DVM is shown in Fig. 5. In regard to function, a DVM is basically the same instrument as a volt-ohm-milliammeter (VOM), a digital multimeter (DMM), or a vacuum-tube voltmeter (VTVM).
The term DVM is most frequently used today, and it is the term we will use through the remainder of this guide. When talking with experienced electrical or electronics personnel, they will probably refer to a DVM as a "voltmeter," or simply "meter." Modern DVMs can typically perform a variety of functions other than simple voltage, current, and resistance measurements. Some might come in very handy; others are somewhat gimmicky. The only important additional feature to look for, when shopping for a DVM, is a "diode test" function. The purpose for this will be explained later in this guide. The other functions are between you and your pocketbook.
A DVM is the only piece of test equipment you will need to accomplish the goals of this textbook. If you continue to pursue the electrical/electronic field, you will use this instrument for many years to come, so try to find one from a reputable company that is durable and well proven. A well-established electronics dealership might provide some valuable guidance in this area. As you progress through this guide, you will discover many uses for a DVM. But at this point, we offer the following words of caution: Don't try to use a DVM without reading and understanding the operator's manual! This caution also applies to other types of test equipment. Electricity is dangerous! The remainder of this section covers the additional types of commonly used electronic test equipment. This is not a suggestion that you should go out and buy all of this equipment. Depending on your interests, you might never need some of these; some pieces you might decide to buy as you progress through this guide, and fully understand their function and purpose. You might even decide to build some of it your self for the fun, satisfaction, and great savings. In any event, read through the remainder of this section, get some basic concepts (don't get upset if you don't understand it all right now), and consider it for future reference as needed.
The oscilloscope (Fig. 6) can provide a visual representation of voltage and current variations (commonly called waveforms) within an operating circuit. In addition to displaying these waveforms, the oscilloscope can also be used to measure their amplitude and frequency.
In many ways, an oscilloscope is similar to a small television set. The cathode-ray tube (CRT; picture tube) is used for displaying the voltage or current waveforms. The waveform amplitude is calculated by measuring the vertical height of the waveform, and comparing it to the vertical sensitivity adjustment on the front panel of the oscilloscope.
The frequency of the waveform is calculated by measuring the horizontal length of one complete waveform (one complete cycle), and comparing it to the horizontal-sweep frequency adjustment on the front panel of the oscilloscope.
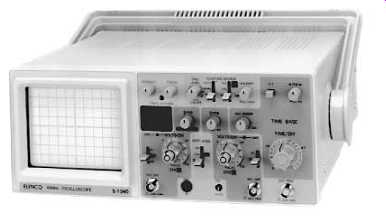
FIG. 6 A modern dual-trace oscilloscope.
In addition to amplitude and frequency measurements, an oscilloscope is used for waveform analysis. Simply stated, this means that the person performing a test should have a good idea of what the waveform should look like at the point being checked. If the waveform is not correct, the defect in the waveform can often identify the problem.
Logic probes and logic pulsers are used by personnel involved with digital electronics. Logic probes give a visual (and sometimes aural) indication of the logic state of the checkpoint in question; either high, low, or pulsing. A logic pulser "injects" a continuous train of highs and lows (called pulses) into a digital circuit, so that its operation might be observed.
Power supplies are used to externally power circuits that are being built, serviced, or tested. For example, if you wanted to functionally test an automobile radio, it would be necessary to connect it to a +12-volt DC power supply to simulate the automobile battery. Lab power supplies are usually line-powered, and adjustable over a wide range of voltages and currents. Most electronics enthusiasts will collect a variety of power supplies (some purchased, some home-built, some salvaged from used equipment) for maximum lab versatility. FIG. 7 shows an example of power supplies.
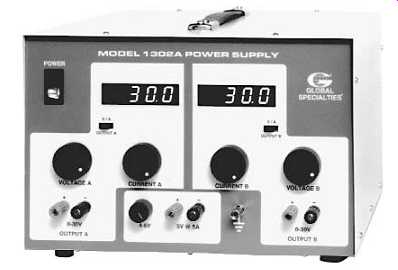
FIG. 7 A triple-output lab power supply.
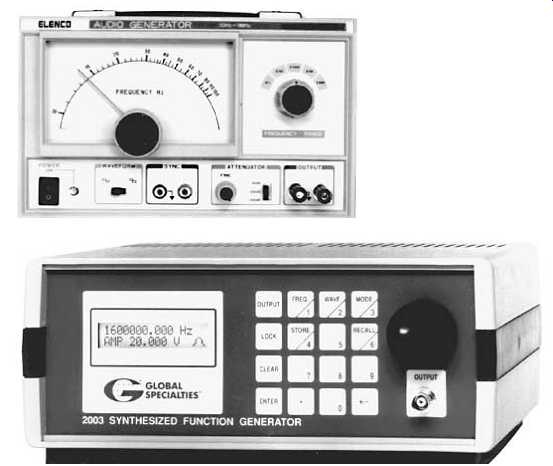
FIG. 8 An Audio-frequency signal generator and function generator.
Frequency counters are instruments used to count the frequency of any periodic waveform. They are more convenient, and more precise for measuring frequency, than an oscilloscope.
Signal generators produce a test signal to be injected into an electronic circuit for testing and design purposes (Fig. 8). Signal generators typically produce a selectable "sine" wave or "square" wave test signal with adjustable amplitude and frequency. Signal generators that produce a greater variety of test waveforms (such as triangular waves) are called function generators. A special type of signal generator, which automatically varies the output frequency within preselected limits, is called a sweep generator.
Current-transformer ammeters (commonly known by a manufacturer's trade name Amprobe) are most often used by electricians for measuring high values of AC current. (This type of ammeter will not measure DC currents.) This instrument measures the strength of the moving magnetic field created around any wire through which AC current is flowing. The circuit does not have to be opened, and no physical contact needs to be made to the wire. It then converts this field strength reading to a proportional current reading.
Starting a Parts and Materials Inventory
Collecting and organizing a good parts inventory is one of the more enjoyable and profitable aspects of the electrical-electronics field. But, like most other endeavors in life, there is a right way and a wrong way to do it. The wrong way will cost you plenty. The right way will open up a fascinating hobby within a hobby (or career within a career) that is both entertaining and educational. If you follow many of the suggestions we have outlined in this section, you can easily acquire a parts inventory that will rival most local electronic parts stores, at very little expense.
Salvaging
The cheapest way to acquire electronic parts is to remove them from electronic "junk" that someone has thrown away, or given to you. The key to success here is to be able to differentiate the good junk from the bad junk. Unless your interest lies exclusively in the TV repair business, old defective television sets should probably remain in the bad-junk category for several reasons. First, they're big, bulky, and hard to move, and may take up too much space. Second, they can be dangerous to tinker around with, unless you know what you're doing. The CRT (picture tube) is subject to implosion (the opposite of explosion, but with the same catastrophic results) if accidentally fractured. Also, the second anode of the CRT can retain a very nasty high voltage for months.
Whereas the shock probably wouldn't do you any physical harm, the involuntary response from your muscles could! Third, the quantity of useful parts that can be removed from TV sets is usually small, unless you have a need for high-voltage components. Fourth, they're hard to get rid of after you're through with them.
The good-junk category would include radios, VCRs, CD players, stereo systems, computers, tape players, electronic musical instruments, automobile stereo systems, and some types of commercial or industrial electronic equipment.
Good junk can be acquired in a variety of ways. Most electronics repair shops get stuck with a large volume of junk from customers who don't want to pick up their electronic equipment when they find out how expensive it will be to repair. Many shop owners will give it away for the asking. The local garbage dump is also a good place to find scrap electronics. Don't forget to spread the word around (to all of your friends, neighbors, and relatives) that you would like to have any of their electronic junk destined for the trash can. If you're really ambitious, contact the maintenance superintendents or plant engineers at the local manufacturing plants in your area. Manufacturers often upgrade to new electronic systems, and will discard their old systems for salvage prices. (We once purchased three truckloads of extremely valuable electronic equipment from a large manufacturer for only a penny a pound!) Keep in mind that an electronic bargain is in the eye of the knowledgeable beholder. For illustration, let's assume your particular interest is in the audio electronics field (speaker systems, amplifiers, CD players, etc.). If you receive catalogs from the various electronics suppliers listed in Section B, you'll be amazed at the low prices on top-quality internal components for audio systems. (These are the same companies that many of your local electronics dealerships probably buy from.) Unfortunately, the biggest problem you will run into is obtaining suitable cabinets, housings, or enclosures into which to mount your internal components for a finished product. High-quality speaker cabinets might cost $100 or more. Professional-quality project enclosures are very expensive, or unavailable in the size needed. This is one of the areas where the junk market really pays off. Junked CD players, VCRs, and computers often have beautiful cases that might require little or no modification to install your parts. If an expensive speaker system goes bad (usually from cone dry rot or misuse), most people simply throw them away; cabinets and all! The speakers can easily be replaced for a third (or less) the cost of a new speaker system of equal quality. Of course, these are just a couple of examples of the cost-effectiveness of collecting the right kinds of electronic junk. Try to be somewhat selective, according to your interests, or you might wind up with more junk than living space in your home.
A good place to find materials for cabinet or enclosure fabrication is the local scrap metals yard. You will be particularly interested in sheet aluminum, aluminum plate, and extruded-aluminum stock (both channel and angle stock). Most scrap yards will sell this stuff for about 30 to 50 cents a pound. If you attempt to buy this material new, you'll appreciate how much of a savings this is. It is also handy to know that most road signs are made from plate aluminum. When the local highway department replaces old road signs, they will typically sell them to scrap metal companies. Look for road signs while you're at the scrap yard, or you might try contacting your local highway department to ask if they will sell them to you directly.
If your interests happen to lie in robotics, automation, or car sound systems, don't forget your local automobile junkyard. Old automobiles are a good source for powerful electric motors (used in windshield wipers, automatic seat adjusters, etc.), lamps and fixtures, car radios and stereo systems, and miscellaneous hardware.
One of the best ways to be selective and to obtain all of the salvage able equipment you need, is to advertise in the local "shopper" magazines (often called "advertisers"). For noncommercial individuals, these ads are usually placed free of charge. If your interests happen to be in the digital electronics field (computers and accessories), a typical ad might read as follows:
Electronics experimenter interested in purchasing obsolete or nonfunctional computers or computer equipment. Call (your telephone number).
Hypothetically, if you placed an ad such as this in a local shopper magazine, and someone called you in response to that ad, try to keep a few points in mind. There are many obsolete and useless computers in homes and businesses today. In many cases, obsolete or defective computers are not even supportable by the companies that manufactured them. The person calling you probably has only two options available: sell the computer stuff to you, or throw it away. You shouldn't pay any more than "scrap" value for equipment of this sort. This is just an example, but the technique should work equally well in any personal electronics interest you might have. But we have one word of caution; do a little research, and know your market before you try this technique.
What to Salvage Many junked electronic items will contain subassemblies that are valuable to the electronics hobbyist and experimenter. Old CD players, computers, and VCRs often contain good power supplies, usable for other projects, or even for lab power supplies. (Two of the power supplies that we use the most often in our lab came from junked equipment.) Junked stereo systems might contain good audio power amplifier subassemblies. These are only a few examples. The point is, always check out the value of equipment subassemblies before tearing everything apart to salvage components.
Any person interested in robotics will find a wealth of electro mechanical items in old VCRs, including motors, gears, pulleys, belts, limit switches, and optical sensors. Junked CD players often contain functional laser diodes for experimentation or making laser pointers (be very careful to protect your eyes if you experiment with any kind of laser, or laser diode). Junked computers might contain good floppy drives, hard drives, or memory chips. Commonly used electronic hard ware (fuse holders, line cords, switches, etc.) is found in almost all electronic equipment.
Salvaging Electronic Components
If you are not familiar with the names or appearance of commonly used electronic components, it would be advisable to read the section entitled Electronic Components in Section 2 of this guide before proceeding.
Now a few words of common sense. An inventory must be organized to be of value to the user. If you have limited inventory space, be practical and selective according to your needs. Every part you salvage will cost you time to remove, and time to enter into your inventory.
Although small-parts cabinets are not extremely expensive, their cost will add up in time. Try to be more conscious of variety than quantity.
Compare the cost of "grab bag" specials from surplus dealers versus your time spent in acquiring the same items by salvaging.
It is usually not a good idea to mix salvaged parts with new "assumed to be good" parts. Salvaged parts are used and could be defective. Some salvaged parts might be destroyed in trying to remove them. Unless you want to go through exhaustive functional testing procedures, simply keep your salvaged stock separate from your new stock. Then, if the need arises for a salvaged component, you will want to check out that component before using it in a circuit.
The remainder of this section provides some basic guidelines in salvaging electronic components for inventory purposes. These are only suggestions. You might want to do things a little differently to meet your specific needs.
RESISTORS
Common 1/4- and 1/2-watt resistors are probably going to be more trouble than they're worth to salvage. Electronics surplus dealers sell mixed resistors in this size range for as low as a dollar a pound. On the other hand, power resistors (1 watt or higher) are more expensive, and often easier to remove. They are usually a good salvage component.
POTENTIOMETERS
If easily removed, potentiometers are good salvage components. There is a high risk that salvaged potentiometers will function erratically, or contain "dead' spots. They should be thoroughly checked before using in any valuable or critical circuit function.
CAPACITORS
Small capacitors typically fall into the same category as small resistors; they're not practical to salvage. Large electrolytic capacitors are practical to salvage, if they're not too old. The functional characteristics of electrolytic capacitors deteriorate with age. Old oil filled capacitors should not even be brought home; they might contain polychlorinated biphonyls (PCBs)! Large nonpolarized capacitors are good salvage items.
TRANSFORMERS
Step-down power transformers almost always make good salvage items because of their versatility. Other types of transformers become a matter of choice, depending on your interests.
DIODES
Small signal or switching diodes are not practical to salvage because of their low value and ease of availability. Large high-current diodes, high-power zener diodes, and high-current bridge rectifiers are good components to salvage.
TRANSISTORS
Transistors fall into a "gray" area in regard to salvaging. Even small-signal transistors can be practical to salvage if they are marked with generic or easily cross-referenced part numbers.
Generally speaking, any transistor marked with a part number that you cannot cross-reference (many manufacturers use "in house" part numbers) will probably be more trouble than it's worth, considering the time required to analyze it. (In a personal lab, certain types of parameter analysis would not even be possible without damaging the transistor.) LEDS Light-emitting diodes are easily tested and make good salvage items, if their leads are long enough for future use.
INTEGRATED CIRCUITS
There are many snags to salvaging ICs. Soldered-in ICs are difficult to remove (especially the 40-pin varieties); and, without a professional desoldering station, you stand a good chance of destroying it in the removal process. Once removed, a salvaged IC is difficult to functionally test without very expensive and specialized test equipment. Many ICs are in-house marked. You might run into special cases where it is practical to salvage an IC, such as computer memory chips, but this is not the general rule. If your electronic involvement is very specific, you might find it practical to keep a big box in your lab as a storage place for junk printed circuit boards containing a large quantity of ICs on them. Then, if the need arises, you might find it practical to remove and test the IC.
Buying from Surplus Dealers
Before proceeding, let's define the word surplus as it applies to electronic parts. Surplus means "extra stock." Surplus electronic components and equipment are not substandard or defective, they're just extra stuff that has to be moved out to make room for new. To understand the surplus market, here's how a hypothetical electronic item might get there. Most modern electronic printed circuit boards are manufactured in mass quantities by automated processes. Small "runs" of electronic equipment are not cost-competitive in today's market. If a medium-to-large-size electronic manufacturing firm wants to market a new product, they might start out by making 10,000 pieces. If the marketing idea goes sour, or if the product is improved and redesigned, or if the company goes out of business, thousands of these pieces might be left over and sold to a surplus dealership at below manufacturing cost. The surplus dealership can then sell these items far below retail cost and still make a profit.
A typical surplus dealership will sell more than just manufacturers' overruns and excess stock. Because all of the branches of the armed services use considerable electronic equipment (much of it specialized), many surplus dealerships sell government surplus equipment as well.
Usually, government surplus equipment is used and obsolete, but that doesn't mean it's not valuable. Many surplus dealerships sell factory returns or factory-refurbished items. Factory returns are defective items sent back to the manufacturer for repair or replacement. Factory-refurbished items are factory returns that have been repaired by the manufacturer. Surplus dealerships often buy industrial salvage for resale. The surplus dealership might sell industrial subassemblies (control panels, circuit board assemblies, etc.) by listing all of the "goodies" the buyer can get out of it, or they might salvage the subassemblies themselves, and sell the individual components for a greater profit.
Electronic surplus dealerships are great places to buy electronic components. With few exceptions, the components will be new and in "prime" condition. Besides offering low prices on specific components, the grab-bag specials are an excellent way to stock up your general inventory.
If you are lucky, you might have one or more electronics surplus stores in your local area. Because these stores do not cater to the general public, you might have to do a little investigative work to find the ones nearest you, but it will be worth the effort. If you live in a rural area, mail-order surplus is a good alternative. A list of some good mail-order electronics surplus dealerships is included in Section B.
Electronics surplus is an excellent way to round out your parts and materials inventory, but there are a few cautions and considerations.
Don't automatically assume that every item offered for sale by a surplus dealer must be far below retail cost. In some cases, it is not! Before buying or ordering equipment, be aware of its status. It might be new, used, government surplus, factory-returned, factory-refurbished, or sold "as is" (no guarantee of anything). Grab-bag specials will consume a lot of tedious sorting time. Be sure that your eyes and nerves are up to it.
A few additional cautions are relative to mail-order surplus. Most surplus dealerships require a minimum order. Take care to meet this minimum before placing an order. Also, there are hidden costs associated with insurance, postage, COD fees, and shipping/handling. It's also wise to verify that the surplus dealership has a lenient return policy, if you are not satisfied for any reason. A good, ethical firm shouldn't have any problem in this area.