By Homer Davidson
Modern microwave ovens may be operated by a touch of the finger--simply touch the buttons or pads of the control panel and the oven will automatically take over the cooking process. Like all other electronic devices, the control panel may break down and need repairs, but servicing the microwave oven control panel is not as difficult as it may seem at first. In fact, the defective control unit is rather easy to spot after making a few simple tests.
The touch-control panel
Many of the new microwave ovens have a front control panel that allows you to enter the cooking data with just a few buttons. Besides the number pads for cooking time, there are a number of other function keys used to control the cooking operation, such as the AUTO START CLOCK, TIMER, VARIABLE COOKING CONTROL, CLEAR, STOP and COOK pads. (See Figure 1.)
The keyboard assembly contains all the touch pads that control the microwave oven. (See Figure 2.) These touch pads are constructed somewhat like those of the calculator or computer system. When the touch pad is pressed, contact is made through a flexible cable to the control unit. This flat cable plugs into a large pin connector at the control board.
When an oven malfunctions, try operating the controls. If you press the proper sequence of keys and you don't hear audible signals, suspect a defective keyboard. Another symptom of a defective keyboard is the illumination of two or more figures on the display at the same time. Erratic oven operation and improper sign display may be caused by a corroded ribbon cable or dirty pin connector. A simple fix for this problem in some ovens is to cut off the corroded end of the cable, which will start a new set of contacts.
Testing the keyboard
Many microwave ovens feature a set of test-mode connections that allow a servicing technician to bypass the keyboard and force the oven into the cook cycle. When the test points of an inoperative oven are shorted together and the oven goes into a normal cooking cycle, suspect a defective keyboard. If the oven does not start cooking with the test terminals shorted, use the high setting of an ohmmeter to check each wire connection of the cable between the keyboard and the control unit for broken wires.
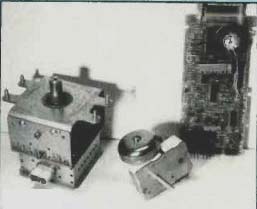
Figure 1. The heart of any microwave oven is the magnetron tube and control
unit. Here an electronic control unit is contrasted with an older manual timer.
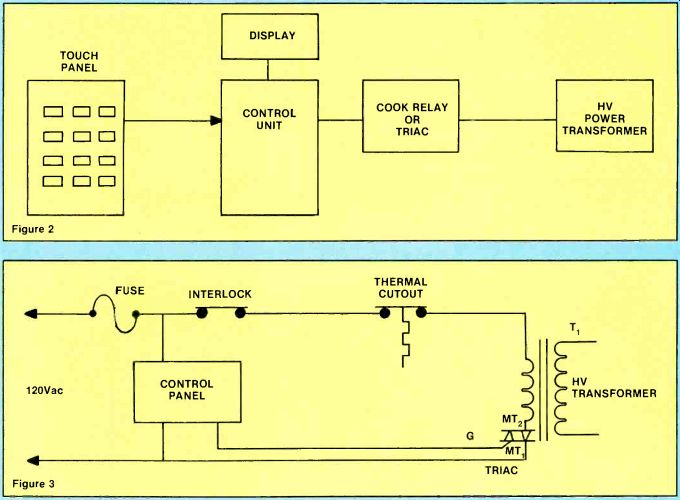
Figure 2. The touch pad or keyboard connects directly to the control board via a large, flat ribbon cable.
Figure 3. Here the control unit provides a controllable gate voltage applied to the triac switch assembly. If there is no gate voltage at the triac, suspect a defective control unit.
The control unit The control unit controls the entire cooking process when the cook key is pressed. As Figure 3 shows, a voltage from the unit energizes a cook relay or turns on a triac, which supplies power-line voltage to the primary winding of the high-voltage power transformer. The fan motor may be controlled by the control unit. In some of Sharp's touch-control circuits, the turntable motor also operates from the control board. If the oven features a temperature probe, it plugs directly into the control unit.
These symptoms suggest a defective control panel:
- Absence of signal when a key or a group of keys is pressed
- Failure of digit segments or indicator lights
- Appearance of incorrect figures on the display
- Flickering or erratic illumination of the display digits
- Erratic or improper clock operation
- Absence of sound from the annunciator, or continuous sound after cooking is complete
- Improper temperature control with the temperature probe in use
- Erratic cooking or no cooking at all
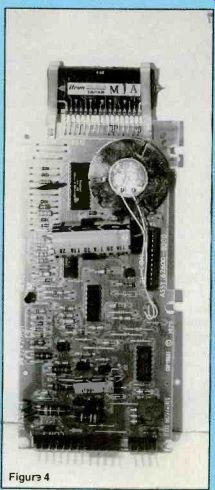
Figure 4. The digital display is found at the top of the control board. The
round object below it is a ceramic annunciator for signaling.
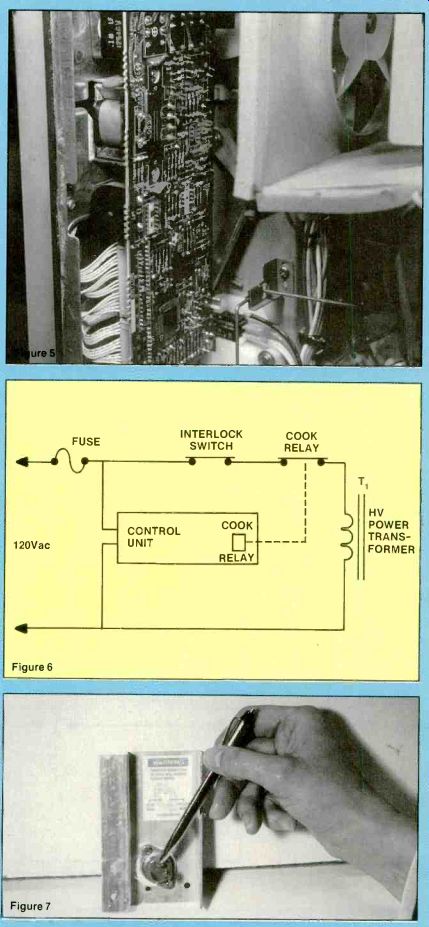
Figure 5. In some ovens the small power transformer of the low-voltage supply is mounted on the control unit. If you suspect that oven failure is due to lightning damage or some other kind of power surge or spike, check this transformer.
Figure 6. In some models the control unit operates the cook relay assembly. The relay may be mounted on the control unit or separately in the oven.
Figure 7. Measure the gate voltage at the triac assembly to see if it is receiving a signal from the control unit. In this example the smallest space terminal is the gate connection.
Digital display problems
A digital clock with LED display may be found in some microwave ovens. Other models have a lighted display panel with a display window of various function indicators.
The digital display panel lights up when the power cord is plugged in.
(See Figure 4.) The digital display assembly may contain a fluorescent display tube that receives its filament voltage from a small power transformer mounted on the control unit. Suspect an open filament or no ac voltage (3V) if the filament of the tube does not light up. (See Figure 5.) The plate and grid voltage for the display tube are supplied by the control board. Check the oven fuse when the digital display does not light up and the oven doesn't operate. If you replace the fuse and the display still doesn't light, suspect a defective control unit.
The temperature probe Some microwave ovens have a removable temperature probe, which is plugged into a jack found on the oven cavity wall. To use the temperature probe, you insert it into the food to be cooked, then press the appropriate buttons to input the final temperature that the cooked food is to reach. The oven will turn off automatically when the food reaches the programmed temperature.
When the temperature probe is plugged into the oven jack, it connects the probe directly to the control board. A probe sense switch may be activated at the same time in some ovens. This sense switch disables all regular cook operations and the oven will only operate on the sensing temperature probe. The probe sense switch is also connected to the control panel. The oven should never be operated with the temperature probe lying in the oven cavity. Most oven temperature probes are not interchangeable with other makes and models.
A defective temperature probe may cause improper program temperature operation: temperature does not update, final food temperature is wrong and the unit shuts off too soon. You can determine whether the problem is caused by the control board or by the probe by making the appropriate tests as discussed below.
For example, the temperature probe in a Norelco S7500 model can be checked with the ohmmeter. A thermistor in its tip has a resistance that decreases as its temperature increases. The probe shows a resistance of 55,000 ohm at room temperature. Other temperature probes may have a resistance of 42,500 ohm to 59,000 ohm.
The temperature of a Sharp R-7350 model may be checked at 200°F. Here's how to do it. Put nine ounces of water in a 2-cup measuring cup and place the temperature probe in the water. Place the container and probe in the center of the oven and plug the probe into the oven receptacle.
Set the cooking temperature at 200°F and touch the COOK pad. In approximately 4 minutes the temperature of the water should be about 200°F and the oven should shut off. Disconnect the probe and measure the resistance at once, while the probe is still hot. The resistance should be 37,000-ohm to 41,000-ohm at 200°F. If the resistance differs greatly from this range of values, the probe is defective and should be replaced.
Servicing the control circuits When you're faced with an oven that doesn't operate, the first step is to determine if it's caused by the power circuits or the control circuits. Determine if the oven relay or triac assembly is activated by the control unit. (See Figure 6.) Although the control panel selects time, temperature and clock operation, its main function is to turn the oven on and off. In ovens with the cook relay, you can hear and see the contacts close if the control panel is normal. Because the triac is silent in operation, you'll have to take a voltage reading to see if the gate voltage is present.
Before touching any of the circuits in the oven, carefully discharge the high-voltage capacitor.
Clip the DMM test probe to the gate terminal of the triac. Clip the ground probe to the bottom or ground side of the high-voltage capacitor; sometimes just clipping the ground probe to the oven chassis may not make a good ground.
Start the oven and measure the gate voltage. (See Figure 7.) A normal 5V is found at the Norelco triac assembly. No gate voltage indicates a defective control unit. A cook relay and triac assembly are both found in a Sharp SKR-9105 model.
Ovens with cook relays may be checked by measuring the voltage across the relay solenoid winding.
Again, clip the leads of a DMM across the solenoid winding terminals after discharging the HV capacitor. Start the oven and measure the do voltage across the relay terminals. No voltage here may indicate a defective control unit.
If the proper control voltage appears at the relay terminals, the relay may be defective: for example, it may have an open solenoid winding. Check the continuity of the relay winding with the ohmmeter. The resistance should be somewhere between 100- and 150-ohm.
In a Sharp R-7350 model, the cook relay is activated by a transistor switch located in the control unit. Actually, the solenoid winding of the cook relay is in series with the transistor turn-on switch and ground return of diodes D5 and D of power transformer T. (See Figure 8.) These components are all located on the control hoard.
To check out the relay in this case, disconnect wire lead terminals 3 and 5 and connect the ohmmeter leads to the relay terminals.
The meter should read infinite with the power off, and display a low reading when the cook pad is touched. Replace the control unit if improper operation is found.
If the relay is energized and the oven still doesn't cook, suspect poor relay contacts. You may check the contacts with the ohmmeter, or simply shunt a clip wire across the solenoid terminals feeding ac to the primary winding of the high-voltage transformer. (See Figure 9.) The oven should come on at once if the high-voltage circuits and the magnetron tube are normal. Replace the oven relay if it is defective.
Oven starts when on/off pushed A problem encountered in some microwave ovens is that the oven will begin to operate immediately when the on/off button is pressed, instead of remaining inoperative until you enter the desired cooking time and press the START or COOK button. In some cases this problem indicates a faulty control unit. In other cases, however, a leaky triac located in the primary winding of the high-voltage transformer may be at fault. To isolate the cause of this problem, simply discharge the high-voltage capacitor, pull the gate wire off the triac and start again. If the oven begins to cook, the triac is conducting with no gate voltage present, ...
-----------

Figure 8. In a Sharp R-7350, a transistorized switch of the control unit controls the cook relay.
Figure 9. Placing a clip lead across the cook relay terminals will establish whether an inoperative oven is caused by the control circuits or if it's the power circuits. Always be sure that the HV capacitor is discharged before touching anything In the oven.
Figure 10. If you suspect that the triac is leaky, check it with the high ohms scale of the ohmmeter. You should measure infinite resistance in both directions between MTV and MT, if the triac is normal.
------------
... which suggests that the triac is leaky. In some ovens, you may find two different triac assemblies, one for the browner element and the other for the primary winding of the power transformer.
The suspected triac may be checked with the high-resistance range of a VOM or DMM. Resistance measurements between gate and T on a good triac are infinite in both forward and reverse directions. (See Figure 10.) Likewise, the resistance measurement between MT1 and MT2 of a normal triac is infinite. A normal low-resistance measurement may be found in either direction between gate and MT,. Suspect a leaky triac if the resistance measurements between gate and MT2 or between MT1 and MT2 in any direction are low.
Blowing the fuse In some ovens the fuse may blow when the on/off switch is pressed, indicating a short in the oven components. If the fuse blows when the cook pad is touched, do not change the control unit. Check for a shorted fan motor, magnetron or high-voltage rectifier.
Carefully discharge the HV capacitor and disconnect the high-voltage lead from the magnetron.
Clip a 100W bulb across the primary winding of the transformer.
Now, reset the control panel and touch the cook pad. If the light is bright and the oven fuse doesn't blow, the leaky component is in the high-voltage circuits. If the fuse blows at once, check the magnetron fan motor and stirrer motor for a short circuit.
Control unit power-supply In cases where the control panel is found to be defective, most manufacturers would like to have the control unit replaced with a new one. This is especially true if the control panel is in warranty. Although replacing the control panel is quick and easy, a few voltage tests on the power supply of the control panel may reveal a few simple defective components; replacing just those will place the oven back into operation. Standard components in the power-supply circuits may be obtained locally or from the manufacturer.
------------

Figure 11. Check the low-voltage power supply of the control unit, just as you would do with a TV or audio system. Voltage measurements and leakage tests of diodes turn up most defective power supplies.
Figure 12. Before you take the drastic step of replacing the control unit, check other components. Poor interlock primary and secondary switches cause many oven problems.
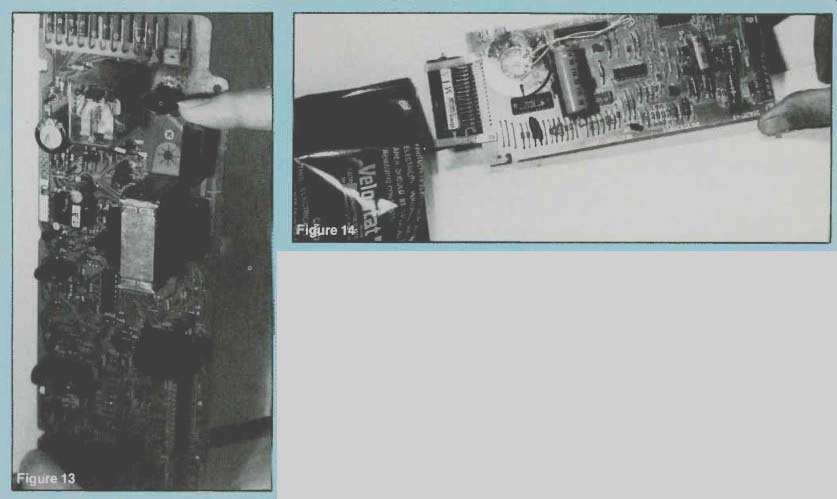
Figure 13. A varistor across the incoming ac line protects the power transformer and other control components when lightning or power-line problems exist. Here the inside of the varistor was blown open after lightning struck the incoming ac line.
Figure 14. If the control board is susceptible to electrostatic discharge (ESD) damage, the replacement will come in a package that protects against static electricity.
Be sure to take precautions against causing ESD damage, or you could destroy the new board before it's installed.
--------------
The power supply may be a fullwave bridge circuit with zener diodes, IC and transistor regulator circuits. (See Figure 11.) Check for correct voltage at the different voltage sources with the DMM. Improper voltage or absence of voltage may indicate a leaky or open component in the power supply. The control unit may be removed from the oven to check transistors, diodes and zener diodes for leakage. Check the transistors and diodes in the circuit with the diode test of a DMM. The windings of T, may be checked with the low ohms scale.
Last minute checks
Before replacing the front panel, make sure other components are not defective, or that problems elsewhere in the oven are not the cause of the trouble. Check for a good ground system at the receptacle the oven is plugged into.
Make sure the ac operating voltage is between 110Vac and 120Vac. Sometimes, if the receptacle ground is defective, the panel may skip numbers, giving incorrect readings, or it may become difficult to program or erratic in operation.
Make sure all interlocks of the oven are operating properly. (See Figure 12.) Check each interlock action with the ohmmeter. Besides the primary and secondary interlock switches, check the door interlock sense switch found in some models. You may be able to program the control panel with a defective door interlock sense switch, but the unit will not start.
This symptom may be confused with a defective control panel.
A defective on/off sense switch may prevent the fan blower, light and stirrer from operating. In this case the display will only show 88.88 on the display. When the oven comes on as the start or cook button is pressed, suspect a shorted triac rather than a defective control board. If the oven blows a fuse as soon as the start or cook button is pressed, check the oven for a leaky magnetron tube or high-voltage diode, not a defective control unit. Make sure the control panel is operated according to the manufacturer's directions, and check that other components are not defective before you replace the control panel.
Lightning damage
Often the control board is damaged by lightning strikes on the power line entering the house or by surges caused by power outages or shorting of high-powered ac lines during electrical storms. If you suspect damage as a result of power-line transients, check for burn marks near the control board. Notice that there is a varistor placed across the line to protect the control-board circuits.
(See Figure 13.) Replace the control board if it is excessively damaged by the lightning strike. If the damage doesn't appear to be excessive, you may find that other components are normal and only the varistor needs replacement. Clean off all burn marks and repair any damaged wiring. Re-install the repaired board in the oven and give the oven a test run. If everything is operating properly, replace the varistor across the ac input.
Some final precautions
Always discharge the HV capacitor before you touch any of the oven circuitry. Make sure that the control panel is defective before you replace it. Take precautions against electrostatic discharge damage when handling the control board. (You will probably find that it comes in an antistatic package for protection--see Figure 14.) Handle the control unit by the edges when you mount it in the oven. Once it is in place and the oven is back in operation, take gate or relay voltage readings to make sure everything is operating properly. Finally, making sure that you are familiar with the control panel, test the operation of the oven to ensure that it is completely restored to normal.
As was pointed out in the body of the article, there are some simple repairs that the technician in the field can make to the control board. In most cases it makes more sense to replace the entire board in order to eliminate lengthy diagnostic procedures to troubleshoot down to the component level.