AMAZON multi-meters discounts AMAZON oscilloscope discounts
Overview
Calibration of control equipment is a key maintenance activity. It is needed to ensure that the accuracy designed into the control system as a whole is maintained.
Typically, this activity is performed in a calibration shop, where most of the calibrating equipment is located. The quality of the calibration shop, the quality and accuracy of the instruments used for calibration, and the calibration records kept for all instruments are important facets of calibration activities.
Calibration is performed in accordance with written procedures. It compares a measurement made by an instrument being tested to that of a more accurate instrument to detect errors in the instrument being tested. Errors are acceptable if they are within a permissible limit.
Instrument calibration should be done for all instruments prior to first use to confirm all set tings. This can be done either by the equipment vendor (who will issue a calibration certificate with the instrument) or by the calibration shop at the plant upon receipt of the instrument. Vendors generally charge a fee for this activity.
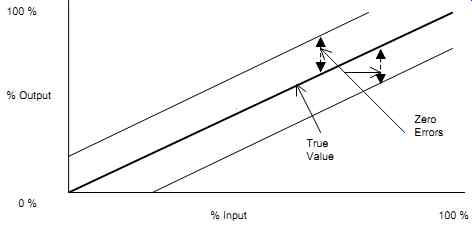
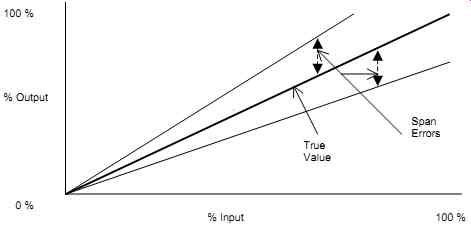
Most analog instruments have adjustable zeros and spans. In most cases, calibration consists of correcting the zero and span errors to an acceptable tolerance (see FIG. 1 and 17-2).

FIG. 1 Zero errors.
Typically, an instrument is checked at a number of points through its calibration range, i.e., from the lower end of its range (the zero point) to the upper end of its range. The zero point is a value assigned to a point within the measured range and does not need to be an actual zero.
The difference between the lower end and upper end is known as the span. The calibrated span of an instrument is in most cases less than the available range of the instrument (i.e., the instrument's capability). In other words, an instrument is calibrated to function within the workable range of an instrument.
The calibration of instruments in a loop should be done one instrument at a time. This approach ensures that any instrument with an error (i.e., an instrument that is out-of-tolerance) will be corrected.
When a number of instruments are in a loop, the combined accuracy of these instruments is equal to the square root of the sum of the square. For example,
Loop total error (Sensor Error) = 2 (Transmitter Error) 2 (Indicator Error) 2
++
A calibration management system is generally required to provide calibration data and procedures to plant personnel, to record and store calibration data, and to ensure that calibration con forms to specifications. In addition, a calibration management system should define what will be calibrated, by whom, and where the calibration will be done. Technicians need to be trained and available, and records should be kept for further reference.
Procedures
Procedures establish the guidelines for the calibration of plant instruments. They ensure good maintenance and the preservation of the control functions as intended. Their detail varies considerably among plants. A typical procedure includes sections to cover the purpose and scope of the procedure, safety guidelines, explanation of the calibration sheets, definitions of key terminology, and references. Often, and depending on the corporate philosophy, procedures may incorporate specific details and instructions. For example, some procedures may state that:
1. Each week a list of instruments to be calibrated will be issued. The maintenance supervisor will then assign the calibration to a trained instrument mechanic.
2. Each month, a list of instruments that were not calibrated, as per the set schedule, will be issued and immediate action taken to tag the equipment out of service until such time that calibration is correctly performed.
3. The maintenance foreman and the quality manager shall semi-annually review the calibration schedule and decide, based on past instrument performance, whether the calibration frequency should be changed.
4. Every calibrated instrument should have a calibration sticker, indicating the equipment tag number, the name of the person that did the calibration, the date of calibration, and the due date for the next calibration (see FIG. 3). It is preferable, where possible, to place the calibration sticker across the seal or over the calibration access to the equipment. When calibration is completed, maintenance personnel should remove the old calibration sticker and affix a new one to the calibrated instrument.
========
FIG. 3: Typical calibration sticker.
CALIBRATION TAG NUMBER:…..
CALIBRATED BY: ……..
CALIBRATION DATE: ……
NEXT CALIBRATION DATE: …..
========
5. No instrument should be put back in service if it does not meet the calibration requirements.
6. On all calibration reports, the instrument mechanic will note on the completed form the "as found" and "as left" conditions. If the "as found" condition deviates by more than the specified acceptable value, the quality manager will try to assess the time during which the instrument was out of calibration and the effect this may have had on the process. This information must then be immediately provided in writing to the maintenance foreman and the production manager. The quality manager and the maintenance foreman will then review the maintenance and calibration records for the instrument in question and decide whether the calibration frequency should be changed or any corrective action is needed.
7. All records pertaining to instrument calibration must be retained for a period of six years.
8. All manufacturers' maintenance manuals will be kept in the maintenance shop in a dedicated area.
9. All calibrating equipment must be identified by individual tag numbers to facilitate identification and historical record keeping.
Instrument Classification
Instrument classification categorizes instruments according to their function. Their classification acts as a reference when such instruments are selected, purchased, tested, and used because each may have different criteria. Such a classification typically covers the identification of critical (as they relate to safety, health, and the environment) and non-critical equipment. The classification may also consider the results due to loss of performance and loss of the instrument's required accuracy. Sometimes such a classification resides in a plant's quality assurance manual. It all depends on the way a plant does business and runs its operation.
In this Section, and as an example, instruments are divided into four classes. Plant management and maintenance personnel may decide that a different classification of instruments is required.
Class 1 Instruments
Class 1 instruments are the plant calibration standards. These types of instruments are used to calibrate Class 2 instruments and are generally traceable to an outside, nationally recognized standards or calibration organization. These instruments are kept in the maintenance shop in an environmentally controlled area that meets the manufacturer's specifications.
Class 1 instruments are calibrated annually by an independent calibration lab. After each calibration, they are returned to the plant with a certificate approved by the calibration lab. They are typically sent and received back within 30 days of the anniversary due date. The anniversary date of these instruments is staggered to ensure the presence of a working and calibrated set in the maintenance shop at all times.
In the event that a Class 1 instrument is found out of tolerance, the calibration lab should immediately advise the plant. The maintenance supervisor at the plant will then assess the effect this out of tolerance may have had on Types 2, 3, and 4 instruments.
When the calibration equipment is received back, it is checked for obvious shipping damage. If there is damage, the equipment must not be used and must be immediately returned to the calibration lab for repair and recalibration.
Class 2 Instruments
Class 2 instruments are the plant instrument calibration standards. These instruments are used by maintenance personnel to calibrate Class 3 and 4 instruments.
Class 2 instruments are calibrated semi-annually by plant maintenance using Class 1 instruments. In addition to the scheduled semi-annual check, calibration may be performed when ever the accuracy of a Class 2 instrument is questionable.
Calibration forms must be completed for each Class 2 instrument every time a calibration is performed. These forms are then signed by and filed with the supervisor of plant maintenance.
Class 3 Instruments
Class 3 instruments are critical process instruments that prevent situations that are either threatening to safety, health, or the environment or that have been defined as critical to plant operation or to product quality. The calibration frequency of Class 3 instruments is based on their required reliability-for critical trips, it is defined by the calculated Trip Testing frequency (T) (see Section 10). Class 3 instruments may also require calibration when the instrument is replaced or when its accuracy is questioned (e.g., when its reading is compared with other indicators).
Calibration sheets are completed for each instrument every time a calibration is performed.
These sheets are then signed by and filed with the supervisor of plant maintenance.
Class 4 Instruments
Class 4 instruments are used for production and represent the majority of the instrumentation and control equipment in a plant.
Calibration of Class 4 instruments is done when required, when an instrument is replaced, or when the instrument's accuracy is questioned (e.g., when its reading is compared with other indicators). After a certain time in service, the records are checked to determine if this approach is adequate.
Calibration sheets are completed for each instrument every time a calibration is performed, and these sheets are then signed by and filed with the supervisor of plant maintenance.
Calibration Sheets
Calibration sheets should be provided for all instruments requiring calibration. They are typically generated from a set form (e.g., database, spreadsheet, or word processing) using a generic template. Calibration sheets should contain all the necessary data related to the instrument to be calibrated (see FIG. 4). The level of detail in a calibration sheet varies from plant to plant. Calibration sheets are typically prepared, reviewed, and approved in accordance with a corporate standard.
A typical calibration sheet has the following four main sections:
• header,
• issue and revision information,
• notes and comments, and
• calibration data.
The header shows the plant name, equipment tag number, manufacturer's model number, and reference documentation.
Issue and revision information describes who prepared and approved the calibration sheet and when the activities were done. This section also lists the revision dates, a brief description of each revision, and the name of the persons that prepared and approved the revision.
The notes and comments section describes all the information related to the calibration of the device in question. For example, the sources of calibration data, special directives to maintenance personnel, etc.
Calibration data shows the information required to perform the calibration: the input range, output range, required equipment accuracy, and the set point(s) for discrete devices. Ranges and set-point information is commonly based on the process requirements and should include corrections for elevation and/or suppression (typically obtained from installation drawings).
Calculations for calibrations should be recorded on the calibration sheets for future reference (typically in the previous notes and comments section). Set points should allow for possible errors to ensure operation within the required process limits, allowing a delay in switch response time.
Some instruments have a time response-for example, where damping or time delay are required. The time response should be identified on the calibration sheets and checked as part of the calibration process, particularly where time is critical in loop response performance.
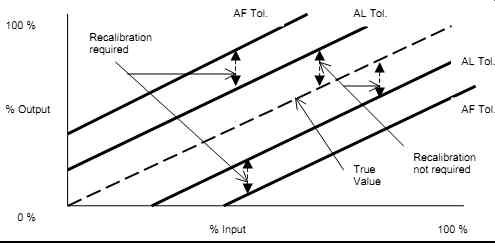
As-left ( AL) and as-found (AF) tolerances are important values in instrument calibration. They represent the post- and pre-calibration tolerances.
The as-left ( AL) tolerance is the required accuracy range within which the instrument must be calibrated. The AL tolerance is based on the process requirements and on the equipment's capability as described in the manufacturer's specifications. No further calibration is required if, after checking the equipment calibration, it is found to be within the AL tolerance.
FIG. 4 Typical format for a calibration sheet.
Common process requirements for AL tolerances are shown in FIG. 5. However, each application should be assessed for its own requirements.
========
FIG. 5 Common process requirements for AL tolerances.
Device Common Process Requirements Transmitters (including pressure, differential pressure, flow, level, and temperature)
±0.5% of calibrated span Switches (including pressure, differential pres sure, flow, level, and temperature) ±1% of calibrated span (or sometimes a percentage of set point) Gauges (including pressure, differential pres sure, flow, level, and temperature) ±5% of calibrated span Controllers and other similar electronic devices (including indicators, transducers, isolators, and alarm units) ±0.5% of calibrated span Analyzers, control valves, and other devices Refer to process requirements and vendor data.
==========
The AF tolerance sets the acceptable limits for drift that the instrument can encounter between calibration checks. Drift is defined as the change in output over time (not due to input or load).
Calibration is required if, after checking the equipment calibration, it is found to be within the AF tolerances but outside the AL tolerances. The AF tolerance is always greater than the AL tolerance (see FIG. 6).
Some plants would replace an instrument if the allowable drift limits have been exceeded (i.e., if the instrument is found outside the AF tolerances). Whereas, other facilities would recalibrate the instrument, put it back in service, and check it again at a later time before discarding it if still found outside the AF tolerances.
The ratio of AF tolerance to AL tolerance is known as the AF multiplier. For example, if an AL tolerance of 0.5% is required, then with an AF multiplier of 2, the AF tolerance is 1%.

FIG. 6 Relationship between AF tolerance and AL tolerance for an analog
instrument.
The calibrator's accuracy must be higher than the accuracy of the equipment being calibrated.
This ensures that no significant errors are introduced by the calibrator. It is recommended to use a calibrator with an accuracy of at least four times the accuracy of the instrument being calibrated. For example, if a transmitter has a required accuracy of ±0.2%, then the minimum accuracy of the calibrator should be ±0.2% / 4 = ±0.05% In some applications, it is required to include the accuracy of the calibrating equipment in the overall AL tolerance. In such cases, the overall AL tolerance, including the calibrator's accuracy equals
(Instruments AL tolerance) 2 (Calibrators total tolerance) 2
+ ±
It should be noted that this requirement is not commonly implemented because the calibrator's tolerance is very small in comparison with the instrument's tolerance.
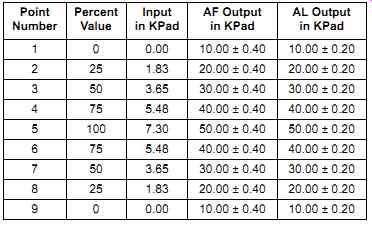
When calibrating modulating devices, such as transmitters and controllers, nine calibration points are commonly used-five points up and four points down. This checks the effect of hysteresis and linearity. The nine points are 0, 25, 50, 75, 100, 75, 50, 25, 0%. In some cases, five points (0, 50, 100, 50, 0%) are considered an acceptable alternative. Hysteresis is the measured separation between upscale-going and downscale-going indications of a measured value-it is sometimes called hysteresis error. Linearity is defined as the closeness to which a curve approximates a straight line-it is usually measured as non-linearity.
For discrete devices, calibration consists of checking the set point with AF and AL minimum and maximum tolerances and defining if the contacts should open or close (on decreasing or increasing process input). Calibration data examples for a differential pressure transmitter and a pressure switch are shown in FIG. 7 and 8, respectively.
In FIG. 7, the differential pressure transmitter has an input range of 0 to 7.3 KPad and a 10 to 50 mAdc output. It is calibrated at nine points. The required tolerance for the transmitter is
±0.5% of span, and an AF Multiplier of 2 is used. Therefore,
AL Tolerance = Span x Tolerance = 40 mAdc x 0.5% = 0.2
AF Tolerance = AL Tolerance x AF Multiplier = 0.2 x 2 = 0.4

FIG. 7 Calibration data example for a transmitter.
In FIG. 8, the pressure switch is to be set with contacts closing (CC) at 800 KPag falling pressure and contacts opening (CO) at 900 KPag rising pressure (i.e., the differential is adjust able). The required tolerance for the switch is ±3% of set point.

FIG. 8 Calibration data example for a two-position pressure switch.
