By HERB FRIEDMAN
Cut your etching time by one-half or more and improve printed-circuit board quality by putting thousands of little air bubbles to work.
PHOTO-FINISHERS HAVE LONG KNOWN THEY CAN GET better negative development by bubbling an inert gas through the developer. The reason why it works better is that the gas, which is usually nitrogen, agitates the developing solution as it bubbles up to the top of the chemical tank. That insures freedom from air pockets on the film itself; faster development, because exhausted developer is constantly replenished at the film boundary, and a more even development, because the developer is flowing constantly across the entire surface. The burst process is called Nitrogen Burst Developing.
A burst etching tank for your printed-circuit boards will give you almost the same advantages-even more--and you can use ordinary air for the burst gas. In fact, you can build a complete air-burst etching system for about $15, and that includes the air pump.

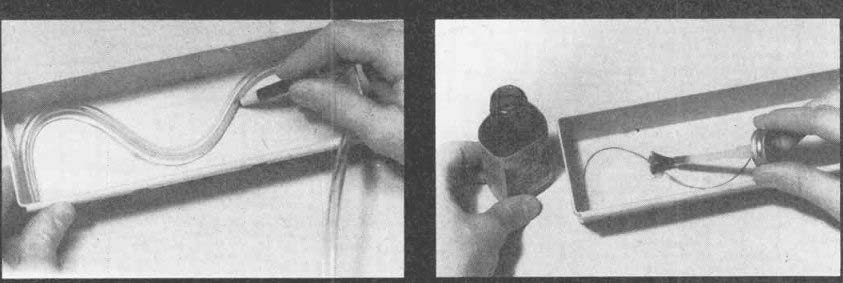
FIG. 1--HERE'S WHAT YOU NEED to make your own air-burst etching system.
A plastic tray, plastic tubing, a small fish-tank air pump, some adhesive,
and a "grease pencil."
FIG. 2--TO SEAL THE END of the plastic tubing, place a drop of plastic cement in the tubing, invert quickly, and clamp the end in a vise until the cement dries. Don't use too much cement.
Why air burst?
The quick-and-dirty way for the hobbyist to make single PC boards is to apply a resist pattern directly to the copper foil, and then etch 'away the unprotected copper by immersing the copper-clad board in a relatively mild acid called an etchant (available under the Vector and GC labels, among others). Within a room temperature range of approximately 70°F to 75°F it takes about 45 to 90 minutes to etch a small board. If the etchant's temperature is below 70°F it could take as much as 2 hours to etch a small PC board. And those timings assume almost constant agitation to insure that there are no air pockets between the copper and the etchant. (Air pockets result in small circles of copper that must be removed from the board by hand, using a knife, chisel, or hand grinder.) By using the continuous air bubbles to produce constant agitation throughout the etchant, you can cut etching time down to 10 minutes for small boards, and produce razor-sharp foils with no copper circles caused by air bubbles. Even well-used etchant at 65 to 68 degrees can produce a fully etched board in as little as 20 minutes, again with no air pockets to worry about.
The parts for an air-burst etching system suitable for hobbyists costs less than $15 if you have the required adhesives. If not, figure a few dollars more. The basic system consists of the smallest possible "fish tank" air pump, 4 to 5 feet of soft 3/16-inch plastic tubing (available from larger hardware stores) and one or more Rubbermaid plastic trays, the type used to store cutlery in kitchen cabinets. The 3W x 9L x 2H-inch tray shown in the photos is perfect for small PC boards. The double-size 6 x 9 x 2-inch tray is recommended for larger boards. (Always use the smallest possible tray for the job.) The pump size is extremely important: If it's too powerful it will splash . etchant for several feet, and doesn't necessary produce a better board. The model you need is sold under various "private labels." It pumps just about enough air for a single small goldfish in a small bowl. It has no "cubic-feet-per-minute" rating. It's just small and cheap. usually $9.95 list (top price you should pay). The PVC tubing must be soft and 3/16 inch. Do not use the semi-rigid tubing usually sold in pet stores for "fish tanks." It's not 3/16-inches, and causes more installation-and-use problems than it's worth. Get the right stuff in a hardware store. It's about 25 cents a foot, top price. Four feet is fine for a small tray; use 5 feet for a large tray.
Build your etcher
The photos show how to build your air-burst etcher.
In addition to the pump, the tubing, and the tray, you'll need some contact adhesive and one of the new fast drying all-purpose "plastic" cements (glue) such as Weldit. See Fig. I. Don't try to have the contact adhesive do double-duty; you must use both adhesives, because the etchant appears to "attack" the contact cement, causing it to loosen it's grip.
The first step is to seal the end of the tubing. Place a drop of plastic cement (Weldit) in the tubing, invert the tubing quickly and clamp about 1/4-inch of the end in a vise. See Fig. 2. Allow the tubing to "set" at least 24 hours, longer if the adhesive appears "wet." The more adhesive you use, the longer it takes to cure.
When the cement is dry, force the tubing into the tray so that it forms a gentle serpentine pattern, as shown in Fig. 3. One-and-a-half sine waves is sufficient. Force the sealed end of the tubing into one corner of the tray and route the tubing up and out from the opposite corner on the same side of the tray. Using a "grease" pencil-also known as a "China Marker"-trace the outline of the tubing in the bottom of the tray and then remove the tubing.
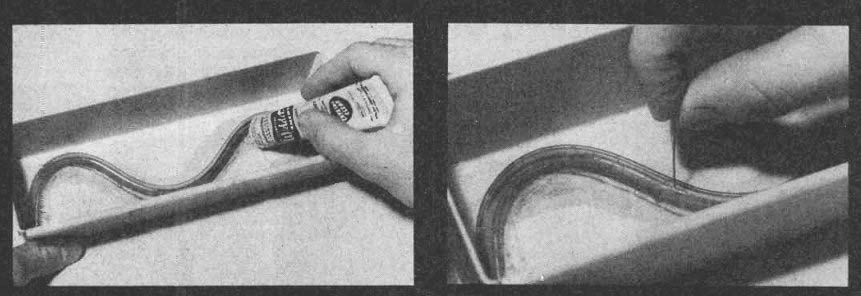
Next, lay down a thin strip of contact cement on the pencil outline and coat a strip of cement along the tubing. Allow both to set until they are dry to the touch.
Be extremely careful now, because the contact adhesive does not permit repositioning; force the sealed end of the tubing into the corner-of-the-tray and apply the tubing along the pencil outline. routing the tubing up and out the opposite corner. Don't worry if the tubing isn't too secure; the contact adhesive is only to hold it in place for the final gluing. See Fig. 4.
Next pack in the cement by forcing the nozzle of the cement tube into the tubing/tray joint. See Fig. 5. If necessary, spread the cement with a toothpick or a screwdriver, so that the tubing is cemented its entire length on both sides. It will look messy, but so what! Don't forget to cement the vertical rise of the tubing at the corner where it exits from the tray. Let the cement dry overnight.
Using a No. 16 or No. 14 sewing-machine needle-not a straight needle or pin-punch a series of holes along the top of the tubing spaced 3/4-inch to 1-inch apart. See Fig. 6. Don't overdo the holes. If you have too many too close, you get excessive acid splash. Push the needle through the tubing until you see the "eye" go through (don't worry if the needle bottoms); then twist the needle once or twice, so the edges of the "eye" cut the tubing, and then remove the needle. That's the whole bit. The Air-Burst Etcher is ready for use.

FIG. 3-FORCE THE TUBING INTO THE TRAY in 3 serpentine pattern and trace
the outline with a grease pencil. Make 1 1/2 "S" turns in a small
tray-more are required in larger trays.
FIG. 4-APPLY A THIN STRIP OF CONTACT CEMENT along the pencil outline and a strip along the plastic tubing. Wait for the cement to get tacky before proceeding to the next step.

FIG. 5-FORCE THE PLASTIC TUBING into the contact adhesive following the
pencil outline and then pack both sides of the tubing where it meets the
tray with the plastic cement.
FIG. 6-USING A NO. 16 OR NO. 14 sewing machine needle.
pierce the air holes in the plastic tubing spaced at 3/4 inch to 1 inch apart, along the tubing's length that is cemented to the bottom of the tray.

FIG. 7-TO ETCH .A BOARD, fill the tray 3,4 full with etchant.
Attach the air pump and power it up. Float the board on top of the etchant face down for the time period prescribed in the text.
FIG. 8--IF AFTER A FEW USES air bursts appears at only one or two locations, some of the air holes are blocked. New air holes should be punched after the etchant is removed.
Checkout and put it to work
Place the tray in the center of several sheets of paper toweling, preferably Bounty. (I don't know how Bounty works in the kitchen, but it's tops in the dark-room for mopping up chemical and acid spills.) Connect the tubing to the pump output. Fill the tray about half-way with water and plug in the pump. See Fig. 7.
Observe the bubbles at the surface of the water; they won't be evenly distributed throughout the surface, but they should be more or less even along the serpentine shape of the tubing. See Fig. 8. If not, some of the holes in the tubing are clogged (poor punching), simply punch others through the water.
Fill the tray about 3/4 full with etchant and plug in the pump. Make certain that you have the tray on paper toweling because there is some etchant spray, which tends to stain if it gets on cloth, wood, or porcelain.
Float your PC board on top of etchant. (Use photographic tongs to position the board.) The air burst will "blast" out any air pockets. If the board is too heavy to float, place a few wood clothespins in the tray so that the board can be supported at an angle with one edge on the bottom of the tray and the other resting on a clothes-pin. You might have to change the position of the board a few times to insure an even removal of the copper.
Generally, the board will float.
If you're using fresh etchant, check the board after 10 minutes and every minute or so thereafter. If it's used etchant, check after 15 minutes and every five minutes thereafter. If a board takes longer than 30 minutes, either the temperature is too low (below 65°F) or the etchant is exhausted.
Don't worry about color
The etchant causes severe discoloration of the contact adhesive and some softening of the tubing. Don't worry about the discoloration; it does no harm. The softening of the tubing can result in some of the air holes closing after the system has been used three or four times. If that happens, simply punch a few new holes in the tubing. (Use water for the testing and punching.) Eventually the tubing stabilizes and you won't have to punch any more new holes.
If you see that some holes are clogged after you have poured the etchant, simply forget about it until you're finished. Just position the board over whatever air burst there is.
Always remember to flush out the tray, and the surface of the tubing, with running water when you're finished.