There are several ways of carrying out solder removal, most of which have been touched on earlier. Here we will discuss those ways in more detail.
The first and most unacceptable way is to try to remove the component by using the soldering iron to melt the solder from the circuit board and lever the component out before the solder hardens again. This would obviously work if there was only one wire involved, although when the component was out there is a great possibility that the hole vacated by the component would become blocked by the solder as it cools. This will prevent you putting in the new component without melting the solder yet again. This method can be very messy and cause solder to flow where you do not want it.
There is even the possibility of overheating the circuit board track, causing it to lift from the main part of the board thus rendering the board useless. This method is obviously suitable for removing wires which are soldered to a surface, rather than being fitted through holes, and also for parting wires that are directly connected to each other or to switches, etc., but as previously shown it is totally unsuitable for circuit boards.
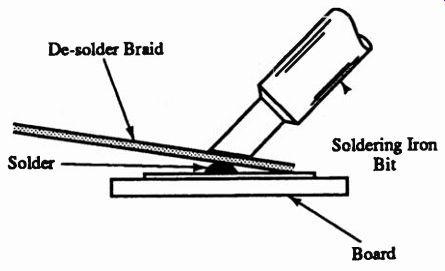
Fig. 9.1
De-solder Braid
The next method is with de -solder braid. This method is acceptable and quicker for removing larger areas of solder but for continuous work it can be very expensive. One disadvantage, as has been mentioned in a previous Section, is that you must use a larger bit than would usually be used for the circuit board. This is because there is a large volume of copper to be heated before the solder below will melt.
The procedure is as follows (Figure 9.1):
(i) Lay the braid over the area where the solder is to be removed. You should only attempt a short distance at a time, say a quarter of an inch.
(ii) Apply the soldering iron bit over the braid where the solder is to be removed.
(iii) Watch the solder under the braid until it melts.
(iv) When it has satisfactorily melted, quickly remove the braid and the soldering iron together. It is extremely important that the braid is not allowed to cool at this stage, otherwise you will pull up the circuit board track with the braid and, as before, destroy the board.
(v) Repeat the procedure with any other solder you wish to remove, remembering that you can only use a piece of the braid once because when the braid is full of solder it cannot absorb any more. It is therefore wise to cut the used piece off the spool after each operation. Also remember that because it is copper braid the heat will travel rapidly along it, and can give you a nasty burn.
The Solder Sucker
The most commonly used way of de-soldering for the hobbyist is by using a solder sucker sometimes called a vacuum pump.
This is a simple device very similar to a small bicycle pump except that it sucks rather than blows. The principle is that the vacuum sucks molten solder from the work and up into its barrel. If used properly and patiently then it is possible to remove almost all the solder from the work. In the case of a circuit board, it will allow even multi-pin devices to be removed without difficulty or the further use of a soldering iron. The solder sucker has to be used with a soldering iron to melt the solder before it is sucked up.
The method of use is simple and as follows:
(i) Make sure that the soldering iron is hot and the bit properly tinned.
(ii) Prime the solder sucker by pushing the pluger down until it latches.
(iii) Hold the solder sucker in one hand, the soldering iron in the other. Before you start, it is worth experimenting to see which hand you are happiest with for each device.
(iv) Hold the solder sucker on one side of the solder to be removed and the soldering iron at the other. Normally they should be at about 90° to each other and 45° to the board (Figure 9.2).
(v) Melt the solder with the soldering iron.
(vi) As the solder melts, quickly remove the soldering iron, bring the solder sucker upright and press the button on the solder sucker. If you have been quick enough then the solder will have been removed into the barrel of the solder sucker (Figure 9.3). If not, then it will have re-hardened on the work.
(vii) If you have successfully removed some or all of the un wanted solder, repeat the process on the rest of the lob to be done. If not, repeat the process again on the area being worked.
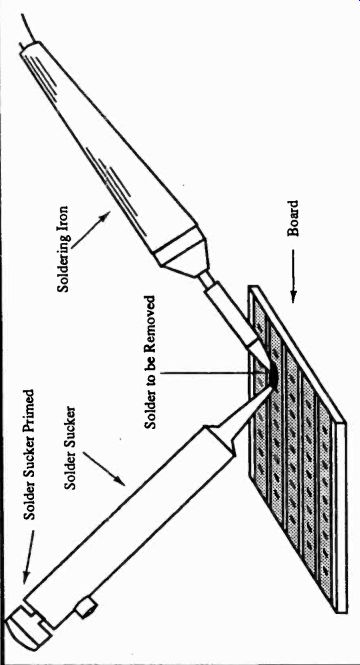
Fig. 9.2 Position of soldering iron and solder sucker prior to solder removal.
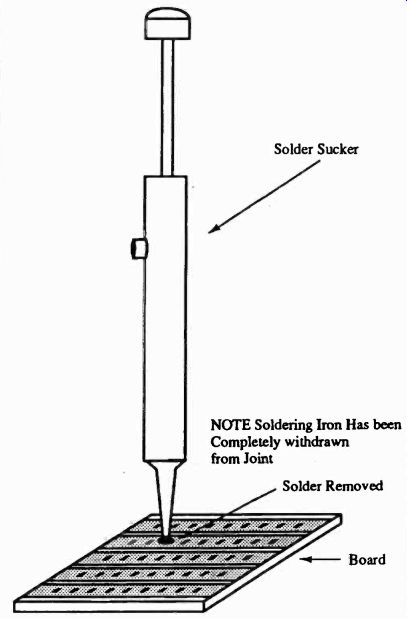
Fig. 9.3 Position of solder sucker on completion of solder removal.
NOTE: Soldering iron has been completely withdrawn from joint
It will be seen that practice will be needed to get the best results from the procedure, especially in judging when to remove the soldering iron and when to apply the solder sucker. Like most skilled operations you will eventually adopt your own method of successfully removing the solder.
One word of warning. When dealing with printed circuit board or stripboard do not keep the soldering iron in contact with the solder or the board longer than is necessary. otherwise, as previously mentioned, you will lift the copper track away from the board causing virtually irreparable damage.
Also, especially on cheaper model solder suckers, try to keep the soldering iron bit away from the nozzle of the solder sucker. If you don't, you will seriously reduce the life of the nozzle by melting it. The more expensive solder suckers have high melting temperature nozzles which are more resistant to that heat.
One useful technique is to allow the component wire to go into the solder sucker's nozzle which will have the effect of removing the solder from all round the wire (Figure 9.4). This will allow you to effectively unplug the component when all its legs are free, thus allowing quick and easy repair and replacement.
There is on the market a device which combines the soldering iron and the solder sucker in one tool. It is very expensive compared with the cost of the two items bought separately, and for the hobbyist it would be a luxury item.
The Integrated Circuit De-soldering Bit
Several soldering iron manufacturers supply IC de-soldering bits as an accessory for their products. As its name suggests it is only for unsoldering integrated circuits and is not suitable, or designed for, general de -soldering work. It replaces the normal bit on the soldering iron and is designed to melt the solder of the many pins of the IC at the same time, enabling it to be removed in one operation rather than the many that would be required in clearing solder from individual pins.
The main disadvantages with this method are:
(i) A different bit has to be used for each different size of integrated circuit.
(ii) The larger the IC the larger the soldering iron that will be required.
(iii) The board will almost certainly have to be tidied up with a soldering iron to remove excess solder before the new IC can be fitted.
However, if you are constantly repairing or replacing integrated circuits, this could be an invaluable addition to your tool box. As previously recommended, once the integrated circuit has been removed, it should be replaced with an IC socket so that if it fails in future it only has to be un plugged to remove it.
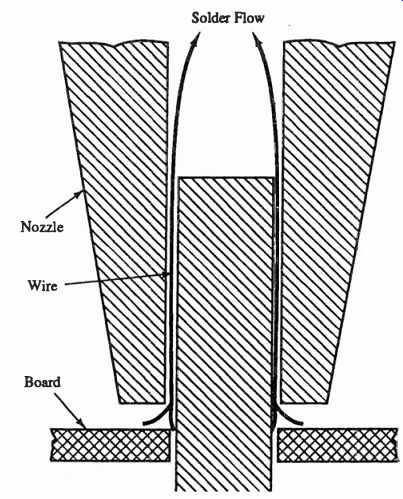
Fig. 9.4 Final position of solder sucker nozzle showing wire inside nozzle
and vacuum effect on solder.
De-soldering and Surface Mount Technology
There are several types of complete de-soldering station--is operating either by compressed air or by vacuum. Because of their cost, they are really only suitable for industrial use, and impractical for the hobby user.
A similar situation exists with de-soldering equipment intended for use with surface-mount technology. The equipment is very expensive and therefore outside the pocket of the average hobbyist.