Many electronics enthusiasts hate metalwork. If they were to take a longer and more thoughtful look at their pet hate, they would realize that what they actually hate is attempting to do metalwork with poor tools. A skilled worker can produce good work even with poor tools, but would far rather use the best.
Beginners do not have this level of expertise, and need all the help that they can get, so they need good tools. Buy the best that you can't quite afford. Good tools last a lifetime, and not only are they cheaper in the long run, but they are a pleasure to use.
Marking out
This is where the mistakes are made, so don't rush, ten minutes saved here could cost hours later. ''Measure twice, cut once.''
Measurements
Before you can mark out, you need detailed measurements of the parts you need to fit. Commercial manufacturers are supplied with detailed drawings including tolerances of parts by their sub-contractors, but you might use salvaged parts, which never come with drawings. You need to confidently make accurate measurements. Digital calipers are far cheaper than they used to be, and make life so much easier. Even better, they have a button that changes them from inches to millimeters, or vice versa (see FIG. 1).

FIG. 1 Digital calipers are now cheap.
Locations on metalwork are traditionally found using a clean grey steel rule in conjunction with an engineer's try square (see FIG. 2).
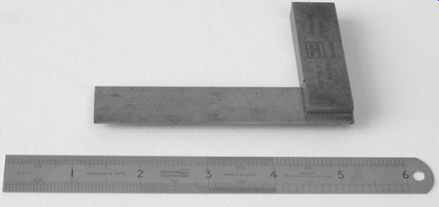
FIG. 2 Engineer's rule and try square
Although you will need both a 150mm and a 300mm rule, it is better to use the shorter rule whenever possible because it is thinner, and reduces the parallax errors that occur as a result of looking at graduations some distance away from the work.
When buying rules, carefully check the engraving quality of the graduations. Some cheaper rules etch the graduations, making them less clearly defined, and difficult to read. Like wise, a rule with a grey finish is easier to read than a shiny (or even worse, rusty) rule.
A small (300 ) try square is easier to use on sub-assemblies, but a large (600 ) square is needed for full-size chassis.
Marking out manually
With the best will in the world, your marking out will never be perfect, so choose a reference edge from which to measure, and only use a try square from this edge to minimize errors.
The center of drilled holes is marked by the intersection of two lines, and these lines are made using a sharp scriber (see FIG. 3).

FIG. 3 Traditional scriber (lower) and modern (upper). Both are equally
good.
With all the construction lines that you will need, there will be a lot of these intersections, so when you are marking the position of a hole, use a scriber to draw a circle around the intersection of roughly the same diameter as the hole. This will prevent you from drilling holes in the wrong place, and may stop you drilling the hole oversize. If you have a pair of dividers, use them to mark the size of larger holes accurately -- any mistakes in marking out will become apparent instantly.
You will often have to cut irregularly shaped holes for transformer connections. Cross-hatch the metal to be removed with a marker pen to avoid confusing construction lines with cutting lines. The reason for using a marker pen rather than a scriber is that if you make a mistake, it can be removed with methylated spirits, whereas scribed marks are permanent.
The CAD solution
Alternatively, you can rely on the precision of a printer to do your marking out for you, although it is a good idea to check the accuracy of your printer in both horizontal and vertical axes against a steel rule. Modern printers can print with a resolution of at least 300 dots per inch (dpi), and often far more, and are much better than you are at positioning lines, so an engineering drawing package can easily produce a precise template that just needs to be spotted through with a scriber to ensure perfect marking out.
Admittedly, learning to use a CAD drawing package takes time, but it will be justified by the improved quality of your metalwork.
Checking and punching
At this point it is still possible to correct mistakes, so offer up the various parts to be fitted, and check that the marking out looks sensible.
Given half a chance, a drill will skid randomly around the surface of metal before cutting - probably in the wrong place.
Punching a dimple to start the drill helps it to cut in the correct place. Having checked your marking out, use a center-punch to indent the centers of all the drilled holes. The modern punch is the automatic spring-loaded punch, whereas the older hand punch has to be struck with a hammer. Although the auto punch is superficially attractive, you will find that it is less accurate than the hand punch (see FIG. 4).

FIG. 4 Traditional center punch (lower) and autopunch (upper)
Whichever punch you use, it must be sharp, and should be ground to an included angle of 90 degrees.
-- A punch is easily sharpened on a bench grinder, or a grinding wheel in a drill. (Always wear goggles when using a grinder.)
Centre-punching sheet metal is noisy. Noise is minimized, and accuracy increased, by supporting the area to be punched directly above a leg of the bench or table. This work is being done for the pleasure of your ears, so buy some ear-defenders (cheaper than you would think), and wear them.
Safety and drilling
Drilling triangular holes in sheet metal is remarkably easy, but drilling round holes in the correct position takes a little more care.
A drill mounted in a stand, bolted to a bench, invariably means that the operator bends or sits to carry out the work. Drilling produces swarf which flies out from the drill; this swarf may be hot (although if it is hot whilst you are drilling aluminum, then something is wrong). You are now at eye level to the swarf, so wear safety glasses. Whether you do your metalwork in a dedicated workshop or on the kitchen table, you will get hot.
If perspiration runs into your eyes, it stings and may cause you to blink - perhaps with disastrous results. Steal the sweatband that your wife or daughter wore when she was feeling self conscious about her figure. Your ears are near your eyes, and drills are noisy, so also wear ear protection.
When you drill sheet metal, the work will try to vibrate, and if it is allowed to do so, the drill will snatch at the work, and you will suddenly find the work spinning on the end of the drill.
This is most alarming and can be very dangerous.
Drilling round holes in the correct position without snatching boils down to:
-- Preventing relative movement between the drill and work
-- Lubrication
-- Correct drill speed.
Preventing relative movement
Support the work. Don't attempt to drill into the middle of an unsupported chassis. Always support the work on a scrap of wood, often known as a drilling block, otherwise, the force required to make the drill cut will make it suddenly bite deeply and snatch. It is important that the work is level when drilling, so use off-cuts of MDF as drilling blocks, rather than natural wood that may have warped or may not have been planed accurately. Ensure that the work remains firmly in contact with the drilling block by deburring the underside of each hole immediately after it is drilled.
Ideally, clamp the work, but if you must hold it down by hand, press firmly, and avoid having your fingers near a part of the work that would cut you if the work were to spin. If the worst comes to the worst, do not try to fight the drill; it is much stronger than you are. Let go, and switch the drill off. Ideally, you would have a foot operated stop switch, but few amateur workshops can afford this level of sophistication.
Use a drill stand bolted to your bench. Again, this is much easier than it used to be, because drill manufacturers have standardized on a 43mm collar to grip the drill in the stand, so a choice of stands is available. Alternatively, small drill presses are now available at remarkably low prices, and although they do not withstand comparison with a genuine workshop drill press, they are perfectly good for amateur work. If you have never used a drill in a stand before, you will not believe how much easier it makes your work!
The most important specification when buying a drill press, or stand, is the depth of the throat. The throat is the distance between the drill axis and the outside of the pillar that supports the drill. A shallow throat renders the drill unable to reach the center of your chassis, forcing you to use a handheld drill. In this instance, a deep throat is very desirable.
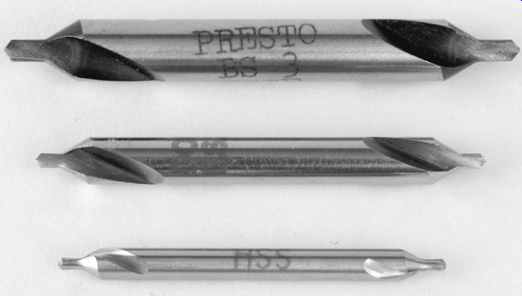
FIG. 5 Center drills enable holes to start in the correct place
Lubrication
Lubrication greatly aids cutting efficiency. If you use a lubricated 3mm center drill to start each hole, you will find that you can immediately use the final size of lubricated drill, without needing pilots. This not only speeds your work, but actually produces more precisely aligned holes (see FIG. 5).
For aluminum, the author keeps a small glass jar containing sufficient depth of methylated spirits to keep the bristles of a 1/2-inch paintbrush wet. Before drilling, wet the tip and flutes of the drill, and spot a droplet at each hole to be drilled. In time, you will knock the jar over and discover why you only wanted a shallow depth of spirits. When you have finished work for the day, screw the lid on the jar, otherwise the spirits will evaporate -- leaving you with an empty jar and a lingering fragrance. (Don't use a jar with a plastic lid as the vapor will eventually melt it.) The traditional cutting fluid for steel was a 50/50 mix of lubricating oil and water with a healthy dash of washing-up liquid.
The water cools, the oil aids cutting, and the washing-up liquid allows the two to mix to form an emulsion. Unfortunately, it is extremely messy and rusts tools. Fortunately, modern proprietary cutting fluids such as Templer's ''Temaxol'' are less destructive.
Only a little lubrication is required--too much will spray you and your surroundings.
Correct drill speed
Use the correct drill speed. A 1mm drill needs to run fast to clear the swarf or it will break, so it should run at 2500 rpm, whereas a 12mm drill should be run at the slowest possible speed, 200 rpm or lower, if possible. This is not nearly as much of a problem as it used to be for the amateur, because the better quality power drills have a two-speed mechanical gearbox and electronic speed control.
Use sharp, correctly ground drills -- never attempt to re-sharpen drills (if you genuinely know how to do this correctly, you don't need to read this section). The cheapest way to buy decent drills is to look for mail order suppliers in a model engineering magazine or on the Internet - most of them will gladly send you a free catalog. All of them stock sets of drills by good manufacturers, but individual drills are expensive, so buy a set of 1-6mm in 0.1mm steps - another from 1-12mm in 0.5mm steps is useful. These are virtually all the drills you will ever need, and they will come in a protective steel box with each size marked (see FIG. 6).
Whatever you do, don't buy drills at your local DIY super market. There is a world of difference between the inaccurately ground rubbish made of muckite that is adequate for knocking up the occasional shelf and a true engineering drill.
Deburring
When you drill a hole in metal, there will always be a small burr on the upper surface, and a larger burr on the lower surface.
The best way of deburring is not to produce a burr in the first place. Provided that the work is firmly pressed down and supported directly below a well-lubricated drill, very little burr will be produced.
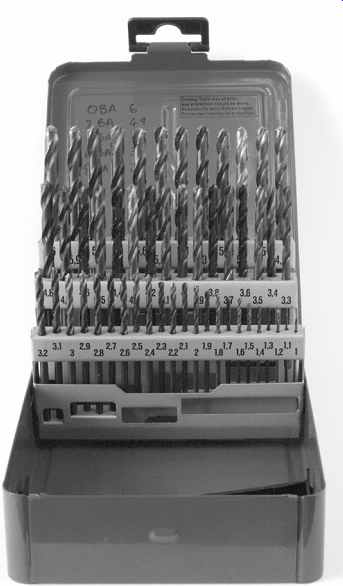
FIG. 6 Set of engineer's twist drills in case

FIG. 7 ''Wiggly'' deburring tool (lower) and rose deburring tool (upper)
All metalworkers have their preferences for burr removal, but a rose countersink in a handle, or a specialized ''wiggly'' deburring tool both work well (see FIG. 7).
You could simply use a large drill without a handle to deburr holes, but you will find that the flutes of the drill tend to cut the surface of your skin as you grip it, and the drill tries to bite deep into the work. If you are lucky enough to find a toolmaker who sharpens their own drills, politely ask them to regrind a ½” and a ¼” drill for deburring. The leading edge is ground to a negative rake of ~1 degr. , so that when gently rotated by hand against a drilled hole, it doesn't quite bite. Correctly ground, these tools deburr superbly (see FIG. 8).
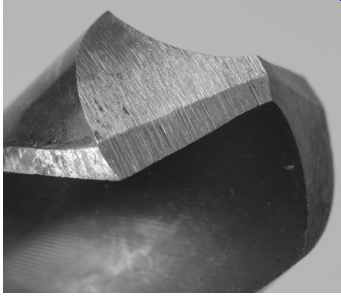
FIG. 8 ½” drill ground to form deburring tool.
Countersinking, and why to avoid it
Stainless steel countersunk screws do look nice, and are some times essential to avoid the screw head fouling other parts, but countersinking produces problems.
The included angle of screw heads is 90 degr. , so we can forget any ideas of using a twist drill (typically 118 degr.or 135 degr.) or center drill (60degr. ).
There are various different types of countersinks (see FIG. 9).
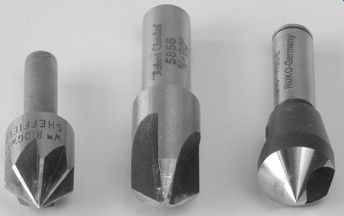
FIG. 9 Selection of countersinks
It is essential to lubricate countersinks before cutting. Unlubricated rose cutters clog, and when forced into the work, suddenly bite and cut an octagonal countersink. Countersinks with three cutting edges are less likely to clog but are not quite as controllable. Conical countersinks are the most controllable and produce the best finish, but they are quite expensive.
Although countersinks are nominally self-centering, they easily move off-course, causing the screw head not to seat properly, so be careful to align the countersink precisely before cutting.
Nobody produces perfect metalwork, and cap head screws are remarkably forgiving of slight inaccuracies. Countersunk holes are not in the least forgiving.
Tapping holes
Sometimes, despite careful planning, we know that a fastener will be inaccessible from the far side, so a screw and a nut cannot be used. Although self-tapping screws can be used to secure parts, the sharp protruding screw can easily nick wires on the other side, and the weak thread it cuts in the chassis doesn't really withstand repeated removal and reinsertion. Be aware that a tapped hole does not allow for any subsequent maneuvering of the screw, so you need to be confident about the accuracy of your drilling.
A far better alternative to a self-tapping screw is to cut a proper engineering thread into the chassis, using a tap. Tapping and clearance sizes are given (in mm) for British Association (BA) and ISO metric screws. The table shows that standard sizes are comparable, except for 4BA which does not really have a metric equivalent. The significance of the comparison is that many NOS parts were intended for BA fasteners.
===========

===========
A rule of thumb for the threads in the table is that the thickness of the material to be tapped should not be less than half the thread diameter. Thus, up to M6 can be tapped into 3mm channel, but the largest thread that should be tapped into 1.6mm sheet is M3.
Taps are typically sold in sets of three for a particular thread size: starting tap, second tap, and bottoming tap. For aluminum, you only really need the starting tap and bottoming tap (see FIG. 10).

FIG. 10 Starting (lower) and bottoming (upper) taps
Taps are held in a tap wrench. The chuck tap wrench is better for small taps and is easier to keep aligned, whereas the larger bar wrench allows more force to be applied, and is better for larger taps (see FIG. 11).
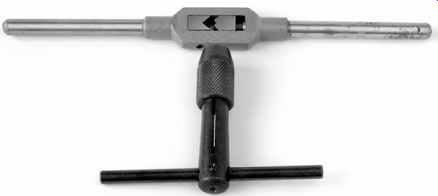
FIG. 11 Chuck and bar tap wrenches
Although taps are slightly self-aligning, it is important that the tap is first aligned with the axis of the hole - check from side to side and from front to back. The way that you use a tap to cut the thread depends on whether the hole to be tapped is clear (you can see through it) or blind. A clear hole allows swarf to clear easily, but a blind hole quickly clogs the tap.
To tap a clear hole, align the tap so that it is vertical, lubricate it, and press down gently as you screw it into the hole. Never force a tap. If everything has been done correctly, the tap will glide through the work and emerge on the other side covered in swarf.
Use a brush to remove all the swarf, then unscrew the tap from the work. If the metal is only a few millimeters thick, you will only need a starting tap to cut a perfect thread (see FIG. 12).
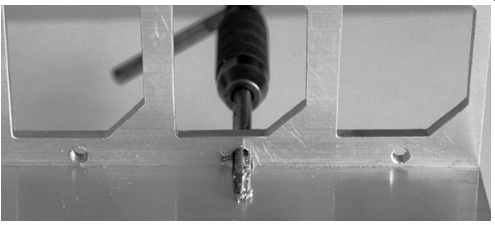
FIG. 12 The tap emerges from tapping 3mm aluminum covered in swarf. Remove
the swarf with a brush, then unscrew the tap.
If the hole is blind, the swarf can't clear easily when tapping, so use plenty of lubricant, and tap by turning the tap 1/2 turn forwards followed by 1/4 turn backwards to clear the swarf. It may be necessary to withdraw the tap and clear the swarf from tap and hole several times before the tap meets the bottom of the hole. It is most important that swarf is cleared regularly, otherwise you may not notice when the tap touches the bottom of the hole, and may break the tap. Removing a broken tap from a blind hole is almost impossible. Blind holes invariably require both a starting tap and a bottoming tap to be used, so they take time. Nevertheless, don't be tempted to hurry—it is so easy to wreck the work.
Tapping invariably leaves a very small burr that is best removed by a rose deburring tool. Be very gentle when deburring, the deburring tool can easily dig in and remove a lot of thread.
Before inserting a screw, clear any remaining swarf by squirting the hole thoroughly with a cleaning solvent such as isopropyl alcohol.
Sheet metal punches
You should not attempt to drill holes larger than 9mm in sheet metal, it is simply asking for trouble.
The solution for round holes is to use a sheet metal punch.
Although these are not often available from high street shops, electronics factors and engineering suppliers stock a reasonable range. If the distributor doesn't have the size you need, contact the manufacturer directly (see FIG. 13).
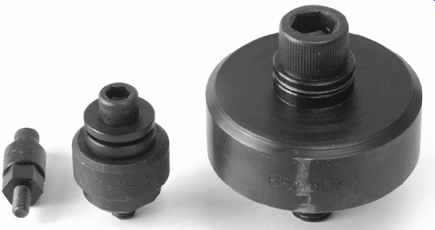
FIG. 13 Selection of sheet metal punches
The punches are of a two-part construction that are drawn together by an Allen bolt. Provided that they are kept well greased on all surfaces, they cut a beautifully neat hole, and last for years. Useful sizes are:
3/8”: Imperial potentiometers and rotary switches, grommets for small cables.
½”: Imperial toggle switches (but measure first -- modern switches are often even smaller than they quote!), 32A loudspeaker terminals, larger grommets.
16mm: B7G sockets, DIN sockets.
¾”: NOS B9A tube (valve) sockets, some cable clamps. Modern ceramic sockets are 21.8mm, so use 7/8” (22.2mm).
1 1/8”: NOS International Octal and Loctal sockets. Modern ceramic sockets are 26.1mm, but the nearest available punch is 1 1/16 -inch (27mm).
Larger punches require quite a large hole for the bolt, so there is no reason why you should not use the 3/8-inch punch to cut the bolt hole for a 35mm punch. Large punches have to sheer a considerable circumference of metal and need a correspondingly large force. Surprisingly, most of the force you expend actually goes into overcoming friction at the shoulder of the Allen bolt against the top of the punch. Distributors do not usually stock the punch manufacturer's entire range of punches, and they very rarely stock the thrust bearings that can be retrofitted to large punches -- contact the manufacturer. Thrust bearings take all the strain out of punching holes >30mm, and are thoroughly recommended, not only for laziness, but because by putting less force into the work, you bend it less.
If, as was suggested earlier, you have used a pair of dividers to draw the exact position of the finished circle, you can align the punch precisely before tightening up the Allen bolt and cutting the hole.
Note that although chassis punches produce very little burr, they do slightly deform the surface from which the cut began. It is therefore usual to punch from the inside of the chassis to the face side to avoid this deformation being visible. Additionally, the pressure of the opposing face on the work can mark decorative surfaces (such as brushed anodized aluminum), but this can be avoided by placing a thin cardboard washer between the opposing punch face and the decorative surface before punching.
Sometimes, you need to enlarge an existing hole, perhaps to replace the original phenolic B9A tube (valve) sockets (3/4-inch ) on a Leak Stereo 20 with new ceramic sockets (22mm). If you were very patient, you could carefully open out all seven holes with a file. It would be much nicer to use a punch, but you have the problem of centering the punch. The way that this can be over come is to fit a thick 3/4-inch washer to the punch's Allen bolt so that it locates in the 3/4-inch hole of the chassis. If the chassis is horizontal, the washer will fall onto the cutting edge of the punch and locate itself in the existing hole. You then start cutting, so that the tips bend into the chassis, release the punch, and remove the washer. You now have correctly aligned indentations to locate the cutting edge and you can complete the hole. Easy.
With care, chassis punches can be used on 3mm aluminum, although the bolt needs to be well greased, and a thrust bearing makes life easier. The metal needs to be weakened by drilling a series of small ~2mm holes just inside the circumference of the hole to be punched (see FIG. 14).
Sadly, sheet metal punches eventually wear out, and when they do, they require more effort and produce more burr. The author has just replaced his 3/8-inch punch. It only lasted 25 years.
Making small holes in thin sheet
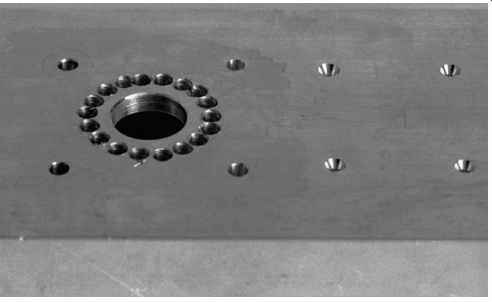
FIG. 14 Sheet metal punches can be used on thicker metal if it is weakened
beforehand by drilling a ring of 2mm holes
If a C-core transformer were to be dropped through a chassis, the laminations would contact the (almost certainly conductive)
chassis, greatly increasing transformer losses. The solution is to fit an insulating spacer. Although the insulating material can be cut neatly to size with a scalpel or sharp scissors, making clean small holes for the screws to pass through is a problem. This quandary can often be solved by a paper punch. Mark the position of the hole, take the bottom off the punch, tip out the chads, and use the punch upside down.
Gripped gently, the cutter holds the material in place, and the marking out can be clearly seen through the exit hole of the punch. The material can be moved precisely into position, where upon a beautifully clean hole in the correct position can be punched.