AMAZON multi-meters discounts AMAZON oscilloscope discounts
Automated External Defibrillator (AED)
When the heart's electrical system is disturbed, as it is during an electrical shock event that passes electrical shock current through the heart, changes in the heart's rate and rhythm occur. These disruptions cause a large percentage of heart deaths.
The electric impulses in the heart must be coordinated to give a smooth, rhythmic beat. An outside current as small as 60 ma can disturb the nerve impulses and create a situation in which the heartbeat is no longer smooth and rhythmic. The heart goes into fibrillation, defined as rapid and inefficient contraction of muscle fibers of the heart caused by disruption of nerve impulses. When the heart is fibrillating, it does not pump blood through the body. As in sudden cardiac arrest (SCA) in which the heart suddenly stops beating, fibrillation of the heart also creates a situation in which blood stops flowing to the brain and other vital organs. If fibrillation is not treated quickly, each minute of SCA or fibrillation leads to a 10 percent reduction in survival. Any prolonged shock current exceeding 75 ma is almost certain to cause death. Just as with any other muscle, the heart becomes paralyzed if the current flowing through it is of sufficient magnitude.
Paralysis of the heart frequently is not fatal if the current is removed quickly enough.
Paralysis is used to an advantage in defibrillators. Defibrillators intentionally apply heart paralyzing current to the patient's chest. Once the heart is paralyzed and the current is removed, the heart is in a relaxed state and ready for the next signal. Frequently, the heart restarts without any other outside intervention.

FIG. 5 alternate positions for hands while applying CPR.
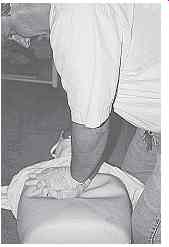
FIG. 6 The weight of the rescuer's upper body is used to compress the
chest of the victim.

FIG. 7 The rescuer gently pinches the nose closed with the thumb and
index finger of the hand on the forehead breathes into the victim's mouth.
How an AED Works
To understand how an AED works, you must first understand how the heart works. The heart has an electrical system that controls the rate and rhythm of the heartbeat.
Normally, a heartbeat starts in the sinus node, travels at approximately 7 feet/second (2.1 meters/second) through the atrioventricular (av) node hIS bundle (a collection of heart muscle cells specialized for electrical conduction that transmits the electrical impulses from the av node, located between the atria and the ventricles, to the point of the apex of the fascicular branches). The fascicular branches then lead to the purkinje fibers, which provide electrical conduction to the ventricles, causing the cardiac muscle of the ventricles to contract at a paced interval.
Problems with the electrical system can cause abnormal heart rhythms called arrhythmias (ah-rITh-me-ahs). During an arrhythmia, the heart can beat too slowly or too quickly. The most common cause of SCA is an arrhythmia called ventricular fibrillation. In ventricular fibrillation, the ventricles don't beat normally. Instead, they quiver very rapidly and irregularly. In this condition, no blood is being pumped out of the ventricles.
Another arrhythmia that can lead to SCA is ventricular tachycardia (TAK-ih-KAR de-ah). This is a fast, regular beating of the ventricles that may last for only a few seconds or for longer periods of time.
In people who have either of these arrhythmias, an electric shock from an AED can restore the heart's normal rhythm. Performing CPR-cardiopulmonary resuscitation-on someone having SCA also can improve that person's chance of survival.
AEDs are lightweight, battery-operated, portable devices that are easy to use. Each unit comes with instructions, and AEDs will even give you voice prompts to let you know if and when you should send a shock current to the heart. Learning how to use an AED and taking a CPR course should be mandatory training for any qualified electrical worker. However, if trained personnel are not available, untrained personnel can use an AED to help save a victim's life.
When Should an AED be Used?
Knowing the signs of SCA can clue you in to when an AED should be used. A person experiencing an SCA may suddenly collapse and lose consciousness. Or you may find the person unconscious and unable to respond when you call or shake him or her. The person may not be breathing or may have an abnormal breathing pattern. If you check, you usually can't find a pulse. The person's skin may become dark or blue from lack of oxygen. Also, the person may not move, or the person's movements may look like a seizure (spasms). An AED can check the victim's heart rhythm and determine whether an electric shock is needed to try to restore normal rhythm.
With modern AEDs, you need not worry about accidentally killing a victim because AEDs have a computer that is able to detect sinus activity and pulse. If either sinus activity (an electric signal being transmitted from the sinus node) or a heartbeat (pulse) is detected, the AED will not deliver a shock to the victim's heart.
The AED is attached to the chest of the victim by use of sticky pads with sensors, called electrodes. The electrodes transmit information about the person's heart rhythm to a computer in the AED. The computer analyzes the heart rhythm to determine whether an electric shock is indicated. If it is, the AED uses voice prompts to tell the operator when to give the shock and the electrodes deliver it.
Facility owners thinking about purchasing and installing AEDs in their facility should provide initial and ongoing training to first responders. It is important to properly maintain an AED and notify local emergency officials where they are located throughout the facility.
How to Use an Automated External Defibrillator (AED)
Before applying an AED to a victim, it is important to confirm that the victim can't respond.
Shout at and shake the person to make sure he or she isn't sleeping. Never shake an infant or young child. Instead, pinch the child to try to wake the child up. Call 9-1-1 or have someone else call 9-1-1. If two rescuers are present, one can provide CPR while the other calls 9-1-1 and gets the AED.
Check the victim's pulse and breathing. If breathing and pulse are irregular, prepare to use the AED as quickly as possible. Death occurs within minutes in cases of SCA. If no one knows how long the person has been unconscious, or if an AED isn't readily available, do two minutes of CPR. Then use the AED, if you have one, to check the victim's condition.
After you use the AED, or if you don't have an AED, give CPR until emergency medical help arrives or until the person begins to move. Try to limit pauses in CPR. After two minutes of CPR, you can use the AED again to check the victim's heart rhythm and give another shock, if needed. If a shock isn't needed, continue CPR.
Before using an AED, check for puddles of water near the person who is unconscious.
Move the victim to a dry area and stay away from wetness when delivering shocks because water conducts electricity. Turn on the AED's power. The AED will give you step-by-step instructions. You'll hear voice prompts and see prompts on a screen. Expose the victim's chest. If the victim's chest is wet, dry it because the sticky electrode pads will not adhere to a wet surface. Apply the electrodes to the victim's chest as pictured on the AED's instructions. Apply one pad on the right center of the victim's chest above the nipple. Place the other pad slightly below the other nipple and to the left of the ribcage. Make sure the electrodes have a good connection to the skin. If the victim has a lot of chest hair, you may have to trim it. AEDs generally are equipped with a kit containing scissors and/or a razor.
Remove metal Necklaces or underwire bras. The metal may conduct electricity and cause burns. You can cut the center of the bra and pull it away from the skin.
Check the person for implanted medical devices, such as a pacemaker or implantable cardioverter defibrillator. The outline of these devices is visible under the skin on the chest or abdomen, and the victim may be wearing a medical alert bracelet. Also check for body piercings. If any of these are found, move the electrode pads at least 1 inch away from the implanted devices or piercings so the electric current can flow freely between the pads.
Ensure the wires from the electrodes are connected to the AED. Make sure no one is touching the victim, and then press the AED's "analyze" button. Stay clear while the machine checks the person's heart rhythm.
If a shock is needed, the AED will let you know when to deliver it. Stand clear of the victim and make sure all other personnel in the area are clear before you push the AED's "shock" button to initiate the shock current.
Start or resume CPR until emergency medical help arrives or until the victim starts moving. Stay with the victim until medical help arrives, and report all the information you know about what has happened.
What Risks Are Associated with Using an Automated External Defibrillator?
AEDs are safe to use. There are no reports of AEDs harming bystanders or users. Also, there are no reports of AEDs delivering inappropriate shocks.
Key Points about Automated External Defibrillators
1. AN AED is a portable device that analyzes the heart rhythm and can administer an electric shock to the heart to paralyze the heart and try to restore normal heart function.
AEDs are used to treat SCA.
2. SCA is a condition in which the heart suddenly and unexpectedly stops beating in normal rhythm. In this condition, no blood is flowing through the body to the brain and other vital organs.
3. In victims having SCA, an electric shock from an AED can paralyze the heart and relax it, so the heart's normal rhythm can be restored. Performing CPR on victims suffering SCA can improve their chances of survival.
4. AEDs are lightweight, battery-operated, portable devices that are easy to use. Each unit comes with instructions, and the device will even give you voice prompts to let you know if and when you should initiate a shock to the victim's heart.
5. Sticky pads with sensors (electrodes) are attached to the chest of the victim having SCA. The electrodes transmit information about the victim's heart rhythm to a computer in the AED.
6. The computer analyzes the heart rhythm to determine whether an electric shock is needed. If a shock is indicated, the AED uses voice prompts to tell you when to initiate the shock and the electrodes deliver it to the chest of the victim.
7. Learning how to use an AED and taking a CPR course should be mandatory for all electrical workers. However, if trained personnel aren't available, untrained personnel can use an AED to help save a victim's life.
8. AEDs are frequently found in locations with large numbers of people such as shopping malls, golf courses, airports, airplanes, casinos, hotels, sports venues, schools, churches, and manufacturing facilities; they can also be purchased for home use.
9. AEDs are very safe to use. There are no reports of AEDs harming bystanders or users, and there are no reports of AEDs delivering inappropriate shocks.
RESCUE TECHNIQUES
General Rescue Procedures
The first priority in any emergency is to remove living victims from the danger area if they cannot escape themselves. This procedure is called rescue. In some instances, the rescuer will be risking his or her life to rescue a victim. The decision to risk one's life is a personal one and cannot be regulated by any sort of standard procedures. In any case, good judgment must be exercised by the rescuer. Remember that becoming a second victim does not help anyone.
The American Red Cross method of rescue is shown in Table Notice that the steps are virtually identical to those employed in preparing for first aid procedures. Rescue is, in fact, one of the preliminary steps in the performance of first aid.
=========
TABLE 14 primary rescue Steps
1. Survey the scene.
a. Develop an action plan.
2. Primary survey.
a. Locate the victim.
b. assess the victim's condition.
c. Try to arouse the victim.
d. Move the victim to a safe place. Caution-do not jostle the victim any more than is necessary when moving. See later sections for a discussion of proper movement techniques.
e. apply first aid as soon as the victim is in a safe location.
3. Call for emergency medical assistance.
=======
After the victim has been removed from the hazardous area (in the case of an electrical accident, do not touch the victim until electric circuits have been de-energized and/or the victim has been removed from contact of the energized circuits) and after first aid has been administered, the accident area should be secured and made safe for other persons. Do not disturb the accident area beyond what is necessary to protect other persons. An accident investigation should be carried out by qualified personnel to determine the nature and cause of the accident and what corrective actions need to be taken to prevent the accident from occurring again.
The following outline details the generalized procedures defined by Table This outline was taken from the AVO Multi-amp Institute textbook titled High Voltage Rescue Techniques.
1. Survey the scene. A quick survey (1 min or less-time is critical) to enable the rescuer to develop a mental plan. Consider the following:
a. Anticipating conditions.
(1) probable life-threatening hazards (2) Observed location of victim (3) Observed condition of victim
b. Facts of the situation.
(1) Time and conditions (2) Situations-What happened? (3) Contributing factors
c. Weighing facts.
(1) rescue requirements (2) accomplish rescue alone? (3) equipment and manpower needed/ available (4) additional assistance now or later (5) If electrical contact, get de-energized
d. Determining procedures.
(1) Immediate action (2) Course of action
e. Initial action decision. May be made before a complete survey. May determine a future course of action.
2. Primary survey plan activated. From the initial decision and action until the victim is being transported to medical facilities, the following would be considered:
a. victim location (1) accessibility of victim.
(2) electric circuit contact.
(3) remove circuit contacts.
(4) Try to arouse victim.
(5) help needed/called.
(6) assess condition of victim (ABCs plus broken bones, burns, twisted torso, etc.).
b. emergency aid required (1) What and where to give emergency aid? (2) how to move victim to safety (3) emergency aid given
3. Call emergency medical service.
a. how to move victim to medical aid.
b. Continue emergency aid as required.
4. Secondary survey.
a. Secure the area.
(1) Do not damage or disturb physical evidence.
(2) Isolate hazards.
(3) Keep untrained personnel away.
b. What happened.
(1) ask victim.
(2) ask witnesses.
(3) examine physical evidence.
(4) photographs, sketches.
(5) preserve physical evidence.
c. reports.
(1) Written records (2) Notification
d. Follow up.
(1) reports distributed (2) action taken to prevent future similar accidents
Note: The action taken during the actual physical rescue must be started and accomplished very rapidly so that the victim is out of further danger and emergency aid may begin quickly.
See FIG. 3. Accident investigation techniques are discussed later in this section.
Elevated Rescue
The physical techniques that are used for any type of rescue should be learned and practiced in a controlled environment under the direction of experienced, qualified training personnel.
FIG. 8 graphically depicts a generally accepted method for performing an elevated, pole-top rescue. Note that this rescue technique requires a skilled line person with climbing ability. Do not attempt such a rescue unless you have had the requisite training. All rescue techniques should be accomplished using the basic rescue approach outline, which is illustrated in the previous section.

FIG. 8 Illustrated method for elevated, pole-top rescue.
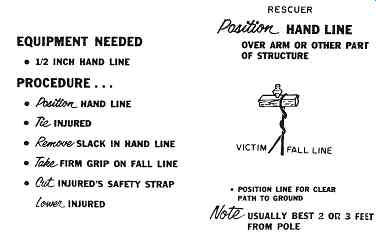

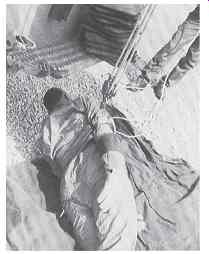
(top) SHORT END OF LINE IS WRAPPED AROUND FALL LINE TWICE (TWO WRAPS AROUND
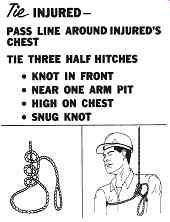
FALL LINE).; (above)RESCUER TIES HAND LINE AROUND VICTIM'S CHEST USING
THREE HALF HITCHES.
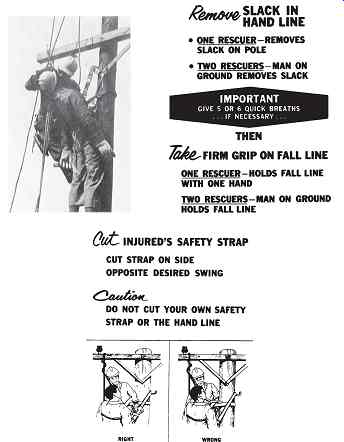
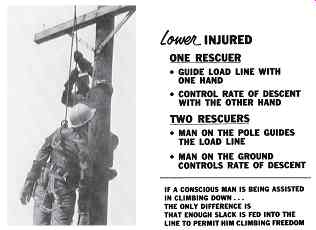
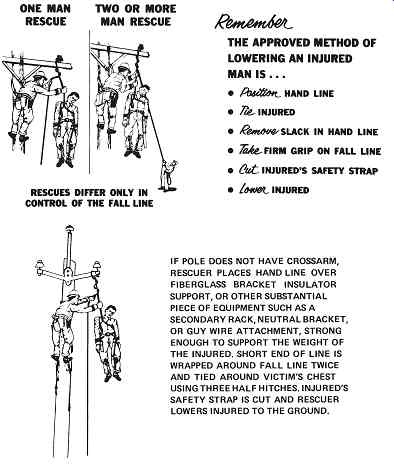
LINE MUST BE REMOVED AND VICTIM EASED ON TO GROUND
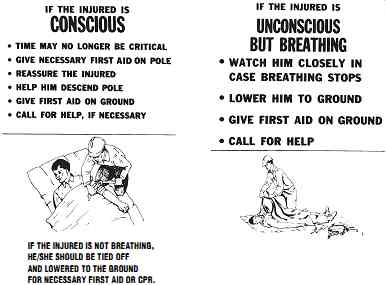
LAY
VICTIM ON HIS BACK AND OBSERVE IF VICTIM IS CONSCIOUS. IF VICTIM
IS CONSCIOUS, TIME MAY NO LONGER BE CRITICAL. GIVE NECESSARY FIRST AID.
CALL FOR HELP. IF VICTIM IS UNCONSCIOUS AND NOT BREATHING AND/OR HAS
AN ERRATIC OR NO PULSE, PERFORM CPR AS DESCRIBED PREVIOUSLY IN THIS SECTION.
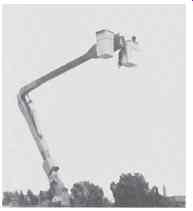
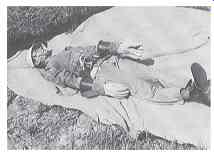
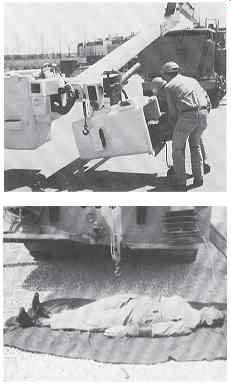
BUCKET TRUCK RESCUE TIME IS CRITICAL.
EQUIP. PORTION OF INSULATED BOOM OF TRUCK WITH ROPE BLOCKS DESIGNED
FOR HOT-LINE WORK.
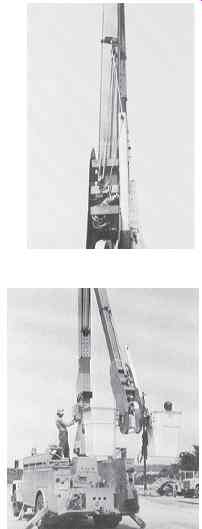
(top) STRAP IS PLACED AROUND INSULATED BOOM APPROXIMATELY 10 FEET FROM BUCKET
TO SUPPORT ROPE BLOCKS. BLOCKS ARE HELD TAUT ON BOOM FROM STRAP TO TOP
OF BOOM.; (above) RESCUER ON THE GROUND EVALUATES THE CONDITIONS WHEN
AN EMERGENCY ARISES. THE BUCKET IS LOWERED USING THE LOWER CONTROLS. OBSTACLES
IN THE PATH OF THE BUCKET MUST BE AVOIDED.

(top) HOOK ON ROPE BLOCKS IS ENGAGED IN A RING ON THE LINEMAN'S SAFETY STRAP.
SAFETY STRAP IS RELEASED FROM BOOM OF TRUCK.; (above) ROPE BLOCKS ARE
DRAWN TAUT BY RESCUER ON THE GROUND. UNCONSCIOUS VICTIM IS RAISED OUT OF BUCKET
WITH ROPE BLOCKS.
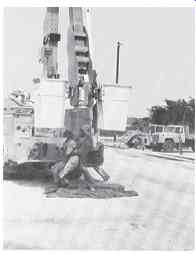
RESCUER EASES VICTIM ON TO THE GROUND. CARE SHOULD BE TAKEN TO PROTECT
THE INJURED VICTIM FROM FURTHER INJURY.
RELEASE ROPE BLOCKS FROM VICTIM.
BASKET OR BUCKET ON AERIAL DEVICE MAY BE CONSTRUCTED TO TILT AFTER BEING
RELEASED, ELIMINATING THE NEED FOR SPECIAL RIGGING TO REMOVE AN INJURED
PERSON FROM THE BASKET OR BUCKET.
LAY VICTIM ON HIS BACK AND OBSERVE IF VICTIM IS CONSCIOUS. IF VICTIM IS CONSCIOUS, TIME MAY NO LONGER BE CRITICAL. GIVE NECESSARY FIRST AID. CALL FOR HELP.
IF VICTIM IS UNCONSCIOUS AND NOT BREATHING AND/OR HAS AN ERRATIC OR NO PULSE, PERFORM CPR AS DESCRIBED PREVIOUSLY IN THIS SECTION.
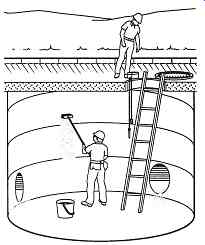
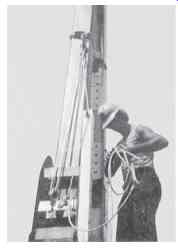
FIG. 9 vault atmosphere monitoring.
Confined-Space Rescue
Confined-space rescue is made more complex by two basic problems. First, the confined space may become filled with gases that are not breathable or, worse, are toxic and therefore hazardous to human life. Second, the confined space does not allow for free motion of rescue personnel. This means that rescue workers may not be able to easily get a grip on the victim.
Atmosphere Checking in Confined-Space Rescues. Before the rescue is attempted, the atmosphere must be tested for the presence of adequate supplies of oxygen, excessive quantities of toxic gases, and excessive quantities of combustible gases. FIG. 9 shows a typical monitoring setup for an underground confined-space area. If the rescuer must descend into a confined space that does not have adequate oxygen concentrations or has excessive quantities of toxic or combustible gases, the rescuer must wear respiration gear.
Oxygen levels must be no less than 19.5 percent and no more than 23.5 percent. Table 15 lists the potential effects of insufficient oxygen. The permissible levels of toxic gas vary depending on the type of gas and the individual. Generally, toxic gases should be kept to levels that are less than 50 parts per million (ppm) by volume. Tables 16 and 17 list the potential effects that carbon monoxide (CO) and hydrogen sulfide (h2S) will have.
Securing the Victim to the Rescue Line. The method used to secure a victim to the line depends upon the logistics of the given rescue. The nature of the injuries and the space available for the rescue both affect the method used. The simplest way is to tie a hand line around the victim using three half hitches as shown in FIG. 10. FIG. 11 shows a preferred method using a padded harness designed specifically for such rescue efforts. If space allows or if the victim's injuries require it, a full body rope harness may be rigged as shown in FIG. 13 shows a victim being lifted using the body rope harness. Sometimes victims' injuries may be so severe that they must be securely immobilized before being removed from the accident area. Both of the devices shown in FIG. 14 may be used.
Retrieving the Victim. After the victim has been secured to the rescue line, he or she must be raised from the confined space to an open area where treatment may be administered. A variety of different methods have been developed to raise victims.
Figures 15 through 19 show various types of rigs that may be used as pulley points to retrieve victims.
==============
TABLE 15 potential effects of an Oxygen-Deficient atmosphere
Oxygen content (% by volume) ---- effects and symptoms* (at atmospheric pressure)
19.5 Minimum permissible oxygen level for normal functioning.
15-19 Decreased ability to work strenuously. May impair coordination and may induce early symptoms in persons with coronary, pulmonary, or circulatory problems.
12-14 respiration increases in exertion; pulse increases, impaired coordination, perception, judgment.
10-12 respiration further increases in rate and depth, poor judgment, lips blue.
8-10 Mental failure, fainting, unconsciousness, ashen face, blueness of lips, nausea, and vomiting.
6-8 eight min, 100% fatal; 6 min, 50% fatal; 4-5 min, recovery with treatment.
4-6 Coma in 40 s, convulsions, respiration ceases, death.
* The effects and symptoms at a given oxygen content are guidelines and will vary with the individual's state of health and physical activity.
TABLE 16 potential effects of Carbon Monoxide exposure
ppm* effects and symptoms --- Time
35 permissible exposure level limit 8 h
200 Slight headache 3 h
400 headache, discomfort 2 h
600 headache, discomfort 1 h
1000-2000 Confusion, headache, nausea 2 h
1000-2000 Tendency to stagger 1¼ h
1000-2000 Slight palpitation of heart 30 min
2000-2500 Unconsciousness 30 min
4000 Fatal Less than 1 h
* ppm-parts per million; volume measurement of gas concentration.
The effects and symptoms at a given exposure are guidelines and will vary with the individual's state of health and physical activity.
TABLE 17 potential effects of hydrogen Sulfide exposure
ppm effects and symptoms Time
10 permissible exposure level limit 8 h
50-100 Mild eye irritation, mild respiratory irritation 1 h
200-300 Marked eye irritation, marked respiratory irritation 1 h
500-700 Unconsciousness, death ¼-1 h
1000 or more Unconsciousness, death Minutes
==============
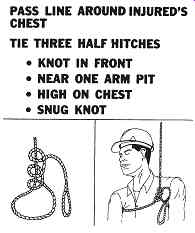
FIG. 10 Securing the victim using a hand line.
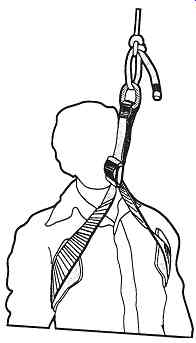
FIG. 11 Using a padded safety harness to secure the rescue line to
the victim. (Courtesy AVO International.)
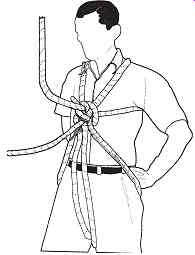
FIG. 12 Full body rope harness. (Courtesy AVO International.)
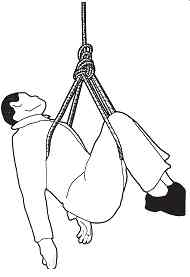
FIG. 13 Full body rope harness being used to lift the victim. (Courtesy
AVO International.)
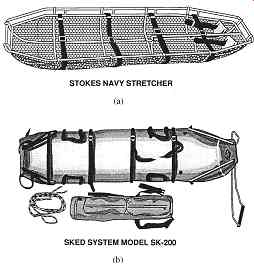
FIG. 14 (a) Stokes navy stretcher. (b) SKED system model SK-200. (Courtesy
AVO International.)
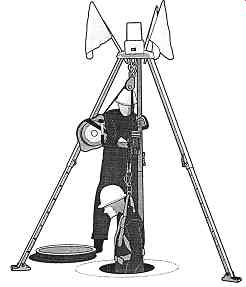
FIG. 15 Tripod hoist operation. (Courtesy AVO International.)
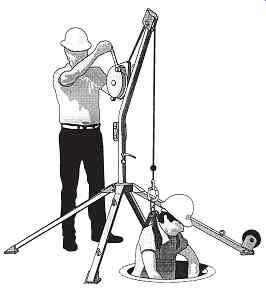
FIG. 16 Quad pod retractable lifeline. (Courtesy AVO International.)
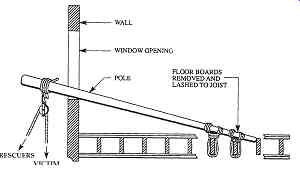
FIG. 17 gin pole hoist. (Courtesy AVO International.)
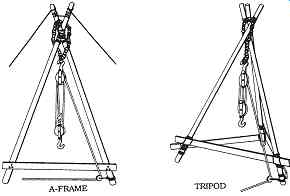
FIG. 18 rope-tied a-frame and tripod hoists. (Courtesy AVO International.)
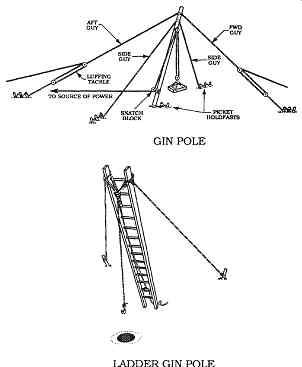
FIG. 19 gin pole hoists. (Courtesy AVO International.)
The key to a successful victim retrieval is teamwork and adequate planning. Remember that human beings can weigh as much as 300 or 400 lb. also remember that unconscious victims cannot assist in their own retrieval. Always be certain that the rigging is strong enough.
Ground-Level Rescue
The Problem. Ground-level victims do not require rescue as often as elevated or confined-space victims. Occasionally, however, victims do need retrieval, especially from metal-clad switchgear assemblies. Walk-in metal-clad switchgear has circuit breaker cubicles that may represent a limited space problem. They also have doorways that must be traversed. In addition to metal-clad gear problems, victims may be endangered by fire, chemical release, or any number of other similar hazards. Regardless of where the rescue is taking place, the general rescue procedures should be the starting point for all rescues.
Retrieving the Victim. Since moving a victim can induce additional injuries or aggravate existing injuries, always make certain that moving the victim is absolutely necessary. If the victim must be moved, immobilizing him or her using a stretcher or other technique is preferred. However, if time is critical, one of the following carries may be employed.
The method used to move the victim depends on the nature and severity of the hazard to which he or she is exposed. For example, Figs. 20 and 21 illustrate two methods that may be used to remove a victim from a fire area. In these types of situations, smoke and heat may require that the rescuer stay low to the ground.
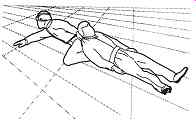
FIG 20 Clothes drag.
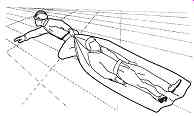
FIG 21 Blanket drag.
If only one person is available for the rescue, and the victim is conscious and mobile, the pack-strap carry ( FIG. 22) may be employed. The firefighter's carry ( FIG. 23) may be used if the victim is not conscious.
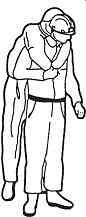
FIG. 22 pack-strap carry (conscious victim). (Courtesy AVO International.)
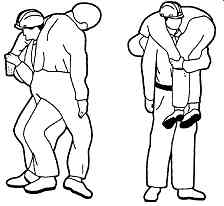
FIG. 23 Firefighter's carry. (Courtesy AVO International.)
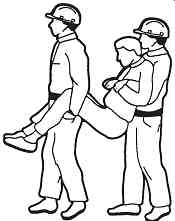
FIG. 24 Carry by extremities. (Courtesy AVO International.)
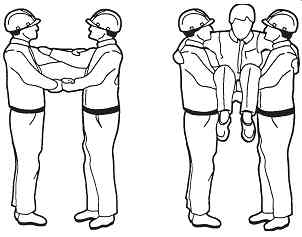
FIG. 25 Two-person seat carry. (Courtesy AVO International.)
If two people are available for the rescue, any of the carries shown in Figs. 24 through 26 may be used. The carry shown in FIG. 25 generally requires that the victim be conscious.
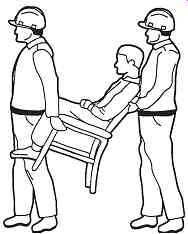
FIG 26 Chair carry.
Accident Investigation
Purpose
When accidents occur, they must be investigated thoroughly. An investigation serves two major purposes as shown in Table 18. Note that accident investigations should be performed only by qualified professionals who are experienced in such matters. Litigation can often ensue and result in corporate, personal, or product liability; errors and omissions; insurance subrogation; or other claims.
Accident Prevention. Accidents occur for a reason, and sometimes the reason is not obvious. A thorough investigation can reveal underlying causes. Employers must then act to eliminate those causes, so such accidents will not occur again.
Litigation. Modern society is becoming increasingly litigious. Evidence gathered during an accident investigation can be used in court to either defend or prosecute a lawsuit. Another aspect of our litigious society is the tendency of companies and individuals to "keep everything secret until the attorney approves it." Sadly, this approach may seem necessary to prevent frivolous lawsuits and/or to protect assets. It should be remembered by all parties involved in an accident investigation that the understanding of the accident and prevention of a recurrence should be the most important issues. Ultimately, the value of a single human life exceeds any corporate asset.
General Rules
Several general rules for carrying out accident investigations are listed in Table 19.
Many investigations have been hampered by well-meaning, inexperienced individuals who remove or alter evidence in the interests of cleaning up the area. Remember that only absolutely necessary modifications should be made at the accident scene, and even these should be documented, preferably with photographs and/or videotapes.
One of the major mistakes made by employers is to wait for the lawsuit before an accident investigation begins. Employers owe it to themselves and their employees to investigate accidents completely and thoroughly, as soon after the accident as possible. This is especially true of witness interviews. Time quickly alters or destroys memories of traumatic events; therefore, people must be interviewed immediately.
Whenever possible, retain an expert. Forensic engineering firms specialize in the investigation and analysis of accidents. Such organizations have a wealth of factual information available to them. They can determine causes in cases where inexperienced investigators can only guess. For information on forensic consultants, contact the American academy of Forensic Sciences or the Canadian Society of Forensic Science.
FIG. 26 Chair carry. (Courtesy AVO International.)
==========
TABLE 18 reasons for performing accident Investigations
• Future accidents may be prevented by elimination of accident causes.
• Evidence gathered during the investigation may be required in litigation.
=========
TABLE 19 general rules for performance of an accident Investigation
• Investigations should be performed only by qualified, experienced personnel.
• Until the investigation is complete, the accident scene should be modified only to the extent necessary to eliminate immediate hazards to personnel.
• No evidence should be destroyed or thrown away for at least 5 to 10 years after the accident.
• Photograph everything from many different angles.
• Document everything that is observed or taken in interviews.
• Perform the investigation as soon as possible. Remember that human memory is volatile.
===========
========
TABLE 20 Steps for an accident Site Survey
• Visually inspect the area, making notes about general observations.
• Photograph or videotape the scene.
• Make a detailed inspection and develop a sketch of the entire scene.
==========
Data Gathering
Site Survey. The gathering of data should start with a survey of the accident scene. If the basic rules have been followed, the scene will be virtually unchanged. The investigator should follow the steps outlined in Table 20.
The first visual inspection can produce amazing insights into the nature and causes of the accident. Following are some things to look for:
• Scorch and burn marks
• Damaged equipment
• evidence of safety equipment
• position of victim and or objects
The photographs or videotape, preferably both, can permanently store vital evidence.
Because of the two-dimensional nature of photography, shots should be taken from all angles including from above to get a complete perspective. A scale reference can be included in the scene. An audio or written record should be made to clearly define the nature of each photograph, where it was taken, and any specific information that should be noted.
The final detailed inspection and sketch can be handmade, clearly labeled, and dimensioned. Dimensions are particularly important since they may prove or disprove the possibility of any given event during the accident. The sketch should also reference photographs or video tape evidence that was taken.
Witness Interviews. Witness interviews help to establish what, how, where, and when.
However, the investigator must remember that of all the evidence he or she will gather, eyewitness accounts are the least reliable. Human beings tend to be influenced by their own personal backgrounds and prejudices. Within a few hours, or even minutes, of the accident, eyewitnesses' memories start to modify. Witnesses should be interviewed as soon as possible and on audiotape if possible.
The cautions in the previous paragraph are especially true of the accident victim. The human mind will literally shut off to prevent the agony associated with an accident. In case after case, victims remember nothing from several hours or even days before and after the accident. Information supplied by a victim should always be viewed with skepticism.
The more traumatic the injury, the less credible will be the victim's statement.
When interviewing witnesses, the following points should be followed:
• When possible, conduct the interview at the accident site. The familiar surroundings may help to arouse memories that would be lost.
• prepare a series of questions to be asked before the interview, and start with these questions.
If the witness seems more comfortable with a freewheeling statement, allow it; however, avoid rambling and nonrelevant statements since these will only cloud the results.
• Try to keep the witness focused on the facts of the case. Blame, fault, and other such subjective conclusions should be left to the analysis stage of the investigation.
• When the interview is completed, the interview notes should be carefully stored and dated. If you make a summary of the interview, it should be stored with the notes; how ever, it should not replace the interview notes.
• arrange for a follow-up interview to deal with questionable or conflicting accounts.
Physical Evidence. One of the most frequent mistakes made by inexperienced investigators is the alteration, destruction, or loss of physical evidence. A scorched or melted wire, a bit of flaked insulation, a piece of torn cloth, or a damaged circuit breaker can all be extremely important evidence.
Physical evidence should be documented in the preliminary stages of the investigation by the use of photographs, sketches, and written notes. After it has been documented, it should be carefully marked and stored. Physical evidence should be kept for a minimum of 5 years and possibly as long as 10 years depending upon the circumstances of the accident.
Accident Analysis
After the evidence has been gathered and the interviews have been taken, the analysis phase begins. The actual steps taken in this portion depend to a large extent on the specifics of the accident itself. However, at least two major steps may be involved.
Experimentation. Actual experimentation includes tests that are performed to evaluate or simulate certain conditions during an accident. For example, pork can be subjected to electric currents to evaluate the degree of burning that occurs for various currents, electric arcs can be staged with manikins to determine the degree of thermal burning that may occur, and air gaps can be checked to see how far an arc will jump in given circumstances. Experimentation is a detailed and sophisticated procedure and should be performed only by organizations with the necessary expertise.
Report. A report is developed based on a comprehensive analysis of all the evidence and experimental data that have been gathered. The report should contain, at a minimum, the sections listed in Table 21.
====
TABLE 21 Major elements of the Final report of an accident Investigation
• Overview
• Step-by-step description of the accident
• Conclusion
• Appendices
=====
• Overview. This section should include an executive summary type of description of the events leading up to the accident, the accident itself, and the accident aftermath. Only very general information should be included, such as the number of injured persons, the basic cause of the injuries, and the generalized suggestions for preventing such a problem in the future.
• Step-by-step description of the accident. Here the investigator takes the reader through each step of the accident from beginning to end. All the physical evidence is discussed, and eyewitness accounts are integrated into this portion of the report. all relevant information should be included, such as the activities of the victim prior to the accident that may have affected his or her behavior, the specific actions of the victim during the accident, the safety equipment that was in use at the time, the actions of witnesses, the duration of the electrical contact, the points on the body that were contacted, and other such details.
• Conclusion. The investigator should provide an evaluation of the accident including such information as the steps that could be taken to prevent similar accidents in the future, changes in safety equipment or rules that may be indicated, changes in employee training that may be required, and/or changes in work procedures that may be indicated. Since this is an engineering report, the investigator should avoid comments about who may be responsible for the accident. Such issues are better left to the legal system.
• Appendices. All the collected data can be included for reference. Remember that others may draw different conclusions than that of the investigator and should, therefore, be given the advantage of being able to examine all the evidence that has been collected. In addition, the evidence must be present to support the conclusions drawn. Do not include the originals of photographs and videotapes. Only copies should be included. The originals should be kept in a secure location such as a locked file cabinet or a safe-deposit box. Of course, physical evidence should not be included except at a formal presentation of the report. However, photographs of physical evidence can be included.
Please note that any and all content of such a report will be subject to insurance contract directives; insurance adjuster's instructions; attorney-client privilege; powers granted to workers' compensation investigators; and powers granted to federal, state, and provincial agencies that have jurisdiction in the investigations.
| Top of Page | PREV. | NEXT | Index |