AMAZON multi-meters discounts AMAZON oscilloscope discounts
<< cont from part 1
1.7 Separating Glass by Type
Because laboratory glassware may be manufactured from a variety of different types of glass, such varied glass can become mixed up-potentially leading to confusion or later problems. It is important to either maintain different types of glassware separately or be able to tell them apart. Although the former approach is preferred, the ability to identify and separate glass is important not only to save time, but also for safety and even the integrity of your experimentation.
Typically, only a few commercial soft glass items may work their way into a research lab. Such items as student ware graduated cylinders or burettes are readily identifiable, and since these items shouldn't be heated, are unlikely to cause damage. Specialized or custom made glassware may not be as easily identifiable and therefore may require some analysis.
Soft glasses, hard glasses, and high temperature glasses all look the same-like clear glass-and therefore may be hard to separate. The process to separate glass may be either destructive or nondestructive. Destructive techniques involve doing some permanent physical change to the glass, after it which will never be the same. Nondestructive techniques, obviously, are preferred if you wish to preserve all of your laboratory glassware. A listing of important properties of various glasses are shown in Table 2.
Logical Deduction and Observation (Nondestructive). By logically deducing what you are likely to have in your laboratory, it is often simple to separate different types of glass and glass apparatus. For example, fused silica or quartz glass ware is expensive. Unless there is a specific demand or need for fused silica in your lab, it is extremely unlikely that you have any. Thus, there is generally no need to look for things that are not likely to be there. (One exception to this is if you have any UV cells.)
[Prolonged cleaning by base baths or HF can remove ceramic markings.]
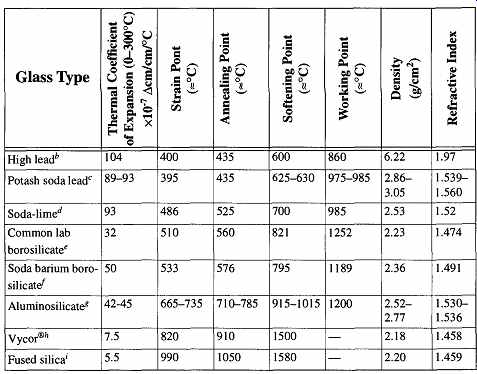
Table 2 Characteristics of Specific Glass Types. Except where
otherwise noted, these data are compiled from Properties of Coming's Glass
and Glass Ceramic Families by Corning Glass Works, Corning, New York 14831,
©1979. Ranges indicate a small family of glass types with similar characteristics.
This glass is for radiation shielding. The data are from Engineering with Glass by Corning Glass Works, Corning, New York 14831, ©1963.
This type of tubing is commonly used on neon signs.
This information is based on Kimble Glass type R-6, compiled from Kimble Glass Technical Data by Owens-Illinois Inc., Toledo, OH 43666, ©1960.
Most laboratory glassware is made from this glass.
Pipettes and other pharmaceutical items are made from this glass.
Aluminosilicates are used for ignition tubes, for halogen lamps, and for containing helium.
Vycor® is 96% silica glass.
Fused silica is essentially pure silica with few impurities.
Glassware identified with ceramic decals or raised letters saying "Pyrex," "Kimex," or "Duran" are exactly what they say they are.* Pipettes from Kimble may be identified as "Kimex-51®" and are not the same as Kimble's common lab oratory borosilicate glass (KG 33). Pipettes from Corning use a lab glass called "Corex®," which is also different from Coming's common laboratory glass (7740). If a commercial container (as opposed to something custom made) doesn't have the words Pyrex or Kimex somehow attached to it, it is invariably made of soft glass.
Glassware that has bends and/or has been fused to other pieces of glass will be either common laboratory borosilicate glass or fused silica. Any soft glass made into laboratory apparatus is for special application or, more likely is very old (and ought to be in a museum).
Sighting Down the End of a Glass Tube or Rod (Nondestructive). Even though most glasses will look the same when observed from the side, looking at glass end-on will exaggerate the different colors inherent within the glass. Common laboratory borosilicate glass will typically show a soft pale blue or green shade of color. Soft glass (soda-lime) will typically exhibit a fuller deep blue. It is recommended that you obtain a 15- to 20-cm rod of each type of glass to keep on hand for use as comparison samples. Absolutely clear (water white) glass is high temperature fused silica or Vycor. By shining a deep UV (254 nm) lamp on the side of the glass and sighting down the end of the tube, Vycor will display a yellow/green or colorless fluorescence while fused quartz will be strong blue (do not stare directly at the UV light).
Matching the Index of Refraction (Nondestructive). To match the index of refraction for two or more glasses, obtain a liquid with the same index of refraction as one type of glass. When an unknown glass is put into the liquid, the glass will seem to disappear if it has the identical index of refraction. Two standard solutions for identifying Pyrex or Kimex glass (their refractive index is 1.474) are:
1)
16 parts methyl alcohol
84 parts benzene
and,
2)
59 parts carbon tetrachloride
41 parts benzene.
The major problem with both of these solutions is their toxicity. The first solution should only be used in a fume hood, and the second is so toxic that it should not be used at all. An alternative solution, albeit a bit messier, is common kitchen corn oil. It does not match the index of refraction as closely as do the two solutions mentioned above, but it does the job and is safe to use. The corn oil can be removed with soap and water.
FIG. 3 Step process for using linear expansion to separate glass types.
Checking the Sodium Content of the Glass (Semi-destructive). Take the bottom unglazed side of a white ceramic tile and evaporate onto it a small quantity of a phenolphthalein-ethanol solution. To test a piece of glassware, drip a little water onto the plate and draw a line across it with the glassware. The action will lightly scratch the surface, so choose a non-significant spot. By scratching the surface, the alkalis of a soda-lime glass will be exposed to the phenolphthalein solution and a pink line will form across the plate. Borosilicate glass may exhibit a minor color change across the plate, but when compared to known soda-lime glass it is fairly easy to distinguish between the two. The plate can be reused repeatedly.
Using Linear Expansion (Destructive).This techniques requires that the end of known glass be fused to the end of an unknown glass (with a gas-oxygen torch). While still hot and soft, the glass is taken out of the flame and the ends are squeezed together with a pair of tweezers. This union is then placed back in the flame and reheated until it is soft again. It is then removed from the flame and, while still soft, the end is taken in the tweezers, and pulled out to a thread about 10-15 cm long (FIG. 3). When the glass hardens, fire-cut off the end piece held in the tweezers. If the glass curls off to one side, the glasses are of different com position and have a different thermal coefficients of expansion (see Table 3). In FIG. 3, the final step (showing the glass bending off to the right) indicates that the glass on the right expanded more while heated, but was originally at the same length as the glass on the left. Then during cooling, it contracted (a greater amount) and pulled the left side over to the right as well. Incidentally, if one of the two glasses resists melting and emits a very bright white light (not sodium yellow) while being heated, it is very likely a high temperature-fused silica, and no further identification techniques are required. If it does exhibit a bright white light, do not pursue heating as the emitted light is high in UV and can potentially damage eyes.
1.8 Physical Properties of Glass and Mechanisms of Glass Fracture
Glass is one of the strongest materials on earth. This statement is a seemingly bizarre one to make concerning a material generally known for its fragility. Surprisingly, freshly drawn, water-free glass can exhibit strengths of over 1,500,000 psi (pounds per square inch). However, once its surface has been hydrated and the uniformity of that surface has been broken [i.e., by a flaw (scratch)], its potential strength can decrease dramatically.
[Newly formed glass has high surface energy. Adsorption of water into the surface of the glass facilitates the lowering of this energy. Water contamination on, and in, a glass surface weakens the tensile strength of that item. The amount of water which potentially may be adsorbed depends on the type of glass and relative atmospheric humidity. For example, soda-lime glass may adsorb water in as deep as several hundred molecules at 75% relative humidity. Common laboratory borosilicate glass may hydrate to between 50 and 100 molecules of depth, and fused silica may exhibit 10 to 50 molecules of depth of adsorbed water (at 75% relative humidity). The only mechanisms to dry glass are high heat (approximately 400°C) or a combination of high heat and high vacuum. Because much of chemistry is wet chemistry or is done in the ambient atmosphere (which has an inherent amount of humidity), it is neither practical nor relevant to try to duplicate the theoretical strength limits of dry glass. For some lamp manufacturing and most high vacuum work, these theoretical limits are relevant, but beyond the scope of this guide. Although this text may refer to wet or dry glass, no one is expecting anyone to try to "dry" their glassware.]
Glass is perfectly elastic until failure. That is, no matter how little or how much you flex glass, it will always return to its original shape when flexed at room temperatures. If a glass is flexed in the region of a flaw, it will flex until it breaks (fails). On the other hand, metals (even spring metals) can remember a new shape or position if flexed beyond a certain point. This quality is true for tangential as well as axial rotations. However, unlike metals, glass gives no indication that it is about to break, nor does glass provide any indication of where it is receiving stress (for example, glass does not begin to fold prior to fracture).
Once flexed beyond a given point, glass breaks. The amount of flexure required to achieve that given point is dependent the nature of the flaws in the region being flexed. Glass can only be broken if two conditions are present: flaw and stress (more specifically, the stress of tension, not compression). Because glass is perfectly elastic until the point of failure, the location of the failure will occur at the most susceptible flaw. This property is a sort of weak-link principle: Glass under tension will break at the weakest link, which, by definition, is its most vulnerable flaw.
Tests demonstrate that a one-quarter-inch-thick piece of glass that has received normal handling can withstand pressures of 6000 psi. Sandblasting the surface to provide large numbers of flaws drops the potential strength to some 2000 psi. However, if a fresh surface is acid-polished and then coated with lacquer (to prevent further abrasion by handling and to limit water content), strengths of up to 250,000 psi have been achieved.
Despite its tremendous strength, glass can be fairly easy to abrade. On the Mohs' scale of hardness, glass is between #5 (apatite) and #7 (quartz). So, glass can scratch materials with lower numbers (for example, copper, aluminum, and talc). Likewise, glass can be scratched by materials that have higher numbers (for example, sand, hard steel, and diamond).
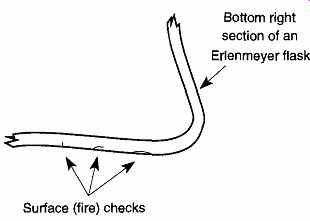
FIG. 4 Surface (fire) checks caused by placing hot glass on a cold surface.
[An exception to this statement would be viewing glass through polarized light, which provides excellent visualization of strains within glass. However, this requires special equipment (polaricope), and the glassware must be in a particular orientation with respect to the equipment.
A ten-scale division of geologic minerals used by geologists to help type rocks, with talc as #1 and diamond as #10.]
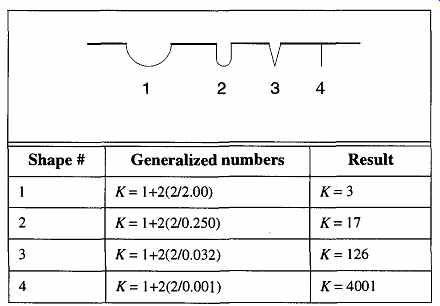
Table 3 Samples of Stress Concentration Factors
We know that diamond can scratch glass, but so can hard metals such as the hardened steel of a file or a tungsten-carbide glass knife. A beaker that is slid or rolled across a dirty benchtop can be scratched by dirt particles. Also, glass can scratch glass. Because glass is often stored with other glass, it is constantly being scratched and abraded. A sharp surface is not necessary for glass to rub and cause flaws on the surface of other glass.
Another type of flaw that can develop on glass is a surface check. These flaws are micro- or macroscopic cracks that lie just on the surface of the glass. They can be caused by laying a very hot glass item on a cold surface. For example, taking a glass item from a hot plate and laying it on a benchtop can cause surface checks.
In addition, surface checks can also be caused by brushing a hot gas-oxygen torch flame across a glass surface. The thicker the glass, the more likely surface checks may develop. Surface checks can aim straight into the glass, curve into the surface, or even curve back out to form a scallop-like crack (see FIG. 4).
Thus, when a glass item has slid across benches, rubbed against other pieces of glass, or has had incidental radical changes of temperature, it is soon covered with flaws. Most of these flaws are microscopic, but any one of them could result in glass failure when subjected to sufficient stress.
The depth of a flaw is not as critical as is the ratio of the depth over the radius at the root (base) of the flaw. An equation indicating the relative degree of stress based on this ratio is given in Eq. (eqn. 1) and provides the stress concentration factor, "KT The greater the value of K, the less stress is required to break the glass.
When K is equal to 3, the depression can be considered not a flaw and is as strong as the surrounding glass.

(eqn. 1)
where A = depth of flaw
B = radius of the flaw at its root
Note that K, A, and B are dimensionless. The only criterion is that A and B be in the same measurement units. Some sample calculations using Eq. (eqn. 1) can be seen in Table 3.
Glass can be broken at a specified location by creating a flaw where the break is desired and then applying stress (tension) to that flaw. However, an improperly made flaw can easily result in a flaw of undesirable quality. For example, an inexperienced flat glass cutter will take a wheeled glass knife, aggressively bear down on the glass, and push the cutter back and forth several times. While a single scratch could have broken cleanly and easily, the repeated scratches create a heavy, round bottom groove with many side fissures. The resulting crack is likely to drift off to the side and not follow the heavily gouged crevasse. Alternatively, an inexperienced glass rod and tube cutter will take a triangular file and (again) bear down on the glass and saw the file back and forth for a "real good scratch." Unfortunately, the nicely rounded fissure will also not break easily. The extra force required to break the heavily gouged flaw is likely to cause the glass to break into many fragments, creating a serious risk of injury.
The key to successful glass breaking is a thin, deep scratch. However, you do not achieve effective depth by excessive force or repeated scratching. To cut a soda-lime flat glass pane, you must maintain a firm pressure on a rotating wheel cutter and make a single continuous scratch toward you. Using a yardstick or meter stick as a straight line guide is recommended. If you bear down extra hard on any part of the swipe, you are likely to create side fissures that may cause the crack to sweep off to one side. The same technique applies to borosilicate flat glass, although more pressure will have to be exerted to achieve the same depth of flaw. Regardless, it is important to maintain even pressure throughout and to make only a single stroke.
Although not as effective as a tungsten-carbide glass knife blade, a triangular file can be used on glass tubing. The trick is to make a single, fast swipe of the file toward you and not to saw back and forth. In addition, the sharper the file's edge, the narrower the scratch. One way to ensure a sharp edge on the file is to use a grinding wheel to remove one face of the file (see FIG. 5). During the grinding process, constantly lower the file into a water bucket to cool the metal. If the file gets too hot, it will turn a bluish color, indicating that the file has lost its temper and will dull faster.
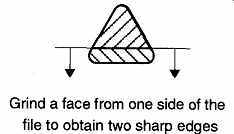
FIG. 5 Altering a triangular file for more efficient glass cutting. Grind
a face from one side of the file to obtain two sharp edges.
It has been well demonstrated since the 1940s that glass breaks more easily if wet with water than if dry. Dry glass is stronger than wet glass (by 20%), and glass in a vacuum is stronger still (250%). Many have observed a glassblower or glazier wet a scratch with spit or water to facilitate the breakage. It has been also shown that not any liquid suffices in fracture assistance as was shown by Moorthy and Tooley as they tested a variety of organic liquids on flawed glass. Seventeen different organic liquids were tested on flawed glass, and only nitrobenzene effectively facilitated glass failure to a greater extent than water.
The best mechanism currently explaining this phenomenon is presented by Michalske and Freidman, whose model suggests that at the crack tip, when there is strain at the bond between a silicon and a oxygen atom, a Lewis acid is created on the silicon while a Lewis base is created on the oxygen. In the environment of water, one hydrogen (from the water) links to a free oxygen, forming a hydroxyl group; the remaining hydroxyl (from the water) joins the free silicon. This process continues to facilitate rupture of the glass. If presented with other liquids with appropriate bond capabilities, such as ammonia, hydrazine, or formamide, equal facilitated rupture ensues.
The molecular dissolution of glass at the crack tip presents both how liquids such as water facilitate glass failure at time of stress and how, over time, water can weaken the surface of glass.
1.9 Stress in Glass
There are two different mechanisms that produce stress (or strain) in glass: physical and thermal. Either of these can cause a distortion of a glass surface that will create compression and tension at one or more points. If sufficient tension develops in the region of a flaw, the glass will fracture.
Physical stress is easy to understand because we can feel, observe, or relate to the events that develop physical stresses. Pulling hard on a plastic tube attached to a hose connection, bending glass, and watching an item fall to the floor are all easily understood (or observed) physical stresses.
When using glass, we want to reduce the amount of physical stress placed on the glass. Anything we do that limits any overt bending and twisting on glass is important. The key phrases here are reduce the lever arm and/or eliminate the resistance. The smaller the lever arm, the less torque and therefore the less stress you place on the glass. Equally important, when sliding or rotating glass against other objects, use a lubricant to limit torque.
Examples of these limitations would be:
1. When placing a glass tube into a stopper, be sure the glass tube and the hole are lubricated with glycerin, water, or soapy water to reduce friction. Never hold the glass tube more than two to four (tube) diameters from the rubber stopper to reduce the lever arm. Always wear leather gloves.
2. When removing a plastic or rubber hose from a glass hose connection, do not try to pull the hose off in one piece. Cut the plastic or rubber hose off with a razor blade to avoid torque.
3. When rotating a stopcock that is free-standing (i.e., one end of the stop cock is attached to glassware and the other is neither attached to another part of the same apparatus nor supported by a clamp), eliminate the lever arm by holding the stopcock with one hand and rotating the plug with the other hand. If the plug requires grease, be sure to clean and change the stopcock grease at regular intervals. Old grease is harder to rotate and creates more torque when rotated, and silicon grease needs to be changed every couple of months. Be sure to use stopcock grease and not joint grease: Greases made for stopcocks have more lateral "slip" than do joint greases, and therefore they develop less torque when rotated.
4. In assembling and disassembling distillation apparatus (typically com posed of sections of varying lengths, curved pieces, and pieces of different shapes connected by joints with no lateral movement), tremendous torque can be created when the piece is secured by sup port clamps. Use caution and common sense when attaching and tightening support clamps so as not to torque pieces toward or away from each other. An additional problem involves joints, or stopcocks, which have become frozen because either distillation solvents have stripped them of grease, or improper cleaning has left dirt on joint or stopcock members. Tremendous torque can be created when trying to disassemble stuck joints and stopcocks on a distillation assembly.
Prevention of stuck joints and stopcocks is achieved by selecting greases that will not be affected by the solvents used and/or by using Teflon sleeves (these sleeves are excellent because they cannot be affected by most solvents). Always be sure that joint members and stopcocks are clean and dust-free. Wipe both members with acetone on a Kimwipe before applying grease or Teflon sleeves and assembling the joint or stopcock. (See Sec. 3.3.7 for more suggestions on how to free stuck stopcocks and joints.) In summary, limit physical abrasion to glassware, reduce the lever arm, and pro vide adequate lubrication to moving items. Your foresight will reduce glass break age.
Fracturing glass at the site of a flaw is based entirely on the amount of tensile stress (or deformation) at a specific location, rather than on the amount of stress the glass was put under to achieve that level of tensile stress. More stress must be placed on thick glass than on thin glass to achieve a given amount of flexing (and resultant tensile stress on the surface). In other words, thick glass is physically stronger than thin glass because it is harder to flex. Unfortunately, the risk of bro ken glass in the lab cannot be resolved by making all glass thick because of thermal stresses.
Thermal stresses are more difficult to imagine than physical stresses, but we can observe what causes them anytime we look at a liquid thermometer. When materials get hot, they expand. When glassware becomes uniformly hot, it expands uniformly. When glassware becomes nonuniformly hot (above its strain point), there is uneven expansion of the glass. The regions between the uneven expansion will develop strain; and the strain will remain if the glass was heated past the strain point, even after the glass has cooled. This strain can be great enough to cause fracture if there is a flaw in the region of the strain. We've all seen the effects of thermal stress when we've poured a hot liquid (i.e., freshly brewed tea) on ice cubes. The warmer exterior of the cube expands faster than the cooler interior, and trapped air bubbles provide the flaw that causes the ice to fracture.
Different materials expand at different rates when heated. Different types of the same materials can have different rates of expansion as well. Thus, different types of glass have radically different expansion properties. The measure of the rate of expansion of materials is the thermal coefficient of expansion stated in delta cm/cm/°C. Because the thermal coefficient of expansion of any material varies as the temperature varies, the thermal coefficient of expansion that is attributed to any particular glass is based on an average of the expansion figures compiled from a 0-300°C range. Table 2 includes the thermal coefficients of expansion for a variety of glasses.
The larger the thermal coefficient of expansion number, the less radical a temperature change the glass can withstand and vice versa. However, a thin piece of glass with a high thermal coefficient of expansion will be able to withstand a more radical temperature change than a very thick piece of glass with the same or lower thermal coefficient of expansion.
We see the effects of a high thermal coefficient of expansion when we pour boiling water in a cold drinking glass: the glass breaks. We see the effects of a low thermal coefficient of expansion when we take quartz glass at melting temperatures and plunge it into ice water with no problems. Telescope mirrors are made out of materials such as quartz glass because they do not distort with changes of temperature to the degree that glasses of higher thermal coefficients of expansion will.
1.10 Managing Thermal and Physical Stress in the Laboratory
Glassware manufacturers must determine whether an item is more likely to be used in a physically stressing environment or in a thermally stressing environment. For use in a more physically stressing situation, glass must be made thicker to achieve physical strength, and for use in a more thermally stressing situation, glass must be made thinner to achieve thermal strength. It is not possible to make glass optimally strong for both physically and thermally stressful environments: A compromise must always be struck.
We see very thick glass used for kitchenware such as measuring cups and bake ware. Kitchenware receives minimal heat stress (baking is a slow heating process and therefore is not a thermally stressing activity) and is more likely to receive physical stress as it is banged around in cupboards and drawers or nested within other kitchenware. A glass coffee pot, however, is expected to withstand rapid heat changes (and is not generally stacked or banged against other objects) and is therefore made out of thinner glass. Kitchenware and coffee pots are made from exactly the same type of glass (common laboratory borosilicate glass), but are designed to withstand radically different types of stress.
We also see thick and thin glass in the laboratory. Because their concave bottoms could not otherwise withstand the force of a vacuum, filter flasks are made of thick glass. However, do not place a filter flask on a heating plate-it cannot tolerate the (heat) stress. The standard Erlenmeyer, by comparison, is thin-walled, designed to withstand thermal stress. However, a standard Erlenmeyer flask can not tolerate the physical stresses of a vacuum: The flask's concave bottom will flex (stress) and is likely to implode in regions of flaws.
The shape of glassware can be a clue as to how and/or where it can be used. The more rounded its corners, the better it can diffuse thermal stress. This idea is similar in concept to the sharpness of flaws and can be compared to Eq. (eqn. 1), the stress concentration factor. Although that equation is intended to be used for surface flaws on glass, the principle is the same.
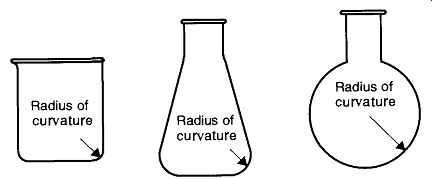
FIG. 6 The radius of curvature on the bottom of a container is smallest
on the beaker, greater on the Erlenmeyer, and largest on the round-bottom
flask.
The three most frequently used laboratory containers are the beaker, the Erlenmeyer, and the round-bottom flasks. Their shapes, radii of curvature of their bases (see FIG. 6), and functions are all different. If you measure the radii of curvature at the bases of 250-ml beakers, Erlenmeyer flasks, and round-bottom flasks, you will find that they are approximately 6 mm, 12 mm, and 42 mm, respectively.
Because the bottom of a beaker is essentially a right angle, as the bottom expands, when subjected to heat, the walls receive stress at right angles. There is little, if any, means to diffuse the stress. Because the Erlenmeyer has a larger curvature on its base corners, it can diffuse thermal stress, but only to a limited degree. Because the round-bottom flask is all curvature, it is best suited for diffusing thermal stress. If you are using a Bunsen burner flame as a heat source, the safest heating vessel to use is clearly a round-bottom flask. If you must use an Erlenmeyer flask or beaker, you can diffuse the intensity of the flame by placing a wire square between it and the container (a hot plate, on the other hand, is not a direct heat source and therefore is a safer heat source for an Erlenmeyer flask or a beaker).
Before heating glass apparatus, be sure to:
1. Examine the surface of the glassware for obvious flaws that may cause fracture when heated.
2. Heat only borosilicate or fused silicate ware. Never heat a soft glass container.
3. Try to avoid using flat-bottom containers such as beakers or Erlenmeyer flasks.
4. Preferably, avoid using a direct flame. An open flame has inherent dangers (i.e., can ignite reactant gases and other materials that come in contact with the flame) that electrical and steam heating do not have.
The use of boiling chips is, and should be, standard practice when heating flu ids. However, careless placement of boiling chips in a container can severely reduce the life span of the container. Never dump boiling chips into an empty glass container. Boiling chips have sharp edges that can scratch glass. By placing your liquid solution into the container before introducing boiling chips, you pre vent the boiling chips from a free fall landing on the bottom of the glass. This practice can decrease the potential wear (i.e., flaws) that boiling chips could other wise inflict on the surface of the glass.
Liquid will not provide adequate lubrication or protection against the scraping of a glass rod across the bottom of a glass container. Glass rods are often used for mixing, creating bubbles (boiling), or scraping material from the sides of a container. All three objectives can be met with a rubber policeman or a wood or plastic stirring rod, both of which cause no damage to the inside surface of the container.
Heating is usually only half the story. After you have heated the material in a container, there is the problem of what to do with the container while it cools. A radical drop in temperature can be as damaging as a radical rise in temperature.
Never heat or rest a round-bottom flask on a non-cushioned metal support ring.
The metal may scratch the glass (providing flaws) or provide pressure (causing strain) and/or radical temperature changes (providing stress). For the round-bottom flask, a cork ring provides a safe stand and avoids radical temperature change.
Similarly, never place a hot beaker or Erlenmeyer flask on a cold lab bench surface. Always place such a container on a wire gauze square or other "trivet" type of resting place.
Finally, do not let the liquids within the container boil off. The liquids prevent the glass from getting any hotter than the boiling temperature of the liquid. By let ting the liquid boil off, the glass can be heated beyond the strain point, rendering the glassware potentially dangerous with inherent strain. The only way to verify whether strain developed in the glassware is with a polariscope (see footnote on page 36), and if there is strain, the only way to remove the strain is by annealing.
Options for dealing with strained glass is below.
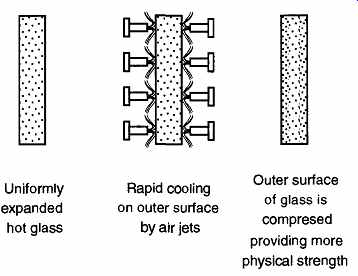
FIG. 7 Production of tempered glass.
1.11 Tempered Glass
It is possible to use thermal stress to physically strengthen glass by processes known as tempering glass and heat-strengthening glass. Both processes depend on rapid cooling to produce strain within the glass. The difference between the two depends on the initial temperature before cooling.
Both tempering and heat-strengthening use the two specific properties of glass; that is, they (a) expand when heated and (b) are a poor conductor of heat. Tempered glass is heated near its softening point and then rapidly chilled by blowing cold air on the surface (see FIG. 7). The technique for heat-strengthening glass is similar to tempering glass, but the glass is not preheated as high and the cooling rates are slower.
Regardless of the strengthening technique, the rapid chilling contracts the surface glass. However, the slow heat conduction of glass prevents the inside glass from cooling at the same rate. In time, the inner glass cools and contracts, which causes tension on the inside of the glass and compression on the outside. Because it is not very likely for there to be flaws on the inside of the glass, this situation demonstrates "safe" tension.
To break tempered or heat-strengthened glass requires the placement of stress on the surface that is greater than the thousands of pounds per square inch of compression created by the strengthening process. That is why these glasses are so physically strong. The surface compression of heat-strengthened glass is between 3000 and 10,000 lb/in.^2. The surface compression of tempered glass is greater than 10,000 lb/in.^2.
Tempering glass is only viable for physically strengthening moderate- to heavy walled glass. It cannot be used to strengthen thin glass because the internal regions cool too fast, preventing the compression and tension forces to develop. In addition, tempered glass cannot be used in high thermal environments because the constant heating and cooling cycles would eventually untemper the glass.
Tempering and heat-strengthening glass decrease its flexibility as well as increase its ability to resist impact abrasion. Heat-tempered or heat-strengthened glass cannot be cut once it is tempered. However, both types of glass-strengthening processes can be reversed by simply annealing the glass. Once the strengthening has been reversed, the glass can be cut in any normal fashion.
If you have a pair of polarized sunglasses, you are likely to have seen the effects of tempered glass on rear and side windows of cars. The telltale white or gray spot array pattern is an indication of where the cold air jets were located (see FIG. 8).
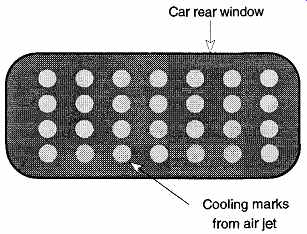
FIG. 8 The telltale signs of "cooling" marks indicating tempered
glass.
There are other techniques used to temper glass. One technique is called ion exchange. In this process, glass is "boiled," or soaked, in liquid potassium, during which the surface sodium ions exchange places with the potassium ions. The potassium atom is larger than the sodium atom, so during ion exchange the potassium must "squeeze" itself into positions that formerly held the sodium. This exchange produces the same compression effect on the glass surface as rapid cooling. Although it is a more expensive process, ion exchange tempering produces a more uniform compressed surface than the air jet process. In addition, the ion exchange process can temper much thinner pieces of glass than using a heat approach. Ion-exchanged tempered glass cannot be untempered by annealing the glass as with heat-tempered glass. When glass catalogs mention that all (or part) of a piece of glassware is strengthened (like the tip of a burette), it is typically done by blowing cold air on hot glass, and not by ion exchange.
[The front windshield of a car is not tempered. Rather, there is a piece of plastic sandwiched by two pieces of glass. This prevent, pieces of glass from flying into the driver's face, and it maintains visibility because broken tempered glass is difficult to see through.]
Although both heat and ion tempering both successfully strengthen glass, heat strengthening and ion tempering do not satisfy either ANSI or federal specifications for safety glazing.
A third technique to produce tempered ware uses two glasses (or ceramics) formed together (laminated), each with different thermal coefficient of expansion.
This is used to make Correll® dishes by Corning. For this tableware, a pyroceramic* material with one type of thermal coefficient of expansion is covered with another pyroceramic with a greater thermal coefficient of expansion and is then baked until the outer layer melts uniformly. Materials with greater thermal coefficients of expansion will expand more when heated and will contract more when cooled. The greater contraction (once cooled) of the outside material causes compression.
1.12 Glass and Internal Pressure
Because tubing walls on a vacuum system are in compression, vacuum systems do not require heavy walled glass. On the other hand, pressure on the inside of a tube creates tension on the walls of the tube. If the tension is great enough, the tube will explode from internal pressure. The strength of tubing to withstand a given amount of pressure is called its bursting strength. To increase the bursting strength and withstand internal pressure requires heavy-wall or small-diameter tubing. This requirement is based on the ratio of the diameter of the tubing to the wall thickness. For example, 2-mm tubing has an inside diameter of 1.0 mm. For 100-mm tubing to have the same percentage wall thickness, it would need an internal diameter of 50 mm. Standard 100-mm wall tubing has an inside diameter of 95.2 mm.
Wall thickness is not the only factor that determines the potential bursting strength of tubing. Glass strength is also based on surface quality and preexistent strains. Either of these properties can significantly jeopardize the theoretical bursting strength of tubing.
The quality of the surface is based on the amount and degree of surface flaws.
Obviously, abusive handling of glassware can cause flaws, but so can normal glass handling, such as laying a piece of glass on a table or against other glass. Any visible surface markings can significantly decrease the potential strength of a glass, but not all flaws are readily visible.
A preexistent strain is any stress within the tubing prior to receiving internal pressure. These flaws can come from poor-quality annealing (thermal strain) or torquing the glass during assembly (physical strain). The extent to which flaws and inherent strain will affect a glass's bursting strength cannot be predetermined.
[
A pyroceramic material is a special type of glass that has been devitrified by controlled nucleation of crystals. It has certain properties that are like glass and other properties that are like ceramics.
Standard round tubing, not square, flat, or distorted walls.
]
Therefore, any calculations determining bursting strength must have built-in safety tolerances to account for the unknown.
The glass industry assumes that new tubing, with no observable flaws, can with stand stresses of up to 4800 psi. It has been calculated that the maximum amount of stress applied to lightly used glassware should not be greater than 1920 psi.
However, typical laboratory glass receives a great amount of surface abuse, so an even greater safety factor should be considered. Unstrained laboratory glassware should not receive stress greater than 960 psi. If preexisting stress in the glassware is considered as a safety factor, the tolerable stress should again be lowered to 750 psi.
Despite such a large safety factor, any pressurization of glassware should be done behind a safety shield. In addition, glassware should be wrapped in a threaded tape such as cloth surgical tape or fibered packaging tape. Both of these tapes lose their adhesive ability and strength as they age, so periodically check the quality of the wrap. The tape serves an additional function by protecting the surface from abrasion which could weaken it. Masking tape is not satisfactory for either purpose and should not be used.
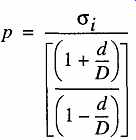
To calculate the tangential or hoop* strength, Shand offers Eq. (eqn. 2). When stress created by internal pressure is greater than the strength of the tubing (based on the location of a potentially susceptible flaw), the tubing will fail (break).

(eqn. 2)
where σa = average stress (psi)
p = pressure
d = inside diameter
D = outside diameter.
Unfortunately, this simple equation is only good when a tubing's wall thickness is 5% or less of the total outside diameter, thus omitting most of the tubing found in a laboratory. Shand offers the somewhat more complicated equation for calculating the hoop strength for all sizes of laboratory tubing:

(eqn. 3)
[The area around the circumference of the tube is called the hoop, similar in concept to the hoop surrounding a wooden wine barrel.]
The average stress (da) is the amount of stress that the system is receiving with any given tubing dimensions and under the pressure loads provided. The internal stress (a,) is the amount of stress placed on the internal wall by any pressure on the inside of the glass.
If Eq. (eqn. 4) is solved for pressure and we substitute for c; the allowable bursting pressure of 750 psi, we can calculate the acceptable pressure limits for commercially available tubing.
(eqn. 4)
As an example of safe pressure limits of a standard commercial tubing, consider one-half-inch tubing and let O = 750 psi. Standard wall tubing can withstand a pressure of 173.1 psi, one-half-inch medium wall tubing can withstand pressures of 268.3 psi, and one-half-inch heavy wall tubing can withstand pressures of 420.4 psi.
Shand
also provides Eq. (eqn. 5) for flat plates.
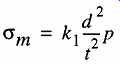
(eqn. 5)
where Gm = maximum stress kY = stress concentration factor (when edges are free, kl = 0.3025, and when edges are clamped, kl = 0.1875) d = diameter t = thickness of plate This equation can also be used on rectangular plates by substituting the narrow dimension of a rectangle for d.
WARNING: Observation of a flaw on the surface of, or within, a piece of glass that is to be used in any pressure situation warrants discarding that piece and replacing it with a new, flawless piece.
[ Medium and heavy wall tubing were originally measured in English measurements and now use the metric equivalent. Standard wall tubing has always been measured in metric measurements.
Because there is no one-half-inch standard wall tubing, 12-mm tubing was used for this example.]
1.13 Limiting Broken Glass in the Lab
If you work with glass in a laboratory, you will break glass. Accidents happen.
However, by limiting the causes, you can dramatically decrease the incidents of breakage. First, limit abrasion of glass surfaces. This precaution can be taken by limiting the amount that glass may roll, slide, and/or bounce into other glass. Similarly, try to prevent, limit, or control the amount of contact with other hard surfaces such as metals and ceramics (including boiling chips).
The second level of defense against glass breakage is to limit stress. For instance, physical stress can be limited by shortening the lever arm and providing proper lubrication. Thermal stress can be limited by selecting appropriately thin walled glass and/or selecting glass with an appropriate thermal coefficient of expansion. In addition, limit the amount that glassware is subjected to radical temperature changes.
Despite the fact that common laboratory borosilicate glass is capable of with standing high-heat conditions, laboratory containers should never be left empty on a heat source. Although this oversight is not made intentionally, it can occur if, for example, a boiling solution is left unattended. The liquid in the container performs an important heat sink function without which the heated glass may achieve temperatures sufficient to cause thermal strains. There are three options for dealing with a glass container left empty on a heat source:
1. Play it safe and throw the item away. Although this option may seem wasteful, it is the safest thing you can do if you have no other means to verify safety or eliminate possible strain (see point #3).
2. Examine the glass with a polariscope to look for strain. If no strain is evident, the item should be safe to use. If strain is evident and you have no means to relieve the strain, throw the item away.
3. If strain in the glassware is evident, or if you cannot verify whether strain is present, oven anneal the entire item by bringing it to a temperature of 560°C and holding it at that temperature for 15 minutes.
Then slowly (> 4 hours) let the temperature drop to room tempera ture.
[
A polariscope is an optical device which shines a light through two polarizing filters. The filters are crossed, which prevents all light from passing except the rays that are aimed straight at the viewer. If a glass object with no strain is placed between the filters, light passes through with no deflection. If the glass object has strain, the specific strain regions deflect and twist the light so it passes through the second filter in a different orientation than light which has not passed through strain. Regions of strain in glassware are therefore easily observed as changes in light intensity or 29 color (if the polariscope is adapted for color).
]
Of the three options, the second and third are limited by available equipment.
Without a polariscope and/or glass annealing oven, you cannot do them. If you do not have this equipment, play it safe and use the first option.