AMAZON multi-meters discounts AMAZON oscilloscope discounts
<< cont. from part 2
4.6 Balance Reading
Consider the following scenario: Many people each make one reading on the same balance, using the same weight for each reading. All readings are within one-hundredth of a gram except that of one user, whose reading was one-tenth of a gram off. It is safe to assume that the user does not know how to use, or read, that particular balance or how to make an accurate weighing on any balance.
Either way, this user needs some help in balance use.
To best examine a person's ability to use a balance, have him or her make multiple weighings (e.g., 10 times) using the same balance and weight. If he or she consistently makes the same type of error, the readings will have very little variation. If he or she makes a variety of random errors, the readings will vary with no consistent pattern or be caused by not preventing the effects of electrostatic forces (see Rule 11 below).
It is impossible to provide instruction for all types of balances in a guide such as this one. However, it is possible to provide simple, generic, general rules for the operation of a balance. These general guidelines for balance operation are the same regardless of the specific type of balance:
1. Never force a lever, pan, door, or other part of a balance. If balance parts do not move smoothly and easily, there is probably a reason, and brute force will not be the cure.
2. Never drop a weight or a sample, or let one fall on any part of the balance (for that matter, do not drop a weight or sample at any time).
3. Never handle a calibration weight with your fingers. Even if the tolerances you are working with are well above the limits for weighing a fingerprint, the oils from your skin could corrode the weights.
Besides, if you get in the habit of handling low-quality weights with your fingers, you are likely to continue the habit with high-quality weights.
4. Never handle an object to be weighed with your fingers when making analytical weighings, because your fingerprints will alter the weight. Use tongs or tweezers.
5. Never let a spill sit. Keep some paper towels within reach of a balance to help mop up any spill immediately. Such a spill may pose a health danger or could damage the balance.
6. Never place or remove a weight on a balance without first verifying that the pans or trays are in the arrested position-that is, the pan(s) are securely supported and cannot move. Otherwise the action could cause the blades to slip from their pivot points and/or damage the blades.
7. Never move, twist, or turn any part of the balance with a quick jerky motion. The balance is a delicate machine and such actions could cause the blades to slip from their pivot points and/or damage the blades.
8. Never place a powder or liquid directly on any part of the balance. Aside from the difficulty in completely removing the entire weighed sample, there is the danger of the material being corrosive to the balance pan, or the powder drifting off, or the liquid dripping off into the balance's mechanical sections. There should always be glass, a weighing pan, or weighing paper between the object and the balance.
9. Never rush. Allow time for the object to reach the balance room's ambient temperature. One way to verify such a temperature alignment is to put a comparable material and thermometer into a dummy vessel.
When the material in the dummy vessel reaches ambient temperature, the weighing sample is also likely to be at an acceptable temperature.
10. Never leave a single-pan balance without first setting the pan(s) to the arrested position, and then turning the weights back to zero. Other wise the constant pressure prematurely ages the balance's mechanical parts.
11. Never weigh objects (particularly powders or granules) if the air is dry (<40% relative humidity), and never use plastic containers.
12. Never take the calibration of a balance for granted. Likewise, the balance should be calibrated each time it is moved regardless of whether it was across the country, to a different building, or to a different table.
There are some interesting quirks as to why temperature (Rule 9) is important to weighings made on an analytical balance. Heat has some seemingly strange effects on the weight of an object. An object that is hot will weigh less than it does at room temperature due to (a) hot air rising and (b) pulling the weight and pan up with the current of air. It is also because hot materials have less adsorbed and absorbed water on them. Thus when you weigh a hot object, you are weighing the weight without any surface water. As an object cools off, water begins to attach to the surface of the object and "weigh it down." The actual significance of this water weight is generally ignored because it is too small for most purposes. Likewise, if a cool object is placed in a weighing chamber, the reverse occurs and the object will appear heavier than it really is. Because cold objects are likely to have water condense on the container's surfaces as well as on the object itself, the amount of collected water is very likely to have a significant effect on an object's measured weight.
Electrostatic problems (Rule 11) are likely to occur when atmospheric (relative) humidity is below 40%. If a container becomes positively (or negatively) charged and the weighing apparatus is likewise charged, they will repel each other and the object will appear heavier than it really is. Conversely, if the container and balance are oppositely charged, they will attract and the object will appear lighter than it really is. There are several ways to prevent this problem:
1. Use a humidifier to increase the humidity to between 45% and 60%,
2. Place weighing vessels in a metal container to screen electrostatic forces.
3. Use an appropriate weighing vessel (plastic is poor, glass is good, and metal is best) to avoid electrostatic forces.
4. Anti-static guns are commercially available, but they should not be relied on.
5. The balance is likely to be grounded through the power cord's third wire. Therefore do not bypass this wire if using an extension cord. Be sure to use a three-wire extension cord and an appropriate wall socket.
Although the need to calibrate (see Rule 12) a balance that was moved to a different table is just to verify that nothing got misaligned, the changes in gravity forces of a balance moved cross-country can be significant. Likewise, a balance move in a vertical motion some 10 meters can show signs of mis-calibration. Aside from the need to recalibrate a balance to counter the effects of changing gravity, the wear and tear of moving balances should be enough reason to not move a balance any more than necessary.
4.7 The Spring Balance
A spring balance compares two different forces (gravitational attraction vs. tensile forces of the spring) to weigh an object. Assuming that the tensile forces of a spring balance remain constant, as any inertial forces (i.e., gravity) change, weight readings will change. A spring balance therefore is typically used to illustrate differences in weight when the gravitational effects of celestial bodies are compared.
A lever arm (pan) balance compares the same force and thereby cannot reflect changes in gravity.
Unfortunately, metal spring balances suffer from a variety of problems. For instance, the spring in a balance can suffer from hysteresis (extended beyond the point of resiliency, the spring cannot return back to its original position). In addition, very accurate spring balances need to be calibrated for changes in gravity depending on where on the Earth they are being used.
Perhaps the biggest problem with spring balances is that the linear motion of the spring is typically converted to some type of circular motion for reading the weight. Such gear reductions introduce friction, which decreases readability, precision, and accuracy. Linear spring balances, such as those used for weighing fish on a boat, also have built-in friction from the parts that rub on the scale face.
Despite their general lack of accuracy, their popularity is understandable. Their limited accuracy and reliability are more than sufficient, however, for the demands of grocery stores or bathroom scales. To use anything more complicated or expensive when the need is not justified is a waste of time and money.
There is an interesting story, from the gold rush days, about people taking advantage of the inaccuracies peculiar to the spring balance. As you go from the north or south pole toward the equator, the centrifugal force caused by the earth spinning increases, which counter-effects the force of gravity. In addition, the earth is somewhat oblate (due to centrifugal force) and the effects of gravity are somewhat less at the equator because the earth's surface is farther from the earth's center. Thus, using a spring balance, an object weighs less at the equator than it does at a pole. During the California gold rush, some people would purchase gold in California, using a spring balance for weight measurement, and sell the same gold in Alaska using the same balance. Because the gold weighed more in Alaska, it was worth more. Thus, a (good) living was made by buying and selling gold at the same price per ounce. Such a practice would not be possible with a two-pan balance.
Some highly accurate spring balances are typically made out of fused silica (quartz glass) and used in vacuum systems. The use of fused silica has two advantages. For one, the material is extremely nonreactive. Thus it is unlikely to corrode as a metal might when in contact with acids and/or oxidizers. In addition, glass is considered perfectly elastic until the point of failure. Thus, there are no hysteresis problems.
These balances simply are a hanging coil of fused silica with a glass basket on the bottom. An optical device with a calibrated vertical measurement system sights on a point on the glass basket. A calibrated weight is placed within the basket, and the optical device is moved down so the system can sight on the same point and the new calibration is noted. Several more weight measurements are made to verify linearity. By observing the amount of spring travel for a given amount of weight, very accurate measurements can be made. Unfortunately, the amount and type of supporting equipment for this type of spring balance are expensive.
4.8 The Lever Arm Balance
The lever arm balance compares the mass of an object to the mass of calibrated weights. There are two major types of lever arm balances. The equal arm balance [see FIG. 23(a)] works by directly comparing a known weight to an unknown weight, both of which are placed an equal distance from the fulcrum. Once in balance, there is a one-to-one ratio (of the weights) between the unknown and known weights. A well-made balance of this type is capable of high accuracy and precision. The disadvantage of this type of balance is that many standard weights are needed to provide the balance with its full range of weighing capabilities.
The unequal arm balance [see FIG. 23(b)] compares an unknown weight to the distance a known weight is to the fulcrum. When weighing an object, the further the balance weight is moved from the fulcrum, the heavier the object. The primary advantage of the unequal arm balance is that it needs only a limited number of calibrated weights. The disadvantage of this type of balance is that its accuracy is limited by how many divisions can accurately be defined between the units on the balance arm.
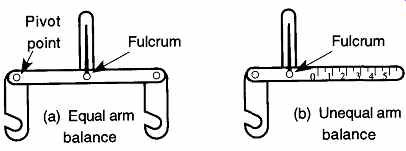
FIG. 23 Two basic lever arm designs.
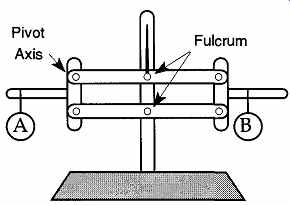
FIG. 24 The Roberval principle balance. From The National Bureau of Standards
Handbook 94, Figure 5, "The Examination of Weighing Equipment" by
M.W.
Jensen and R.W. Smith., U.S. Printing Office, 1965, p. 155. Reprinted courtesy of the national Institute of Standards and Technology, Technology Administration, U.S. Department of Commerce. Not copyrightable in the United States.
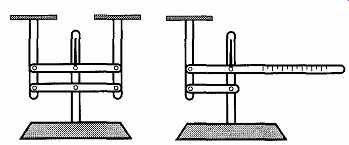
FIG. 25 Applications of the Roberval principle used with top loading balances.*
From The National Bureau of Standards Handbook 94, Figure 6, "The Examination
of Weighing Equipment" by M.W. Jensen and R.W. Smith, U.S. Printing
Office, 1965, p. 155. Reprinted courtesy of the national Institute of Standards
and Technology, Technology Administration, U.S. Department of Commerce.
Another problem of the equal arm balance is ensuring that the weight is directly under its pivot point. This alignment is important because the pivot point helps define how far the weight is from the fulcrum. As the unequal arm balance demonstrates, variations in the distance a weight is from the fulcrum can change its effective weight. In the 17th century, a mathematician named Roberval devised a balance arm that guaranteed that weights would act as if they were under the pivot point, regardless of how far they were placed from the fulcrum. The basic configuration of a balance utilizing the Roberval principle is shown in FIG. 24, and the Roberval principle used in equal and unequal style top-loading balance designs is shown in FIG. 25.
The advantage of the Roberval principle balance is that the placement of the weights has no effect on weight readings because the momentum of the weights is transferred to (and located at) the pivot axis. As far as the functions of the balance are concerned, the effective location of the weight is at the pivot axis regardless of its real location. The Roberval principle is used on all top-loading balances and many pan balances. The major drawback to this system is that it doubles the axis points and therefore doubles the friction on the system, which can reduce the balance's sensitivity.
The pivot axes of laboratory balances are not drawn correctly in either FIG. 24 or FIG. 25, but instead are either a knife edge or flexural pivot as shown in FIG. 26. The knife edge has the advantage of freedom of movement and no inherent restrictions. Its disadvantage is that its edge can wear or collect dust at its edge contact point. Either of these conditions causes friction, decreasing the accuracy and reliability of the balance. Static electricity can also reduce the freedom of movement of a knife edge.
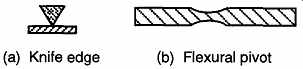
FIG. 26 Pivot axes.
The flexural pivot is free of the problems associated with the knife edge. How ever, it can act as a spring and therefore may add an extra force to the weighing process. This force may artificially subtract from an object's true mass and pro vide inaccurate readings. This effect may arise as a result of time or as tempera ture changes.* [The flexural pivot may become more or less stiff due to time and/or temperature.] Manufacturing design may decrease this effect, and it may also be compensated for in the electronics, especially when used in conjunction with servo-controlled balances.
4.9 Beam Balances
Beam balances fall into the unequal arm balance category. Generally, they are not capable of weighing very light objects (<0.1 g). They obtain greater precision by having a separate beam for each decade of weight capability (by splitting up the measurements on different beams, you obtain greater distance for each subdivision of weight. Otherwise, the gradations are closer together, making it more difficult to distinguish between them).
As seen in FIG. 27, the higher weight readings (the 100- and 10-unit beams) of a beam balance have notches at regular intervals, which forces the sliding weight to consistently land in the same spot each time the weight is moved to that location. This design helps ensure precision (repeatability) for those weight ranges as well. The 1.0-unit beam has no notches, which allows the user to slide the counter weight along the beam until the balance arm is in balance.
Before using a balance, be sure that it is level with the surface of the table.
Some beam balances have a built-in level for this purpose. Screw the legs of the balance until the balance is level. Balances that do not have built-in levels are not expected to have the accuracy of those requiring precision-leveling. Regardless, you should always level the balance as best you can by eye.
Before an object is weighed, the balance should first be nulled, or zeroed. This zeroing procedure is done with nothing on the balance pan and by placing all of the weights (on each beam) to their zero points. If the balance does not indicate "centered," rotate the balancing screw (on the pan side of the balance) as necessary to zero, or "balance" the balance. Balances that require you to complete (finish) the balance process with the beam in the same balanced (null) position at which you started are called null-type balances.
To weigh an object, place the unknown object on the center of the balance pan.
Move the heaviest weight over, a few notches at a time, until the beam side is heavier than the pan side. Move that weight back one notch, then take the next heaviest weight and slide it over, a few notches at a time, until the beam side is again heavier than the pan side. Move that weight back one notch. Repeat this process for all of the weights on notched beams.
The lightest-weight beam has no notches. Slide the counter-weight until the beam and pan are balanced. Reading the weights on the balance involves adding up the weights on the various beams. FIG. 27 shows the counter-weights on the three beams at "70," "8," and "0.76." Thus, the reading of this triple-beam balance is "78.76." After you complete a weighing and record the value in your log book, remove the object and return the counter-weights to their zero value.
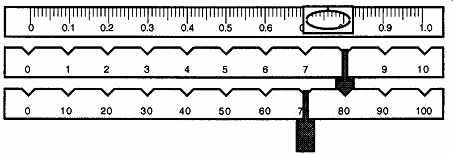
FIG. 27 The calibration readings of a three-beam balance.
4.10 Analytical Balances
Analytical balances are those of Class I and Class II (see Table 21) and require a division of the scale's capacity that is typically smaller than 10~5 of the total capacity with a readability of 0.1 \\g to 0.1 mg (10^- 7 to 10^-4 g). Analytical balances
have the greatest precision for the most demanding work. For many years, only a properlymade two-pan balance could achieve the precision required to obtain the required level of accuracy. Despite their accuracy, weighings made on two-pan balances were slow and inefficient. Eventually, technology improvements in single-pan balances brought them to meet and eventually exceed the capabilities of two-pan balances, yet maintain their speed and efficiency.
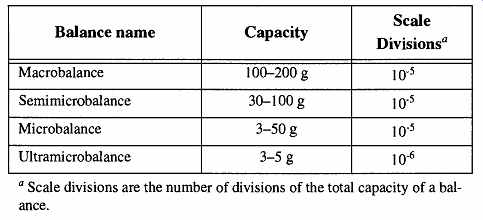
Table 23 Laboratory Analytical Balances
[It is unlikely that you will find the classic two-pan balance in use in laboratories. In a way this omission is a pity because they are typically beautifully-made instruments. For those of you who may still use them, I cannot fault you for your romantic actions. For those of you who are considering getting rid of one to make room, please do not. You do not need to use it, just keep it and let its beautiful construction remind you of the art that is possible in technology. Because of the rarity of two-pan balances in contemporary labs, there will be no discussion of their use or operation in this guide.]
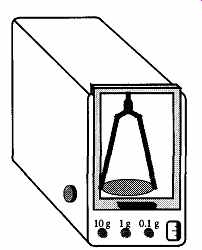
FIG. 28 The single pan balance.
As can be seen in Table 23, a balance that can read 5 grams to 4 decimal points is in the same class as a balance that can read 500 grams to 1 decimal point.
Thus, an analytical balance is not one that can read only small amounts to very small intervals, but is practically any balance that can read its capacity to very small intervals. The terms microbalance or semi-microbalance do not refer to the size of the calibrations, rather they refer to the capacity of the scale. In fact, an analytical balance can have a capacity as great as 50 kg so long as the scale divisions are smaller than 10^-5 of the total capacity. The names of the standard analytical balances used in the laboratory are shown in Table 23.
A single-pan balance (FIG. 28) is typically one in which all that the user sees is a single pan in a container with several knobs and levers on the front or sides.
There also will likely be some optical component that the user may see as a frosted screen or digital readout. There are four major types of single-pan balances: mechanical, mechanical with an optical deflector (for the smallest measurements), servomotor, and hybrids of mechanical (for larger weights) and servomotor (for smaller weights). Although you will still find the former two types of balances in laboratories, most of the balances currently in production today are of the latter two types.
Most of these balances will have either a magnetic or air damper, which arrests the free movement of the balance beam. This damper also allows the balance to come to a rest position much faster than otherwise possible. In addition, hybrid mechanical single-pan balances have a lever arm that can prevent, partially free, and completely free the balance beam's movement. This three-part varying restriction is important, for it protects the knife edge on which the balance beam rocks during gross, or rough, movement actions, yet it allows free and easy movement when final measurements are made. When objects are being placed on the pan, the lever should be in the fully arrested position to prevent any movement of the beam and protect the balance's mechanical parts. Partial movement of the balance beam allows safe addition and subtraction of heavier weights. Full motion of the balance beam is necessary when light (mg) weights or optics are used for final weighing.
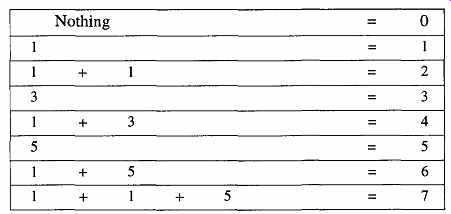
Table 24 The Addition of Weights From 0 to 10.
The mechanical aspect of these balances typically employs a crankshaft or rocker arm assembly that supports the weights. The weights are engaged or disengaged on the balance beam as the shaft is turned. Typically, only four weights per decade are required. An example of the weights necessary to go from 0 to 10 would be 1, 1, 3, and 5 (the 0 to 10 range as shown in Table 24). The selection of weights is handled internally by the crankshaft. The user simply rotates the dial until the proper deflection is noted on the balance's viewing screen.
The counterbalance weights within a single-pan balance are described as having an apparent mass. The term apparent mass is used because what you are reading is different from true mass due to the effects of air buoyancy. If corrections are made for air buoyancy, you have true mass. In more recently manufactured single-pan balances,* the apparent mass has been changed from 8.3909 g/cm^3 (brass) to the current 8.0 g/cm^3 (stainless steel). This change was made to better approximate the density of grade S weights. The density of the apparent mass used within a balance should be identified somewhere on the balance and/or in its literature. If you are using a balance with the older apparent mass and switch to a balance with the newer apparent mass, you would need to add a 0.0007% correction to the total weight. This correction is equivalent to 7 mg in 1 kilogram and is so significantly lower than the tolerance of most balances that the correction is not really necessary.
Regardless of whether a single-pan balance is completely mechanical or a hybrid, there are several advantages of the single-pan balance over the two-pan balance:
1. Because the weights are inaccessible to the user, there is no chance for the weights to be accidentally touched. Analytic balances are so sensitive that fingerprints, or corrosion from fingerprints, can alter the weight of analytic weights.
2. The single-pan balance can make use of optics and/or servomotors (see next section) to obtain the smallest weight measurements. By eliminating mechanical deflection of weights for the final part of the measurement process (such as a gold chain or rider 1), repeatability is substantially improved.
3. Single-pan balances typically have damping devices that help to minimize the free swinging of the lever arm. This device speeds the weighing process immensely over the time spent "counting swings" for two-pan balances.
There are many different brands and models of single-pan balances. Each has its own mechanism for weighing an object. As in all other lab equipment, the original manual, or a copy of the same for information on how to use the balance, should be readily available. Regardless, the general procedures are typically similar: The larger weights are invariably manipulated by dials for each decade of weight.
These dials are rotated until the appropriate weight is obtained or until the final weighing is complete.
Weighing an object on a single-pan balance typically involves first making sure that the balance is nulled. This procedure is done by setting all dials to "0," rotating the lever arm to the free arm position, and manually setting the servomotor or optical window to "0.00" to verify its "null" starting point. Once the balance is set, return the lever arm to the arrest position before placing the object to be weighed on the center of the pan, inside the door of the balance. For very sensitive weighing, do not handle the object with your bare hands. Select tongs that are sufficiently long so that your hands do not get into the weighing chamber area. Close the door and wait a few minutes to allow the internal sections of the balance to regain equilibrium for both drafts and temperature.
The weighing procedure is made by rotating the lever arm to the semi-release position. Slowly rotate the weight knobs from lighter to heavier. When the scale deflects, back up one weight calibration (for instance, if the scale deflects when the gram dial is rotated to "7," rotate the dial back to "6"). Continue the process for each weight dial until the final weight measurement is attained.
[A gold chain was used on one design of the single-pan balance. The gold chain was unwound onto the balance pan until the sample and internal weights balanced. The length of chain on the pan was directly equal to its proportional weight and therefore the length of chain was used to make the final measurement digit.
The rider is a sliding counterbalance that is used to make the final weight calibration on two-pan balances.]
It is not possible to specifically explain how to make the smallest weight division weighing for single-pan balances in a guide like this one because there are so many different ways it can be done depending on the brand or model of balance.
Regardless, the general procedure for a final measurement is made by rotating the arresting arm from the partial freedom position to the full freedom position. Then dial, turn, or observe the smallest weight division for the completed weight. Once the weight has been determined, return the arresting arm back to the full arrest position. Open the door and remove the object that was weighed. If there are any liquid or powder spills, clean them up immediately.