AMAZON multi-meters discounts AMAZON oscilloscope discounts
1. The Clean Laboratory
1.1 Basic Cleaning Concepts
Cleaning glassware is the bane of chemistry; what gets dirty must get cleaned.
Remember though, just because something looks clean does not mean it is clean.
If you do not know if glassware is clean, wash it. It is better to take the few extra minutes to be sure that something is clean than to spend hours on an experiment only to have contamination cause bizarre or inconsistent results. Attempting titrations with a base is futile if acid residues from a previous experiment were never properly cleaned from a burette. Worse, it's possible for unintended combinations of chemicals (and even water) to produce toxic fumes or explosions.
One common and simple test to determine the cleanliness of glassware is to examine how well water "wets" the glass. Water will bead up on the walls of dirty glassware, but on clean glass walls, it "sheets." This test by itself should not, how ever, be used as the sole criterion for clean glass.
Despite the aforementioned precautions, glassware needs to be only as clean as is required for the work being done. Over-cleaning, or incorrect cleaning, wastes time, equipment, and money. You need to know your chemistry as well as the equipment being used. For instance, acids can be catalysts for certain organic reactions, therefore the use of an acid as a final rinse of your glassware will help such a reaction. Conversely, using a base as a final rinse could prevent any reaction from taking place. In addition, higher precision instrumentation requires greater cleanliness. The glassware for an instrument that has the detection ability of 0.1 ppm does not have to be as clean as an instrument with the detection ability of 0.001 ppm.
Cleaning glassware is invariably a multistep process. If the contaminating material can be removed by soap and water, at least two more steps will be required: rinsing with water, followed by a distilled water rinse. If there is paniculate material on the glassware, it needs to be brushed or wiped off before other cleaning processes begin. Similarly, organic solvents are used first to remove grease (i.e., stopcock grease) before water is used to remove salt deposits.
The basic tenet of cleaning is like dissolves like. Polar solutions dissolve polar materials and vice versa for non-polar solutions. Crystals cannot dissolve in oils, and grease cannot be cleaned by water. Lubricants based on chlorofluorocarbons require chlorofluorocarbon solvents for cleaning. Thus, for effective cleaning, you must know what you are cleaning to have an effective plan of (cleaning) attack.
Borosilicate glassware (such as Pyrex or Kimex) is more chemically resistant than soda-lime glassware. However, hydrofluoric acid, perchloric acid, and all bases can react with borosilicate glass and strip the surface glass off layer by layer. Given enough time, some organic tars and minerals in water can also react with the surface of laboratory glass.
Objectively, the reason we clean glassware is to reuse the glassware. Because some cleaning processes may dissolve glass, you need to be objective about which cleaning process you choose, and on what items to use that cleaning process.
Glass dissolving is a cleaning process removing a layer of glass in a process called stripping, and anything that was stuck to the glass is removed along with the glass.
Some glass strippers are far more aggressive than others, and they can do considerable damage to glassware in a short time. This damage may include any markings on the glass such as calibration lines. Such destruction may be just a nuisance in an item such as a beaker, but it can also make a volumetric flask absolutely worthless.
Another problem with glass strippers is that they are typically oxide-selective.
Glass is composed of a combination of oxides. Because some of these oxides may be more susceptible to specific chemical attack than others, the result is an uneven surface. Such a pitted surface gets dirty easier, and is more difficult to clean, and the greater surface area requires more time for removal of adsorbed gases (i.e., water) in vacuum systems.
It is obvious then that there is no single magic potion that can clean all glass ware. Cleaning laboratory ware is an art; and your knowledge of what solvents, or combinations of solvents, to use for any given contaminant will improve with experience.
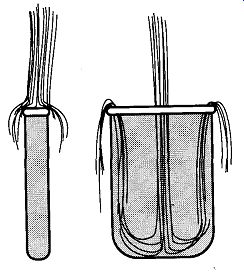
Fig.1 Water flowing into narrow and wide containers.
Fig.2 (a) Cuvette cleaner and (b) NMR tube cleaner.
The best time to clean glassware is just after use. The longer dirty glassaare sits, the harder it is to clean. Fortunately there are often waiting periods in most experiments when things that you are working on are cooling, heating up, or waiting to react. These waiting periods are excellent times to clean glassware. If an experiment has no waiting times, then try to have a large basin with a soapy water solution for used glassware handy (assuming that the contaminants will not react with soapy water). However, be sure the glassware is totally submerged; other wise, mineral deposits are likely to form on the glassware. Because mineral deposits cannot be removed with soap and water, more complex (and more dangerous) cleaning procedures will need to be used.
One common complication in laboratory cleaning is the proper rinsing of long and/or narrow pieces of equipment. This difficulty arises because once a narrow item is filled up with water (or whatever the rinsing and/or cleaning solution), no more liquid can enter the piece from its opening. As you can see in Fig. 1, any extra liquid in these containers just falls off the top. If the item has a sufficiently wide opening, there can be circulation within the piece. More specifically, this principle is related to the force of the liquid, the viscosity of the liquid, the width of the stream, and the width of the container.
Cuvettes and NMR tubes are two good examples of items that are difficult to rinse properly because of their narrow designs. If a jet of water is strong enough and narrow enough, it could enter, and rinse an NMR tube. However, such a stream is unlikely to be found in most laboratories. If a cuvett needs to be cleaned, a cuvette cleaner [see Fig. 2(a)] provides the required deep cleaning. The same goes for NMR tubes; an NMR tube cleaner [see Fig. 2(b)] provides deep rinsing that ensures no residue. Without the ability to squirt a rinsing liquid to the bottom of a tube, it is necessary to repeatedly fill up and pour (or shake) out the liquid many times to ensure that the glassware is properly rinsed.
It is also possible to attach a flexible tube up to the distilled (or deionized) water source and add a pipette to the hose. By placing a pipette into test tubes, graduated cylinders, or even separatory runnels (which are upside down to provide draining), fast and efficient rinsing can be achieved.
1.2 Safety
When cleaning glassware, each item should be handled one item at a time.
Although you may be able to hold several items in one hand, it is better to wash one item at a time than to hurry and risk wasting time, equipment, and money (and injury to yourself) which is caused by breakage. There are many ways to clean glassware, but there is only one proper procedure, and that is to do it carefully.
Glassware will invariably bounce one time less than the number of times it hits a hard surface. Star cracks (see Fig. 3), chipped edges, broken sections, or total destruction are all possible results of the "final landing."

Fig.3 Star cracks are caused by hitting one point of a laboratory flask
against a hard surface with enough force to crack the glass, but not hard
enough to destroy the flask. The crack lines radiate from the point of impact.
They frequently occur in glassware left to roll loose in drawers.
Broken glassware, aside from being a financial loss, is dangerous. Labs often use beakers, funnels, graduated cylinders, and the like with chipped edges or bro ken ends. This practice is not safe, and many people have assumed that they could not be cut only to regret their naive optimism. Often, by simply fire-polishing the end of a chipped glass apparatus, you can salvage an item that would otherwise be dangerous to use.
Because there are various "strengths" between each cleaner and any other, cleaning glassware can be thought of as a stepwise procedure. That is, as you try to clean something, you go from the least to the most powerful medium until the glassware is as clean as required for the work you are doing. Although it may seem that you would save time to only use the most powerful cleaner, that is not always safe, environmentally sound, or economically wise.
One aspect of cleaning that can save considerable time and energy is remembering that like dissolves like. Polar solvents can dissolve polar contamination far more effectively than can non-polar solvents. In addition, proper selection of sol vent material can avoid damaging the object you want to clean as well as preventing the introduction of possibly hazardous materials. For example, say you have a plastic container with a stick-on label which, after it is removed, leaves a sticky, gummy glue. You might try a hydrocarbon solvent to remove the sticky material, but, depending on the solvent, that may to damage the plastic container. However, a light oil, such as WD-40® can dissolve and remove the adhesive.* The remaining oil film can easily be washed off with soap and water.
Regardless of the cleaning process, you should always wear a basic minimum of safety clothing. Lab coats do more than just protect your street clothes; if a dangerous chemical spills on a lab coat, the coat can be easily taken off at a moment's notice with no embarrassment. Street clothes often cannot be removed with equal ease and modesty, and they can provide time for a toxic or dangerous chemical to soak through to your skin.
Eye protection is also critical. Although glasses provide some protection, when liquid splashes, it is seldom considerate enough to aim straight at the glass. Eye goggles fit over glasses and provide protection not only from the front, but from the top, sides, and bottom. If you wear contacts, it is strongly recommended to not wear them in laboratory environments. Although the use of goggles should pre vent liquids from splashing your eye, it will not stop vapors. Contact lenses are made from elastomers that are capable of adsorbing vapors, which would then be in constant contact with the eye. Although the use of a fume hood will decrease the danger, it is best to avoid the problem altogether.
Gloves are good protection when using acids or bases for cleaning, and they should also be used with soap and water because they can offer, by removal, immediately dry, clean hands whenever they are needed. They also permit using much hotter water than can be used with bare hands. Typically, the hotter the cleaning solution, the faster and more effective the cleaning. Unfortunately, most gloves cannot be used with hydrocarbon solvents because they are likely to dissolve the gloves. It is difficult to protect hands from the drying effects of hydro carbon solvents. Although various hand creams are available to re-moisturize hands if necessary, it is best to try not to make contact with the solvents.
Never dispose of organic tars, Kimwipes, paper with organic residue, or other solid material down a sink. Such materials should be placed in a waste container labeled for laboratory wastes. Never dispose of used cleaning solutions of any type down a sink without first checking with the safety officer. Different environ mental laws exist in each state and sometimes within separate counties, so it is difficult to generalize about waste disposal too broadly.
[In general, as you go from left to right and from bottom to top in the periodic chart, you go toward greater electro-negativity. Compounds formed from elements with wildly differing electro-negativities are more polar. Likewise, one of the pitfalls of walking along a seashore beach is tar blobs sticking to the soles of feet. Again, the selection of a strong hydrocarbon solvent is not advised because such solvents are likely to dry out and/or damage human tissue, and some are carcinogenic. Surprisingly, common baby oil is a wonderful solvent for tar blobs and will not harm the skin. ]
1.3 Removing Stopcock Grease
Pre-preparation. Stopcock grease on a joint or stopcock must be removed before adequate soap and water cleaning can begin. It is always best to remove excess stopcock grease physically with a Kimwipe. Then, any film of stopcock grease remaining can be removed with less solvent.
Organic greases (i.e., Apiezon) can easily be removed with halogenated hydro carbons, such as chloroform or methylene chloride. Methylene chloride is a minor suspected carcinogen and is therefore safer to use than chloroform, which is definitely a suspected carcinogen and known cause of liver damage. However, both of these are dangerous compounds and should be used in a fume hood. Acetone can also be used, but is not very effective on most stopcock greases. Heating glass ware to about 400°C will also remove any organic greases. However, this heating may cause any remaining inorganic material to burn into the surface of the glass, which may prove very difficult to remove. Be sure to remove any Teflon items before heating because burning Teflon fumes are extremely toxic.
Silicone grease can be mostly removed with pentane or methylene chloride, but this technique leaves a film residue. Such a residue will not affect most chemical reactions, but can wreak havoc for any future glassblowing work. It cannot be stressed enough how completely silicone grease must be removed before any glasswork is to be done. Silicone grease can be effectively removed with a base bath (see Sec. 1.7), but this process is glass-destructive and should not be used with any volumetric ware. These greases cannot be removed with heat because the silicone itself will not burn off and any remains on the glassware can only be removed with approximately a three-minute soak in 5% to 10% HF.
Fluorocarbon greases (Krytox) originally required a chlorinated fluorocarbon for removal. In the last few years, it was found that an industrial solvent (such as BH-38 from Spartan Chemical Co.*) can remove Krytox. Tests that this author has conducted seem to show a film of some kind remains on the joint, so it is unknown exactly how safe it is to heat a joint or stopcock that has been cleaned with this technique. Do not use heat to remove Krytox because heating (> 260°C) will produce fumes (lethal fluorine compounds, such as HF) that are highly toxic.
1.4 Soap and Water
After the various greases are removed from the apparatus, it is then possible to continue with soap and water cleaning. However, whether organic solvents were used or not, glassware should be rinsed out first with a small amount of acetone and then water, before being placed in a soapy water solution.
Material. There is a variety of powdered and liquid washing compounds avail able on the commercial market that, when mixed with water, provide excellent cleaning. There are a few super-concentrated cleaners (that come as liquids) which are excellent for cleaning items by long-term soaking.
Preparation. Because there are as many different preparation techniques as there are commercial brands, it is best to read the instructions on the container of the cleaner you are using.
Use. Soap-based cleaning products are generally long-chain hydrocarbons that are negatively charged at one end. The hydrocarbon end of the soap molecule does not dissolve in (polar) water, but combines with other soap molecules to form "sphere" like shapes called micelles. The outer surface of the "sphere" has a charged end which allows it to freely associate within water. However, the hydro carbon end is still able to dissolve other hydrocarbons. Thus, one end can grab dirt and the other end can grab water. Soaps and detergents do not make an oil soluble in water, rather with the assistance of agitation they aid its emulsification.
Soaps and detergents make water "wetter" by lowering the surface tension of the water. In doing so, less energy is required to lift dirt off whatever it is on.
Other agents within a cleaning solution may include materials that help emulsify oily matter, soften water, solubilize compounds, control pH, and perform other actions to assist the cleaning process.
In general, these cleaning compounds work better in warm or hot water. Some scrubbing with a test tube brush, sponge, or the like, is usually needed, but some of the liquid cleaners only require soaking the glassware overnight. Do not use any rough-surfaced material (i.e., pumice, kitchen cleanser, rough plastic, or metal scouring pads) that can scratch the glass. When glass is scratched, the rough surface provides an easier surface for contaminates to adhere to and is therefore much harder to clean (and maintain) in the future. This surface scratching is also why you should never use abrasive scouring cleansers on new porcelain surfaces in the home. If you do, you will destroy the surface and will have no recourse but to scour away in all future cleaning. In addition to cleaning problems, abraded surfaces make glass much easier to break.
Some people use a green scouring square, found in the kitchen on their glass ware. These are wonderful in scratching off dirt, contamination, glass, and porcelain. These should not be used in the kitchen or the laboratory. Any scrubber that is identified as Teflon safe should be used in either the kitchen or the laboratory.
There is a yellow scouring pad from the Arden Corporation that is Teflon safe and that is particularly abrasive to dirt and leaves glass and porcelain untouched.
There is a nonabrasive scouring cleaner on the market called Bon Ami®. Most other cleansers contain silica as the abrasive agent. Bon Ami contains feldspar and calcium carbonate, which are softer than glass and therefore cannot scratch glass surfaces.
After cleaning, copiously rinse glassware with tap water and follow with a deionized (or distilled) water rinse. Let the glassware stand upside down for storage or to dry. If your freshly washed glassware needs to be immediately dried for an experiment, you may facilitate the drying by placing the glassware in a drying oven. Alternatively, you may pour about 10 mL of reagent-grade acetone or methanol into the glassware, swirl it around, and pour the remains into a container labeled "used acetone" or "used methanol," which can then be used for future cleaning.
Safety Considerations. You should always wear safety glasses. Because most cleaning compounds can be drying to the skin, it would be wise to wear rubber gloves. Also, wearing gloves allows the use of hotter water. Hot water can facilitate and improve the cleaning action of most cleaners.
Disposal. These soaps and detergents may all be washed down the sink. Some of the older types contain phosphates and, due to environmental concerns, should be phased out, or used as little as possible. Additionally some concentrated liquid cleaners can be reused many times before they need to be disposed, so check the instructions before you discard a cleaner.
1.5 Ultrasonic Cleaners
Ultrasonic cleaners can loosen dirt particles off the walls of solid material and are essential if there is any particulate matter in small crevasses or corners where it would be otherwise impossible to reach.
Ultrasonic cleaning works by emitting a series of very high-pitched sound waves that create a series of standing waves in solution. The waves alternately compress and decompress the cleaning solution. During the decompression stage, the liquid out-gasses and millions of tiny bubbles are formed. During the compression stage, the bubbles implode. This implosion (called cavitation) is the destructive force that loosens dirt particles.
To use an ultrasonic cleaner, immerse the item to be cleaned in the cleaning solution within the device's tank. There are general-purpose and industrial strength cleaning solutions as well as specific cleaning solutions for jewelry, oxides, and buffing compound removers. Turn the ultrasonic cleaner on for several minutes, and see if your item is clean. If not, repeat the process and/or try an alternate cleaning method. After an item has been cleaned, rinse as you would with a soap and water wash.
Although uncommon, it is possible to damage glass items with ground sections in an ultrasonic cleaner. This damage can occur when items are left too long in the cleaner. Ground sections to be concerned about include ground joints, stopcocks, and even the lightly etched dots on flasks and beakers (used for writing on). The damage can range from simple cracks that radiate from the ground areas, to chipped-off pieces of glass.
One of the obvious restrictions with ultrasonic cleaners is that the object to be cleaned needs to be able to fit inside the cleaning tray. Commercial ultrasonic cleaners can be as small as 3 1/2 diameter and 3~ deep to as large as 19 3/4" x 11 1/2" x 8".
1.6 Organic Solvents
There are three types of organic solvents that can be used for cleaning: non-polar, polar, and the halocarbons. They are all capable of removing adsorbed (soaked into the walls of a container) contaminants.
Non-polar solvents, such as hexane, can be used to dissolve non-polar contaminants such as oils from glass.
Examples:
(various hydrocarbons) Hexane Ethane Benzene
Polar solvents, such as the alcohols and ketones, are useful for the removal of polar contaminants, but also attach to adsorbed sites and thereby limit the amount of area available for undesirable materials. Thus, final rinses with polar hydrocarbons can be very beneficial.
Examples:
(various alcohols and ketones) Ethanol
Methanol
Isopropanol
Acetone
Methyl ethyl ketone
Halocarbons, a class of polar solvents, are hydrocarbons with an attached halo gen. There are commonly three types of halocarbon solvents: those based on chlorine, fluorine, and a combination of the two. They are all powerful degreasing materials and can be particularly effective in removing polar contaminants from glass. The chlorofluorocarbons are currently under review because they cause environmental damage to the ozone layer.
Examples:
(various fluorocarbons, chlorocarbons, and chlorofluorocarbons)
Trichloroethylene
Perchloroethylene
Methylene chloride (dichloromethane)
Trichlorotrifluoroethane
By adding small quantities of a hydrocarbon polar solvent to a chlorofluorocarbon, the overall cleaning abilities of both may be substantially improved.
Pre-preparation. Ascertain whether the contamination is polar or non-polar.
Material. Dichloromethane or acetone are good places to start because of their costs and safety. If there is limited or no success with either of these solvents, try other appropriate solvents.
Preparation. Be sure to remove any soaps or excess water that may be remaining in the glassware.
Use. Always use the lowest grade (Technical) of any solvent when cleaning glassware. Use 10 mL of a higher grade (Reagent) for a final rinse of the glass ware. If the solvent has a high boiling point, select a suitable (polar or non-polar) solvent with a low boiling point for the final rinse to facilitate evaporation.
Safety Consideration. Safety glasses should be worn. Because there is often a high percentage of synthetic fibers in clothing, it is a good idea to wear a lab coat.
Many of the organic solvents used in the laboratory could damage your clothing.
Organic solvents should not come in contact with skin because they are drying to the skin. Most organic solvents are irritating to some degree to most people. If an organic solvent is trapped against your skin, such as between a ring and finger or absorbed into clothing, the irritation will have a greater time to develop.
Keep in mind that a number of organic solvents are carcinogenic (i.e., carbon tetrachloride and benzene in particular). Some may dissolve rubber gloves, so be careful of that possibility. Always use organic solvents in a fume hood. The vapors of many solvents can have minor to major health dangers. For instance, chloroform is a suspected carcinogen and known to cause liver damage. Chloroform used to be used as an anesthetic by putting patients to sleep. With improper ventilation, one could pass out from the vapors. Most organic solvents are flammable and should therefore be kept far from any open flame, sparks, or high heat sources.
Disposal. Acetone and alcohol can be saved for future cleaning, or recovered by distillation. None of the halogenated hydrocarbons should ever be poured down the sink. If poured on a rag to wipe a stopcock, you may be able to leave the rag in a fume hood to dry before disposing of the rag. However, such a rag may classify as a toxic waste and may require special handling and disposal. There are many laws that govern the disposal of organic solvents, so check with the safety coordinator where you work for specific information.
1.7 The Base Bath
The base bath seems like an ideal cleaning method. You carefully lower your item to be cleaned into the bath, let it soak for a period of time (about a half hour), take it out, rinse it, give it an acid rinse, rinse it in water once again, then give it a distilled water rinse. The base bath is the preferred method of cleaning when silicone stopcock grease is used, as it effectively removes that type of grease better than any other cleaning method.
However, there are disadvantages to the base bath. First, it has some safety hazards. The alcohol is a potential fire hazard, and the bath's alkalinity is caustic to skin. The base bath is also a mild glass stripper. That is, instead of cleaning the glassware, it actually removes layers of glass (and any adjoining contamination). Therefore, glassware should not soak in a base bath for an extended period of time, and the base bath should never be used for volumetric ware.
Pre-preparation. Wipe off any excess stopcock grease with a Kimwipe tissue. Then, clean any glassware covered with organic stopcock grease with an organic solvent, dimethyl chloride is particularly good. Next, use the standard general cleaning procedure with soap and water and/or a rinse with an organic solvent.
Material. Sodium hydroxide (NaOH) or potassium hydroxide (KOH) and ethyl alcohol.
Preparation. Mix one liter of 95% ethyl alcohol with a solution of 120 g of NaOH (or KOH) mixed in 120 mL of water.
Important note. A base bath can be stored in a plastic (OK) or stainless steel (best) container. This solution is highly basic, and as such it will dissolve a glass container. The alcohol in a base bath is flammable, and it therefore presents a problem for plastic containers that would be likely to melt or burn.
Use. Separate all ground joints and stopcocks before placing an apparatus into a base bath, otherwise they may stick together so effectively that they will end up inseparable. It is important to pre-remove as much as possible any remaining silicon grease. Any buildup of grease in one area and not another will cause uneven stripping of the glass underneath. Place glassware (completely submerged) into the base bath and let it soak about a half-hour. (Because the bass bath can be extensively reused, this time may be extended as necessary.) After removing any apparatus from the bass bath, rinse with copious amounts of water. You may choose to followed this with a brief soak in a 2-3 molar solution of nitric acid.
The acid soak will restore the hydroxyl groups on the glass surface and stop the base attack on the glass. The glassware should then be re-rinsed in water follow by a deionized water rinse. A final rinse of alcohol or acetone can be used to facilitate drying.
Base baths can be used over and over until they begin to show a decrease in effectiveness. Between use, a base bath should be covered to prevent evaporation and to prevent other glassware from inadvertently falling in.
[Organic stopcock greases are insoluble in a base bath and will prevent the base bath from cleaning any contamination beneath the grease. Because a base bath can dissolve aluminum, do not even try to determine whether a particular aluminum alloy is acceptable or not. The simplest and safest route is to use a stainless steel container. If for any reason you need to soak disposable glassware in a base bath, you will want to let it soak for considerably less time as it is less resistant to chemical attack. ]
It is also important to keep in mind that a base bath is completely ineffective against any hydrocarbon or fluorinated grease. Therefore any attempts to clean glassware with either of these grease types will result in no cleaning of the "greased" area, nor removal of the grease. It will cause stripping of glass in any submerged glass that is grease-free. With this in mind, there is a potential problem with mixing silicon grease and any other grease type on the same apparatus with out thoroughly removing all traces of the previous grease. As long as the other grease is a hydrocarbon grease, thoroughly cleaning the region with a halogenated hydrocarbon solvent (for example, dimethyl chloride) should be sufficient before a base bath soak. If there is a fluorinated grease (such as Krytox) mixed with the silicon grease, see Sec. 3.3.3 for some suggestions on cleaning prior to any subsequent high-heating situations.
Safety Considerations. Safety goggles should be worn. A base bath is highly caustic, so rubber gloves are a must. Since the primary liquid of a base bath is alcohol, it is also highly flammable, so the bath must be kept away from open flames, sparks, high heat sources, or anything that could ignite the solution.
Because a strong base can dissolve (strip) glassware, it is important not to let glassware sit too long in the base bath.
The long-term effects of glass remaining in a base bath are as follows:
1. An etching (frosting) of the glass could increase the ability of contaminants to "cling" to the glassware. Etching provides more surface area for dirt to cling to. Thus, it is more difficult to remove material from etched glassware.
2. The ability of high-vacuum stopcocks to maintain a vacuum may be lost.
3. The ceramic decals on glassware (including volumetric marks) may be removed.
4. Volumetric glassware is likely to exhibit increased volumes.
Disposal. As a base bath is used, it tends to lose volume both to evaporation and to the small loss incurred each time an object is removed carrying some base bath with it. The remaining base bath can be recharged by adding to it a new solution, so disposal is seldom necessary. If you wish to dispose of the remaining solution, as long as the base has been neutralized (check with litmus paper) and contains no heavy metals, it can be rinsed down the sink. However, check with local environmental and safety laws to see if any other concerns need to be addressed.
1.8 Acids and Oxidizers
Organic and carbonaceous materials can be easily removed with acids and oxidizers. In addition, other glass contamination, such as calcium and other alkali deposits, can be effectively removed with hydrochloric acid (HCl). On the other hand, because alkali deposits are removed from glass surfaces with this rinse, there will be a more porous surface on the glass than before the rinse. This greater porosity will mean greater water absorption and possibly greater cleaning problems in the future. This problem is more likely in porcelain containers and soft glass than borosilicate glass.
Pre-preparation. Wipe off any excess stopcock grease with a Kimwipe tissue. Then, clean any glassware covered with organic stopcock grease with an organic solvent. Next there should be the standard general cleaning with soap and water and/or a rinse with an organic solvent.
Material. Hydrochloric acid (HCl), sulfuric acid (H2SO4), nitric acid (HNO3), or chromic acid (Chromerge®) (see the next section).
Preparation. Acids can be used as straight concentrated solutions or diluted to some degree with water. Some can be mixed (i.e., aqua regia: three parts hydrochloric and one part nitric acid). Another mixed solution is peroxysulfuric acid. It is made by mixing a few milliliters (i.e., 5 mL) of concentrated H2SO4 with an equal amount of 30% H2O2. Wanning (by steam) can often increase the effectiveness of an acid or oxidizer.
Use. All acids must be used in a fume hood. Let the acid soak in the glassware for a short (or long) period of time (as necessary). Swirling with a magno-stirrer and/or heating the acid or oxidizer by use of a steam bath (do not use a direct flame) can facilitate the action. Mineral deposits can often be removed by hydrochloric acid. Metal films can often be removed by nitric acid.
After cleaning with an acid or oxidizer and after rinsing with water, it is good practice to use ammonia as a neutralizing rinse. This rinse should be done before a second rinse is made with water, and a final rinse with distilled (or deionized) water. The ammonia neutralizes the acid or oxidizer. However, if you are working with organic compounds, it is better not to do an ammonia rinse because many organic reactions are acid-catalyzed.
Safety Considerations. The use of a fume hood, eye protection, and protective gloves are a must. Lab coats are also recommended because these acids can destroy clothing and they can damage skin. If any acid gets in your eyes, wash them copiously with water and seek medical attention. If you wear contacts, after washing copiously with water, remove the contacts, rinse with more water, then seek medical attention. Do not stop to remove contacts before rinsing with water.
The flushing water will probably remove your contacts for you. If you think you might have accidentally spilled any acid on any part of your body, wash copiously with soap and water just as a precaution. If you feel an itching or burning sensation after having worked with acids or oxidizers, wash the area copiously with soap and water. If the itching or burning sensation continues, seek medical attention.
Disposal. As long as the acid does not contain chromium, or is not hydrofluoric acid, it may be washed down the sink after proper neutralization. Neutralization is done by first diluting the acid with water to less than 1 M followed by adding either solid sodium hydroxide or 5% sodium hydroxide while constantly mixing the solution until the solution is approximately neutral. Any heavy metals that may have been dissolved by the acid must be removed before disposal. The best way to remove the metal is to participate the metal, neutralize the acid, and send the metal participate to a proper waste facility.
[Both chromic acid and hydrofluoric acid disposal are dealt with in Sec. 1.9 and Sec. 1.10, respectively.]
Any hazardous waste cannot be simply thrown away. Such materials must be stored by the user and picked up by companies licensed to remove such materials. For the sake of this planet, do not ignore environmental laws.
1.9 Chromic Acid
Because of the long history of chromic acid use and because of the current environmental problems of heavy metals, chromic acid deserves separate comment.
Preparation. Mix 15-20 g K2Cr2O7 (potassium dichromate) and 50-100 ml water to dissolve. Then, slowly add 900 mL of concentrated H2SO4 (sulfuric acid). This solution gets very hot, so do not use a plastic container for mixing.
Use. Chromic acid effectively removes organic contaminants, and it has a long history of good service. Chromic acid is, by many standards, an excellent cleaner.
By simply soaking your glassware in chromic acid, organic dirt and film deposits are removed. It is safe for glassware to be left in chromic acid for extended periods of time. It can be used over and over until it begins to turn green (it provides its own potency indicator). Chromic acid is safe for volumetric ware. It does not have the same problems of the base bath of dissolving the glass (and changing the volume) or of dissolving the ceramic lines on volumetric ware. There are, of course, safety precautions for its use because of its strong oxidation potential.
Chromic acid use is not recommended if you are doing experiments in conductivity because the chromic ion can coat the walls of the glassware.
Because chromic acid can be reused, it is often kept in large glass containers. It is important to keep a lid on the container that is (reasonably) air-tight. This containment is not so much for evaporation concerns, but rather because sulfuric acid can absorb 30% of its weight in water, including water from the atmosphere. As it absorbs atmospheric water, its volume changes, and it can overflow the container.
Disposal. Disposal is best done by reducing the dichromate to the insoluble chromium hydroxide with a sodium thiosulfate solution. The process for neutralizing 100 mL of chromate solution is as follows:
1. Add sodium carbonate (about 180 g) slowly (while stirring) until the solution is neutral to litmus paper (color goes from orange to green).
2. Re-acidify this solution with 55 mL of 3 M sulfuric acid (color returns to green).
3. While continuously stirring, add 40 g of sodium thiosulfate (Na2S2O3-5H2O). (The solution now goes to blue and cloudy.)
4. Neutralize the solution by adding 10 g of sodium carbonate. In a few minutes, a blue-gray flocculent precipitate forms.
5. Filter the solution through Celite or let stand for one week and decant the liquid. This liquid can be allowed to evaporate or be filtered through Celite. Regardless, the remaining liquid contains less then 0.5 ppm of chromium and can be washed down the sink (check local regulations).
6. The solid residue should be packaged, labeled, and sent to a proper disposal firm.
Alternatives. Fortunately, there are a variety of alternatives to chromic acid, so its use is really unnecessary. Some homemade alternatives include:
1. Combining H2O2 and H2SO4 to make peroxysulfuric acid. This solution does not have the convenience of a color change as it begins to lose its oxidizing potential. On the other hand, it does not have any heavy metals that are difficult to dispose of.
2. 3:1, a solution of three parts sulfuric acid to one part nitric acid.
Some commercial alternatives include:
1. Nochromix (Godax Laboratories, New York, NY 10013), the Nochromix powder, is mixed with concentrated H2SO4. The clear solution turns orange as the oxidizer is used up and therefore provides the same "indicator" advantage of chromic acid.
2. Eosulf (Micro, International Products Corporation) contains EDTA (an organosulfonate-based detergent), is non-acidic, has no toxic ions, and is biodegradable, meaning that there are fewer acids to store and work with; this significantly decreases hazardous chemical disposal.
3. Phosphate-based cleaning solutions do very well as surfactants, and phosphate ions assist in solubilizing materials in polar solvents such as water. Unfortunately, these same phosphate ions also cling to the polar glass ions, cannot be easily removed, and interfere with some biochemical assays. Even if phosphate contamination did not interfere with your work, there are strong environmental concerns about using phosphate-based cleaners and how to safely dispose of them.
Although many labs may continue to use chromic acid, there are enough other choices for cleaning organics off glassware for it not to be essential for use. If you use chromic acid, you may consider phasing out its use.
[Each with their own range of safety concerns.]
1.10 Hydrofluoric Acid
Hydrofluoric acid (HF) is an extremely dangerous but highly effective glass strip per. It is sometimes used as a cleaner because of its ability to remove (dissolve) layers of glass off an item's surface. What remains underneath is very clean glass.
Two of the best reasons to use HF is glassware that has burnt inorganic materials on its surface or glassware with contamination from radioisotopic work.
There are few occasions where HF is recommended over a safer glass stripper or a base bath (see Sec. 1.7). The biggest demand for HF as a cleaner is to remove burnt-on particulate matter from a glass surface. For example, if silicone
grease was left on glassware that went through an oven (> 400°C), the nonvolatile remains of the grease are undoubtedly burnt into the surface. HF can be used to remove burnt silicon grease remains, decal identification markings, and some quantity of the glass. Thus, prolonged or repeated soaking of glassware in HF can easily remove enough of a glass item to make it useless. Volumetric ware should never be soaked in HF. It was found that cleaning a 100-mL flask with a 5% HF solution for five minutes increased the flask's capacity by 0.04 mL.
Pre-preparation. All greases and oils must be removed before treating with HF. Baking the glassware in an oven of at least 400°C is very effective for removing any organics and other volatile materials. However, such baking can burn inorganics into the glass surface, requiring more extensive soaking in HF which, in turn, could cause greater erosion of the glass.
Material. Hydrofluoric acid is available in plastic containers (in a concentration of 48%-52%). These containers should always be stored in a fume hood. Never store HF in glass containers.
Preparation. HF should not be used at full (bottle) strength (typically 48%). A 5% to 10% solution is best. Once prepared, it should be stored in a polyethylene or other strong plastic container that can be closed. Because HF is a glass stripper, do not store the acid solution in a glass container. HF, at any concentration, should always be stored in a fume hood.
Use. It is important to wear gloves and safety glasses and to work in a fume hood!! If you do not have all of these items for safe use of HF, do not use HF as a cleaning material! Pour the diluted HF from its plastic storage container into a plastic soaking tank (like a polypropylene beaker). Let the glassware soak in the HF for anywhere from 30 seconds to two minutes. Rinse for at least one minute (or five full flushes) with water. Then rinse with distilled or deionized water. The HF can be reused many times until a decrease in effectiveness is obvious.
Safety Considerations. Always wear rubber gloves with long arm covers when working with HF. It is hard to overemphasize how dangerous HF can be. One of the dangers in getting dilute HF on your skin is that it may initially be no more noticeable than water. If you get HNO3 on your skin, you know it instantly by the burning sensation. That burning sensation is telling you something is terribly wrong. Because of the seemingly inconsequential aspects of HF, you might be inclined simply to rinse off any suspected HF. However, even with some washing, you may not successfully remove all of the HF. If any HF gets on your skin, wash with copious amounts of soap and water for 10 minutes. If you get any HF under a fingernail, scrub thoroughly with a fingernail brush!! The treatment for an HF burn under the fingernail invariably includes removal of the fingernail. Once in the skin, HF spreads throughout all the surrounding tissue. Hydrofluoric acid burns can look similar to those of fire burns, but the development is in slow motion and can eat through to the bone. Remember, HF travels through body tissues doing damage to those tissues as it travels. If HF gets in the eye, blindness is highly probable. Always wear protective goggles when using HF.
The fumes from HF are also very dangerous and can cause burn blisters on the linings of the lungs. Although not pleasant, HF is not as sharply irritating to breathe as other strong acids (such as HNO3), and you may not think to be repelled. Always use HF in a fume hood.
One safety trick is to add to your total HF solution about one or two percent nitric acid. This addition will not assist the cleaning properties to any significant amount, but it will add more effective warning characteristics to both the odor and any accidental skin contact. This practice is similar in concept to the addition of hydrogen sulfide to methane.
Disposal. Although HF is an acid, it cannot simply be neutralized and washed down the sink because the fluorine in the acid will attack any aluminum in the plumbing. Thus, HF, like chromic acid, requires special handling. A 5% solution of HF can be safely treated by mixing with a 1:1 ratio of the following solution :
2 g aluminum nitrate (A1(NO3)3-2H2O)
0.8 g Ca(OH)2
1 liter of water
After mixing the HF and the above neutralizing solution in a 1:1 ratio, the resultant mixture can then be poured down the sink.
Extra Tip: For an extra-tough stain, use a mixture of 3 mL of storage bottle strength (49%-52%) hydrofluoric acid to 100 mL of concentrated nitric acid. This solution should be used for only a minute or two at most and must be done in a fume hood. Use the same safety considerations that you would use for standard hydrofluoric acid.
Hydrofluoric acid alternative. Hydrofluoric and perchloric acid both aggressively attack glass. Because of the speed of attack on glass as well as the significant danger with working with either acid, Occasionally it may be safer (and easier) to a less aggressive glass stripper. Ammonium hydrogen difluoride ((NH4)HF2) (a.k.a. ammonium bisulfate) has shown to be an appropriately aggressive glass stripper that provides safer (longer) "soaking" time and is much safer to use. To prepare a solution of ammonium bisulfate for glass "cleaning," dissolve approximately 240 - 250 grams of ammonium bisulfate into four liters of distilled water. It must be stored in a plastic (polyethylene is best) or metal container.
Soaking times can range from ten minutes to a half hour depending on the degree of contamination and the freshness of the solution. All grease must be removed prior to any soaking as this solution will not be able to remove the grease, and the grease will prevent the solution from making contact with the glass. Just because this is considered a "safer" glass stripper, it doesn't mean safety considerations can be ignored. Gloves, eye protection, proper clothing are still a must for using this material.
This solution can be reused till it shows significant signs of impaired performance. It can be disposed of by mixing in some slacked lime (calcium hydroxide Ca(OH)2) till any fizzing stops. The calcium and fluoride will combine to form solid CaF2 which is inert and safe to throw out. Do not use sodium or potassium hydroxide (Na(OH)2 or K(OH)2) because sodium and potassium fluorides are highly poisonous.
1.11 Extra Cleaning Tips
Cleaning Fritted Filters. Because of the nature of fritted glass, its cleaning requires special mention. Fritted glass is crushed glass (Ace Glass uses crushed glass fibers) separated by size, compacted together, then heated until the pieces stick together. Because the structure is loosely connected, the frit maintains its porous nature, which provides the frit its filtering abilities.
Because different materials get onto and in a frit, different cleaning processes are required to clean a frit. For this reason, storage is an important aspect of frit cleaning. If you know what got on a frit, you know how to clean it. Keeping a frit in a clean, dry, and dust-free area will simplify your cleaning needs. Before a frit ted filter is first used, it should be rinsed with hot sulfuric acid and then with distilled water until the filtrate is neutral in pH. This procedure will remove any glass particles and dust that may be on the new frit.
After a frit has just been used, it is important to flush it immediately with distilled water in the opposite direction that it was used. Then proceed with a chemical cleaning. Once the fritted glass is cleaned, rinsed, and dried, store it in a clean, dry, and dust-free area. Some suggested contamination and appropriate cleaning solutions are as follows:
• Fats; Carbon tetrachloride
• Silver chloride; Ammonia
• Albumen; Warm ammonia or hydrochloric acid
• Nitric acid: Hot hydrochloric acid with potassium chlorate
• Barium sulfate: Hot concentrated sulfuric acid
• Organic materials: Potassium permanganate
• General cleaning: Potassium permanganate
[ Treat the filter with a 1% aqueous solution of potassium permanganate followed by a few drops of concentrated sulfuric acid. The heat of the reaction will increase the oxidizing power of the mixture. Treat the filter with a 1% aqueous solution of potassium permanganate followed by a few drops of concentrated sulfuric acid. The heat of the reaction will increase the oxidizing power of the mixture. ]
Because of the effects of basic solutions on glass, never let a basic solution (such as NaOH or KOH) remain in contact with a fritted glass filter. Rinse with hydrochloric acid and then with distilled water until the filtrate is neutral in pH.
Removing Tungsten from Glassware. A dark film of tungsten is often deposited on the walls of components of glass vacuum systems having tungsten filaments. This deposit hinders observation within the glassware and can also cause an increase in wall temperature.
Although a solution of HF, or a mixture of HF and HNO3, can remove the tungsten stain, it also removes some of the glass, which can etch the glass and thereby increase pumping time due to increased surface area. If the HF solution is left too long, the glass can become dangerously thin for a vacuum system.
A tungsten coating can be removed quite successfully with a hypochlorite solution (Clorox bleach, for example). A black opaque coating can be removed in a few minutes, and, if the solution is warmed, the process is even faster. The solution can be reused many times.
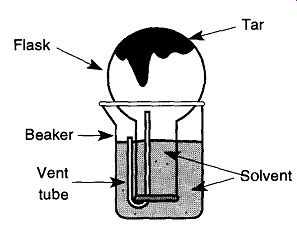
Fig.4 Removing tar from a flask.
Removing Tar from Distillation Flasks. As mentioned in the beginning of this section, the best time to clean glassware is immediately after it is used. The hardest glass pieces to clean are those that have been left for someone else to clean. Tar, however, is always hard to clean and is always left for last (which also makes it more difficult to clean). A simple solution for cleaning tar from the bottom of flasks is to invert the flask into a beaker of acetone and let the vapor of the solvent dissolve the tar (see Fig. 4). This technique can remove most of the tar deposit in a few hours. It can be hastened by heating the solvent in a steam bath (do not use an open flame).
The trick to this technique is getting the solvent into the neck of the upside down flask. One method is to lightly heat the flask before inserting it into the sol vent. Then, as the flask cools, the solvent will be drawn into the flask. Perhaps the simplest method is to place a flexible tube into the neck to allow air out of the flask as it is inverted into the beaker (be sure the tube is not soluble in the solvent).
1.12 Additional Cleaning Problems and Solutions
In the following cleaning procedures, all work should be done in a fume hood, hand and eye protection should be worn, and a lab apron is recommended. After cleaning, an item should be thoroughly rinsed in water followed by a rinse in distilled water. If an item needs to be dried, a final rinse in reagent-grade methanol, ethyl alcohol, or acetone can be used.
Iron Stains. Equal parts hydrochloric acid and water should be used.
Mercury Residue. Use hot nitric acid. The acid used should be collected and returned to your safety supervisor because it now contains a heavy metal and should not be rinsed down the sink under any circumstances.
Permanganate Stains. Use concentrated hydrochloric acid or a saturated solution of oxalic acid at room temperature.
Bacteriological Material. Soak the glassware in a weak Lysol® solution, or autoclave in steam. A number of sources recommend soaking the glassware in a 2% to 4% cresol solution. However, the EPA has recently identified cresol as a hazardous material. Because other options are readily available (see Sec. 1.1 through Sec. 1.9), there is no reason to use the material. If you have any cresol, contact a hazardous materials disposal firm in your area for removal.
Albuminous Materials. Soak in nitric acid.
Carbonaceous Materials. Soak in a solution of equal parts sulfuric and nitric acid. Be aware of the possible formation of dangerous compounds when organic material is present.
Magnesium Oxide Stains. Instead of HC1, try a 20% to 30% solution of sodium bisulfite (NaHSO3). Because an acid is not being used, SO2 is not libeated.
1.13 Last Resort Cleaning Solutions
The following solutions should only be used as last resorts for cleaning glassware because of the dangers each present. Each is meant to be used as a soaking solution for glassware and should be left in a fume hood at all times. After soaking, rinse off the solution with copious amounts of water. Before using any of the following materials, strongly consider whether the glassware is worth cleaning.
Alkaline Peroxide. This material is good for removing organics. Place 100 g of NaOH (sodium hydroxide) into a 500-mL glass beaker. Slowly add 250 mL of water. This solution will get hot (120°C), bubble, and fizzle. Therefore gloves and eye protection are a must. This material can etch glass if it is left to soak for an extended period of time, therefore you might wish to select an old, worn beaker in which to do the mixing. You must use a glass beaker because of the exothermic reaction that is created when the mixture is first mixed. If this solution is in a container and allowed to get cold, it can begin to deposit out of solution. The solid can be removed by slowly adding water or a dilute acid.
Alkaline Permanganate. This material is good for removing siliceous deposits and acidic crud. Place 500 g to 1 kg of NaOH (Sodium Hydroxide) in a 5-liter beaker. Add 4 V2 liters of water. Once dissolved, add 50 mg of KMnO4 (potassium permanganate). This solution will be purple and, after leaving it overnight to allow it to become active, will turn green. This mixture can be used up to one year. It should be covered to reduce evaporation. During that time some water will evaporate leaving a brown crust of MnO. This crust can be knocked back into the remaining solution. If too much water has evaporated, simply add water to original levels. If the solution leaves a brown deposit on glassware, the deposit can be removed with HC1 (hydrochloric acid). Besides damaging skin tissue, this solution can also stain skin, so be sure to use gloves.
Fuming Sulfuric Acid. This material is good for a wide variety of contaminants. Use a small amount of heated sulfuric acid in a fume hood. Roll the item around so the acid comes in contact will all areas of the piece. Unless the item needs to soak (for example, 30 minutes of soaking time is recommended for the removal of silicone grease), immediately empty the glassware and rinse. Although more dangerous to use than a base bath, this technique can be used to remove silicone grease from volumetric ware without concerns about altering the volume of volumetric ware.
References
1. F. Sherwood Rowland, "Chlorofluorocarbons and the Depletion of Stratospheric Ozone," American Scientist, 77, pp. 36-45 (1989).
2. Margaret-Ann Armour, "Chemical Waste Management and Disposal," Journal of Chemical Education, 65, pp. A64-8 (1988).
3. Ibid, Ref. 2.
4. P.L. Manske, T.M. Stimpfel, and E.L. Gershey, "A Less Hazardous Chromic Acid Substitute for Cleaning Glassware," Journal of Chemical Education, 67, pp. A280-A282 (1990).
5. L. Holland, The Properties of Glass Surfaces John Wiley & Sons, Inc., New York, 1964, p. 295.
6. Dr. Cathy Cobb, personal communication.
7. Pope Pacers (a publication of Pope Scientific), Menomonee Falls, WI 53052, March 1966, p. 17.
8. James Merritt, personal conversation, Nov. 1996.
9. National Research Council, Prudent Practices for Disposal of Chemicals from Laboratories, National Academy Press, Washington D.C., 1983, p. 86.
10. Ibid, Ref. 7, p. 15.
11. R.W. Burns, "To Remove Stains of Evaporated Tungsten from Inside of Glass Envelopes," Review of Scientific Instruments, 44, p. 1409 (1973).
12. E.J. Eisenbraun, "Solvent Saving Procedure for Removing Tar from Distillation Flasks," Journal of Chemical Education, 63, p. 553 (1986).
13. Kontes Catalogue, 1989, p. XIV.
14. R.E. Schaffrath, "A Suggestion for Cleaning Glassware Coated with MnO2," Journal of Chemical Education, 43, p. 578 (1966).
15. . P. Page, "Cleaning Solutions for Glassware," British Society of Scientific Glassblowers Journal, 27, p. 122 (1989).