Fix up, patch up and make do! That was the motto of the 1930s, the time when many of the collectible radios were made. In the Great Depression of the 1930s, radios and radio parts were available—if you had the money to buy them. Now radios like the old-time radios are no longer made, so tubes and other parts for them are obsolete and hard to come by. This is the major problem of the collector or restorer of old-time radios—the unavailability of replacement parts. Fortunately there are ways around this problem. One solution is to repair parts rather than replace them. In the case of tubes, of course, repair is not possible, but substitution is. Often it is possible to replace one old-time tube with another of the same vintage. This Section will show you how to make do with the original parts of your old-time radio by repairing or rebuilding them. The next Section will complete the picture by showing how to substitute for parts you cannot buy or repair.
REPAIRS IN GENERAL
Radio repair is the work done to restore a radio set to efficient operating condition after troubleshooting has identified and isolated the fault. It consists of realignment, the replacement of defective parts—including tubes—and all necessary disassembly and reassembly work.
When unsoldering a connection, whether it is the pig-tailed lead of a resistor or capacitor, or the lead of a transformer, heat the solder joint just enough to melt the solder. When the solder is soft, use a tool to separate the lead from the lug ( FIG. 1). Twisting and pulling at the lead can splatter solder into inaccessible places and cause short circuits that are difficult to find, and can break the connecting lug. Shake excess solder from the iron to prevent the solder from dropping into the set.
When a part is being replaced, tag the disconnected leads or identify them in a sketch to insure proper connections to the new part ( FIG. 2).
INSTALLING SMALL REPLACEMENT PARTS
When defective parts are replaced, exact replacement parts must be used if available. This procedure will insure normal operation of the radio if it operated normally before the part failed. If an exact replacement part is not available, and the original part is beyond repair, an equivalent or better part should be substituted for it.
The new part must, if at all possible, be installed in the same place. If this is out of the question, and there is room elsewhere, it can be installed where there is space. The disadvantage in changing the position of parts, especially in RF units or other high-frequency circuits, is that the change may effect the tuning and alignment.
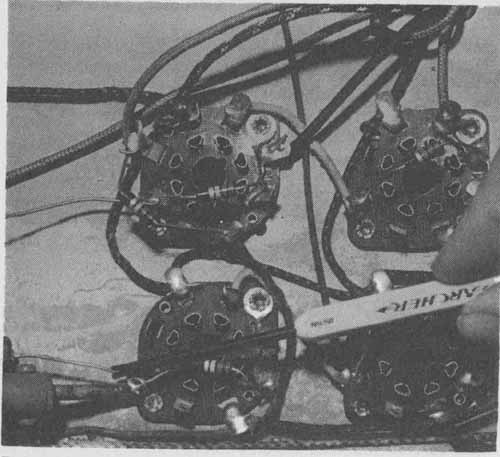
FIG. 1. Use of soldering tool with 2-pronged tip.
Before soldering any connections, carefully scrape and clean all connections on parts that will come in contact with solder. This means removing all corrosion, paint and also the enamel insulation of the wire leads. Tin the lugs and leads with solder to be sure that when the joint is made there will be a perfect bond by the solder. Make a good mechanical connection by twisting the wire lead around the lug several times before soldering. Do not depend on the solder to form a mechanical bond. Use only enough solder to join the wire to the lug and remove the soldering iron as soon as solder flows well into the joint. When soldering very small parts such as low-wattage resistors, ceramic capacitors, or germanium diodes, hold the pig tailed lead with a pair of long-nosed pliers at a point between the part and the joint you are about to solder. Thus interposed between the part and the source of heat, the pliers form a sink into which the excessive heat drains off before reaching the part. Hold the pliers in this position until after the solder has cooled. This quickens the cooling of the solder while at the same time it continues to protect the part against the heat.
REPAIR AND REPLACEMENT OF VARIABLE CAPACITORS
Variable capacitors do not normally become defective during operation. Mishandling a receiver can ruin capacitor plates or bend them out of place; it may then be necessary to replace the capacitor or capacitor gang. If the plates are bent only slightly they can be straightened out with ordinary tools. Other troubles include poor contact at the rotor wiper springs, and loose “pig-tail” connections.
A receiver can become erratic if there is dirt or other foreign matter between the tuning capacitor plates. The trouble will be noticed mostly while the set is being tuned. The spaces between the plates can be cleaned with an ordinary pipe cleaner ( FIG. 3).
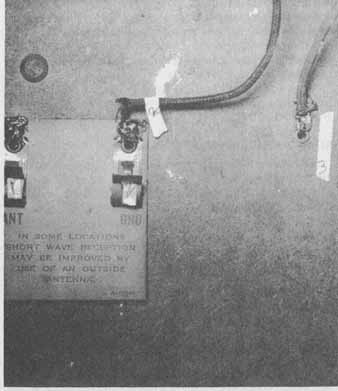
FIG. 2. Tags identifying wires from chassis and corresponding terminals on
the large loop antenna of a Sparton console.
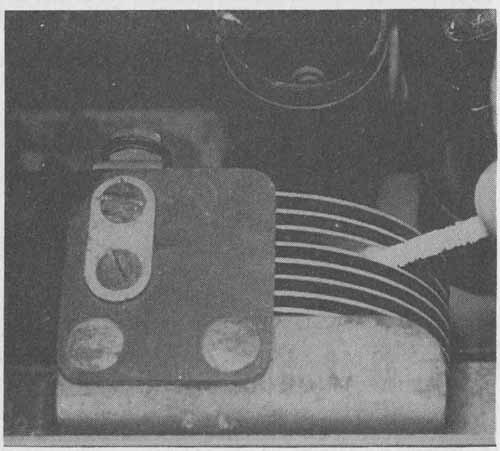
FIG. 3. Use a pipe cleaner to clear away dirt and plating slivers from plates
of a tuning capacitor.
Some receiver tuning capacitor plates are plated with zinc or other metallic material. The plating may peel over small areas and leave slivers that will cause arcing or erratic operation. If the plates have wide spacing between them, the plating can be removed with a pair of long-nosed pliers.
If the slivers cannot be removed, they can be burned off by connecting a high AC voltage across the capacitor. Sometimes the line voltage will be sufficient. If not, the high voltage may be obtained from the high-voltage winding of a separate power transformer. If a separate transformer is not available, it can be taken from the high-voltage winding of the transformer of the set under repair. For safety, a light bulb should be connected in series with the AC line voltage. The coil connected across the capacitor must be disconnected to prevent it from burning out. To prevent any possible damage to the filter circuit, the rectifier should be removed, if the set transformer is used.
If the capacitor develops trouble, every effort should be made to repair it, rather than replace it, for replacement would involve realignment of the RF, mixer and local oscillator. If the capacitor cannot be repaired, the replacement work will be difficult.
REPAIRING AND CLEANING ELECTRICAL CONTACTS
The spacing between the electrical contacts in switches is often critical. If the troubleshooter finds they are touching when they should not be touching, or vice versa, the contacts must be set to their proper positions. Sometimes this involves the bending of a wiper. Wipers and other spring contacts can be bent only a few times before they fatigue and break, and a new unit must be installed.
Use an abrasive, such as a fine emery doth, to clean the contacts when possible.
TUBE SOCKET REPAIR
When the body of a socket is defective, it must be replaced. The defective socket cannot be repaired. Certain types of sockets, especially octals, have replaceable contacts.
When a tube is removed from a socket by rocking it from side to side, one or more of the metal contact sleeves within the tube socket might become spread. This may result in poor or intermittent con tact between the tube pin and the metal sleeve when a tube is reinserted in the socket. The metal sleeve of the contact may be repaired by inserting the tip of a pair of long-nosed pliers into the tube socket hole and compressing the sleeve to its original shape. If long-nosed pliers do not fit into the tube socket hole, insert a pointed tool such as an awl between the sleeve and the inside wall of the hole containing it.
If the terminal is merely bent out of shape so that contact cannot be made or is intermittent, it probably can be bent back into shape with a pair of long-nosed pliers. It might also be possible to make contact by inserting a pointed tool, such as an awl, between the contact and socket body.
CORD AND CABLE REPAIRS
Cord trouble results from the breakage of a conductor at the connecting plug. To make the indicated repairs.
—Thread the cord through the hole in the plug and tie the wires in a simple knot. This procedure will keep the strain on the knot, rather than on the connection ( FIG. 4).
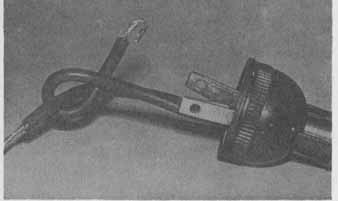
FIG. 4. The wires of a line cord have been threaded through a plug and tied
to provide a strain relief.
—Remove about one-half inch of the insulation from the end of each conductor and tin the ends of the wires. The tinning will form a solid mass at the ends and will eliminate loose ends and possible short circuits.
—Wrap each wire in a clockwise, direction around a prong, then around a screw. When the screw is tightened, the wire will be pulled tight in the same direction ( FIG. 5).
In multiconductor cables the most common trouble is a broken conductor at the connector terminal. To effect repairs:
—Remove the broken end from the terminal while heating it with a soldering iron.
—If the remaining wire is too short to reach the terminal, splice and solder a piece to it as an extension. Slip a piece of spaghetti tubing over the wire before the splice is made. After splicing and soldering, slide the spaghetti tubing over the joint.
—Solder the other end of the extension to the proper terminal. If necessary, clean out the excess solder from the terminal by heating it with a soldering iron. Shake out the old solder while it is still hot. All the conductors should be inspected, because if one is broken, others may be broken, or be near the breaking point. If others are badly worn, replace the entire cable.
REPAIRING SHIELDED CABLES AND WIRES
Shielded cables are repaired in the same manner as unshielded cables. The purpose of the shielding is to keep magnetic fields from causing interference in the cable and to prevent radiation from reaching the conductors. It is therefore important to reconnect the shield if it has been disconnected.
If the shielded cable has only one conductor in addition to the shield, the shield should always bear the strain. This is accomplished by making the shield connection shorter than any other connection, so that the shield will prevent the other conductor from breaking when any strain is put on the cable.
REPAIRING TRANSFORMER WINDINGS
If a primary or secondary winding is open, repair is impossible except in a relatively few cases. Such cases occur when the open winding is on the outside—that is, when it appears on top of the other windings—and when the break is on the surface layer and not buried under one or more turns of wire.
Repairable breaks are those that occur where a lead is soldered to the thin wire of a winding. The cause of the break, most often, is corrosion. Repair is done by resoldering.
In a few instances, it may be possible to repair a break inside a winding (below the surface layer) by fusion. Such a repair, however, would be only temporary. It is done by applying a high voltage momentarily across the ends of the winding; the power used should be of several hundred volts taken from the B+ line. If the separation is not too great, the applied voltage may cause an arc that will fuse the separated ends of the wire.
TUBE REACTIVATION
If a tube checker indicates that a tube has low emission, it may be possible to reactivate the tube. Apply a voltage of two to three times the normal voltage to the filaments for a few seconds with the plate voltage removed. This will force to the surface some of the electrons that are well within the cathode. This procedure is a temporary one and applies only to tubes with certain types of cathode material. However, it can be tried on any tube if the tube cannot be used otherwise.
If the tube does not respond to this treatment, the filament can be subjected to a voltage about 1½ times the normal value for several hours with the plate voltage removed.
REWINDING RF COILS AND CHOKES
Most RF coils and chokes used in old radios can be easily wound by hand, or with a lathe or drill press. If the wire on the defective coil has been damaged by corrosion, it is only necessary to remove and count the number of turns of wire originally on the coil. Clean the FIG. 5. The wires have been attached to the plug screws in the proper manner.
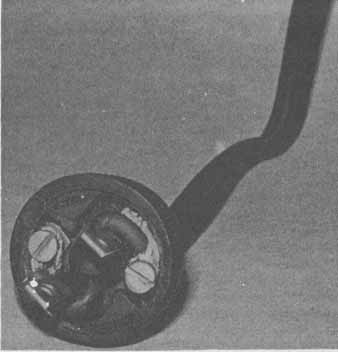
FIG. 5.
In instances where it is necessary to construct the entire coil, select the proper diameter form. Unless a close wound winding is definitely specified, the number of turns of wire should be spaced to fill the required length on the form. The length specified should be marked on the form and holes drilled opposite the pins to which the ends of the winding are to connect. Scrape one end of the wire and pass it through the lower hole in the form to the pin to which the bottom end of the winding will connect and solder this end. Unroll an amount of wire sufficient to make the winding and clamp the spool in a vise so it will not turn. The wire should be pulled out straight and the winding started by turning the form in the hands and walking up toward the vise. A fair tension should be kept on the wire at all times. The spacing can be judged by the eye. If, as the winding progresses, it becomes evident that the spacing is going to be incorrect to fill the required length, the winding can be started over again with a different spacing. If the spacing is only slightly off, the winding can be completed, the top end fastened, and the spacing corrected by pushing each turn. After a little practice, it will be difficult to deter mine the correct spacing.
Another efficient method of winding coils is with a drill press or lathe, operating at a slow speed. A mechanical counting device attached to the drill press or lathe makes this method particularly useful in accurately winding chokes and coils containing many turns of wire.
REPAIRING SWITCHES
Multi-contact switches should be cleaned with solvent and a brush. After the switch has been cleaned, a careful inspection should be made of the spring tension for each contact, and the tension increased on any weak contacts. The tension on wave-band switch contacts can be increased by carefully bending the contact slightly with a small hook shaped bending tool, as shown in FIG. 5.
REPAIRING FIXED VARIABLE RESISTORS
When a carbon resistor becomes overheated, its resistance decreases. The resistance may be raised to the correct value simply by scrapping part of the carbon from the body until the correct value is obtained. A wire-wound resistor can sometimes be repaired by placing a clamp over the break or by shorting the break. This restores continuity with a slight decrease in resistance.
Variable resistors and potentiometers, as used in volume controls, seldom burn out, because of the small amount of current that passes through them. Faulty operation is generally due to poor contact, wear and dirt at the rubbing contacts. Clean these thoroughly with solvent. Polish them with an ordinary pencil eraser, one which is not too gritty, and adjust the tension of the arm so that it makes a firm contact. If the variable resistor is too worn to make a temporary repair, replace it with a fixed resistor, the value of which must be found by experimentation. If the variable resistor is wire wound and there is a break in the winding, slipping a small metal tab underneath the broken section will restore continuity in most in stances.
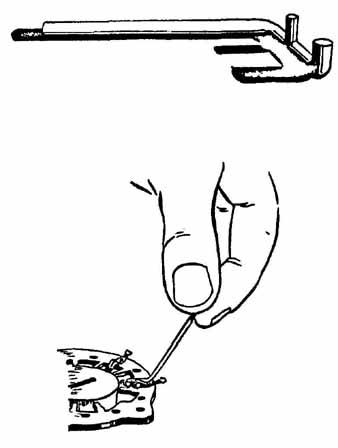
FIG. 6. Suggested way for increasing switch-contact tension.