by Howard A. Roberson
The inclusion of Dolby noise reduction has certainly been a major factor in the success of the cassette format.
Unfortunately, performance in this mode has been unsatisfactory in too many cases because of poor matching between the tape formulation and the Dolby circuit adjustments in a particular deck. A good part of the problem is the fact that most manufacturers do not inform the owners as to what specific tapes were used for set-up.
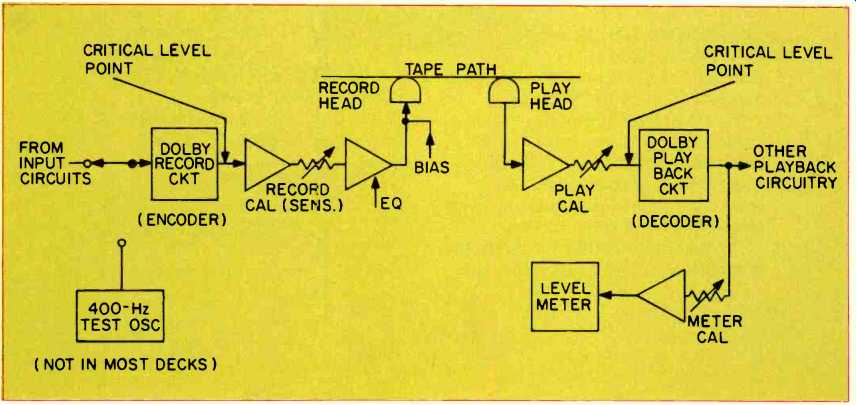
Let's take a look at the elements essential to Dolby NR calibration. Figure 1 shows the blocks of important parts, as they appear in a few decks. What is shown is for purposes of illustration, such as separate record and play heads and the built-in test oscillator; many other circuit elements, including some switching to the meter, are not shown.
The Dolby encoder and decoder per form correctly when fed specific voltages. The output of the decoder should be at a certain voltage at the Dolby level reference, the manufacturer may make an internal adjustment if necessary, and then Meter Cal is adjusted for such an indication. Now, when a standard Dolby-level tape (200 nWb/m at 400 Hz) is played on the deck, Play Cal is adjusted for the same indication. At this point, playback and metering are calibrated; in other words, metering and decoding are properly referenced to Dolby level.

Fig. 1--Essential elements in Dolby N/R loop calibration.
The critical level points, as indicated in the figure, are at the input of the decoder (which is set with Play Cal) and the output of the encoder. To set up the encoder, the manufacturer uses signals specified by Dolby and makes any adjustments necessary, all of which are points inaccessible to the user. If there is a built-in test oscillator, it must be set (usually internally) for the correct drive level, but this is not an adjustment of the encoding function. Between the two points defined as "critical" in the figure, we have some amplifiers, the record and play back heads, the tape path, and the introduction of bias and EQ. In general, we can say, and we do rely on the fact, that the amplifiers have stable gain.
What does change, however, is tape type with corresponding changes in record sensitivity and EQ and bias requirements.
When the manufacturer sets up the deck, he uses a series of adjustments for each tape for best frequency response and to maintain the level relationship between the two critical points. These same requirements apply to a two-head machine with the single record-play head, where the head and Dolby-circuit functions are switched for playback. If the user of the deck knows what the manufacturer utilized for set-up, he will probably get the best results with the same formulations (or ones very close in characteristics).
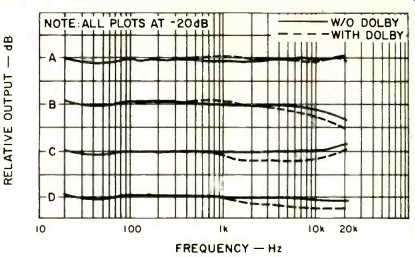
If another formulation is used, how ever, the results may be quite disappointing if bias requirements and/or record sensitivity are different. In Fig. 2, the swept-frequency response plots from 20 Hz to 20 kHz illustrate how this can happen. In the top set of plots, the Dolby response is almost exactly the same as that without noise reduction. For the second set, bias was purposely increased to cause a drop of 3 dB at 15 kHz without Dolby NR. As the dashed plot shows, the response with Dolby is poorer, having about twice as much droop above 3 kHz.
For the third group, bias was re turned to the original setting, and record level calibration was set 3 dB too low (at 400 Hz). Here the result is a shelving action with a 2-dB reduction in level, with Dolby, from 2 to 10 kHz.
For the bottom plots, bias was set for a 2-dB reduction at 15 kHz, and 400-Hz record sensitivity was set 2-dB low.
Here we have a -1 1/2 to -2-dB shelf with Dolby NR with a general fall-off as the frequency is increased. Changes in the sound when switching in Dolby are most evident in the last two cases:
There is a definite loss in presence, and most music sounds quite dull.
So, what can you the owner do to minimize such effects? First of all, if you have a deck which includes facilities for checking and adjusting bias, EQ, play calibration or record calibration, you can use what adjustments you have to aid in verifying the performance with Dolby N/R. Proceed cautiously, however, and keep track of any changes made. You may deter mine that you can get a better match with another tape type. Don't forget that if you want to check play calibration, a Dolby-level test tape is needed.
Checking for unwanted shifts in response when switching to Dolby is easiest at 20 to 25 dB below Dolby level. Mistracking should be obvious, and the signal level well above noise.
Use music and FM interstation noise, if you do not have test sources.
It's tougher to get to the solution if your deck does not have such adjustments on the front panel. If you're lucky, the manufacturer stated exactly which tapes are best. If there are more than a very few tapes listed, the list is suspect. Unfortunately, most manufacturers hesitate to state exactly which formulations are used for set up, a reluctance they should over come. By referring to the two figures and reviewing the discussion above, the reader may correctly conclude that using a tape that plays 400 Hz back at the same indicated level as in record is a matching of record sensitivity.
(Check position of output pot, etc.) With a number of tapes that pass this test, record/listen tests with music should pinpoint the best bias/EQ match without Dolby. The tapes surviving these tests should give you good frequency response as well as low noise when in Dolby mode.

Fig. 2--How various bias and record sensitivities affect frequency response.
A, responses with bias and record sensitivity matched to tape. B, responses with excessive bias. C, responses with correct bias with sensitivity set 3 dB too low. D, responses with bias causing 2-dB drop in Normal and record sensitivity set 2 dB low.
(Source: Audio magazine, Sept. 1979)
Up in the Air About Metal Tape (Sept. 1979)
= = = =