In the beginning, there was only natural sound. It might have been loud or soft, high or low, but it was never upside- down. Then came recording, and the trouble started. Without meaning to do it, we now had a way to turn sound upside-down. If you have never heard of the argument about whether absolute polarity (or absolute-phase) inversion is important or not, you might ask me, “What on earth are you talking about? How can you describe sound as being upside-down?”
Sound causes a variation in air pressure above and below the median (or normal) barometric air pressure When sounds reach our ears, our eardrums move in with an increase in air pressure and out with a decrease in air pressure. Most acoustically generated sounds—such as speech, brass instruments, plucked instruments, drum rim shots, and so forth—are asymmetrical, especially at their onset; they cause air pressure to vary up and down in an unequal manner. Figure 1, for example, shows the onset of a trumpet tone; it is clear that the waveform and its envelope are asymmetrical. If such a sound is recorded and then played back with its polarity inverted, not only will air pressure go up when it should go down, and vice versa, but the asymmetry will be flipped as well, reversing the directions of the greater and lesser excursions.
Greiner and Melton have shown that the waveforms of most musical instruments are asymmetrical. There are some exceptions, however. Years ago, I asked a friend to play a song on the clarinet but to do it back wards and with the intonation reversed. I recorded a full-track tape recorder, and then we reversed the tape and listened to it. On the second try, he did so well that it was difficult to tell that we weren’t listening to a normal recording.
In any event, there are numerous opportunities for sounds to get turned upside-down in the recording or playback chain, purposely or accidentally. Depending on how it is wired or connected, a cable may invert polarity (and some electronics invert signal polarity). Even if you are careful to maintain correct polarity in your own playback system, you have no way of knowing the polarities of the signals on recordings you buy.
Whether it is important to maintain the correct polarity is not my concern here. To some people, the question is moot, but I think that everyone should have a chance to check it out for himself. I am reminded of a study done many years ago by a major electronics company to determine the bandwidth necessary for “high-fidelity” sound reproduction. The conclusion was that 5 kHz was adequate, which seems laughable today. The point is that as audio recording and reproducing equipment improve, people can often hear things they couldn’t hear before. I believe that is probably true for polarity inversion. I am one of those people who can hear the difference in the polarity of sound, yet I have listened to loudspeakers and earphones that did things to waveforms that made it impossible for me to determine the correct absolute polarity. I have also found that hearing polarity inversion is something that can be learned, so even if you build one of the polarity switches described here and don’t hear a difference right away, don’t give up.

FIG 1. a—ONSET OF A TRUMPET TONE. NOTE THE ASYMMETRY OF THE WAVEFORM AND ITS
ENVELOPE. A POLARITY SWITCH FOR HEADPHONES.
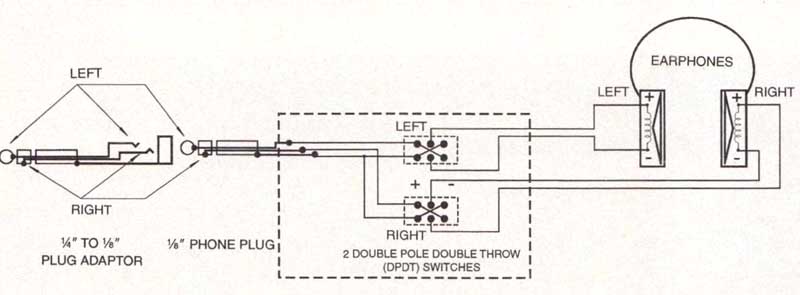
FIG. 2—SCHEMATIC FOR AN EARPHONE-POLARITY SWITCH. 2 DOUBLE POLE DOUBLE THROW
(DPDT) SWITCHES; ¼” TO 1/8” PLUG ADAPTOR.
The easiest way to determine whether you can hear polarity reversal is by using earphones. The reason I suggest that you should use earphones rather than loudspeakers for this experiment is that the characteristics of some loudspeakers and room acoustics can make hearing the effects very difficult. Even if you do most of your listening with loudspeakers, it still makes sense to use earphones when you are just trying to determine if you can hear a change in acoustical polarity.
Unless your preamp has a polarity switch, you will have to make your own. For earphones, which use a three-circuit plug, that means the earphone cable must be modified. The problem is that the common (negative) wire from each earphone element is connected to the sleeve of the plug, so you can’t reverse polarity unless you cut the cable and wire a switch between the plug and the ‘phones. Most of the earphones that I have tested for Audio will enable you to hear polarity reversal, but since you might have qualms about cutting the cord to your earphones just to do this experiment, especially if they are expensive, I looked around for some that are relatively in expensive yet good enough for the purpose.
I came up with Sony’s MDR-E565--small, in-the-earphones that are good enough for me to hear the effects of polarity inversion on certain program material. They come with a 1/8-inch stereo mini-plug and a ¼-inch adaptor and cost only $29.95. They are also reasonably easy to modify. These “earbuds” have very good frequency response, with excellent high-frequency extension; the bass response is just adequate, lacking the powerful sound of more expensive ear phones, but I must admit that I was pleasantly surprised by their overall performance. They are very sensitive and provide a very high output from a number of sources. This is because of their low impedance; I made a quick check with an ohmmeter and measured 17.5 ohms on the left side and 18.0 ohms on the right. They are wired with positive polarity, but they do ring somewhat because of delayed response above the audio band. The transducer elements fit comfortably in my ears, and I could wear them for long periods without feeling any discomfort. Although each earpiece is marked for left or right, you will not have to look each time you put them on because the left channel has a shorter lead than the right—a nice touch.
Figure 2 is a schematic of the modification. It is very hard to find four-pole double-throw switches, so I used two Radio Shack No. 275-407 sub-mini double-pole double-throw (DPDT) slide switches. I mounted them into a cassette case. You can use any small case, but a cassette case has some advantages, at least for this experiment: Such cases are readily available at record stores, they are easy to drill and file, they fit your hand, and they have enough room to store the phone-plug adaptor supplied with the MDR-E565 earbuds.
I drilled a hole in the top of the body of the case and then filed a ½ x 5/16-inch opening for the two switches. I also drilled a ½-inch hole at each end of the cassette case to allow the earphone cable to enter and exit. I picked the No. 275-407 switches because, when they are mounted close together, the two slide levers can be moved together easily with a thumb or finger. If you wish, you can use mini toggle switches (such as Radio Shack No. 275-614 or 275-663), but they are more expensive, are harder to move, and make a click that might be distracting.
After I drilled and filed the openings in the cassette case, I checked the switch opening to make certain that it was large enough to allow the full travel of the switch levers. I glued the two switches together (with Scotch Brand Super Strength Adhesive) and then glued them against the inside of the case, with the levers sticking out of the opening. The switches come with tiny screws, but I decided to avoid the problem of locating and drilling holes for them in the case.
Cutting the earphone cable and soldering it to the switches requires some care. The Sony MDR-E565 earbuds have a very flexible cable jacket that is slightly oversized relative to the four very fine litz wires inside. I used a razor blade to cut the outside jacket and pulled it back to expose 2 inches of the wiring within. There are two copper-colored wires for the common ground, a green wire (left), and a red wire (right). I determined which common went to which channel by strip ping the insulation from each of the wires, scraping them carefully with the razor blade, and cutting just one of the two copper-colored wires. I then put on the earphones and touched the ends of a 1.5-volt battery to the cut common wire and the green or red wire. If you hear a click in the left ear when you connect the cut common wire and the green wire, they go together as a pair; if the click is in the right ear when you connect the red wire and the common wire, then they go together as a pair.
After I determined which colored wire went with the cut common wire, I cut the colored wire to the same length for connection to the switch. I then cut both the other common and its matching colored wire at a slightly different point from the first pair so that I could keep track of which pairs went together. I slipped the ends of the wires through the holes at the ends of the case, leaving enough slack to make soldering them to the switch easy. Next, I tied a slip knot in each cable, inside the box, to act as a strain relief so that the cable could not be pulled back through the hole. I soldered the crisscrossed wires (shown in Fig. 2) to the switches, using insulation tubing on one of them. (You can use insulated tape on both wires if you don’t have slip-on insulation tubing.) I then wired the earphone part of the cable to the switches’ center lugs and the cable’s plug end to the lugs at the ends of the switches. That’s it! Follow this procedure, and you will be ready to try to hear the effects of polarity reversal through your earphones.
=== THE EASIEST WAY TO DETERMINE WHETHER YOU CAN HEAR POLARITY REVERSAL IS BY USING HEADPHONES. ===
LISTENING FOR POLARITY REVERSAL
Over the years, the effects of reversing acoustical polarity have been described in different ways. Some people say that they perceive the effect as a subtle change in pitch, with correct polarity having slightly higher pitch than inverted polarity. Many people can hear this effect over a single loudspeaker reproducing a mono source, such as a human voice. In stereo, many people hear a more solid and defined soundstage when polarity is correct. If the stereo program features a vocal, most people will say that the voice is more forward and distinct when the polarity is correct.
The best source for testing your ability to hear the effects of polarity reversal is a live microphone feed. Have someone speak into a microphone that is connected to your recorder while you switch polarity back and forth, listening for a difference. The quality of the microphone can affect the results, so try to use a good one. (If you do this experiment later with loudspeakers, you will need a long microphone cable to allow the mike to be in a different room from the speakers so that the sound won’t feed back and howl.)
Another good program source for this purpose is AM radio. Of necessity, AM broadcast limiters are designed in such a way that they maintain signal asymmetry. If you listen carefully to an announcer’s voice, you should be able to hear a difference when you switch from positive to negative polarity. One switch position will make the announcer’s voice sound more natural than the other, especially with certain hard consonants (Ts, Ps, and so forth).
Recordings, especially those that contain prominent brass or percussion, should also enable you to hear the effects of polarity reversal. I have listed a few suggested CDs in “A Polarity Tester’s Listening Library.”
If you can hear the effect of polarity inversion on some program material with earphones, then you will probably want to experiment with your loudspeakers. There are several things you can do to make the process easier. If you can, move your loudspeakers so that they are about 3 feet apart and away from any walls or objects that could produce acoustical reflections. Sit between the loudspeakers and as close to them as practical. Play some program material (pink noise from an off-tuned FM station or a test CD is excellent for this purpose) and move your head up and down while listening for any major changes in spectral balance. Try to keep your head in the spot that provides the smoothest sound with the least coloration; this will be the best position to listen for the effects of acoustical polarity.
A POLARITY TESTER’S LISTENING LIBRARY
- Live microphone into a tape recorder. Ask someone to read something you listen and switch polarity. You can record the voice for later tests, but the best quality will be while to the original microphone sound.
- Announcer’s voice on AM radio. Tune in a clear AM station, and listen to a live announcer’s voice. Listen for the sound of hard consonants (Ts, Ps, etc.).
- My Disc: The Sheffield/A2TB Test Disc (Sheffield Lab 10045), track 23, polarity test signal. This is a sequence of clicks, three positive, and one negative. The sound should be “tick, tick, tick, tuck.” If it sounds like “tuck, tuck, tuck, tick,” the polarity of something in your system is reversed.
- Coustic Test CD (Sheffield Lab 10040), track 10, polarity test signal. This is the same test described above.
- The All-Star Percussion Ensemble (MMG MCD- 10007), various tracks. Robert Hohner Percussion Ensemble, Lift Off (dmp CD-498), track 4, “La Bamba.” The percussion should be bright and clear, the sound stage stable and precise.
- Steve Miller Band, Wide River (Polydor 314-519- 441), track 6, “Like a Horse and Rider.” The snare drum should sound bright and real, not muffled. The voice should be clear and articulate.
- Prokofiev, Lieutenant Kijé Suite for Orchestra (RCA Gold Seal 60176), track 8. The trumpet should sound clear and bright.
- Copland, Billy the Kid (Mercury Living Presence 434301), track 13, “Gun Battle.” Listen for realistic, bright brass and sharp percussive transients.
- Margie Gibson, Say It with Music ( Sheffield Lab 10036). Gibson’s voice should be clear, articulate, and forward.
- One Night in Vienna (Windham Hill WD-1060), track 1, “Wishing Well” The percussive sounds should be clear, bright, and articulate.
- Sheffield Drum and Track Disc (Sheffield Lab 11420), track 6. The cymbals should sound bright. The snare drum should have a clear, sharp sound, with good attack.
SPEAKER POLARITYS SWITCHES
If you listen to a single loudspeaker, you can change polarity with a simple DPDT switch connected between your amplifier output and the speaker. If you use two speakers, you must be able to switch both of them simultaneously; this will require two DPDT switches or some other, more sophisticated system for reversing polarity.
Figure 3 is a schematic of a simple loudspeaker-polarity switch. This switch can be placed between your amps and speakers. If you have an external speaker selector that connects the negative wires for all the speakers together, as most of them do, you will have to put the switch after it.
I used a Radio Shack No. 274-623 eight-position push button terminal for my loudspeaker-polarity switch; it will easily accept even very heavy cable. It has a diagram on the back of the package that will help you to cut the correct opening in the switchbox before you mount the terminal. I selected Radio Shack No. 275-652 flat-lever toggle switches, which are rated at 6 amperes, but any heavy-duty DPDT switches will work. The terminals and switches can be mounted on a Radio Shack No. 270-224 or 270-232 box. (These boxes are also large enough for the relay-type polarity switch discussed below.)
REFERENCES:
- Greiner, R. A. and Douglas E. Melton, “A Quest for the Audibility of Polarity,” Audio, December 1993.
- Stodolsky, D. S., “The Standardization of Monaural Phase,” IEEE Transactions on Audio and Electroacoustics, September 1970 (Vol. AU18).
- Lipshitz, Stanley P. and John Vanderkooy, “Polarity Calibration Tape (Issue 2),” Journal of the Audio Engineering Society, July/August 1981 (Vol. 29, No. 7/8).
- Heyser, Richard C., “Forum: Polarity Convention,” Audio, September 1979.
- Atkinson, John, “Listening Tests & Absolute Phase,” Hi-Fi News & Record Review, November 1980.
- Fletcher, Ted, “Thought in Phase,” Studio Sound, July 1981.
- Burnham, Scott R., “Feedback,” Mix, April 1986. Hirsch, Julian, “Polarity Revisited,” Stereo Review, October 1989.

FIG. 3— SCHEMATIC FOR A STEREO SPEAKER POLARITY SWITCH.

FIG. 4—Schematic for a Relay-Operated Speaker-Polarity Switch Actuated By
A Remote Pushbutton.
Since the distance between the terminals and the switch is very short, you can use 18- or even 20-gauge wire. Mount the switches close together so that you can flip them simultaneously with your thumb and fingers. If you glue a bar between them, this will be even easier.
If you determine that you can hear the effects of polarity inversion and that it is important to you to be able to set your loudspeakers to the correct polarity for each recording, you should probably build a loud speaker-polarity switchbox that uses relays and a remote pushbutton so you don’t have to leave your listening position. A schematic for a relay-type speaker-polarity switch, using two Radio Shack No. 275-218 relays, is shown in Fig. 4. The remote pushbutton can be mounted on a small box that you can hold in your hand. I used a Radio Shack No. 275-1565 push-on/push- off switch in a 2 x 1 x 1-inch case.
I hope that I have provided the incentive for you to experiment and discover for yourself whether you can hear the effects of acoustical polarity reversal. Remember that it is a learning experience; you might not hear the effects right away. Also remember that the quality of the program material and your earphones and loudspeakers, as well as your acoustical environment, can affect the results. I also hope that the guidelines that I have provided will make it easier for you to decide whether you are willing to accept upside-down sound.