You need only rudimentary skills to build this 7” two-way, which features new Parts Express drivers.
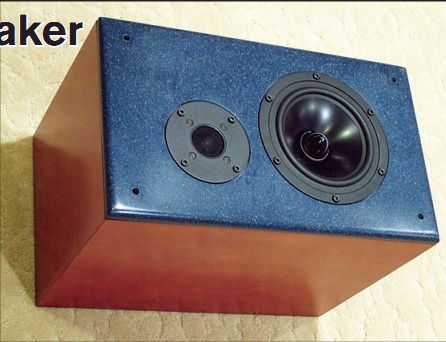
PHOTO 1: The completed NeoNoir two-way speaker.
When I sit down to design a speaker, I start with one of three ideas: a visual design, an audio design, or an experiment of some sort. This project was borne of the visual criteria, but came to excel in the audio realm. It is one of the easier projects I have done. This 7” two way incorporates newly designed Reference Series (RS) drivers from Parts Ex press (PE) into a prefabricated box with only basic skills needed to complete the project. The resulting sound and appearance is outstanding.
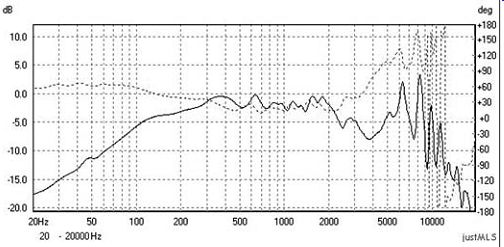
FIGURE 1: Dayton RS180S-8 woofer MLS plot full range in near field. Gated
response measures 500Hz-20kHz to show cone breakup.
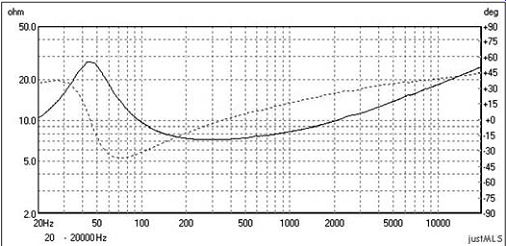
FIGURE 2: Impedance plot of Dayton RS180S-8 7” woofer. Note the Fs is a little
higher than spec, typical of production run measurements. Typically, the electromechanical
parameters offset this. This will lower as the woofer breaks in.
DRIVERS
Driver selection has become more complex in recent years as waves of units have flooded the market, many from Asia. While some are junk, others have real promise, so finding the roses among the thorns can be a challenge. Some of the established driver companies needed to adjust to this new market by refocusing on profit and core distribution net works, often leaving the DIY market in a tertiary position.
Over the past five years, speaker builders have lost access to many brands including Focal , Dynaudio, and Audax.
To fill this void, distributors have added brands for the DIY market.
One of the larger US distributors, Parts Express, has added such brands as Hi-Vi, Tang Band, and Usher. In early 2004, they introduced a new line, the Dayton Reference Series to compete with the higher-end drivers from large international manufacturers.
I was lucky enough to win a pair of the new RS180 7” drivers at the 2004 DIY "Spring Warm Up" event in DC. Because I was busy with another project, I waited until PE introduced the matching RS tweeter in early 2005 before put ting together a design. Both RS drivers look beautiful and are well made. The woofer uses a cast basket and coated black aluminum cone with black phase plug.
Like many metal-coned drivers, it has a nasty breakup mode beginning at 5kHz (Fig. 1), which will take a little extra crossover experience to tame. The Fs is around 44Hz, typical for a 7? driver (Fig. 2). The driver has Faraday shorting rings, which suggest it should run with the big boys as far as distortion.
The tweeter has a 1 1/8” aluminum dome with ferrofluid and comes in shielded and non-shielded versions, both of which are 4-Ohm with Fs around 800Hz.
The large dome and low Fs make this a great match for the RS180 woofer.
Like the woofer, this tweeter measures a smooth response (Fig. 3) with some drop-off above 10kHz. The build quality of this tweeter is very high with a cast metal flange and robust dome grille. THE CABINET
To compute cabinet size, I use a free spreadsheet program, "Unibox"
(http:// home20. inet .tele.dk/kou/ubmodel .html),
which suggested a 20 ltr cabinet tuned to 40Hz using a 6.4cm (2.5") by 26cm (10¼") port. I enjoy the woodworking part of speaker building and had some pretty nice veneer stored in the garage, so I was looking forward to building these cabinets. But by coincidence, I also had a pair of PE 20 ltr prefabricated cabinets I was planning to sell to a friend as part of a kit. Because this friend was waffling on the kit, the PE cabinets were available. I decided to make this an "all PE" speaker.
I don't intend this article to be a PE love fest, but this is another area PE has really scored in the past couple of years.
Their prefab cabinets are the highest quality I have seen in the prefab DIY market. The fit and finish is excellent and the price extremely reasonable. Extra baffles are available just in case you have a miscut. The black gloss and cherry versions are especially beautiful. These cabinets are made of MDF and braced reasonably well as delivered. I added additional bracing between the woofer and tweeter and on the sides, just for good measure.
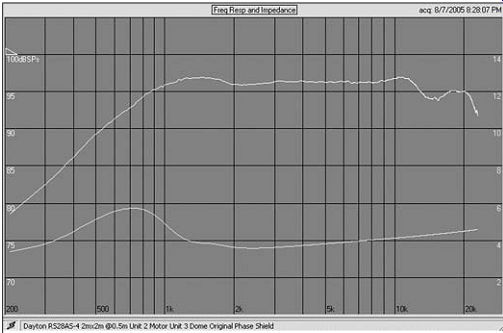
FIGURE 3: Dayton RS28AS-4 tweeter. Some rolloff in the region above 10kHz.
The 20-ltr cabinet measures 17” H × 10” W × 12.5” D. The baffle is rounded so the usable face is really about 7½”. I like to keep at least 3? of space behind the port.
The inside depth of this cabinet is too short for the port I modeled, so I needed to change ports, find a bigger cabinet, or change the tuning. Fortunately, I keep a stock of low-cost items such as adjustable ports so I don't need to order parts in the middle of a project. Doing the math in Unibox, I could move the tuning up 4Hz and leave a 2¾” gap behind the port. That did little to other parameters, and I could keep the larger port to prevent chuffing.
So I tuned the cabinet box up to 43Hz with a 21cm (8¼”) port. I am still a little short on the 3? back relief, but I don't dare go any higher with the tuning. I debated about putting the port on the front or the rear, but decided on the rear because putting it on the front would have made for a crowded baffle. I now wish I had put it on the front, because I think it is easier for room placement.
The drivers have a ½” space between them. The PE boxes are sold in a finished state, so you must be very careful when routing holes. The current best practice is to place paper shelf liner with a slight tacky (not adhesive) backing toward the box and cut through the paper. Then peel the paper off. I place a foam mat tress pad on the workbench to protect finished wood during these operations.
On this project, you cut holes for the port, woofer, and tweeter. I recess the port for looks, but that is not necessary.
However, you must recess the woofer and tweeter. Use a plunge router with the Jasper jig and a ¾? bit for the recesses and a ¼” bit for the holes. These are the only cuts on this project if you use the baffle that comes with the cabinet.
A couple of gold input terminals require only a drill-worth the extra cost be cause they look great and you don't need to cut a terminal plate hole or recess. PE would do well to stock baffles with pre cut holes for their more popular driver combinations.
Another part of this project requires the use of a Corian baffle. Corian is the plastic used in countertops and is made by Dupont.
A very generous speaker-building colleague offered to cut a pair of baffles for me and I took him up on his offer for this project. Corian is brittle and difficult to work with.
You will get chips, nicks, and scratches no matter how careful you are.
I glued the Corian onto an MDF slab using Liquid Nails so it fit exactly into the PE box and to provide sup- port for the thin Corian, which I cut to fit the same baffle mounting holes in the PE box. So the whole Corian baffle is replaceable with the PE baffle if I change my mind later. Even the original grille fits into the mounting holes in the Corian. I used cap screws and hurricane nuts to fasten the drivers. I have one more set of Corian baffles already cut for the next project, but after that, I don't think it is worth it.
There are a number of options for interior damping. I have used Acousta-Stuf as well as a number of other products. My usual methodology is to use Dacron pillow stuffing from a fabric store in the upper part of the cabinet away from the port and stick-on foam near the woofer. I try very hard not to interrupt the flow from the woofer to the port.
If you have measuring equipment, you can see the effects of limiting air to the port by noting the height of the saddle on the impedance plot. This subject is covered in most speaker-building books, but I was surprised at how little interruption it takes to affect the performance. I included some sticky foam in the parts list. Place it on the sides of the cabinet behind and in back of the woofer. You might also add some wherever the cabinet sounds a little hollow on the rap test (or add more bracing).
------------
PARTS LIST
Component Item No. Estimated cost Total cost
For ease of ordering, I am using all parts from PE. The woofer circuit (Fig. 7) is mostly a second-order. The tweeter is a second-order (Fig. 8) with L-pad. The tweeter is not reversed on this configuration as the filter to kill the woofer breakup moves the drivers into phase.
-----------
THE CROSSOVER
This crossover is just a little more complex than a simple second-order. I downloaded the CLIO files from PE and manually stripped the header in formation so Lsp CAD (www.ijdata.com) could read them. Lsp CAD did a reason able job of predicting response, but this speaker needed much trial and error.
There are different topologies to kill the cone breakup. I tried three or four and ended up with this version. It is close to some of the other crossovers for this driver combination, so if you don't like my crossover, you can try one of the other designs on the Internet that use a similar cabinet. I am not sure whether you call this a second-order or third order because the second capacitor is after the filter. The acoustic rolloff is close to second-order.
Again, the idea is to start the knee to merge with the tweeter, but then pro duce a steep drop to kill the cone break up. Note that I listed a 1.80mH coil as the primary woofer coil. This is one spot where it pays to spend a little extra money to get the larger gauge wire with less resistance.
While 1.80mH will work fine, you can unwind 6-10 turns to bring the value close to 1.70. This will brighten up the speaker if you prefer brighter speakers. Remember that all of the components in the speaker have tolerances, so you are not putting something terribly out of balance if your unwinding is not perfect. The impedance is a little steeper than I prefer, but it does not seem to affect the sound (Fig. 4). You can add a zobel to straighten out the impedance curve if you wish.
I left it off the parts list because, while it does level the impedance, it pulls the tweeter impedance down t o under 4-O, which I think a larger sin than the impedance curve.
If you decide to add a zobel, use a 10-O resistor and 24µF cap across the woofer input.
To install crossovers, cut a sheet of pegboard into 4 × 6 rectangular blanks.
Then place a pearl-size drop from a hot glue gun on each of the four corners of the bottom of the blank. When this is dry, the hot glue pearls act as feet. Assemble the crossover using plastic ties and solder the connections. Put a small piece of foam under resistors to pad them under the pressure of the plastic tie. If the crossover is large and complex, use two blanks per speaker.
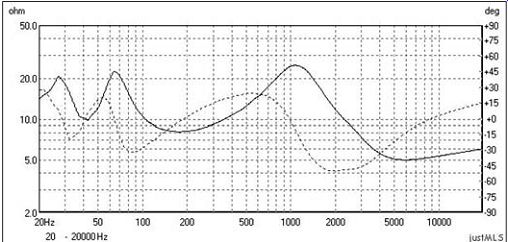
FIGURE 4: Completed speaker impedance plot. Easy to drive speaker with a drop
to 5O up at 5kHz. A zobel circuit will smooth the impedance in the 1kHz region
at the cost of dropping the upper region below 4O.
To mount the crossover, simply use one screw in any hole in the center of the blank and into the speaker. As the screw tightens, it pulls the blank at the center, pressing the feet firmly against the speakers. This produces a five-point compression: four feet and the center screw. I have never had a crossover come off or even move using this technique.
MEASUREMENTS
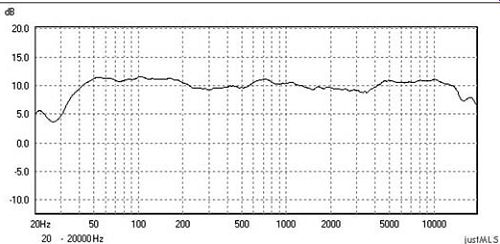
FIGURE 5: Merged MLS plot for the completed speaker.
Some drop-off in the mids section to cool brightness.
Port output and lower woofer range taken near field, mid/upper range at 1 meter.
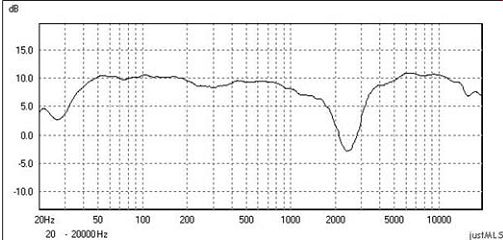
FIGURE 6: Reversed tweeter showing null in crossover section.
The final measurements look very good with a flat MLS across the midband and a small dip in the upper mid. I did that on purpose to take some of the coldness out of the voice, typical of flat-voiced speakers (Fig. 5). The off-axis and vertical axis are typical for this configuration with little variation 15° horizontal, but like many second-order crossovers, there is a fair amount of vertical variation at the crossover point due to phase. The impedance looks good with a typical rise near the crossover. The reverse null is good with a more than 12dB drop at crossover (Fig. 6).
SOUND
The overall sound is detailed and gentle, with no brightness at all with solid bass.
The clarity of the bass and the detail in the mids surprise me the most. My usual test tracks sound great. Duke Ellington/Louis Armstrong "Duke's Place" (The Great Summit) is the most revealing track in my arsenal. When this goes bad, it really goes bad.
Everything works well with the Neo Noir. Duke is on the edge of bright with a touch of harshness, great striking on the piano, reedy horns, and chesty voice. The over-miked trumpet is tamed nicely. Dave Brubeck's "Take Five" also plays very well with the high hat clear, avoiding that "running water" sound.
The drum is solid, the clarinet breathy.
The NeoNoir pulls it off with amazing clarity for a 7? two-way. Use this one to position the speaker for best bass.
Classical also is good with excellent separation of instruments and staging. I generally use one of the Telarc Orchestra Spectaculars. The rear port comes alive about 18” from the back wall. Room position is important on this speaker as the bass is not elevated.
Again, if I started over, I would squeeze the port onto the front.
Peter Smith has been an audio hobbyist for most of his life, starting in the early 70s.
He has been building speakers for about six years. He runs a hobby website, www.helarc.com, and hosts a regional DIY speaker event every October in the Washington DC area. Look for posts under Pjay on the audio boards.
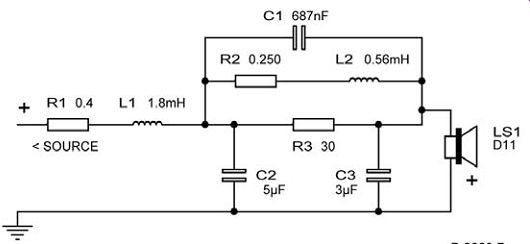
FIGURE 7: Woofer circuit. Second-order filter followed by a notch filter and
then a capacitor. The goal is to produce normal second-order slope with a steeper
slope in the upper region to kill the cone breakup.
The final acoustic slope is almost second-order in the crossover region.
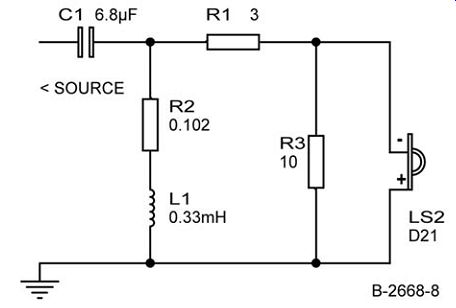
FIGURE 8: Normal second-order crossover with L-pad attenuation. The acoustic
slope is also second-order. Note the tweeter is electrically in phase with
the woofer. I think this is due to the phase shift caused by the notch filter
and the added capacitor in the woofer network.
Also see: