|
|
Follow the plans in this simple DIY project and get your speakers into the action.
I needed some stands for a pair of PSB Alpha Intro LR speakers to flank the entertainment center of our house we moved into recently. Some projects don’t work or look funky and end up in what an early mentor referred to as “the graveyard of broken dreams.” This project turned out differently.
It went together quickly, works, and looks pretty good. To top it off, it would make a good beginner’s project because construction and assembly require just a few simple tools that any beginning speaker builder living in an apartment has.
The PSB Alpha Intros measure a diminutive 4.25” wide, 6.75” tall, and 5.75” deep, and the stands place the center of the enclosure about 33.5” above the floor. You can adapt the basic design to a fair range of speaker sizes by simply changing the dimensions of some of the components. Wider speakers may re quire a wider base; deeper speakers may need a longer foreleg on the base to keep them from taking a nosedive. And, some of you may find a more elegant approach to cable management.
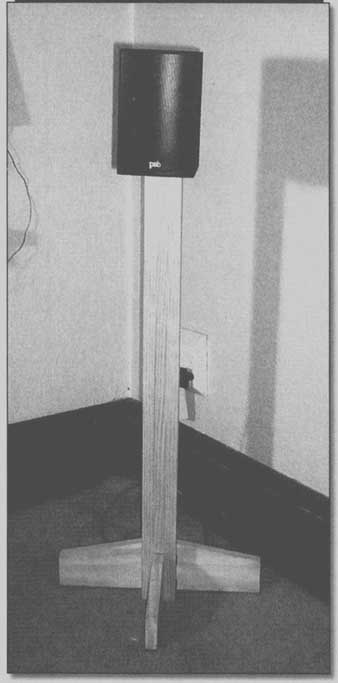
PHOTO 1: Speaker stand complete in corner.
PARTS
I purchased my materials at Home Depot, but you could also try any home center/lumberyard with a good selection of hardware. Some folks may be able to pull most of the materials out of the scrap bin. Here is a list of materials to build one unit:
• 1 — 10’ 1 x 2. I used select pine, but you could substitute any species.
• 1 — 4’ 1 x 4. Match species you used for the 1 x 2 if matching matters.
• 2 — 1.5 to 2” confirmat screws (Rockler, Home Depot).
• 4 — 50mm cabinet connector bolts with nuts— hex socket by 1/4” x 20 thread (Rockler’s, Home Depot).
• 1 — 2” cabinet connector bolt. A ¼ x 20 thread pitch will match many sockets on speaker backs, but you can change this to fit the application. McFeely’s threaded inserts, which you can install on home-built units, will take machine- threaded attachments like the commercial units.
• 3 screw-on feet of your choice, de pending on whether the units will stand on carpet or bare hardwood, as mine do.
Here are the tools you’ll need:
• Saw (handsaw will do)
• Electric drill/driver
• /16” drill bit and pilot drill to match confirmat screws and feet screws
• 5/32” hex key
• Sandpaper
ASSEMBLY
1. Millwork.
You can get a full service lumber house to cut these for you.
•2—36” 1x2s 1—32.5” 1x2
•1—14” 1 x4 and 1—7.5” 1 x4
• Cut taper in 1 x 4s starting at width of 2 to 2 ¼"; leaving 2 ¼” of the length of each the original width (Fig.1). That portion will be in the center of the long 1 x 4 and at one end of the short 1 x 4.
2. Drilling
Drill pilot holes for the two confirmat** screws attaching the front leg to the back leg. Screw the front leg to the rear legs. Then attach three feet to the bottom of the legs near their ends. I used screw-on rubber feet for placing the units on my hardwood floors. You could use t-nuts and screw in spikes for placement on carpet.
Sandwich three 1 x 2s together straddling the front leg and drill four 5 pilot holes for the cabinet coupling bolts and nuts.
3. Assembly
Insert the cabinet coupling bolts and tighten with a 5/32” hex key (Allen wrench). Stand the unit up and drill two 5/16” holes. One should be lined up with the socket in your speaker to attach it to the stand. The second should be lined up for the passage of the speaker cable to the terminals.
You will notice in the pictures that I actually used two pieces for the center part of the upright, leaving a gap for the speaker cable. If you use a hole, this second hole should be large enough for the size of speaker cable used.
Thread the speaker cable through the stand, attach cable ends to the speaker terminals, and insert the 50mm cabinet coupling bolt to attach the speaker to the stand. I used a cable staple to secure the cable to the backside of the upright.
4. Boogie on
Attach the other end of the speaker cable to the amp and fire up the system. You can lightly sand the stand, leave it natural, paint it, or stain and clear-coat it to match your preference.
**You can substitute regular wood screws. Confirmat screws work especially well in MDF, and are available from McFeely’s and Rockler.

FIGURE 1: Legs and feet for stands
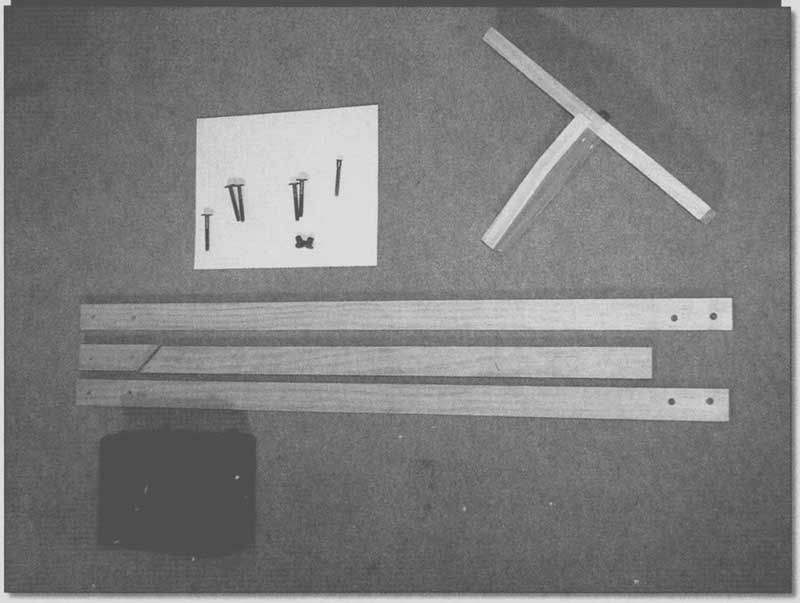
PHOTO 1: Millwork laid out with tools.
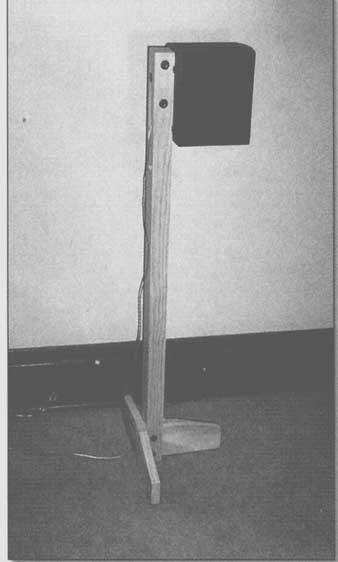
PHOTO 3 Stand with speaker on back

PHOTO 4: Stand with speaker removed.
AUTHOR: is a custom training instructor for the Dunwoody College of Technology in Minneapolis, Minn. He started building Heathkits, Eico Kits, and Dynakits in high school and has built dozens of speakers and a few church sound system installations over the years. He holds an MA in Speech Communication and has several years’ experience in plant engineering in the fuel ethanol industry.