

By J. A. "Sam" Wilson, CET
Sam Wilson's monthly "Technical Notebook" will present a variety of subjects and ideas.
Sam has strong opinions, and possibly some will provoke conversation and controversy.
The ideas and opinions of this column are not necessarily those of the editor or other employees of Electronic Servicing.
Your letters are welcome, so long as you give us permission to quote from them. Address all letters to:
J. A. "Sam" Wilson c/o Electronic Servicing
P.O. Box 12901 Overland Park, Kansas 66212]

------- Figure 1 Conduction of diodes (or the junctions of transistors)
add non-linear resistances that cause errors during in-circuit resistance
tests.
Measuring Resistors "In Situ"
My dictionary defines "in situ" as "in position" or "in its original place." Therefore, this discussion is about the measurement of resistances in-circuit, without disconnecting them first.
Diode resistance varies with voltage
Regardless of the equipment or the method used, all resistance measurements involve application of a voltage to the circuit under test. This voltage changes with the resistance value, and it is different for each resistance range.
Those changing voltages are the reason why the resistance of a diode (or a transistor junction) depends on the type of meter circuit and on the range selected. For example, the base/emitter junction of a germanium transistor might measure 5 ohms when the X1 range of a VTVM was used, 29 ohms for X10, 170 ohms for X100, and 1,000 ohms with the X1000 range. The ohmmeter is not producing wrong resistances. Instead, the diode is changing forward resistance ac cording to the actual voltage applied to it.
Not all ohmmeters apply the same voltage. Therefore, diodes and transistor junctions will measure many different resistances according to the type of meter.
Circuit paths through diodes
Problems begin when a tech tries to measure the value of a resistor that's in a circuit along with a diode or a transistor junction (Figure 1). Because diode resistance varies with the applied voltage, it's not possible to assign a definite resistance to each diode. As shown, the base resistor and the B/E junction of the transistor are in parallel. So, the ohmmeter current flows through both. The diode conduction causes an erroneous reading, which varies with the range and with the type of meter.
Low-power ohmmeter readings
Some late-model meters (particularly multimeters) offer "low power" ohms functions. The maxi mum voltage is kept below the conduction point of silicon diodes and transistors. Therefore, "in situ" resistance measurements can be made without many errors from the silicon diode-or-junction resistances.
Of course, circuits with extremely high resistances might show some errors, but other circuits can be tested accurately.
On the other hand, germanium diodes and transistor junctions can conduct with less than 0.1 volt applied. If germanium devices are in the circuit, use additional pre cautions.
Reversed voltages
Another effective method of eliminating nearly all of the errors from diode and junction conduction is to take a reading, and then reverse the test leads before making the same measurement again. If the two resistance readings are identical, there's little chance of errors from diode conduction. When the two readings are very different, the higher reading will be more accurate.
This method has some limitations. For example, circuits having two or more semiconductor devices might have leakage through a diode during the test with one polarity, and leakage through a transistor junction when the polarity is reversed.
Combining the low-power ohms feature with the reversed-voltage measurements should eliminate most diode-conduction resistance errors.
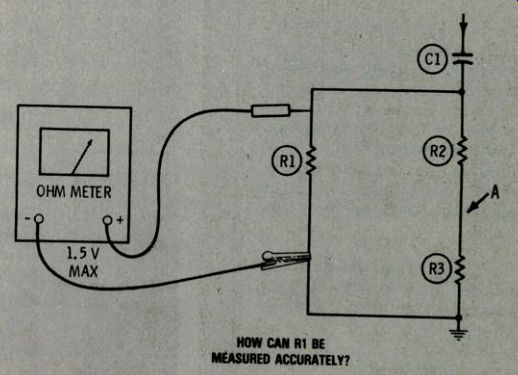
Figure 2 Combinations of series and parallel resistors make in-circuit
resistance tests more difficult. One way is to calculate the correct
value of the combination and compare that with the total measured resistance.
Any significant variation between the two figures suggests that one of
the resistors has a wrong value. As a last resort, R2 and R3 can be disconnected
at point A. This allows testing of all three resistors with a minimum
of unsoldering.
Resistances in parallel
Neither of the previous methods can measure the individual resistors of Figure 2. Any ohmmeter will read the resistance of R1 in parallel with the sum of R2 and R3.
One solution is to determine the proper resistances (from a schematic or the color codes of the resistors), calculate the total resistance, and measure the actual resistance with your ohmmeter. If the calculated and actual resistances are equal, it's likely all three resistors have the correct values. (Of course, that's assuming the resistors do not have widely different values.
For example, if one resistor is sup posed to have more than 10 times the resistance of the other two, an open in the large resistor would not change the total resistance reading enough to be significant.) If the measured resistance is incorrect according to the calculated value, one of the three resistors must have a wrong value.
To calculate the resistance of the combination, use this formula:
R= R1 X R2 ± R1 X R3 R1 ± R2 R3
If you have an electronic calculator, it's easy to do the math. An alternate method is to add the resistances of R2 and R3. Then use that value and the resistance of RI in the formula for two resistors in parallel.
If these tests indicate a wrong resistor value, open the circuit at point A. and test each resistor separately.
Use a bucking voltage Figure 3 shows a way of measuring R1, without errors from R2 and R3. Connect a variable-voltage source to the junction of R2 and R3, and adjust the voltage until it is exactly equal to the ohmmeter voltage that's at the R2 end of R1.
This places equal voltages at both ends of R2, thus eliminating all current through R2. The zero R2 current gives the same effect as an open R2, which breaks the R2/R3 path that parallels R1. The ohmmeter now reads only the resistance of R1.
Editor's Note: I tried this test by using the ohmmeter function of a VTVM and found the method to be valid. However, the balancing of the two voltages was so critical that a digital meter was required to determine when the two voltages were equal. This matching of voltages is made difficult also by the ohmmeter voltage changing as the variable voltage is adjusted. For example, as the variable DC voltage was in creased from zero, the ohmmeter voltage across R1 increased, along with the resistance reading. When the variable voltage is less than the ohmmeter voltage, the R1 resistance reading is too low. At the other extreme, a variable voltage that is higher than the ohmmeter voltage produces RI resistance readings that are too high.
Tuning By Resistance Change
Last year, I was in Indianapolis at an ISCET board meeting. I had discussed the resistance-tuned circuit of Figure 4 in a previous issue of my Technical Notebook, and several technician friends were giving me a hard time about it.
In the article, I pointed out that varying either the resistance in series with the capacitor or the resistance in series with the inductance would change the resonant frequency of the tuned circuit.
The first question from a "friend" was, "So what?" A question like that is nearly impossible to answer! Another tech asked if the circuit had any practical uses. I could answer that question. It has been used in automatic frequency-control circuits. Also, it is useful for adjusting low-frequency filters where the capacitance value is so high that a varactor diode won't work.
But the next comment stopped me cold. One man said that the change of frequency is too small to merit any discussion.
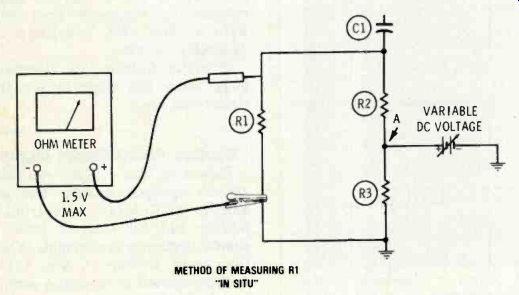
Figure 3 Specific resistors in a series-plus-parallel configuration
often can be isolated for test by applying a bucking voltage that is
equal to the DC voltage applied by the ohmmeter.

Figure 4 A resistance added in series with the inductance or a parallel-tuned
circuit reduces the frequency of the resonance point. A resistance added
in series with the tuning capacitor increases the resonant frequency.

Figure 5
This graph shows the calculated change of resonance (in the circuit of Figure 4) when the resistance that's in series with the coil is varied from zero to 25 ohms.
Although I knew the basic theory was correct, I never had calculated the amount of change before. Now was the time to use my calculator.
The equation for the resonant frequency of parallel capacitance and inductance when there's resistance in the circuit is shown in Figure 4, along with the schematic and values of the circuit.
In schools, there is an unfortunate tendency to ignore the general (complete) equation. Instead this partial equation is given for parallel resonance:
Fr = 2 pi LC
Actually, this is a special-case equation that is correct only when the resistances of the inductor and the capacitor are equal, or when the two resistances are small enough to be ignored.
The general equation is important because it shows that the value of a resistance in series with either the inductor or the capacitor of a parallel-tuned circuit will affect the resonant frequency.
Incidentally, there are two resistant conditions that completely eliminate all resonance. In the general equation for parallel resonance, if the inductor resistance squared times the capacitance equals the inductance, the numerator becomes zero, thus making the resonant frequency zero. This indicates that larger inductor resistances lower the resonant frequency.
Also, if the capacitor resistance squared times the capacitance equals the inductance, the resonant frequency is infinite. This indicates that increasing the value of the capacitor resistance raises the resonance frequency. In both of these examples, there is no resonant frequency. Compare this with series RLC tuned circuits that always have a resonant frequency.
Back to the mathematical proof.
I chose the values shown in Figure 4 and calculated in 5-ohm steps from zero to 25 ohms for the resistance in series with the inductor. These are the results:
Inductor Ohms Frequency
In KHz
0 83.40 5 82.34 10 79.08 15 73.30 20 64.37 25 50.60
A graph of these values is shown in Figure 5. Notice that 25 ohms reduces the frequency from 83.4 KHz to 50.6 KHz, a decrease of 32.8 KHz (or 39%).
If you're designing an electronic buggy whip, this might be just the circuit you need.
Caution
About Strobe Lights
Repeating strobe lights can trigger an epileptic seizure. For example, a Colorado electronics teacher had his students build a simple electronic strobe light. While they were testing it, the rapid flashing started an epileptic seizure in one of the students.
To cause the problem, the repetitive frequency must be slow enough to be seen as individual flashes of light.
After I heard of this incident, I researched the subject and found that almost any repetitive low-frequency energy seems to do the same thing. Other triggers are windshield wipers (especially under certain kinds of street lights), shower sprays, and rapidly-flashing neon signs.
Advise any epileptics to avoid looking at flashing lights or repeated movements of any kind.
Sound Sickness
Very low-frequency sounds can cause fatigue or nausea. The sound level must be high, and the frequency should be around 10 Hz, although the critical frequency depends on the individual person.
Could the constant thumping noise of car wheels passing over the tar strips of a pavement be the real cause of "car sickness"? Also, think about the low-frequency beats caused by intermodulation distortion in a hi-fi system that is operated at loud sound levels. Could they be the cause of fatigue, which is the first stage of Onausea? Inserting IC Pins Have you ever had trouble inserting all of the pins of DIP ICs into a socket at the same time? Well, it can be an exasperating job, that often results in bent pins.
Try this tip: insert all the pins in one side of the socket; then, use a stiff rectangle of plastic or card- board to gently bend the other row of pins into line with the socket holes (see Figure 6). Usually this last row of pins will slip easily into place, when they are all moved at once. Finally, press down gently with your fingers on top of the IC, to seat all of the pins tightly.
Protect CMOS ICs
The manufacturers of CMOS ICs have nearly solved the problem of gates being destroyed by static voltage charges. Zener diodes are connected from the leads and common inside each IC. Voltages that are higher than the zener rating cause the zener to conduct, thus reducing the transient high voltage to a harmless value.
Caution: If you build or repair a digital clock that has CMOS ICs, be very careful and use all of the usual MOSFET precautions. Many (perhaps most) CMOS clock chips are NOT protected.
Mystery Of The Magnetic Poles
If you give me the slightest encouragement, I'll readily launch into stories about the brilliant students I've taught, and the clever solutions they have found for difficult electronic problems.
But one problem has defied their best efforts so far, although it appears to be very easy. Here are the conditions: magnetize a 3-foot length of steel welding rod so one end has a north pole and the other end has a south pole, but there are no other poles in between.
After you have magnetized the rod, check your result by using a small pocket compass. My students have tried to do this for so many times that I'm beginning to believe it can't be done. Figure 7 shows what usually happens to the magnetic poles.
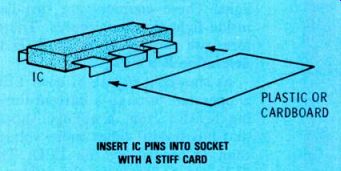
Figure 6 To make installation of ICs easy, insert all of the IC pins
of one side into the socket. Then, slightly bend all pins of the other
row toward the body of the IC, using a rectangle made of plastic or stiff
card board. These pins should slide easily into the socket.

Figure 7 Can you magnetize a 3-foot length of steel welding rod so the
north pole is at one end, and a south pole is at the other end, but without
any extra poles in between? Sams students always obtained several poles,
as shown.
Technician Shortage?
You sometimes are told there are too many electronic technicians. At other times you hear about the shortage of technicians. (Or, is it too many short technicians?) I heard of one who was really "short," and I'm not referring to his height, but to his brain power.
This next event actually happened in a Youngstown, Ohio, "Ma and Pa" store. They needed a good outside technician, and advertised in the local paper. Out of several applicants, they selected a man who claimed 27 years of experience.
The new employee had a couple of unusual characteristics. He was built like a gorilla (about 260 pounds), and he even looked a bit like one in the face. But, who's to say that large ugly people can't be competent technicians? Also, it's not smart to become unpopular with the ugly-lib people.
Out of the eight calls he made the first day, he brought in eight TV sets. He didn't pull the chassis, but brought in cabinets with all the works. Now, these were huge con soles that usually require two strong men to lift them, but he carried one under each arm! The "Pa" end of the business sat down with him and explained that it wasn't a good practice to bring in complete machines, especially since many of them suffered dings and scratches in the process.
"Fix them in the home. If the TV must be brought in for shop work, bring only the chassis," Pa said.
The new man went out on calls the next day, with "Fix them in the home" ringing in his ears. But, within an hour the first customer was on the phone, and she was MAD. "What kind of a fool outfit have you got there, you idiot?" "Ma" got to field this problem. "Is something wrong?" "Well, that turkey you sent out to fix my set took out all of the tubes, put them in a paper bag, and told me to go down to the drug store and test them!" After "Ma" calmed the customer, she turned to " Pa." "You get out there and stop that nut, while we still have a business. Here's a list of his calls." "Pa" (who probably weighed 140 pounds, soaking wet) didn't dash for the door. "Maybe we could just call the customers..." "Get him!" As he started out the door, "Ma" called after him, "Pa!" "Yeah?" "And don't hurt him.' Alternator Question This request for information was received from Brian Cook, CET: "Is it possible to cheaply rewire an automobile alternator for use at low RPMs?" My answer Mr. Cook, thanks for the letter, and a special thanks for the self addressed stamped envelope.
The original battery-charging de vice in cars was a DC generator.
However, it had two inherent problems. The first problem was excessive maintenance (brush re placements and repairing the commutator). Secondly, generators could not produce a charging current when the engine was idled.
After the auto makers added more and more electrically-powered equipment, better battery charging was necessary. Then came the changeover to alternators, which basically are AC generators. Solid state diodes are built inside the case to rectify the AC power.
Alternators will produce some charging power at idling speeds, without requiring any modification.
Perhaps you need increased charging current at slower-than-idle RPMs (your letter didn't say how you wanted to use the modified alternator). If only slightly more charging current is needed, you could install a pulley of a smaller diameter on the alternator itself.
Give me more details about what result you want, and the uses for the increased current, and I'll try to give other answers. Or, perhaps another reader of Technical Note book can supply a better answer.
Write to me in care of Electronic Servicing.
Is The LED Lit? Many optical couplers have an LED to furnish light and a light sensitive transistor to detect the light. These couplers are installed inside light-tight enclosures. There fore, you can't look at the LED to determine if it's lit.
As shown in Figure 8, each LED is operated through a current-limiting resistor from a voltage supply that has several times more voltage than is needed by the LED. The LED can be tested by the tendency toward regulation of the voltage across itself. Many LEDs are rated at 1.6 volts; therefore, a measurement of 1.4 to 1.7 volts across the LED leads proves the LED is emitting light.
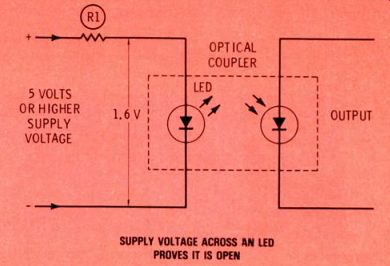
Figure 8 Two characteristics of LED circuits allow you to determine
whether or not an LED hidden inside an optical coupler is lit. Current-limiting
resistors are necessary, and LEDs tend to act much like zener diodes
to stabilize their voltage at a certain DC voltage. Therefore, if you
measure the full supply voltage at the leads of such an LED, it proves
the LED is open (not lit). But if the rated DC voltage for that type
of LED is measured at the leads, the LED is okay (emitting light).
(adapted from: Electronic Servicing magazine, Mar. 1978)
Next: Apr. 1978
Prev: Link |
Also see: