A cartridge, whether moving magnet or moving coil, consists of three basic parts: (1) the stylus assembly, which traces the groove and drives the generator, (2) a tiny electromechanical generator, which converts the groove’s mechanical energy into an electrical signal, and (3) the housing, the plastic or metal body that encloses the generator and provides the means of securing the cartridge to the tonearm.
How carefully the cartridge is assembled and tuned is as critical as the kind of cartridge it is or the quality of the individual elements that go into it. Assembling a cartridge is a process of microsurgery. The cantilever must be meticulously mounted in the body, the stylus precisely mounted on the cantilever. If the stylus or the cantilever is assembled the least bit off-axis, not only will the sound be harsh but, worse yet, the stylus will no longer be a record revealer but a “record eraser,” re-grooving all your LPs. This is neither a joke nor an exaggeration. It happens.
The Stylus Assembly
This is composed of the stylus (nearly always diamond), mounted on a shank, fastened to the cantilever. When stylus and shank are cut from a single gem, this is called a nude stylus.
Until the 1950s, the stylus was steel—an unparalleled record reamer. Thorn, cactus, and other fiber needles were sometimes used instead, as these caused less damage to records, had a more pleasing, less “steely” sound, and could be re-sharpened by the user to extend their otherwise very short life somewhat. Steel and fiber needles started being replaced by synthetic gemstone in the early 1950s.
The cantilever is a short metal or gemstone rod that pivots on a bushing in relation to the generator, relaying the Stylus’s every nuance of vibration. The ideal cantilever material is light, stiff, and dead—and remains all of these from sub- to supersonic frequencies. These requirements tend to be mutually contradictory so, once again, the final choice of materials calls for engineering compromises.
The cantilever is commonly damped (sometimes painted with special gunk, sometimes, if hollow, internally damped) to prevent its resonances from being added to the music signal. “Needle talk” occurs when the cantilever is overly alive and adds its own chattering to the signal. Proper damping is essential in preventing the shock waves and vibrations that travel up the rod from also traveling back down it again and into the stylus to interfere further with the music. This damping in effect serves the same purpose as the surround on a speaker cone.
Hollow cantilevers—either metal leaf rolled into a cylinder or gemstone (often sapphire) bored out with a laser beam—minimize mass. Solid cantilevers of a very hard, jewel rod may ensure that all the frequencies traveling together up the cantilever, maintaining time coherence.
Don’t fixate on these “exotic” details until your system has achieved the resolving power that will reveal the difference between a metal or gem stone cantilever. Many fine cartridges use a metal cantilever, including the Grado Signatures and the Garrott P-77. These are excellent cartridges that, matched with a good table and arm, will give you a lot of music.
The shorter the cantilever of the cartridge, some feel, the more accurate the transcription. It offers exactly the same advantages as the shorter tonearm tube possible with SLTs—greater rigidity and so less resonance and less flexing. The Dynavector uses a very short cantilever and Decca cartridges have none. Whether or not you’ll like the sound of the Deccas is intensely personal, even more so than with most cartridges. Bill Firebaugh, who collects cartridges, says he’ll no more recommend a cartridge than he’ll give out marriage advice. Deccas (preferably Garrott modified) are the favorites of, among others, Ken Kessler of Hi-Fi News & Record Review. The $2,600 Rosewood Signature, also sans cantilever, is to some minds the only cartridge able to challenge the Deccas.
Stylus Footprint
The whole illusion of LP recorded sound rests on the tiny point of the stylus. The playback stylus must in essence “uncut” the identical path made by its counterpart, the cutting lathe stylus. Its success in retracing the music’s path largely determines playback fidelity.
However, cutting and playback styli have two different shapes. The cutting stylus, which gouges out the grooves in the master lacquer, is deeply beveled for accurate cutting. The same sharp edges on the playback stylus would “re-cut” the soft vinyl of the groove. Just how closely the stylus can follow all the minute twists and turns of the music groove without ever losing contact with the groove walls is known as its tracing ability.
The record groove is roughly V-shaped, with modulations both from side to side and up and down (see Record grooves under an electron microscope). Each groove wall, sloped at about 45 degrees, carries a different signal and so has different modulations. (The inner groove wall provides the left channel, the outer groove the right—a handy mnemonic is “ Long Island” for left inside.) The groove path is quite complex, swinging from side to side and growing deeper and shallower according to the two signals’ interaction.
When the record master is being cut, the sharp edges of the cutter are always on a perfect radius from the center of the record. But during playback, the stylus’s two contact points with the groove wall, because the stylus is much more rounded, are seldom on the same perfect radius. Pinch effect is one distortion caused by this difference in shape between the cutting and playback styli. Because of the chisel shape of the cutter, the record groove narrows as it wiggles. This narrowing, which the blunter playback stylus cannot exactly trace, “pinches” the playback stylus and forces it upward, thus introducing spurious vertical (out-of phase) movements to the stylus.
As the music’s signal level (amplitude) and frequency (pitch) increase, so do the groove modulations. Again, the relatively blunt shape of the playback stylus tip (compared to the cutting stylus) may be at times too crude to follow all these ins and outs. This results in both a loss of high frequencies—sometimes called scanning loss—and in tracing distortion. Both are unfortunately worst at the end of the record side, which often coincides with the musical climax. These three forms of distortion are ineradicable, but the extent of their severity is a function of stylus shape or footprint.
In order to trace the rapid changes in groove modulations, the stylus should be as short as possible so it reads only one modulation at a time (see Fig. 11). Yet you also want contact with the groove walls to be as broad as possible, in order to distribute the tremendous downward force of the stylus tip on the record groove. This force measures literally tons per square inch. To combine these two requirements, you want the stylus footprint to touch a large area vertically on the wall to spread the weight, and only a very narrow sliver horizontally to permit rapid movement.
The stylus should ride along the sides of the groove walls, just about in the middle. You don’t want it in the bottom of the groove, where it will miss some of the signal and also pick up muck left over from the pressing process along with the dirt that has been accumulating there ever since. It should ride just low enough on the walls to keep well clear of the “horns” or rough edges near the top of the groove, leftovers from manufacturing, as these do cause noise.
Stylus Shape
A conical tip is the original gemstone stylus shape, still standard on less expensive cartridges. It traces the groove quite crudely, missing fairly sizable amounts of musical detail. Because it touches the groove wall only at the apex of its roundness, this shape focuses the mass of the cartridge and arm on a small area of the groove wall, resulting in a higher degree of record wear. Fortunately, a record worn by a conical stylus can often be successfully played by a narrow-profile stylus. The wear points caused by conical styli are usually high on the groove walls; a sleeker stylus rides below the wear line and so (it’s hoped) traces a pristine groove area.
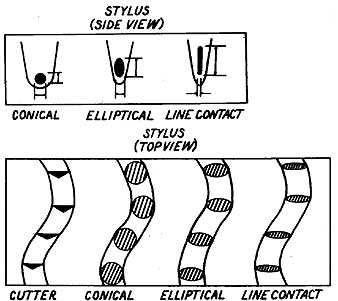
Fig. 11 CONICAL, ELLIPTICAL, LINE CONTACT
The elliptical stylus is a flattened oval version of a conical. Being narrower from front to back, it can more accurately trace fewer groove modulations at a time, without blurring them together. This is particularly important with the denser inner grooves. However, its smaller con tact area increases pressure per square centimeter on the record. Sensitivity to setup is also increased.
The most recently developed stylus profile is the line contact, a.k.a. Shibata, van den Hul, microlinear, and similar terms. Used on better cartridges, this stretches the elliptical shape both vertically, making it longer, and horizontally, making it narrower. To greatly increase con tact up and down with the groove wall, it has two flat faces ground into its surface. Because of this, it imposes less pressure for a given tracking weight, minimizing record wear. In addition, its narrowness means it can track fine high-frequency modulations. These styli are, however, the most demanding of proper setup. Misalignment will significantly increase record and stylus wear and result in bad tracing distortion.
A refinement on this basic design is the microridge. A ridge is cut along each face of the stylus where it touches the groove, “hollow ground” in the same way a knife is sharpened and for the same reason. This way, even as the stylus wears, its contact area with the groove retains much the same profile—thin from back to front for tracing ac curacy, while vertically long to distribute weight and reduce record wear. The degree of tip curvature remains constant throughout stylus life. Microridge styli wear down just as fast as any other, but because their profile remains unchanged much longer, they effectively have a much longer life.
Another advantage is that the very small front-to-back contact area provides a closer approximation to the geometry of the cutting stylus, so the tip is more easily able to follow small-scale, high-frequency modulations. This improved tracking particularly helps reduce inner-groove distortion.
The drawback to micro-linear cartridge is that they are extremely sensitive to setup and alignment, especially to VTA. Even slight misalignment results in distortion and groove damage. The fine ridge requires meticulous care and handling as it is subject to chipping and easily clogged by dirt.
The polish on a stylus tip in many ways is as important as its footprint. A high polish reduces record wear, friction, and the vibrations and the resonances generated by the stylus tracing the groove. Both van den Hul and Garrott are well known for their super-polished styli. Look at a Garrott under high magnification and it’s like looking at a blob of mercury—most other cartridges in comparison look bumpy and misshapen.
Here’s a (risky) way to hear what your stylus sounds like and what colorations it adds to the music—suggested by Bill Firebaugh. With the table turned off, place the stylus in a blank, unmodulated groove (the run-out or lead-in of a record, or the blank grooves included on some test records). Very gently, by hand, rotate the record a short distance while listening to the sound of the stylus. You must be VERY CAREFUL in doing this—moving the record backward against the very delicate cantilever can bend it or even rip it right off.