Home from the wars, standing in the centre of the living room, surrounded by large brown boxes and an air of confusion. Thus begins the final act of the 'Quest for Music'.

YOU'VE SURVIVED the demos and the deadly salesman's coffee to return home with the hi-fi of your choice. Only one thing now stands between you and success, the Rite of Installation. Usually rushed, rarely planned, and often botched, this final hurdle can bring to thought many of the gains made earlier, in the buying process.
So put the scissors to one side for a while and let us look at each stage in a logical order, then follow it closely to guarantee the best from those expensive boxes. Read right through and don't do anything until you've got to the end, lest smoking ruin befall you.
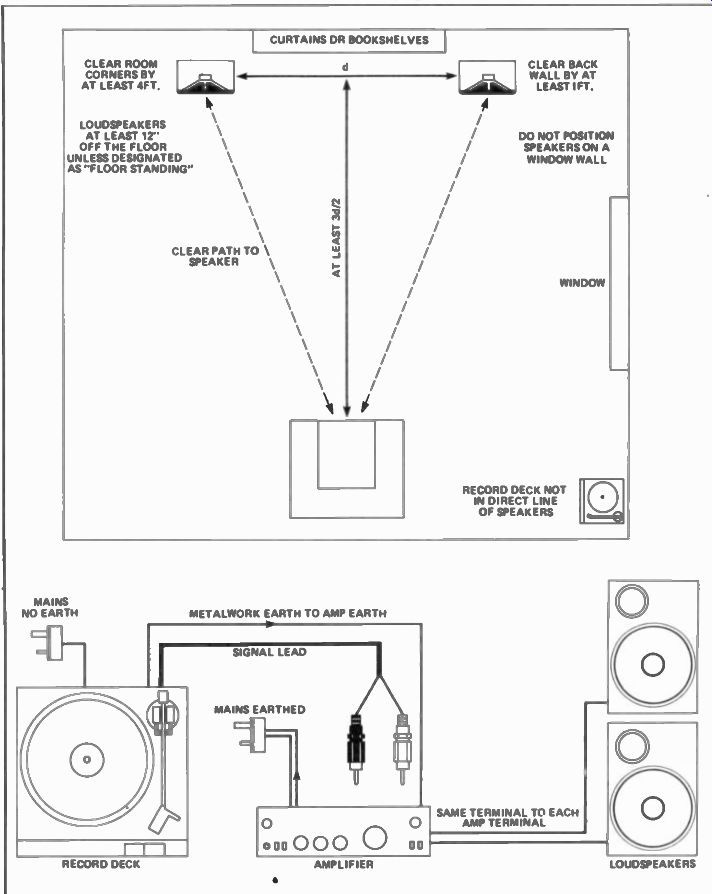
Now I've got it --where do I put it?: Earlier on, you decided the size of your proposed loudspeakers on the basis of fitting them into your living room --this is the moment of truth! Has it worked? Take a look at Figure 1 for some ideas on the siting of seating and speakers. If you can't accommodate one of the schemes shown therein, then take your courage (and couch) in both hands and re-arrange the room! Having spent the time and money to achieve sonic happiness, don't spoil it now for the sake of a few marks on the carpet. Whilst perusing the speaker plans, look around for a possible site for the record deck.
Unless the floor is concrete, the deck has to go on a separate, wall mounted shelf. Sorry, but there it is.
No coffee table, wall divider and/or cupboard will compensate for a set of floorboards determined to lead your new stylus a merry dance across the vinyl. If you're clever you can hide the shelf brackets behind a wall unit or equipment rack, so that the shelf appears part of the structure. Just make it solid. After you've positioned the deck and/or loudspeakers --prefer ably not directly facing each other, the rest of the system will probably site itself. Go for longer speaker leads, rather than extended runs of screened cable from deck to amp.
Now it's there --what do I do with it?: Before setting-up the deck, or switching anything on, consider how to link the units together. The record-deck to amp connection can be accommodated with high-quality screened leads and phono plugs. If you've acquired an SME arm, then use their excellent connectors. An integrated deck might have phono sockets on the rear somewhere. If it does, then invest in a couple of these expensive gold-ended leads; they will repay the cost, over the years. A lot of nonsense has been spouted about speaker leads in recent times --a little sense has come through, too, thank goodness, and the basic requirement for the link seems, at last, undisputed. Simple as it may sound, all that the cable has to do is to join the amplifier to the speaker without offering any resistance (or impedance) of its own to confuse the issue. In this way the amplifier is able to preserve its control over the cones in the speaker, as the damping factor (see Part 1, January '82) is not reduced.
Use at least thirteen-amp wire, regardless of the power of the amp.
Your local electrical retailer will sup ply the stuff by the yard. If the amp is more than 50 W a channel, then use two lengths per speaker, twisting the ends together, at both ends, to form one huge wire for each terminal! This will work out cheaper than the specialized 'Super-wires' and provide a performance comparable to any of them (if you do buy one of these, get "Monster Cable", as it is indisputably the best of the bunch). I switched it on and nothing happened: Hang on a minute --it wouldn't, would it? No mains connections yet.
Let that be a lesson to you. Patience--music comes to him who waits.
First we go down to earth literally, while we discuss the avoidance of the dreaded 'hum-loop'. This occurs when there is more than one way for a current to get to earth from the amp or record deck. The symptom is a horrible, music-destroying, 50 Hz (or 100 Hz, if the transformer is injecting noise into the circuits) buzz that both saps power from the amp and endangers speakers. Connect the amplifier, only, to the mains earth.
There will also be an earth or ground terminal on the back of the amp and a wire from the turntable should be attached here to earth the deck.
Some turntables will connect the deck earth to the outer of the phono plugs and thus there will be no external connection. The golden rule is, "so long as it doesn't hum --don't worry about it!" If you intend to expand the system later, it will prove a good idea to get one of those blocks of multiple mains sockets now, rather than later. QED make a nice one, but it's expensive, as are the nice special plugs to fit it --it's up to you whether you feel like splashing out. Bear in mind, though, that a mass of wires all snaking off to one mains socket is neither safe nor conducive to expansion. It's better to "do it right" at the start. One more thing before pushing the button --make sure that the speakers are wired the same way round, ie with the black and red of each enclosure to the corresponding terminal on the amp (use red to + ye). This will ensure the 'phasing' is correct so that the cones move together, rather than against each other. Incorrect speaker wiring would destroy the stereo image as well as the bass response.

Figure 1. Some pointers of position; keep your listening 'throne' at
least 1 1/2 times as far away as the speakers are apart. Don't put the
speakers in corners but be prepared to angle them inwards if the sound
is at all 'booming'. Record decks should be out of the direct line of
the speakers, on a wall-mounted shelf. Putting the speakers on a window
wall will greatly impair the stereo image and lead to a dramatic change in
sound quality when you pull the curtains at night.
Figure 2. Earthing arrangements. These are the most basic and most successful set-ups, but don't be afraid to experiment to get the best results from your particular system. Make sure only one wire goes to mains earth. Some cartridges (eg. Shure) have a small metal tag wrapped around one pin on the back of the body. If you get hum in one channel only. CAREFULLY bend this away from the pin.
Figure 3. Looks simple doesn't it? Loudspeaker phasing is just a matter of connecting the + ye on the speakers to the same terminal on both channels.
Use colored or 'ribbed' cable and make sure you get it right. If you don't? Very poor bass and no stereo image.
Just two small pools of sound around the enclosures.
Is This a Set-up? If you have to set-up the record deck yourself --do try to get the dealer to do it, if possible --then now is the hour! An integrated player is simple. Just set the distance between the rear of the headshell and the stylus to the manufacturer's figure.
This is usually 49 mm, but check anyway. Use an alignment protractor to set the cartridge parallel to the headshell sides; again, individual decks vary so much that you'll have to consult the instructions. If you've assembled a record player from separate turntable, arm and cartridge then have the dealer set it up. Without wishing to be unkind, this is the only sensible course for a first system. The necessary adjustments are unbelievably precise and involve the use of test records to some degree. If you get it wrong, not only will you remove large amounts of plastic from the LP, like as not you'll re-arrange the anatomy of your beloved cartridge, too. And, before you say it --yes, I am trying to frighten you off! It would take a four-page article to explain how to do the job properly and, if demand proves sufficient, you may well see the feature in HE. Until then, let the shop earn its money (you know it makes sense!).
What a Turn-on ... This is it. You've plugged the deck into 'phono', earthed it properly, set the loudspeakers up in the correct place in the room, fitted all the mains plugs and finally checked everything again. If you haven't, go back two spaces and do it. Do not pass "go" and do not push any mains buttons. Now switch on and advance the volume control to 12 o'clock. All you should be able to hear from your listening position is a faint hiss. If there is any obtrusive humming sound, then check your earthing arrangement against Figure 2. If all is well, put a record on, sit back and forget all the hassles.
Now That It's Working ... What do I Upgrade First? If you're asking this question then you're hooked on hi-fi already and nothing short of a £3000 (1982 prices) system will eventually satisfy your evil desires. You have my sympathy.
Table 1 shows a list of recommended units and systems which will assist in choosing a first system and in selecting upgrade-units. It is not complete and will conflict with other magazine's favorite equipment.
After all, everyone is entitled to their own opinions --and these are ours.
Everything mentioned herein is a model that we have tested and found to represent both good value for money and excellent engineering.
The list should be used as a "shopping guide" --not as a Bible. If you don't like the sound of any of it, don't buy it!
------------------
CARTRIDGES
Grado FCE + 1 Shure M97 HE Goldring G920 IGC Dynavector 10x11 Coral MC88E Shure V15 IV/MV3OHE Dynavector Ruby Ortofon FF15 Stanton 881S Audio Tech AT-31E
HIGH-END TURNTABLES
Thorens TD160S Oracle Kitdeck Logic DM101 ARMS SME Series III/IIIS Linn ITTOK Audio Tech AT1100 ADC LMF1 Mission 774 Syrinx PU2
MORE TURNTABLES
Dual CS505 Thorens TD 160C Trio LO7D Technics SL10 Pioneer PL300
AMPLIFIERS
Crimson 310/520 Trio KA 1000 Monogram 106/109 Crimson CK1010/1100 Quad 44/405 Pioneer A9 NAD 3020 Seoum SA 41 30 Sansui A9 Lentek
LOUDSPEAKERS
Wharfedale Laser 80 KEF 10511 Gale 401 KEF 103.2 Celestion 200 Tangent TM3 Wharfedale TSR 108 Monitor Audio MA 9 Mourdant-Short Carnivals Harbeth HL1
PO WER 50 W 100 W 150 W 120 W 100 W 100 W 35 W 35 W 75 W 70 W APPROX.
SYSTEM PRICE CODE
-----------------
-----------------
(adapted from: Hobby Electronics magazine, Apr. 1982)
Also see:
SCALING the Hi-Fi HEIGHTS Part 2: Record Decks