AMAZON multi-meters discounts AMAZON oscilloscope discounts
Remember the first time you saw a real hologram? The image seemed to float in space, as if a piece of invisible film hung in mid-air in front of you. Moving your head back and forth verified the image was more than two-dimensional. You could actually see around the object to examine its top, bottom, and sides.
If experimenting with fiberoptics, modulators, and power supplies is the technical side of lasers, then holography is the artistic side. Armed with a helium-neon laser, some assorted optics, and a pack of film, you can create your own holograms. Your subjects can be anything that's small enough to illuminate with the laser beam and patient enough to sit still for the exposure.
After development of the film, you can display your holograms for others to see and appreciate. As you gain experience, you can tackle more complex forms of the laser holographic art—rainbow holograms, holographic interferometry, and even motion picture holograms.
This section introduces you to the art and science of making holograms, including how holograms work and what you need to set up shop. You’ll learn how to build a holographic table and create, and later view, a transmission hologram. The next section continues with plans and procedures for a more advanced holographic table as well as how to create elaborate two- and three-beam reflection holograms.
A SHORT HISTORY OF HOLOGRAPHY
The idea of holography is older than the laser. Dr. Dennis Gabor, a researcher at the Imperial College in London, conceived and produced the first hologram in 1948.
Because Gabor was of a scientific bent, he published his ideas in a paper titled “Image Formation by Reconstructed Wavefronts,” a phrase that aptly describes the technology behind holography. Gabor was later awarded the Nobel prize for Physics in 1971 for his pioneering work in holography.
Dr. Gabor’s first holograms were crude and difficult to decipher. Compared to regular photography, the first Gabor holograms were scratchy throwbacks to pre-Civil War Daguerreotypes. Part of the problem was the lack of a sufficiently coherent source of light. No matter how complex the setup, the images remained fuzzy and indistinct. The introduction of visible-light lasers in the early sixties provided the final ingredient required to make sharp and clear holograms.
Gabor left much of the exploration of holography to other pioneers such as Lloyd Cross, T.H. Jeong, Emmett Lieth, Pam Brazier, Juris Upatnieks, Fred Unterseher, and Robert Schinella. Much of the original developments of laser holography—first developed by Leith at the University of Michigan—had scientific and even military applications. Today, holography is used in medicine, fluid aerodynamics, stress testing, forensics, and even art.
In the 1960s and most of the 1970s, the equipment required to make professional- looking holograms was beyond the reach of most amateur experimenters. Now, however, with the wide proliferation of visible-light helium-neon lasers and the availability of surplus optical components, it’s possible to build a workable holography setup for less than a few hundred dollars. And, that includes the materials required to construct a vibration-free isolation table.
If you’re apprehensive of holography because you are afraid you won’t understand how it works, consider that you don’t need to know how the silver halide crystals in photographic emulsion react to light to take a snapshot of your family. You just pick up the camera, set some dials, focus, and press the shutter release.
Although you are encouraged to understand how coherent laser light is used to create, and later reconstruct, a multi-dimensional image, you needn’t have a college degree in physics to make a hologram. Photographic experience is also not required, though it comes in handy. You will find the process of developing holographic films similar to processing ordinary black-and-white films and papers. If you’ve never been in a dark room before, you might want to pick up a basic book on the subject and read up on the various processes and procedures involved. Obviously, you can’t learn everything you need to know about holography in the two sections in this book, and you are urged to expand your knowledge by further reading. A partial list of titles on holography is in Section B.
WHAT A HOLOGRAM IS — AND ISN’T
Many people hold misconceptions about the nature of holograms. A hologram is a photographic plate that contains interference patterns that represent the light waves from a reference source as well as from the photographed object itself. The patterns, like those in ill. 17-1, contain information about the intensity of the light (just as in regular photography), as well as its instantaneous phase and direction. These elements together make possible the three-dimensional reproduction of the hologram.
The interference patterns constitute a series of diffraction gratings, and form what is, in effect, an extremely sophisticated lens. The orientation of the gratings, along with their width and size, determine how the image is reconstructed when viewed in light. In most types of holograms, the image becomes clear only when viewed with the same wavelength of coherent light used to expose the film.
Not all holograms are the same. As you’ll see later in this section and in the next section, there are two general forms of holograms: transmission and reflection. The terminology refers to how the hologram is viewed, not exposed. The typical transmission hologram needs a laser for image reconstruction. The reflection hologram, while made with a laser, can be viewed under ordinary light.
The hologram stores an almost unlimited number of views of a three-dimensional object. Put another way, specific areas on the surface of the film contain different three- dimensional views of the object. You see these views by moving your head up and down or right and left. This effect is most readily demonstrated by cutting a hologram into small pieces (or simply covering portions of it with a piece of cardboard). Each piece contains the entire image of the photographed object but at a slightly different angle. As you make your own holograms, you get a clearer view of how the image actually occupies a three-dimensional space.
Some other types of images impart a sense of multi-dimensional imagery, but they are not true holograms. The coin-in-the-bowl scientific novelty, popular in mail-order catalogs, uses concave lenses to project an image of a coin into your eyes. The image appears closer than it's and when you reach out for it, it’s not there. Another example:
The famous shots of Princess Leia projecting out of the R2-D2 robot in the movie Star Wars was created with the aid of photographic trickery.
WHAT YOU NEED
You need relatively few materials to make a hologram:
* Stable isolation table (often nothing more than a sandbox on cement pillars)
* Laser—a 1 mW, 632.8 nm helium-neon is perfectly suited for holography, though other visible-light lasers will do as well; it must operate in TEMØ mode.
* Beam expander lens
* Film holder

ill. 17-1. A thumbprint? No, it’s a close-up of the interference
fringes of a hologram, captured on high- resolution film.
* Film and darkroom chemicals
* Object to holograph
Other materials are needed for more advanced holographic setups, but this is the basic equipment list. These and other materials are detailed throughout this section.
THE ISOLATION TABLE
If you built the Michelson interferometer described in Section 9, you know how sensitive it's to vibration. The circular fringes that appear on the frosted glass shake and can even disappear if the interferometer is bumped or nudged. Depending on the table or workbench you use, vibrations from people walking nearby or even passing cars and trucks can cause the fringes to bob.
Because the interference fringes create the holographic image in the first place, you can understand why the table you use to snap the picture must be carefully isolated from external vibrations. If the laser setup moves at all during the exposure—even a few millionths of an inch—the hologram is ruined. Optical tables for scientific research cost in excess of $25,000 and weigh more than your car. But they do a good job at damping vibrations in the lab and preventing them from reaching the laser and optical components.
Obviously, a professional-grade optical table is out of the question, but you can build your own with common yard materials. Your own isolation table uses sand as the heavy damping material. The sand is dumped in a box that's perched on cement blocks. The homemade sandbox table isn't as efficient as a commercially made isolation table, but it comes close. Add to your sand table a reasonably vibration-free area ( California during an earthquake is out!) and you are on your way to making clear holograms.
Selecting the Right Size
The size of the table dictates the type of setups you can design as well as the maximum dimensions of the holographed object. The ideal isolation table measures 4-by-8 feet or larger, but a more compact 2-by-2-foot version can suffice for beginners. You will be limited to fairly simple optical arrangements and shooting objects smaller than a few inches square, but the table will be reasonably portable and won’t take up half your garage.
The design for the sand table is shown in ill. 17-2. The table consists of four concrete blocks (the kind used for outside retaining walls), a 2-by-2-foot sheet of ¾-inch plywood, some carpeting, four small pneumatic inner tubes, and an 8-inch-deep box filled with sand. You can build this table using larger dimensions (such as 4-by-4 or 4-by-8 feet), but it requires considerably more sand. You can figure about one 75- or 100-pound bag of fine sand for each square foot of table area.
Building the Table
First, build the box using the materials indicated in TABLE 17-1. Use heavy-duty construction—heavy screws, wood glue, and battens. Make the box as sturdy as possible—strong enough for an adult to sit or stand on. Next, lay out the blocks in a 2-foot-square area, inside the house or shop. You’ll need a fairly light-tight room to work in, so a garage with all the cracks, and vents, and windows covered up is a good area. In addition, be sure that the room isn't drafty. Air movement is enough to upset the fringes. You need a solid, level floor, or the sand table might rock back and forth.
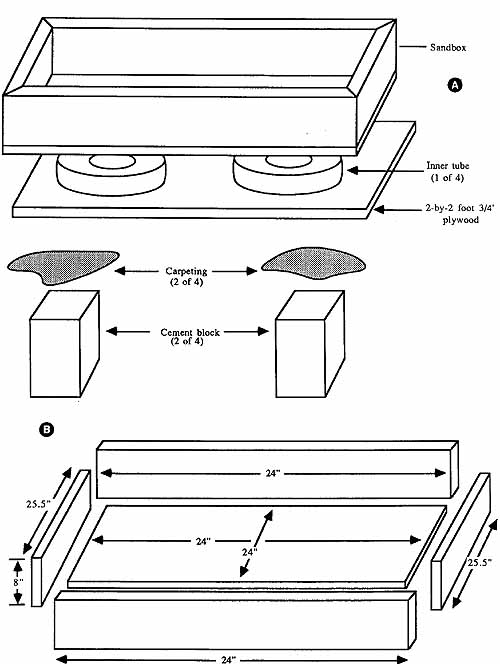
ill. 17-2. Design of the 2-by-2-foot sand table. (A) Blocks,
carpet, plywood base, inner tubes, and sandbox and how they go together.
(B) Construction details of the sandbox. Use ¾-inch plywood for the sandbox.
Table 17-1. Small Sand Table Parts Lists
- Base and Pedestal:
- 4 Cement building blocks
- 4 8-inch-square pieces of carpet
- 1 2-foot-square piece of carpeting
- 4 10- to 14-inch inner tubes
- 1 2-by-2-foot sheet of ¾ inch thick plywood
- Sand Box:
- 1 2-by-2-foot sheet of ¾-inch thick plywood
- 2 8- by 25.5-inch, ¾-inch thick plywood
- 2 8- by 24-inch, ¾-inch thick plywood
- 4 75- or 100-pound bags of washed, sterilized, and filtered sand
Place the 2-by-2-foot sheet of plywood over the blocks, then cover the plywood with one or two layers of soft carpeting (plush or shag works well). Partially inflate the four inner tubes (to about 50 to 60 percent) and place them on the carpet. Don’t over-inflate the tubes or fill them with liquid. If possible, position the valves so that you can reach them easily to refill the inner tubes. You may need to jack up the sand box to access the valves, but if the tubes are good to begin with, you won’t need to perform this duty often.
Carefully position the box over the inner tube. Don’t worry about stability at this point: the table will settle down when you add the sand. Be sure to evenly distribute the sand inside the box as you pour out the contents of each bag. There should be little dust if you use high-quality, pre-washed and sterilized play sand. Fill the box with as much sand as you can, but avoid overfilling where the sand spills over the edges.
Testing the Table
You can test the effectiveness of the sand table by building a makeshift Michelson interferometer, as shown in ill. 17-3. The optical components are mounted on PVC pipe, as described more fully in Section 7, “Constructing an Optical Bench.” You can place the laser inside the box, on the top of the sand, or locate it off the table. As long as the beam remains fairly steady, any slight vibration of the laser won't affect the formation of the interference fringes necessary for successful holography.
Once you have the optics aligned and the laser on, wait for the table to settle (5 to 15 minutes), and then look at the frosted glass. You should see a series of circular fringes. If the fringes don’t appear, wait a little longer for the table to settle some more. Should the fringes still not materialize, double-check the arrangement of the laser and optics. The paths of the two beams must meet exactly at the frosted glass, and their propagation must be parallel—vertically as well as horizontally.
Determining Settling Times
Test the isolation capabilities of the table by moving around the room and watching the fringes (you might need someone to stand by the glass and closely watch the fringes).
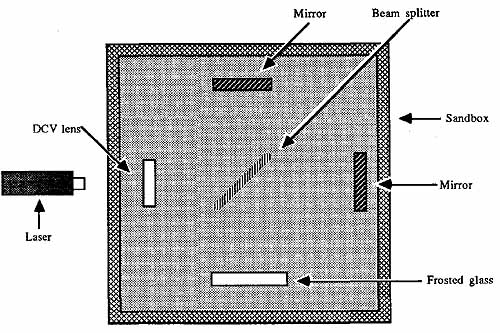
ill. 17-3. Optics arranged as a Michelson interferometer for
testing the stability of the table.
The fringes shouldn’t move at all, but if they do, it should be slight. More energetic movement, such as bouncing up and down or shaking the walls, will greatly affect the formation of the fringes.
Watch particularly for the effects of vibrations that you can’t control, such as other people walking around or cars passing by. Adequate isolation might require a more advanced table (such as the one detailed in the next section), more sand, or a change in location. You might also want to wait until after hours, where activity of both people and automobiles is reduced. Keep in mind that you will have better luck when the sand table is located on a ground floor and on heavy wood or cement.
Note the time it takes for the table to settle each time you change the optics or disturb the sand. You will need to wait for at least this amount of time before you can make a holographic exposure. Also note how long it takes for the table to recover from small shocks and disturbances; recovery time for most tables should be a matter of seconds.
THE DARKROOM
Part of holography takes place in the darkroom, where the film is processed after exposure. Although it’s most convenient to place the isolation table and processing materials in the same room, they can be separate. As with the isolation table, the dark room must be reasonably light-tight. It should have a source of running water to rinse processed film and a drain to wash away unwanted chemicals. A bathroom is ideal, as long as you have room to move and can work uninterrupted for periods up to 15 to 20 minutes.
Tithe bathroom has windows, cover them with opaque black fabric or painted cardboard. If you plan on making many holograms, arrange some sort of easily installed curtain system. Drape some material over the mirror and other shiny objects, like metal towel racks and fixtures. You’ll need access to the sink and faucet, so leave these clear.
Only two chemicals are needed for basic holography (advanced holographers use many more chemicals, as detailed in the next section). You need to set out two shallow plastic bowls or trays large enough to accommodate the film. If space is a premium inside your bathroom, place a wooden rack over the tub and set the trays on it. The bathtub makes a good location for the trays, because the processing chemicals might stain clothing, walls, floors, and other porous materials. If any drips into the tub, you can promptly wash it away.
OPTICS, FILM, FILM HOLDERS, AND CHEMICALS
Here’s a run-down of the basic materials you need to complete your holographic setup.
Optics
Basic holography requires the use of a plano-concave or double-concave lens and one or more front-surface mirrors. The lens can be small—on the order of 4 to 10 mm in diameter. Focal length isn't a major consideration but should be fairly short. Mount the lens in 1- or 1¼-inch PVC pipe, painted black, as detailed in Section 7.
The purpose of the lens is to expand the pencil-thin beam of the laser into an area large enough to completely illuminate the object being photographed. The area of the beam is expanded proportionately to the distance between the lens and object, and the basic 2-by-2-foot table doesn’t allow much room for extreme beam expansion. If the beam isn't adequately expanded, use a lens with a shorter focal length, or position two negative lenses together as shown in ill. 17-4.
The direct one-beam transmission hologram setup described below does not require the use of mirrors or beam splitters, but multiple-beam arrangements do. The size of the mirror depends on the amount of beam spread and the size of the object, but in general, you need one or more mirrors measuring 2-by-3 inches or larger. Some setups also require beam steering or transfer mirrors. These are used before the beam has been expanded, so they can be small. See Section 7 for ideas on how to mount mirrors and other optics.
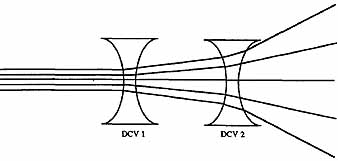
ill. 17-4. How to obtain maximum beam spread by using two double-concave
lenses.
Holographic Film
Holography requires a special ultra-high resolution film emulsion that's most sensitive to the wavelength of the laser you are using. Kodak Type 120 and SO-i 73 or Agfa-Gevaert Holotest 8E75 and 10E75, for example, are made for 632.8 nm helium-neon lasers and are most sensitive to red light (a relatively insensitive wavelength for orthochromatic film). You can handle and develop this film using a dim (7-watt or less) green safelight—a small green bug light works well as long as it's placed 5 feet or more from the sand table and film handling areas. Holographic film comes in various sizes and base thicknesses. Film measuring 2¼ inches square to 4-by-5 inches is ideal for holography.
Holographic films are available with and without antihalation backing. This backing material, which comes off during processing, prevents halos during exposure. The backing is semi-opaque, which prevents light from passing through it. Transmission holograms are made with the laser light striking the emulsion surface, so you can use a film with antihalation backing. Reflective holograms are made with light passing through the film and striking the emulsion on the other side. Unless you are eager to make exposures lasting several minutes or more, you’ll want a film without the anti-halation backing when experimenting with reflection holography.
When buying or ordering film, be sure to note whether the stuff you want comes with anti-halation backing. If you want to try both basic forms of holography (transmission and reflection) but don’t want to spend the money for both kinds of films, use stock without the backing. Note that this film does not make the best transmission holograms, but the results are more than adequate. Be sure to place a black matte card (available at art supply stores) in back of the film when making the exposure. This prevents light from entering the film through the back and fogging the emulsion.
Another alternative is to use glass plates for your first holograms. These consist of a photographic emulsion sprayed onto a piece of optically clear glass. The benefit of the glass is that it's easier to handle for beginners and isn't as susceptible to buckling and movement during the exposure.
Where do you get holographic film? Good question. Start by opening the Yellow Pages and looking under the Photographic heading. Call the various camera stores and ask if they carry it or can special-order it for you. But in the interest of saving you the disappointment, be aware that the personnel at most camera stores are not even aware of such a thing as holographic film. You will probably have better luck calling those outlets that specialize in professional photography or darkroom supplies.
You might also happen to live in an area close to a Kodak or Agfa-Gevaert field office. Call and ask for help. A few companies, such as Metrologic, offer film suitable for holography; check Section A for the address. Lastly, write directly to the film manufacturers and ask for a list of local dealers that handle the materials you need. You might even be able to order holographic film through the mail.
Film Holder
You will need some means to hold the film in place during the exposure. One method is to sandwich the film between two pieces of glass held together by two heavy spring clips, as shown in the photograph in ill. 17-5. The glass must be spotlessly clean. The disadvantage of this method is that the contact of the glass and film can create what’s known as Newton’s Rings, a form of interference patterns.
If you plan on using a glass-plate film holder, remember to press the plates together firmly and keep constant pressure for 10 to 20 seconds (use wooden blocks for even pressure). This removes all air bubbles trapped between the glass and film. Snap the binder clips around the glass and position the holder in front of the object. The handles of the clips can be secured to the table by butting them against two pieces of PVC pipe. Depending on the arrangement of the optics, you might be able to locate the film holder between the PVC pipes that contain the expansion lenses.
Yet another approach is to use a commercially-made film holder, the kind designed for processing plate film. The holders come in a variety of sizes and use novel approaches to loading and holding the film. Most any camera store that carries professional dark room supplies has a variety of film holders to choose from. You can also make your own following the diagram in ill. 17-6. Construct the holder to accommodate the size of film you are using. You might need to make several holders if you use different sizes of film.
To use any of the holders, load the film (in complete darkness or under the dim illumination of a small green safelight) into the holder, and stick the holder in the proper location in the sand. If the holder does not allow easy mounting in the sand, attach it to small wood or plastic pieces, as illustrated in ill. 17-7.
Processing Chemicals
You can use ordinary film developer to process most holographic film emulsions. A good choice is Kodak D-19, available in powder form at some photographic shops. If D-19 isn't available, you may use most any other high-resolution film developer. Agfa,
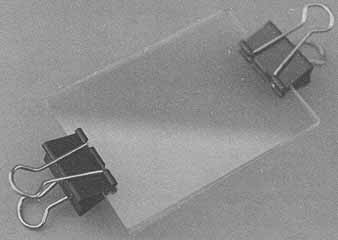
ill. 17-5. A homemade film pressure plate consisting of two pieces
of optically clear glass and two binder clips. The film is inserted between
the glass and pressed tightly together to eliminate air bubbles.
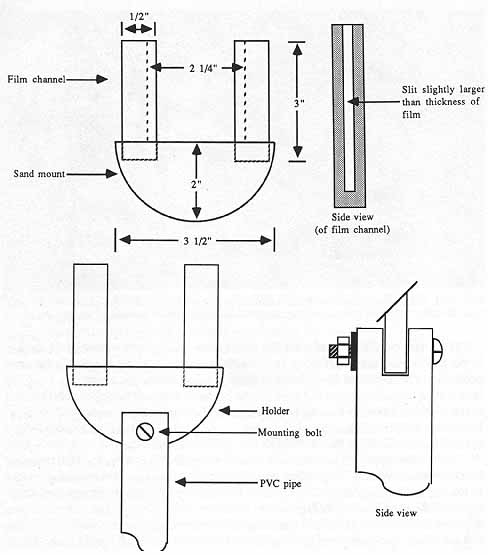
ill. 17-6. Construction details for a homemade wooden film holder.
The holder shown is made for 2¼- by-2¼ film.
ill. 17-7. You can raise the distance between film and sand by mounting the holder on a piece of PVC pipe.
Nacco, and Kodak make a variety of high-quality powder and liquid developers that you can use.
Both transmission and reflection holograms require bleaching as one of the processing steps. If you can’t buy pre-made bleach specifically designed for holography, you can mix your own following the directions that appear below. Note that transmission and reflection holograms need different bleach formulas. Chemicals for making the bleach are available at many of the larger industry photographic outlets. If you can’t find what you want, dial up a chemical supply house and see if you can buy what you need in small quantities.
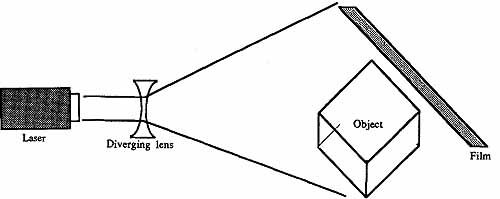
ill. 17.8. The basic arrangement for making a single-beam transmission
hologram.
The remaining, optional chemicals are available at most camera stores. These include acetic acid stop bath, fixer (with or without hardener), photoflo, and hypo clear.
SINGLE-BEAM TRANSMISSION SETUP
The layout in ill. 17-8 shows how to arrange the laser, lens, photographic object, and film plate for a direct, one-beam transmission hologram. A parts list is provided in TABLE 17-2. Note that the term “transmission” has nothing to do with the arrangement of the film, optics, or object for making the hologram but rather the method of viewing the image after it's processed. You look through transmission holograms to see an image; you shine light off the emulsion side of a reflection hologram to see the picture.
You can use almost anything as the object, but for your first attempt, choose something small (about the size of a pack of cigarettes or less), with a smooth but not highly reflective surface. A pair of dice, a coffee mug, a chess piece, a small electronic circuit board, or an electronic component make good subjects. Things to avoid include silverware, highly reflective jewelry, the family TV set, and your cat. These and other reflective, large, and /or animate objects can be subjects for holograms, but only after you gain experience.
Making the Exposure
After you arrange the laser and optics as shown above, turn the laser on. The distance between the lens and object/film should be 1.5 to 2 feet. Be sure the beam covers the object and the film, as shown in the figure. Now block the beam with a black “shutter” card.
Table 17-2. Single-Beam Transmission Hologram Setup Parts List
- Diverging lens
- Film
- 1 He-Ne laser
- 1 8 to 10 mm bi-concave lens
- 1 Holographic film in film holder
- 1 Object
Turn off all the lights and switch on the safelight. The safelight should emit only a tinge of illumination, hardly enough for you to see your hand out in front of you. The idea is to help you see your way in the dark, not provide daylight illumination. You can test for excessive safelight illumination by placing a piece of film on the sand table for 5 minutes with half of it covered with a piece of black cardboard. Process the film and look for a darkening on the uncovered side. A dark portion means that the film was fogged by the safelight.
Load the film into the holder, emulsion side towards the laser, and place the holder at a 45-degree angle to the laser beam (you can tell the emulsion side by wetting a corner of the film; the emulsion side becomes sticky). The film should be close to the object but not touching it. Wait 10 minutes or so for the table to settle, then quickly but carefully remove the card covering the laser. After the exposure is complete, replace the card. Don't control the exposure by turning the laser on and off. The coherency of lasers improves after they have warmed up. For best results, allow the laser to warm up for 20 to 30 minutes before making any holographic exposure.
Exposure times depend on the power output of the laser. As a rule of thumb, allow 3 to 4 seconds for a 1 mW laser and 1 to 2 seconds for a 3 mW laser. You might want to make a test exposure using the technique shown in ill. 17-9. Place a card in front of the film and make a 1 second exposure. Move the card so that it exposes a little more of the film and make another 1-second exposure. Repeat the process four to six times until you have a series of strips on the film. Each strip along the length of the film denotes an increase in exposure of 1 second.
Develop the test strip film following the steps below, then choose the exposure used for the best-looking strip. In the average transmission hologram, the film should be dark gray with distinct fringe patterning. When viewed with laser light, underexposure causes the film to be excessively light and lack contrast. Overexposure makes the image hard—if not impossible—to see.
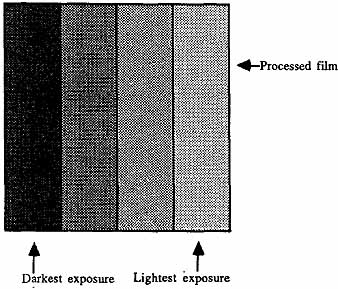
ill. 17-9. The results of a sample test strip with increasingly
dark stripes of gray across the film. Choose the exposure (and development
time) that yields the proper density, as noted in the text.
Processing Steps
Once the hologram is exposed, place it in a light-tight container or box. Mix the processing chemicals (if you haven’t already) as follows:
* D-19 developer—Full strength as detailed in the instructions printed on the package (when using another developer, mix according to instructions to obtain the highest resolution).
* Bleach—One tablespoon of potassium ferrocyanide mixed with one tablespoon of potassium bromide in 16 ounces of water. Alternatively, you may dissolve 5 grams of potassium dichromate in 1 liter of water. Add 20 ml of diluted sulfuric acid.
Use water at room temperature (68 to 76 degrees F), and be sure the temperature is roughly the same between each chemical bath. High temperatures or wide variations in temperature can soften the film and introduce reticulation—two side effects you want to avoid. Place the developer and bleach in large plastic bowls or processing trays (available at photo stores). The chemicals have a finite shelf life of a few months when stored in stoppered plastic bottles. Use small or collapsible bottles to minimize the air content, and store the bottles in a cool place away from sunlight.
In the dark or with a green safelight, remove the film from the light-tight box and place it in the developer. Use plastic tongs to handle the film (avoid using metallic implements and your fingers). Swish the film in the developer and knock the tongs against the side of the tray or bowl to dislodge any air bubbles under or on the film. Maintain a slow and even agitation of the film. After about 2 to 5 minutes, the image on the film will appear and development is complete.
If you have a safelight, you can see the image appear and can better judge when the development is complete. As a rule of thumb, when held up to a safelight, a properly exposed and developed transmission hologram allows about 70 to 80 percent of the light to pass through it (reflective holograms pass about 20 to 30 percent of the light).
After development, rinse the film in running water or a tray filled with clean water. You can also use an acetic stop bath, mixed according to directions. The stop bath more completely removes traces of developer and helps prolong the life of the bleach used in the next step.
After 15 seconds or so of rinsing, place the film in the bleach. Keep it there for 2 to 3 minutes. After a minute or two of bleaching, you can turn on the lights. Follow bleaching with another rinse. Use lots of water and keep the film in the wash for 5 to 10 minutes. A cyclonic rinser, used in many professional darkrooms, does a good job of removing all the processing chemicals.
The hologram is almost ready for viewing. Before drying it, dip the film in Kodak Photoflo solution—a capful in a pint of water is sufficient. The Photoflo reduces the surface tension of the water and helps promote even drying without spotting. It also removes minerals left from the water bath. You may also use a squeegee to remove excess liquid. Darkroom squeegees cost $10 to $20 and are good for the purpose, or a new car windshield wiper blade costs $5 and is just as good.
Use clothespins or real honest-to-goodness film clips to hang up the film to dry. Place the film in a dust-free area. A specially made drying cabinet is the best place, but the shower or bathtub is another good choice.
Wait until the film has completely dried before trying to view it (the fringes might not be clear until drying is complete). Depending on the temperature, humidity, and other conditions, it takes 30 to 120 minutes for the film to dry completely. Glass plate film dries more quickly. Note that when wet, photographic emulsion becomes soft and scratches easily. Be sure to handle the film with care and avoid touching it (with hands or tongs) except by the edges.
Let’s recap the processing steps:
* Develop for 2 to 5 minutes.
* Rinse for 15 seconds (water or stop bath).
* Bleach for 2 to 3 minutes.
* Rinse for 5 to 10 minutes in constantly running water.
* Dip in Photoflo for 15 seconds (optional step).
* Squeegee to remove excess liquid (don’t scratch the emulsion!).
* Let dry at least 30 minutes.
Viewing the Hologram
Part of the fun of holography is making the picture; the rest is seeing the result with your own eyes. If you haven’t disturbed the setup used to take the picture, simply replace the film in the film holder. The emulsion should face the laser. View the image by looking through the film. The image might not be noticeable unless you move your head from side to side or up and down.
Note that if you have dismantled the sand box setup, you must replace the laser, optics, and film holder in the same arrangement to reconstitute the image. The simple layout used in the single-beam direct transmission exposure makes it relatively easy to reconstitute the image.
Problems
Having problems? The image in the hologram isn’t clear or the exposure just isn’t right? Most difficulties in image quality are caused by motion. The fringes must remain absolutely still during the exposure or the hologram could be ruined. Consider that a more powerful laser decreases the exposure time, reducing the problems of vibration. E.g., a 5 to 8 mW laser might require an exposure of only 0.5 to 1 second. If at all possible, use the most powerful laser you can get your hands on, but don’t give up on holography if all you own is a tiny 0.5 mW tube.
Like regular photography, it takes time, patience, and practice to make really good holograms. Don’t expect to make a perfect exposure the first time around. Odds are the exposure will be too short and the development too long, or vice versa. If your first attempt doesn’t come out the way you want it (or doesn’t come out at all!), analyze what went wrong and try again.
Check the layout and be sure that the film is inserted in the holder with the emulsion side out (that is, towards the laser). If you use a film with an AH backing (recommended for transmission holograms), the light won’t pass through to the emulsion if the film is inserted backward in the holder. Be sure that the chemicals are mixed right and that you are following the proper procedure.
INTERMEDIATE HOLOGRAPHY
You can learn more about holography by actually making a hologram than reading an entire book on the subject (however, that's recommended, see Section B for a list of books on holography). Below are some observations that will help you better grasp the technology and artistry of holograms.
Field of Vision
Here’s an important point to keep in mind as you experiment further. You might have realized that the film holder represents the frame of a window onto which you can view the subject. Place your head against the film holder, close one eye, and look at the object from up close. Without actually moving your eye, scan your head vertically and horizontally and note the different views you can see of the subject. They are the same views you see in a hologram. Use this technique to view the perspective and field of vision for your holograms. You can then adjust the position of the object, film, or even the optics to obtain the views you want.
Varying Exposure
Unless you have a calibrated power meter and lots of experience, expect mistakes in estimating exposure times when experimenting with different types of holographic setups. The direct, one-beam setup detailed previously conserves laser light energy, thus reducing exposure time. Some multi-beam setups (see below and in the next section) require exposure times of 15 to 25 seconds, assuming a 3 to 5 mW laser.
Light Ratios
All holograms are made by directing a reference beam and an object beam onto a film plate. The reference beam comes directly from the laser, perhaps after bouncing off a beam splitter and a mirror or two. The object beam is reflected off the object being photographed. The ratio between the reference and object beams is a major consideration. If the ratio isn’t right, the hologram becomes “noisy” and difficult to see. The reflectivity of the object largely determines the ratio, but with most commonly holographed subjects, the reference-to-object light ratio for a transmission hologram is about 4:1 (four parts reference to one part object).
Intermediate and advanced holography requires careful control over light ratios, which means you must take readings using a calibrated power meter (available through Metrologic) or a light meter.
You may adjust the light ratios by repositioning the optics or by using a variable- density beam splitter. A variable-density beam splitter is a wheel (or sometimes a rectangular piece of glass) with an anti-reflective coating, applied in varying density, on one side. An area with little or no anti-reflection coating reflects little light and passes much. The opposite is true at an area with a high amount of AR coating. You can “dial” in the ratio of transmitted versus reflected light by turning the wheel. Note that basic holography doesn’t require a variable-density beam splitter, which is good because they’re expensive.
Reverse Viewing
If you flip the hologram over top to bottom, you’ll see the image appear in front of the film, looming toward you. You see the image inside-out as you view it from the back side. This effect is created by light focusing in the space in front of the hologram. Although the entire image can’t be focused onto a plane, you can see the formation of three-dimensions by placing a piece of frosted glass at the apparent spot where the hologram appears. As you move the plate in and out, different portions of the picture will come in and out of focus.
Projected Viewing
The image in a hologram can be projected in a variety of ways. Try this method. Replace the hologram so that its emulsion faces the laser. Remove the beam-expanding lens so that just the pencil-thin beam of the laser strikes the center of the hologram film. Place a white card or screen behind the film to catch the light going through the hologram. The screen or card should be located where your eyes would be if you were viewing the hologram. Watch the image that appears. You’ll see the complete object, but the image will be two-dimensional.
Now move the film up and down and right and left. Notice how the picture of the object remains complete but the perspective changes. This is the same effect you get if you cut a hologram into many pieces. Each piece contains a full picture of the subject but at slightly different views.
Transfer Mirrors
Some holographers prefer to place the laser in the sand table. This is perfectly acceptable, as long as you mount the laser on a wood or plastic board. Position it along one side of the table and direct the beam diagonally across the table with a transfer mirror. Aiming the beam diagonally across the surface of the sand table gives you more room and allows you to create more elaborate setups. The general idea is shown in ill. 17-10.
Alternate Single-Beam Transmission Setups
Ill. 17-11 shows the setup for an alternate single-beam transmission hologram. This arrangement requires a white card measuring about 4-by-4 inches and a 5- or 6-inch square mirror. Position the film holder as shown and locate the mirror at about an 80-degree angle to the film. Place the card so that no direct light from the laser strikes the film. All of the light used for exposing the film should be reflected off the mirror.
Yet another single-beam transmission hologram can be created by using the simple setup shown in ill. 17-12. It is similar to the first arrangement, but the film is positioned at almost a 90- degree angle to the path of the laser light. Here, no white card or mirror is used. TABLES 17-3 and 174 provide the parts lists for these two setups.
The film can actually be beside, under, or over the object. Place the film angled downward on a hill of sand. Underneath, place a piece of painted airport runway from a model airplane kit. The finished hologram will have a starting 3-D image of the runway that will appear as if you are actually landing an airplane. Try this technique the next time you exhibit your best model airplane. You’re sure to win first place!
Table 17-3. Alternate #1 Single-Beam Transmission Hologram Parts List
- 1 - He-Ne laser
- 1 8 to 10 mm bi-concave lens
- 1 Holographic film in film holder
- 1 5- or 6-inch-square front-surface mirror
- 1 Black blocking card
- 1 Object
Table 17-4. Alternate #2 Single-Beam Transmission Hologram Parts List
- 1 He-Ne laser
- 1 8 to 10 mm bi-concave lens
- 1 Holographic film in film holder
- 1 Object
SPLIT-BEAM TRANSMISSION HOLOGRAM
The visual effect of a single-beam hologram is limited due to the single source of light. Objects photographed in this manner can look dark or lack detail in shadowed areas. Only one side of the hologram might be illuminated, and as you move your head to see different views, the image grows dim. In portraiture photography, two, three, and sometimes four different light sources are used to illuminate different parts of the head or body. The amount of illumination from each light is carefully controlled to make the picture as pleasing as possible.
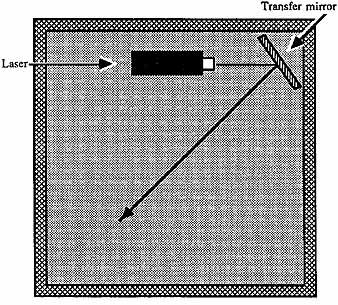
ill. 17-10. The idea of transfer mirrors.
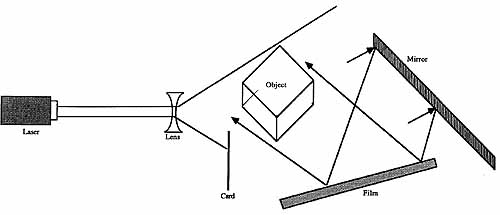
ill. 17-11. A single-beam transmission hologram using a large
mirror. The mirror provides the reference beam as well as a large portion
of light for the illumination of the object.
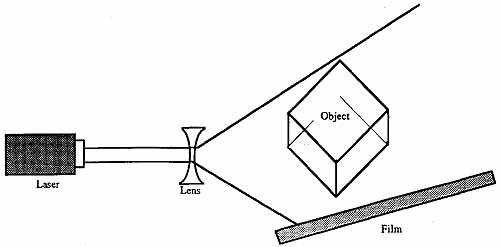
ill. 17-12. A simple single-beam transmission hologram arrangement,
shown with film set at a 75 to 80 degree angle to the beam path.
A similar approach can be used in holography by splitting the laser beam and providing two or more sources of light to illuminate the object (there is still only one reference beam). The setup in ill. 17-13 shows how to illuminate an object by splitting the laser light and directing two expanded beams to either side of the object. See TABLE 17-5 for a list of required materials.
The main consideration when splitting the light is that the reference and object beams should travel approximately the same distance from the laser. That is, the reference beam shouldn't travel 2.5 feet and the object beam(s) only 1.2 feet. Use a fabric tape to measure distances. Accuracy within one or two inches will assure you of good results. Longer distances might exceed the coherency length of the laser, and your holograms might not come out right. Note that high-power lasers generally have longer coherency lengths than low-power ones.
The arrangement requires three diverging lenses, three mirrors, and two beam splitters. A slightly different variation, using fewer components, is presented in the holography gallery found in the next section. The first beam splitter reflects the light to a reference mirror. This light is then expanded by a bi-concave lens and directed at the film. The transmitted light through the first beam splitter is divided again by a second beam splitter. These two beams are bounced off positioning mirrors, expanded by lenses, and pointed at the object.
It’s very important that no light from the two object mirrors strikes the film. It is a good idea to baffle the light by placing black cards on either side of the film holder, as illustrated in the figure.
Film

ill. 17-13. Optical arrangement (shown in the sandbox) for a
multiple-beam transmission hologram. The object is illuminated on two sides,
providing even lighting and better contrast.
Exposure time should be similar to the one-beam method described earlier in this section, but you should probably make another test strip to make sure. Although roughly the same total amount of light is striking the film in both single- and multiple-beam setups, there is inherent light loss through the beam splitters as well as additional light scattering through the three lenses.
Table 17-5. Split-Beam Transmission Hologram Parts List
- 1 He-Ne laser
- 3 8- to 10-mm bi-concave lens
- 1 Holographic film in film holder
- 4 1- to 2-inch-square front-surface mirror
- 2 Plate beam splitter (50:50)
- 2 Black blocking card
- 1 Object
Process the film in the usual manner, and when dried, place it back in the film holder, emulsion side facing the reference beam. Remove the object you photographed as well as the object mirrors and second beam splitter because you need only the reference beam to reconstitute the image. An image should now appear.
You can visually see how the processed hologram must be placed in the exact same position relative to the reference beam, or the image won’t appear. Try turning the film in the holder. Notice that the image disappears if you rotate the film more than a few degrees in either direction.