Source: Popular Electronics--Electronic Experimenter's Handbook (1983)
By using the proper shunt, a DMM can measure up to hundreds of amperes.
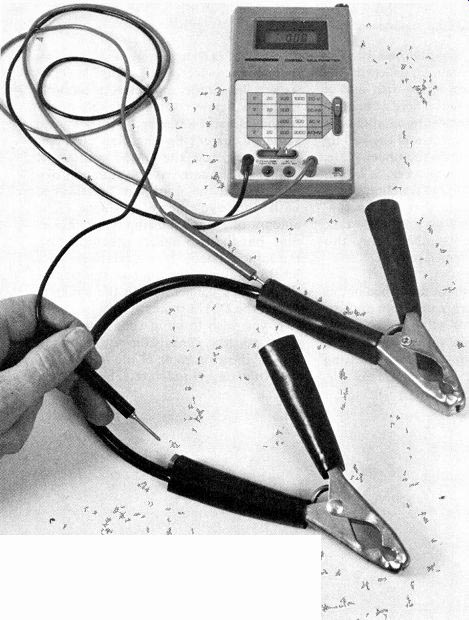
---------Shunt of heavy wire (0.001 ohm) is connected to clamps and
test probes plug into tip jacks in clamp handles to measure large currents.
THE current-measuring function of digital multimeters (DMMs) is usually limited to 1 or 2 amperes at most. How then can one use a DMM to measure the tens or hundreds of amperes that may be associated with auto motive starter and battery-charging systems, or heavy-duty appliances? The answer is: use a high-current shunt.
A DMM set to its current function really measures the voltage developed by a current in a known shunt resistance. Since all DMMs measure dc voltages, an internal rectifier is used to convert ac voltages to dc. Even though the DMM is operating as a voltmeter, the current function display is calibrated in milliamperes or amperes.
If the resistance of the shunt is low, a large current through it will develop only a small voltage drop. For example, as shown in Fig. 1, a shunt resistor of 0.001 S2 (one milliohm) will produce a drop of 0.001 volt for each ampere that flows through it. If a DMM is capable of displaying 0.001 volt at the least-significant digit (the one on the extreme right), this range can be interpreted directly in amperes. Thus, a display of 0.028 represents 28 amperes flowing through the 0.001-ohm shunt resistor.
Then there is the matter of wattage. Since the shunt is a resistor, a current flowing through it will develop heat that the resistor must dissipate. The power dissipated as heat can be calculated as W=I2R, where I is the current and R the resistance of the shunt: thus a current of 50 amperes would develop 2500 milliwatts of heat.
Note that the shunt is, for all practical purposes, a short circuit and should not be connected directly across a power source. Always place the shunt in series with the load!
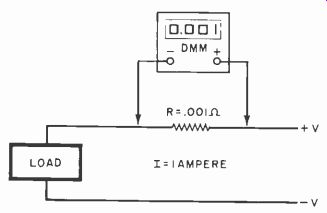
---- Fig. 1. Current can be read by measuring voltage drop across a
known resistance.
In all metallic elements including copper wire, resistance increases with temperature. Therefore, the thicker the wire the less the resistance change and the better the tolerance to I^2R heat build-up. Ambient temperature also affects conductor resistance. Commercial shunts often use manganin, an alloy that was specially developed to have very little resistance change with temperature.
The typical experimenter may not have access to a manganin shunt, but he can use a heavy-duty cable specifically de signed for very high current work automotive jumper cables using multi-strand #10 wire.
Shunt Construction. Remove the clamps from one of the jumper cables and cut the cable to exactly 13.5 inches.
Then, as shown in Fig. 2, remove 1.5 inches of the heavy plastic insulation from each end, being careful not to nick the wire strands. This leaves 10.5 inches of insulated wire. The electrical connections should be 11.0 inches apart, yielding a resistance of 0.001 ohm, taking into account the resistance of the clamps and soldered connections. Carefully separate one or two strands of wire from each end and cut them so that the ends are as close as possible to 11.0 inches apart. (Bear in mind that different samples of this wire may have slightly different resistances due to variations in manufacture.) Carefully tape a tip-jack connector (see Figs. 2 and 3) to the end of the plastic insulation, then solder the loose wire strands to the electrical connector. Do the same at the other end.
Carefully solder together and mount the remaining bundle of wires to the hand clamp. Use a high-wattage soldering iron to make a secure electrical connection. Replace the heavy plastic sleeve over the connection. Do the same at the other end.
If desired, smaller clamps, or even banana plugs can be used at the ends of the shunt cable as shown in Fig. 4. Regard less of the termination used, make sure that the high current flows in the shunt and its end connectors and not through the jacks that feed the DMM.
If your DMM does not indicate to tenths of a millivolt, a 0.01-ohm shunt having a current sensitivity of 0.1 ampere per millivolt can be built. With this shunt, a DMM indication of 0.016 volt represents a current flow of 1.6 amperes.
Use the same approach as previously de scribed, but use 66 inches of #12 stranded copper wire with the tip jacks 65 inches apart.
--------------------
Fig. 1. Current can be read by measuring voltage drop across a known resistance.
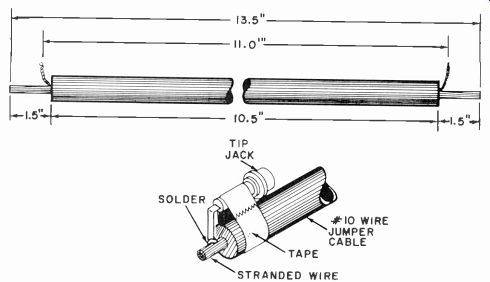
Fig. 2. As described in the text, a 0.001-ohm, high-power shunt can be
constructed as shown here from a conventional battery jumper cable and
a pair of standard tip jacks.
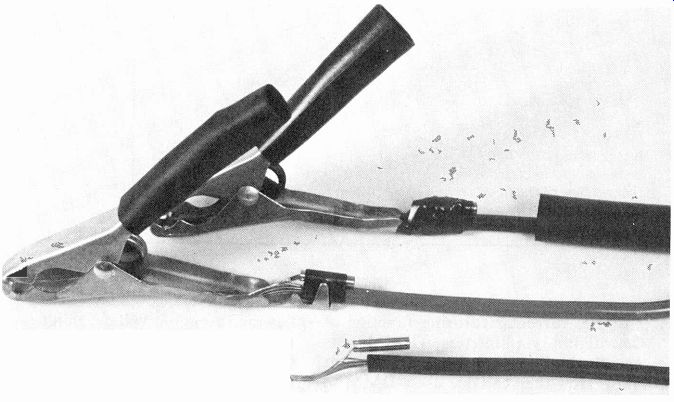
Fig. 3. Assembly of the tip jack and shunt cable to the clamp. After soldering,
the large plastic sleeve is placed over the joint and clamp handle.

Fig. 4. Shunts can be terminated in banana plugs or small clips as shown
here.
PARTS NEEDED
Automotive jumper cables, tip jacks ( Lafayette 32A65105, Allied 920-0292, Calectro F2-879 or 30-1080, or similar), or combination tip jack-and-banana connector (Lafayette 32A64850, Calectro F2-883, or similar), 50-ampere clamps (Mueller PK46A or similar), electrical tape, solder.
Note: A 0.001-ohm shunt is available for $5.95 plus $1 shipping and handling from R. H. Johns Scientific Instruments, 3379 Papermill Rd., Huntingdon Valley, PA 19006. Pennsylvania residents, please add 6% sales tax.
----------------------
To measure ac current, a convention-al ac outlet box having one or two appliance sockets mounted on it with the 0.001-ohm shunt in series with one of the leads can be used. There is enough room within the enclosure to allow the shunt to be placed inside and the two tip jacks to be mounted on the upper plate.
This approach is shown in Fig. 5. In this mode, use the ac voltage function of the DMM. Keep in mind that the tip connectors may be "hot" to ground so take all safety precautions when using this method of current measurement.
Accuracy. The shunt described in this article will be accurate to within approximately ± 3%. This value is dependent on the actual ohmic value of the shunt and resistance changes due to heating (PR losses).
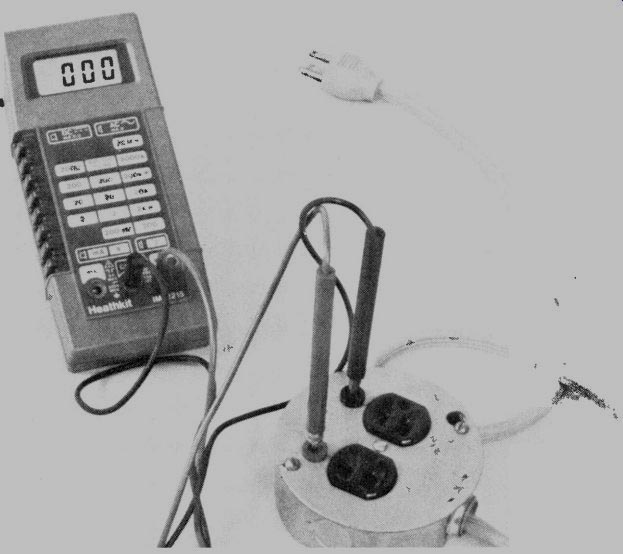
Fig. 5. To measure ac current, the shunt can be coiled inside a conventional
ac outlet box and the two tip jacks mounted on the top plate.
The shunts' accuracy can be improved by connecting the shunt in series with a lab-grade ammeter, a suitable load and a power source capable of delivering several amperes. With a known value of current flowing (lab ammeter indication), note the DMM readout. It should be the same as the ammeter display. If not, the shunt can be trimmed until the two meters coincide. The amount of current flowing is not important, but the two meters should display the same readout. It is a relatively easy job to re-adjust the contact position of the tip jack connectors on the shunt to adjust the DMM indication.
If you wish to build your own "standard" resistor, consult the wire tables in any engineering book, or the ARRL Radio Amateurs Handbook. These list the resistance of solid copper wire to four significant digits. For example, a 0.001-ohm resistor can be fabricated from 10 parallel strands of #16 Formvar or enamel-insulated copper wire, each strand 30.6 inches long. Scrape about 1/4 inch of the insulation from each end and, after affixing a flexible bare wire to make the connections to the tip jacks, solder the bundle together. To calibrate other shunts, connect them in series with your "standard" and adjust the lengths of the meter connections until both resistors generate the same voltage. Al though a DM M is accurate on dc, on the ac functions, signals that are not sine waves can produce measurement errors.
One common source of error is the unfiltered dc output from an automotive battery charger. The current measured across a shunt from the 60-Hz rectified charger can be as much as 18% low. However, the high-frequency, 3-phase rectified output from an automotive alternator is only a few percent low, not enough to worry about.
Although readers are encouraged to build for their own use the shunt technique described, many features de scribed here are covered in patent applications now pending.