Source: Popular Electronics Electronic Experimenter's Handbook (1983)
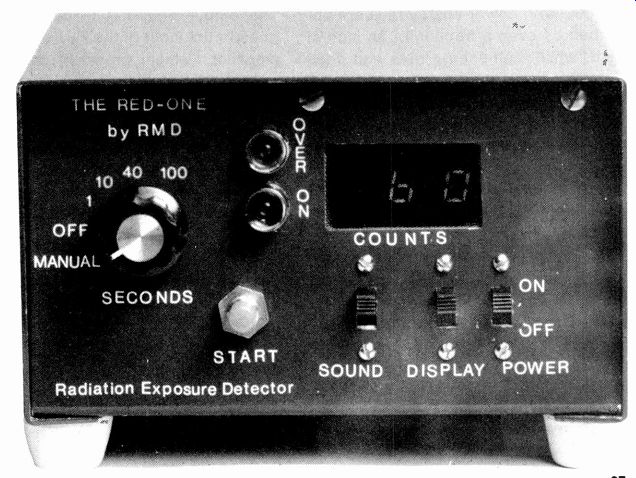
Uses latest cadmium-telluride detector to provide audible or visual indication
of radiation level.
BY JOHN STEIDLEY MARTIN NAKASHIAN and GERALD ENTINE
THOUGH its function as a personal warning monitor is not as important as that of a fire alarm or a gas detector, a radiation monitor can give peace of mind to people who are apprehensive about the hazards of possible radiation leakage and radioactive devices. This concern is obviously heightened when ever the news media report a nuclear incident of one kind or another.
The RED-ONE battery-powered radiation monitor project described here detects local radiation levels from man made and natural sources. It indicates relative radiation, which is perfectly satisfactory for alerting one to excess radiation levels.
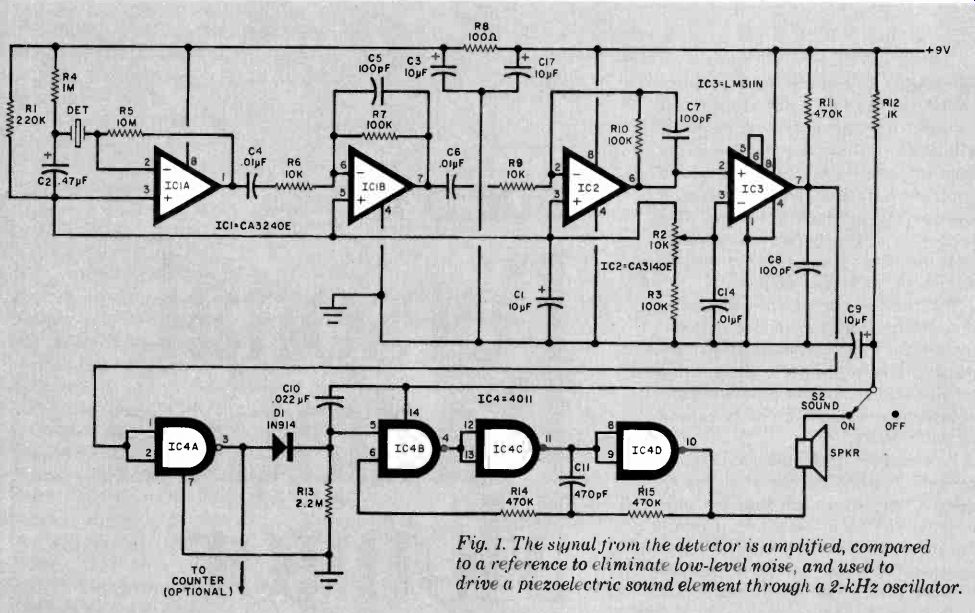
Fig. 1. The signal from the detector is amplified, compared to a reference
to eliminate low-level noise, and used to drive a piezoelectric sound element
through a 2-kHz oscillator.
-------------
PARTS LIST--FIG. 1
C1, C3, C17--10- uF. 16-V tantalum C2-0.47-µF, 35-V tantalum C4.C6,C14-0.01-uF disc ceramic C5,C7,C8-100-pF disc ceramic C10-0.022- 1-1-F disc ceramic C I 1-470-pF disc ceramic DI-1N914 diode DET-CdTe radiation detector (see text and Note below) IC I-CA3240E dual FET op amp (RCA)
IC2-CA3140E op amp (RCA) IC3-LM31 1 N comparator (National) IC4-4011 quad NAND gate The following are 1/4-watt. 10'': resistors un less otherwise specified:
R 1-220,000 ohms R2- 10,000-ohm pc potentiometer R3,R7,R10-100,000 ohms R4 1 megohm R5--10 megohms R6,R9-10,000 ohms R8-100 ohms R 11,R 14, R15-470,000 ohms
R12-1000 ohms R13 2.2 megohms
SPKR-Piezoelectric sound element (Kyocera K BS 27DB-3A or similar)
S2-Spst switch
Misc.-Suitable enclosure, 9-volt battery including holder and power on/off switch, 0.005" brass foil for shield, machine hardware, etc.
Note---For availability of kit and parts, see Parts List for Fig. 2.
--------------
Two versions of the monitor are de scribed. The simpler one produces an audible "chirp" for each detected gamma ray. The other teams up a three-decade counter with the basic circuit to count and display gamma-ray events over a controlled period of time, sounding a chirp for each event.
The RED-ONE is a sophisticated unit that offers many advantages over earlier radiation detectors. Replacing fragile, cumbersome, and less-sensitive Geiger-Muller tubes, this monitor is built around a solid-state cadmium-telluride (CdTe) detector. About the size of a transistor, the device offers high sensitivity, low bias-voltage requirements, extremely low power consumption, and solid-state reliability. Moreover, cost is competitive with tube-detector types.
Radiation and Its Detection. Gamma rays can occur naturally (from sub stances such as uranium) or can be man-made (as in a nuclear power plant).
Radioactive gases, such as those released during the Three Mile Island nuclear power plant incident, and medical diagnostic and therapeutic isotopes are typical man-made gamma-ray sources.
Each radioisotope produces gamma rays of specific energies which are measured in electron volts (eV), the energy acquired by an electron accelerated by a potential difference of one volt.
Gamma rays have high energies measured in thousands of electron volts (keV), the typical range being from 100 to 1000 keV. Lower-energy rays are absorbed by even a fraction of an inch of lead, while high-energy rays can pass through many inches of lead.
When gamma rays are absorbed by a CdTe detector such as that used in RED ONE, an electrical-charge burst is produced and amplified to detect the event. Higher-energy rays produce greater charge bursts.
The gamma-ray sensor in RED-ONE is designed to allow detection of reason able gamma-ray levels and to permit many interesting experiments to be made. For example, bricks in many New England fireplaces have detectable (though very-low-level) amounts of radioactivity. By observing indications with either version of the monitor, an estimate of activity level can be made.
About the Circuit. The basic detector / beeper circuit is shown in Fig. 1. The output of radiation detector DET goes to the input of the FET operational amplifier, which provides impedance matching and initial amplification. Additional amplification is provided by IC1B and IC2. Feedback capacitors C5 and C7 shape the pulse and improve S/N.
The output from IC2 at pin 6 is about 40µs wide and has a height that is proportional to the amount of charge de posited on the detector. Signal level here is about 1 mV/keV of collected charge. Unfortunately, thermally generated charge carriers and leakage cur rent in the detector also produce about 30 mV of noise impulses. Adjustment of R2, however, ensures that comparator IC3 discriminates against and prevents this low-level noise from triggering the comparator. Signal pulses that override the noise cause the comparator's out put and, hence, NAND gate IC4A's input to go low. Resistor R13 keeps pin 5 of IC4B low to turn off the 2000-Hz (approximately) oscillator made up of IC4B, IC4C, IC4D, R14, R15, and C When a detected event causes IC4A to go low, IC4A's output goes high. This high signal is passed through now for ward-biased diode D1 to raise the pin-5 output of IC4B, which causes the oscillator to sound via the piezoelectric transducer, SPKR. The approximately 20-ms C 10R13 time constant maintains the high state of pin 5 of IC4B. When IC4A reverts to low, D1 prevents rapid discharge of C10 and maintains the time constant. The oscillator thus generates a 20 ms chirp for each detected gamma-ray event.
If you wish to count and display the number of events as they are generated at the output of IC4A, you can add the circuit shown in Fig. 2 to that in Fig. 1.
The combination of IC10, IC11, and seven-segment displays DIS1, DIS2, and DIS3 and digit drivers Q1, Q2, and 03 make up a conventional three digit counter /display system. The output of IC4A drives counter IC10.
Operation of IC10 is controlled by the signal at its pin-11 input. This signal can be either manually applied or automatically generated by an internal timer.
When S5 is set to MANUAL, the pin-1 out put from IC9A continuously increments the counter/display for each incoming count from IC4A. When 999 counts are exceeded, pin 14 of /C/O goes low and, via NAND gate IC5B, clocks flip-flop IC9B. The output of IC9B at pin 13 is NANDed with a 2-Hz signal from IC7 to flash OVER (LED!) two times a second.
This flashing continues until START switch S4 is pressed to reset IC9B.
Internal timing is based on 100-Hz 555 timer oscillator IC6. Frequency is determined by C13, R13, R30, and adjustable R29. The oscillator drives di vide-by-100 IC7, whose output at pin 14 is 1 Hz. Counter IC8, switch S5, NAND gate IC5A, and flip-flop IC9A generate 1-, 10-, 40-, and 100-second timing periods. START switch S4 initiates timing by resetting the two counters and flip-flop.
Power for the Fig. 1 circuit can be a conventional 9-volt battery or dc power supply. When the Fig. 2 circuit is added, four AA cells in series can be used to power the LED display. POWER switch S / controls both power sources.
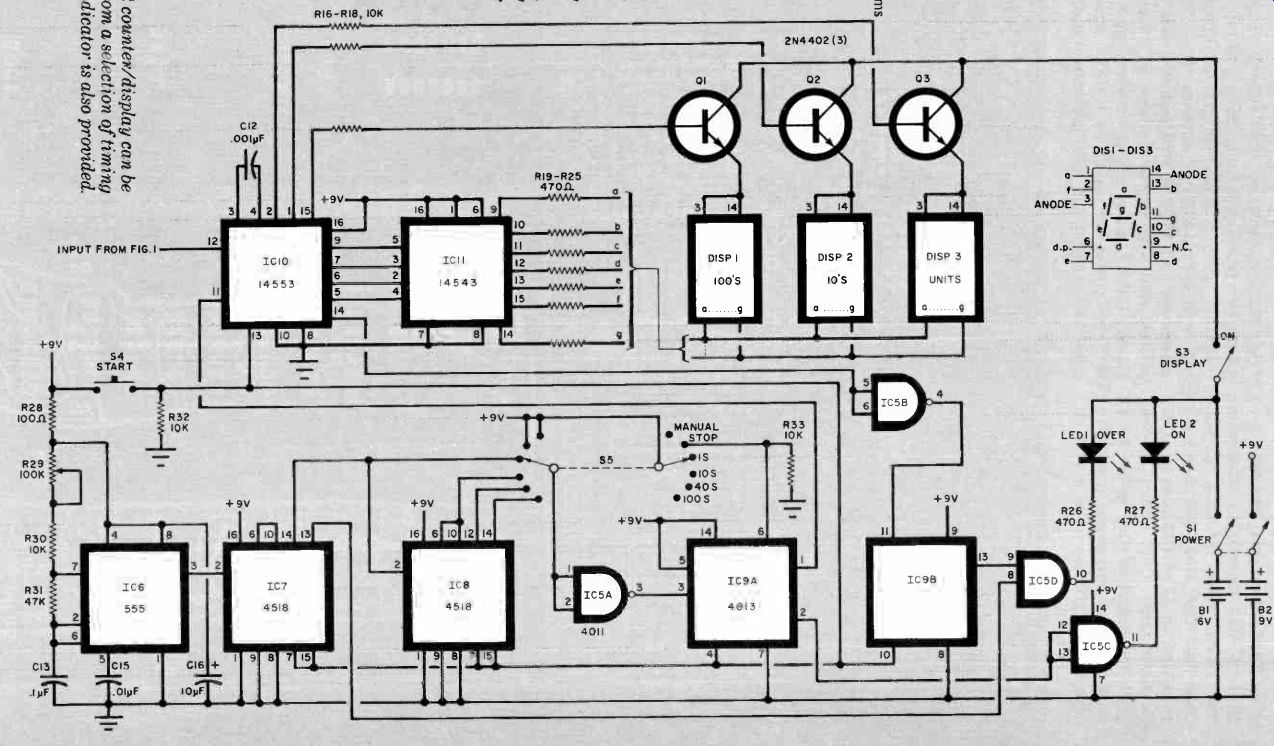
Fig. 2. The conventional 3-digit counter/display can be enabled either
manually or from a selection of timing signals. A blinking overrange indicator
is also provided.
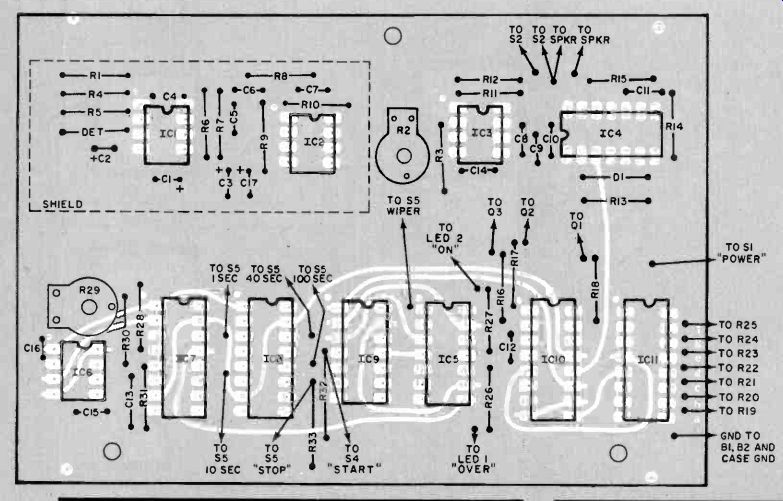
Fig. 3. Actual-size etching and drilling guides for the two-sided pc board
are shown below. Component mounting on the top is at left. Note that the
upper portion of the board (containing the audible circuit shown in Fig.
1) can be detached if only that circuit is to be used.
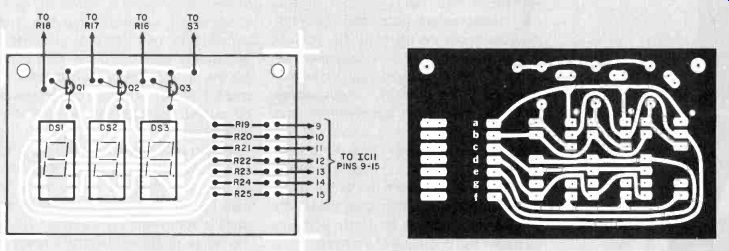
Fig. 4. Actual-size etching and drilling guide and component layout for
the display board.
PARTS LIST—
FIG. 2---B1--4 AA cells (not in kit) B2--9-volt battery (not in kit) C12-0.001-uF disc ceramic C13-0.1- uF disc ceramic C15-0.01-uF disc ceramic C16-10- RE, 35-V tantalum DISP I ,DISP2,DISP3-7-segment, common-anode LED IC6--555 timer IC7,1C8-4518 dual BCD counter IC9-4013 dual-D flip-flop ICI 0-14553 3-decade counter ICI 1-14543 7-segment decoder/driver LED 1 , LED 2-Red light-emitting diode Q1, Q2, Q3-2N4402 transistors The following are 1/4-watt. 10% resistors un less otherwise specified: R16, R17, R18, R30, R32, R33 10,000 ohms R19 through R27-470 ohms R28-100 ohms R29-100,000-ohm pc potentiometer R31-47,000 ohms S I-Dpdt switch S3-Spst switch S4-Normally open pushbutton switch S5-2-pole, 6-position rotary switch Misc.-Suitable enclosure (LMB453 or similar), battery holders; control knob; machine hardware; red filter; etc.
Note--The following are available for non commercial use from Radiation Monitoring Devices, Inc., 44 Hunt St. Watertown, M.4 02172: complete kit of parts for Fig. 1 for $85: complete kit of parts for Figs. 1 and 2. including case but not batteries, for $125.
Also available separately: CdTe radiation detector for $90.
Add $5 for shipping and handling. Massachusetts residents. please add 5% tax., allow 6 weeks for delivery. Available in U.S.A. only.
Construction. Since there are relatively high-impedance, low-level analog signals present in the ICI and IC2 stages Of RED-ONE, good circuit-board construction techniques must be exercised. The use of a printed circuit board and Molex Soldercons is strongly recommended.
Actual-size etching and drilling guides for the double-sided board and its component-placement diagram are shown in Fig. 3. At some component locations, pads appear only on the bottom side of the board. At these points, holes should be drilled from the bottom and components mounted from the top. If you elect to build only the beeper version of the Red One, you can separate and disregard the upper half of the guide. The only interconnecting trace between the two guide sections is from IC4 to /C/O.
The etching-and-drilling guide and component-placement diagram for the optional display board are shown in Fig. 4. This is a single-sided board.
In addition to normal precautions used when soldering solid-state de vices, special care must be taken with the detector. Use a low-wattage, fine-tipped soldering pencil and fine solder and provide a heat sink for the leads with long-nose pliers. Use only enough heat and solder to give reliable, solid connections.

Fig. 4. Actual-size etching and drilling guide and component layout for
the display board.
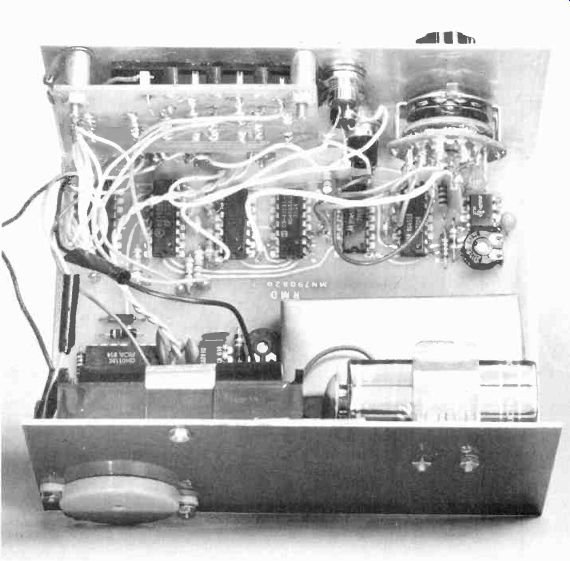
----------Photo of the author's prototype shows the main pc board mounted
on chassis bottom with sound element on back and display on front.
Begin assembly by installing and soldering into place the resistors, capacitors, and Soldercons (if used) on the main pc board. Some points that require soldering on both sides of the board are indicated by short tabs on the pc pads.
In addition, any pad on the component side of the board from which a foil runs requires soldering to the component lead. This suggests the use of Molex Soldercons as opposed to IC sockets.
Provisions for using miniature clips at critical test points and where interboard connections occur are indicated in the Fig. 3 component-placement diagram.
Tape a Ve" (3.2-mm) thick piece of foam rubber around the detector to cushion it from mechanical shock. (Be cause of its piezoelectric design, any mechanical shock to it will cause the detector to generate a false output.) Use copper foil or 0.005" (0.13-mm) thick brass to fabricate an electrical interference shield to prevent external in fluence on the low-level analog signals generated in the detector. Shape it as an open-faced box measuring 21/2" X 1" X 1/2" (63.5 X 24.5 x 12.7 mm). Then solder the box to four miniature clips spaced on the board as indicated in Fig. 3. (This box also holds the foam-rubber-wrapped detector gently against the main pc board.) Rubber cement a 4" X 212" x (102 x 63 x 9.5 mm) piece of foam-rubber carpet pad to the bottom of the main pc board. Assemble the display board, if used.
All components should be mounted in side a prepared metal case that measures 5"W x 33,4"D )< 23/4"H (127 x 92.3 X 70 mm) if you build the counter /display version of the project (smaller if you elect to build only the beeper version). Install the SPKR chirper on the outside surface of the box's rear wall, the battery holder on the inside surface.
Rubber cement the main pc board assembly to the floor of the box, making sure it will not interfere with the controls or battery holder and does not contact the case. (The foam rubber between main pc board assembly and case ensures maximum mechanical protection and vibration insulation.) Mount the display board with 443" (9.5-mm) long spacers and machine hard ware, using a ground lug on one post.
Install the switches, LEDs, and connecting wires, referring back to Fig. 1 and the component-placement guides. Don't forget the ground wire to the chassis (case), and use twisted-pair leads for S2 and SPKR. Label the front panel.
Calibration and Use. Prior to applying power to the RED-ONE, recheck all wiring and component orientations. Then turn on the power and, with a voltmeter connected from pin 3 of IC3 to ground, ad just R2 for minimum voltage. This lowers the noise threshold so that triggering will occur even on electrical noise. Out put pin 7 of IC3 will now fire rapidly or be continuously at ground potential.
This will cause a steady tone.
Using the voltmeter, or an oscilloscope set to the dc mode, slowly adjust R2 to raise the IC3 pin-3 reference voltage toward maximum. Chirp rate will gradually decrease, eventually ceasing altogether. Continue to adjust R2 only slightly past this point. This eliminates false triggering on electrical noise.
Gamma rays that deposit less than the minimum energy required to overcome this threshold will also be rejected. The equivalent energy of a typical low-level gamma photon is 30 keV.
Calibrate the timing chain by adjusting R29 and observing total ON time of LED2 with S5 in one time position. With a little patience, you can adjust R29 to obtain accuracy within a fraction of a second. Gross adjustment can be made in the 10- and fine adjustment in the 100-second periods. Accuracy is determined by the stability of IC6 and its associated resistors and capacitors.
REDONE can be used to estimate exposure to radiation from natural and man-made isotopes and to measure changes in exposure. Units of radiation exposure include the roentgen, which is approximately equal to the absorption of 0.01 joule of gamma radiation by 1 kg of matter, and the rem (roentgen-equivalent-man), which measures the equivalent biological damage to man by any form of radiation. Average radiation exposure in the U.S. is about 0.2 rem / yr from natural sources. RED-ONE'S sensitivity is between 20 and 40 counts / min milli-rem / hr. Hence, natural background radiation produces about 1 count / min.
Natural background radiation levels can vary by as much as a factor of two, depending on where you live, the materials from which your house is built, and your altitude above sea level (the last due to cosmic rays). In addition, variables in detector construction and electronic components influence noise level and, therefore, overall detection sensitivity. Actual count-rate measurements are not as important as are changes in count rate due to the presence of radio active material or environment changes.
It is important to note that random emissions of radioactivity will cause the monitored rate to apparently change from reading to reading. To estimate this statistical deviation, assume that any given count is accurate to within plus and minus the square root of the number of counts. Therefore, a display of 100 should be interpreted as 100 ± 10 counts, a display of 120 counts as 120 ± 11, etc. This means that the numerical difference between any two measurements is significant only if it is greater than the sum of the two square roots. For example, if your readings are 100 and 120, the numerical difference is 20 and square-root sum is 21 (10 + 11); because 20 is less than 21, there is no reason for concern. However, if your figures are 100 and 169, the difference is 69 and square-root sum is 23 (10 + 13), which gives you reason for concern be cause 69 is much greater than 23.
Once you have established a normal background level for your RED-ONE, you can compare readings at various locations and investigate possible radioactive sources. So now you can satisfy your curiosity about radiation levels in your locale.