Source: Radio Electronics--Electronic Experimenter's Handbook (1993)
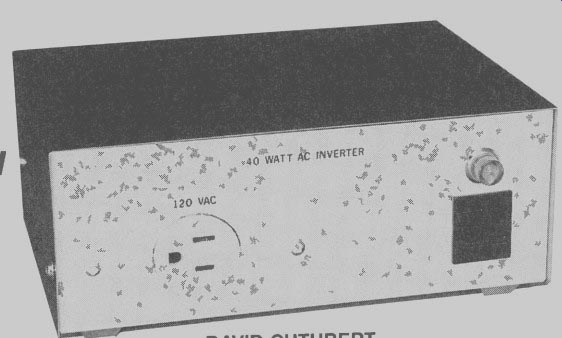
Build a 40-watt DC-to-AC inverter, and power AC appliances from your
automobile cigarette lighter.
by DAVID CUTHBERT
WOULD YOU BELIEVE THAT THIS article was written on an electric typewriter while the author was sitting next to a stream on a camping trip? The typewriter was powered from our 40-watt inverter that can be plugged into an automobile's cigarette lighter socket. The unit has enough power for many items that normally don't go on camping trips, such as a TV, a stereo, an electric razor, or a desk lamp. However, it also has some uses that may not be as obvious; it can be used to power items such as an oscilloscope or soldering iron when doing electronics work in the field. On road trips, the inverter can be used to power a camcorder battery charger.
The inverter draws a maximum of 5 amps, which is completely safe for an automobile cigarette lighter socket, and the no-load current is only half an amp. The output voltage is regulated and remains fairly constant from no-load to full-load. Figure 1 shows the output-voltage wave form superimposed over a sine wave. The rectangular output waveform has the same RMS and peak voltage as the sine wave, so the device being powered will never know the difference. The rectangle-wave operation greatly increases efficiency. The wave form would look similar if displayed on an oscilloscope.
Operation
The inverter, the schematic of which is shown in Fig. 2, is actually a push-pull audio amplifier.
The "input," or reference signal, is a 5-volt square wave. The out put is 340-volt peak-to-peak AC signal. The feedback signal is rectified in order to match the DC reference signal. On one half of the AC waveform, the upper three FET's are gated on, and on the other half the lower three FET's are on.
Normally, 120-volt AC outlets have one side at ground and one side that's "hot." The hot side alternates from-170 to +170 volts. The inverter output is a little different. On one half of the AC cycle, one side is near ground and the other is at +170 volts.
During the other half of the cycle the situation is reversed.
Op-amp IC1-a and its associated components form a 300-Hz clock oscillator, and counter IC2 divides the clock signal by four to obtain a 75-Hz inverter frequency. The 75 Hz, rather than 60 Hz, is used to avoid transformer saturation. Some electric clocks will run fast with that frequency, but most electronic gear will work just fine. Decade counter IC2 controls the timing of the reference signal and the gating-on of the error-amp signal to the proper set of FET's.
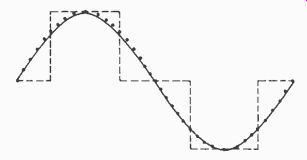
FIG. 1--BECAUSE THE OUTPUT-VOLTAGE waveform, which is shown here superimposed
over a sine wave, has the same RMS and peak voltage as the sine wave, the
device being powered will never know the difference.
Figure 3 shows the timing relationships in the inverter. When IC2 pin 3 goes high, the output of buffer IC1-c is high. That reverse biases D1 and allows the error amp signal to reach Q1, Q2, and Q3. At the same time, IC2 pin 4 is low, which causes the output of buffer IC1-d to below. That grounds the gates of Q4, Q5, and Q6 thereby turning them off.
Pins 2 and 7 of IC2 are also low, so Q7 is off. A 5-volt reference from regulator IC3 is now present at the error-amp's (IC1-b) non-inverting input. The reference-signal rise time is slowed by R12 and C2 in order to avoid output over shoot, and the gain and frequency response of the error amp is set by R15, R25, and C3.
Next, pin 2 of IC2 goes high, which turns Q7 on and the reference signal is pulled to ground.
Pins 3 and 4 of IC2 are now low and the FET gates are grounded, turning them off. Pin 4 of IC2 now goes high and the other three FET's are gated on. The reference signal now rises to 5 volts.
and the other half of the AC out put waveform is generated. The next clock pulse causes IC2 pin 7 to go high; all FET's are now off and the reference is set to zero.
The following clock pulse resets IC2 and another cycle begins.
A filter that protects the CMOS circuitry against alternator spikes and reversed input polarity is formed by R7, C8, and D7.
Components R9 and C4 filter output spikes, and R18-R21 are pre-load resistors to stabilize the inverter when no load is connected. Although the FET's have no current-equalizing source resistors, they still share current fairly equally. (When a FET "hogs" current it heats up more and its on resistance increases, causing it to draw less current.)
PARTS LIST
All resistors are 1/4-watt, 5%, unless otherwise noted.
R1-R7-100 ohms R8-1000 ohms R9-1000 ohms, 1/2-watt R10, R11-4700 ohms R12-R16-10,000 ohms R17-10,000-ohm potentiometer R18-R21-22,000 ohms, 1/2-watt R22-R26-100,000 ohms R27, R28-470,000 ohms R29-1 megohm Capacitors C1--0.001 uF, ceramic disc C2-0.01 uF, ceramic disc C3-0.0047 F, ceramic disc C4-0.05 uF, 200 volts, ceramic disc or metal film C5-C7-0.1 uF, ceramic disc C8, C9-470 uF, 35 volts, electrolytic
Semiconductors
IC1-LM324 quad op-amp IC2-4017 CMOS decade counter IC3-LM7805 or LM340-5 +5-volt regulator D1-D7-1N4003 diode
Q1-Q6--IRF511 60-volt 3.5-amp MOSFET
Q7-2N2222 or 2N3904 NPN transistor
Other components
T1-120/12.6 volt center-tapped 3-amp power transformer J1-banana jack, red J2-banana jack, black J3-AC power receptacle F1-5-amp slow-blow fuse S1-SPST 6-amp switch NE1-neon indicator light with series resistor Miscellaneous: fuse holder, perforated construction board, enclosure, aluminum for heatsinks, standoffs for mounting circuit board, wire, solder, etc.
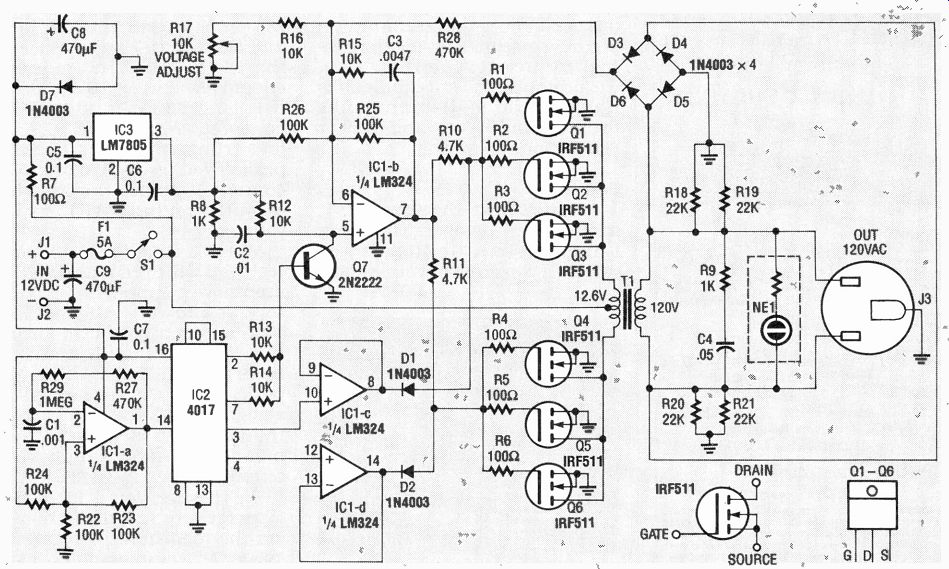
FIG. 2--THE INVERTER is actually a push-pull audio amplifier where, on
one half of the AC waveform, the upper three FET's are gated on, and on
the other half the lower three FET's are on.
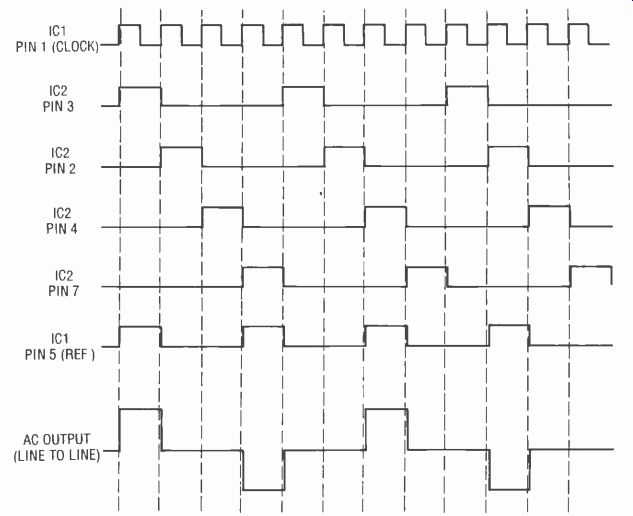
FIG. 3--THE TIMING RELATIONSHIPS in the inverter. When IC2 pin 3 goes
high, the output of buffer IC1-c (pin 8) is high. That reverse biases
D1 and allows the error amp signal to reach Q1, Q2, and 03. At the
same time, IC2 pin 4 is low, which causes the output of buffer IC1-d
to below. That grounds the gates of 04, 05, and 06 thereby turning
them off.
Construction
The inverter circuit was built on a perforated construction board. 11-ansistors Q1, Q2, and Q3 share a 1.5- by 4-inch heat-sink, and Q4, Q5, and Q6 share another: the heat sinks are made of aluminum sheet. Figure 4 shows an internal view of the inverter. In the prototype, the FET's were not insulated from the heat-sinks because the heatsinks are isolated from ground and all other circuitry. If you use any other heatsinking configuration, the FET's should be insulated.
Parts placement isn't critical except for the 100-ohm gate resistors. They prevent VHF oscillations and should be placed within half an inch of the FET's.
Just make sure that everything is securely mounted inside the cabinet to prevent shorting. Also, the prototype's metal cabinet has had several half-inch holes drilled in the bottom and rear for ventilation.
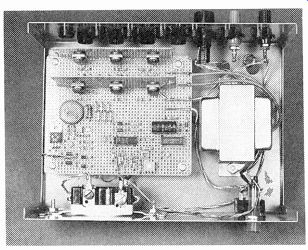
FIG. 4--IN THE PROTOTYPE, the FET's are not insulated from the heatsinks
because the heatsinks are isolated from ground and all other circuitry.
Power up
To safely test the inverter, it should really be operated with a 1-amp current-limited power supply. If you don't have one, simply connect it to approximately 12-volts DC, and keep a look out for smoke or sudden failures.
Connect an oscilloscope ground to chassis ground and the probe to the junction of D3 and D6; you will see an alternating DC signal. The frequency should be between 70 and 90 Hz.
If it isn't you can adjust it by changing the value of R27. Ad just trimmer R17 for 180-volts peak. If you use a DVM or a VOM, connect it across the inverter's AC outlet, and adjust R17 for 120-volts AC.
Now it's time for a full-power test. You will need a 12.6 volt, 10-amp power supply or a car battery. A 120-volt, 40-watt light bulb makes a good load for testing. With a 12.6-volt input, the inverter will deliver 150 volts peak, which will read about 105 volts on a DVM. With a 14.2-volt input, which is what an auto mobile alternator supplies, the output will be 115-volts AC.
We're sure you'll find many uses for your inverter at home or on the road from powering low-power AC equipment on a camping trip to re-charging your camcorder batteries as you drive to your next vacation spot!