Ready to record a live gig? The recording will go a lot more smoothly if you plan what you're going to do. So sit down, grab a pen, and make some lists and diagrams as described here. We'll go over the steps needed to plan a multitrack recording of a concert.
Selecting a Venue
If you can select a place for the recording, use a room where the audience is attentive and enthusiastic, and the background noise is minimal. Visit some potential venues and check out the noise and acoustics. A very live room with lots of reverb can make the recording muddy. Ideally the stage should be large so the performers can spread apart for better separation.
A large stage also reduces leakage from wall reflections.
Musical Preparation
Before the recording, band members might want to upgrade guitar strings and drum heads, and repair the "action" and intonation of guitars.
Long jams may be fun to play live, but they can get boring on a CD.
Try to keep the songs short and focused. Be sure to check tuning before each song.
The band should consider playing some songs more than once. If a song is played poorly in the first set, the band can re-play it in a later set and re-record it. Put the best performance on the CD. If budget allows, record several shows and pick the best takes for the album or demo. The song sequence can be changed during mastering.
Preproduction Meeting
Call or meet with the PA company and the production company (or just the musicians) who are putting on the event. Find out the date of the event, location, phone numbers, and email addresses of everyone involved, when the job starts, when you can get into the hall, when the second set starts, and other pertinent information. Decide who will provide the mic split, which system will be plugged in first, second, and so on. Draw block diagrams for the audio system and communications (comm) system. Deter mine who will provide the comm headphones.
If you're using a mic splitter, work out the splitter feeds. The mixer getting the direct side of the split provides phantom power for condenser mics that are not powered on stage. If the house system has been in use for a long time, give its operators the direct side of the split.
Overloud stage monitors can ruin a recording, so work with the sound-reinforcement people and musicians toward a compromise. Explain to the musicians that if they can play with a low monitor level, it will help their recording. In-ear monitors are preferred over floor monitors for live recording because then no monitor sound gets into the mics.
Make copies of the meeting notes for all participants. Don't leave things unresolved. Know who is responsible for supplying what equipment.
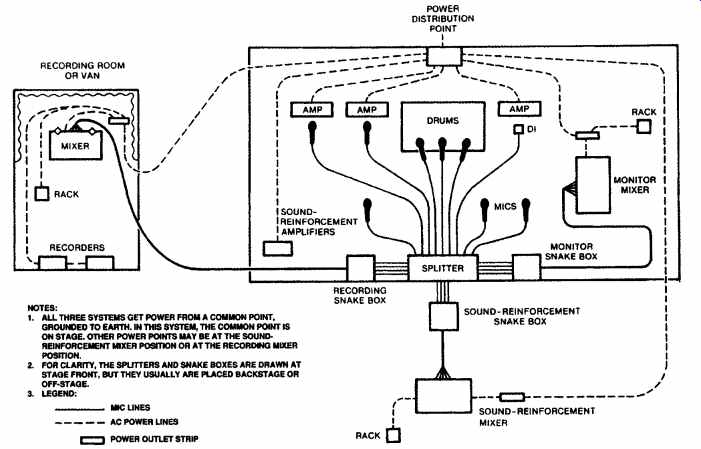
FIG. 1 shows a typical equipment layout worked out at a pre production meeting. There are three systems in use: sound-reinforcement, recording, and monitor mixing. The mic signals are split three ways to feed these systems.

FIG. 1 Typical layout for an on-location recording of a live concert.
Site Survey
If possible, visit the recording site in advance and go through the following checklist:
• Check the AC power to make sure the voltage is adequate, the third pin is grounded, and the waveform is clean.
• Listen for ambient noises-ice machines, coolers, 400-Hz generators, heating pipes, air conditioning, nearby discos, etc. Try to have these noise sources under control by the day of the concert.
• Sketch dimensions of all rooms related to the job. Estimate distances for cable runs.
• Turn on the sound-reinforcement system to see if it functions okay by itself (no hum and so on). Turn the lighting on at various levels with the sound system on. Listen for buzzes. Try to correct any problem so that you don't document bad PA sound on your recording.
• Determine locations for any audience or ambience mics. Keep them away from air-conditioning ducts and noisy machinery.
• Plan your cable runs from the stage to the recording mixer.
• If you plan to hang mic cables, feel the supports for vibration. You may need microphone shock mounts. If there's a breeze in the room, plan on taking windscreens.
• Make a file on each recording venue that includes the dimensions and the location of the circuit breakers.
• Determine where the control room will be, if any. Find out what surrounds it-any noisy machinery?
• Visit the site when a crowd is there to see where there may be traffic problems.
Mic List
Now write down all the instruments and vocals in the band. If you want to put several mics on the drum kit, list each drum that you want to mike.
As for keyboards, decide whether you want to record off each keyboard's output, or off the keyboard mixer (if any).
Next, write down the mic or direct box you want to use on each instrument; for example:
--------------
1. Bass DI
2. Kick AKG-D112
3. Snare Shure Beta 57
4. Hi-hat Crown CM-700
5. Small-rack tom 57
6. Big-rack tom 57
7. Small-floor tom Sennheiser MD-421
8. Big-floor tom 421
9. Cymbals overhead left Shure SM81
10. Cymbals overhead right SM81
11. Lead guitar 57
12. Rhythm guitar 57
13. Keyboard mixer DI
14. Lead vocal Beyer M88
15. Harmony vocal Crown CM-311A
---------------
Make some copies of this mic list. At the gig, place one list by the stage box and the other by each mixer. The list will act as a guide to help you keep things organized.
Track Sheet
Next, decide what will go on each track of your multitrack recorder. If you have enough tracks, your job is easy: just assign each instrument or vocal to its own track. Bass to track 1, kick to track 2, and so on.
What if you have more instruments than tracks? Suppose you have an eight-track recorder, but there are 15 instruments and vocals (including each part of the drum set). You can combine several drum mics into one or two drum tracks (or combine several vocal mics into one or two vocal tracks). That is, you can set up a sub-mix.
Let's say the drum kit includes a snare, kick drum, two rack toms, two floor toms, hi-hat, and cymbals. If you want to mike everything individually, that's nine mics including two for the cymbals. But you don't need to use nine tracks. Assign or group those mics to buses 1 and 2 to create a stereo drum mix. Connect buses 1 and 2 to recorder tracks 1 and 2. At the sound check, you set up a sub-mix of all the drum mics, and assign them to buses 1 and 2. You control the overall level of the drum mix with sub-master faders 1 and 2 (also called bus faders or group faders).
Use tracks 3 through 8 for amps and vocals (as in the following example). Feed tracks 3-8 from insert sends.
Track/instrument
1. Drum mix L
2. Drum mix R
3. Bass
4. Lead guitar
5. Rhythm guitar
6. Keys mix
7. Lead vocal
8. Harmony vocal.
Block Diagram
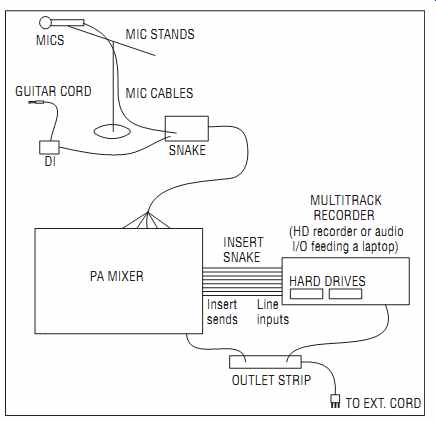
Now that your track assignments are planned, you can figure out what equipment you'll need. Draw a block diagram of your recording setup from input to output (FIG. 2). Include mics, mic stands, DI boxes, cables, snake, mixer, multitrack recorder(s), recording media, and powering. On your diagram, label the cable connectors on each end so you'll know what kind of cables to bring. It is a good idea to keep a file of system block diagrams for various recording venues.

FIG. 2 Example block diagram of recording setup.
In FIG. 2, the block diagram shows a typical recording method: feeding PA-console insert connectors to a multitrack hard disk recorder.
We'll use this example throughout the rest of the section.
Equipment List
From your block diagram, generate a list of recording equipment. Based on FIG. 2, you would need the following PA and recording gear (not including power amps and speakers):
• Mics
• Mic stands and booms
• Direct box
• Guitar cable
• Snake
• PA mixer
• An insert snake made of eight phone-to-phone cables (called "jack to-jack" cables outside the US)
• Multitrack recorder
• Outlet strip
• Extension cord
• Hard drives (HDs) (enough capacity for the duration of the gig).
Multitrack audio consumes a lot of disk storage space. Table 1 shows the amount of HD or flash-memory space needed for a 1-hour recording with various recording formats.
Don't forget the incidentals: a pen, notebook, flashlight, guitar picks, heavy-duty guitar cords, drum keys, mic pop filters, gaffers tape, console tape, tuner, ear plugs, audio-connector adapters, audio ground-lift adapters, in-line pads, in-line polarity reversers, spare cables, gooseneck lights for the console, spare batteries, bottled water, and aspirin.

Table 1: Storage required for a 1-hour recording.
Let's explain some of those terms. Aground-lift adapter disconnects the shield at one end of a line-level balanced cable, preventing hum from a ground loop (multiple connections to ground). A pad or attenuator reduces the signal level to prevent distortion from overly hot signals. A polarity reverser reverses the connections to XLR pins 2 and 3 to correct for mics that are wired in opposite polarity.
Instead of duct tape, use gaffers tape, which does not leave a sticky residue. Gaffers tape and console tape are available at markertek.com. Also use light-colored electrical tape and a Sharpie pen to identify your mic stands and mic cables.
Bring a tool kit with screwdrivers, pliers, soldering iron and solder, AC-outlet checkers, fuses, a pocket radio to listen for interference, ferrite beads of various sizes for RFI (radio-frequency interference) suppression, canned air to shoot out dirt, cotton swabs and pipe cleaners, and De-Oxit from Caig Labs to remove oxide from connectors.
Check off each item on the list as you pack it. After the gig, you can check the list to see whether you've reclaimed all your gear.
Preparing for Easier Setup
You want to make your setup as fast and easy as possible. Here are some tips to help this process.
Put It on Wheels
Mount your console and recorders in protective carrying cases. Install casters or swivel wheels under racks and carrying cases so you can roll them in. Rolling is so much easier than lifting and carrying.
You might permanently install the HD recorder in an SKB carrying case, which acts as a rack (gigcases.com). When a remote job comes up, just grab it and go.
A very helpful item is a dolly or wheeled cart to transport heavy equipment into the venue. Consider getting some lightweight tubular carts. Collapsible carts will store easily in your car or truck. One maker of equipment carts is Rock n Roller, which advertises in the Musician's Friend catalog, musiciansfriend.com. Another cart is the Remin Kart a-Bag, kart-a-bag.com. Also see gigcases.com.
Pack mics, headphones, and other small pieces in trunks or milk crates. You might want to build a mic container: a big box full of foam rubber with cutouts for all the mics. Or construct a wheeled cabinet with drawers for mics, DI's, and speaker cables.
In an article in the September/October 1985 issue of db magazine, remote recording engineer Ron Streicher offers these suggestions:
Especially for international travel, make sure your documentation is up to date and matches the equipment you're carrying. Make a list of everything you take: all the details, such as each pencil, connector, etc.
Also make sure your insurance is up to date. You need insurance for en route as well as at the destination.
I organize my cases so I know where every item is. They're ready to go anytime and make setup much faster. The cables are packed with their associated equipment, not in a cables case. I check everything coming and going, and try to have 100 percent redundancy, such as a small mixer to substitute for the large console.
Mic Mounts
If you'll be recording a singer/guitarist, take a short mic mount that clamps onto the singer's mic stand. Put the guitar mic in the mount. Also bring some short mounts to clamp onto drum rims and guitar amps. By using these mounts, you eliminate the weight and clutter of several mic stands. Some examples of short mounts are the Mic-Eze units by Ac-cetera (http:/ /ac cetera.com). They have standard 5/8-27 threads (3/8 inches outside the US) and mic clamps that either spring shut or are screw-tightened.

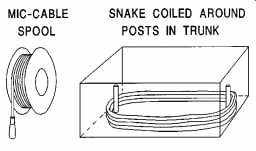
FIG. 3 Some cable-storage methods.
Snakes and Cables
You can store mic cables on a cable spool, available in the electrical department of a hardware store. Wrap one mic cable around the spool, plug it into the next cable and wrap it, and so on.
A snake can be wrapped around a garden-hose spool, or coiled inside the bottom of a trunk (see FIG. 3). Commercial snake reels are made by such companies as Whirlwind (whirlwindusa.com), Pro Co Sound (procosound.com), and Hannay (hannay.com).
Use wire ties to join cables that you normally run together, such as PA sends and returns.
Snake hookup is quicker if the snake has a multipin twist-lock connector or "disconnect" (such as Whirlwind W1 or W2). This connector plugs into a mating connector that divides into several male XLRs. Those XLRs plug into the mixing console. Leave the XLRs in the console carrying case.
You'll find that the snake is easier to handle without the XLR pigtails.
For a clean, rapid hookup of drum mics, put a small snake near the drum kit and run it to the main stage box. Snakes are made by companies such as Whirlwind, Pro Co Sound, and Horizon (horizonmusic.com).
Check that all your mic cables are wired in the same polarity-pin 2 hot.
You might use three-conductor shielded mic cables (hot, cold, and ground leads in a shield). Connect the shield to ground only at the male XLR end. Also use cables with 100% shielding. Those measures enhance the shielding capability of the shield and reduce pickup of lighting buzzes.
In XLR-type cable connectors, do not connect pin 1 to the shell, or you may get ground loops when the shell contacts a metallic surface.
Label all your line-level cables on both ends according to what they plug into; for example, compressor in, track 12 out, power amp ch.1 in, snake aux1 out. Or you might prefer to number the cables near their connectors. Cover these labels with clear heat-shrink tubing.
Label both ends of each mic cable with the cable length. Put a drop of glue on each connector screw to temporarily lock it in place.
Multitrack Wiring
You can speed the PA console wiring by using a short phone-to-phone snake (jack-to-jack snake outside the US) between the console and your multitrack recorder. When packing, plug the snake into the multitrack recorder and coil the snake inside the recorder's carrying case or rack. In other words, have all your equipment pre-wired. At the gig, pull out the snake and plug it into the console connectors.
Use an insert snake with TRS (tip-ring-sleeve) phone plugs (TRS jack plugs outside the US) at the console end. Carry some TRS-to-dual TS (tip-sleeve) adapters to handle consoles that have separate connectors for insert send and return. Short snakes for rack and multitrack connections are made by Hosa (hosatech.com), Horizon, and Pro Co Sound, among others.
Other Tips
Here are some more helpful hints for successful on-location recordings:
• Plan to use a talk-back mic from the board to the stage monitors during sound checks.
• Hook up and use unfamiliar equipment before going on the road.
Don't experiment on the job.
• Consider recording with redundant (double) systems so you have a backup if one fails.
• Walkie-talkies are okay for preshow use, but don't use them during the performance because they cause RFI. Use hard-wired communications headsets. Assistants can relay messages to and from the stage crew while you're mixing.
• Allow for delays at airline security checkpoints.
• Get a public-liability insurance policy to protect yourself against lawsuits.
• Call the venue and ask directions to the load-in door. Make sure that someone will be there at setup time to let you in. Ask the custodian not to lock the circuit-breaker box the day of the recording.
• A few days before the session, check out the parking situation.
• Just before you go, check out all your equipment to make sure it's working.
• Arrive several hours ahead of time for parking and setup. Expect failures-something always goes wrong, something unexpected.
Allow 50% more time for troubleshooting than you think you'll need. Have backup plans if equipment fails.
• In general, plan everything in advance so you can relax at the gig and have fun.
By following these suggestions, you should improve your efficiency- and your recordings-at on-location sessions.
Some of the information in this section was derived from two work shops presented at the 79th convention of the Audio Engineering Society in October 1985. These workshops were titled "On the Repeal of Murphy's Law-Interfacing Problem Solving, Planning, and General Efficiency On Location," given by Paul Blakemore, Neil Muncy, and Skip Pizzi; and "Popular Music Recording Techniques," given by Paul Blakemore, Dave Moulton, Neil Muncy, Skip Pizzi, and Curt Wittig.