In this section, we are concerned with the three major types of special effects. (1) electronic, (2) optical, and (3) mechanical.
The electronic effects are generated electronically, within the circuitry of the television system. They consist of image combination effects, where two or more images are combined, and of image manipulation effects, where the picture is distorted in a predetermined way. An image combination effect is, for example, the adding of a show title to a background scene. An image manipulation effect is one in which the image takes on a prominent color, or where the image seems to disintegrate into an array of geometric patterns.
Optical effects are produced either by scenic devices, such as a slide projection in the studio that provides the background for a specific scene, or by actual optical distortions through mirrors or lens attachments. As simple a device as racking in and out of focus is an optical effect.
Mechanical effects include the simulation of rain, smoke, wind, and other such natural events that usually occur outside the studio.
=============
Chroma Key A color matte; the color blue is generally used for the chroma key area that is to become transparent for the matte.
Clipper A knob on the switcher that selects the whitest portion of the video source, clipping out the darker shades. The clipper produces high-contrasting blacks and whites for keying or matting.
Colorizing The creation of color patterns or color areas through a color generator (without a color camera).
De-beaming The gradual reduction of the scanning beam intensity. The picture becomes a high-contrast picture, with the detail in the white and black areas no longer visible, gradually deteriorating into a non-distinct, light-gray screen.
Edge Key A keyed (electronically cut-in) title whose letters have distinctive edges, such as dark outlines or a drop shadow.
External Key A key signal that shapes the cut-in figure (into the background image). It is generated by a camera used exclusively for keying and fed into an external key input.
Gobo A scenic foreground piece through which the camera can shoot, thus integrating the decorative foreground with the background action. In film, a gobo is an opaque shield that is used for partial blocking of a light.
Internal Key A key signal that shapes the cut-in (into the background picture). It is supplied by any one of the studio cameras fed into the mix/effects bus.
Key An electronic effect.
Keying means the cutting in of an image (usually lettering) into a background image.
Lens Prism A prism that, when attached to the camera lens, will produce special effects, such as the tilting of the horizon line, or the creation of multiple images.
Matte The keying of two scenes; the electronic laying in of a background image behind a foreground scene, such as the picture of a town meeting behind the newscaster reporting on this meeting.
Matte Key Keyed (electronically cut-in) title whose letters are filled with shades of gray or a specific color.
Polarity Reversal The reversal of the grayscale; the white areas in the picture become black and the black areas white, as the film negative is to the print.
Rear Screen Translucent screen onto which images are projected from the rear and photographed from the front.
R.P. Rear screen projection; also abbreviated as B.P. (back projection). Special Effects Generator An electronic image generator that produces a variety of special effects wipe patterns, such as circle wipes, diamond wipes, and key and matte effects, usually called S.E.G. Sweep Reversal Electronic scanning reversal; results in a mirror image (horizontal sweep reversal) or in an upside-down image (vertical sweep reversal). Video Feedback The picture on the television set is photographed by a television camera and fed back into the same monitor, producing multiple images.
=============
As the term special effects indicates, the effects should remain "special." If overused, the special will soon lose its unusualness and effectiveness.
With modern switching and electronic effects generating equipment, a great number of startling effects are so readily available that they may tempt the inexperienced television director to substitute effects for content. On the other hand, when judiciously used, special effects can enhance production to a considerable degree, and help greatly in the task of clarifying and intensifying the message.
Whenever you intend to use a special effect, you should ask yourself: (1) Is the effect really necessary? (2) Does it help in the clarification and intensification of my message? (3) Can the effect be easily produced? (4) Is it reliable? If you can give a "yes" answer to all these questions, the effect is in. If there is a "no" or even a "maybe" to any one or several of them, the effect is out.
There are two further factors you might consider before setting up complicated effects. One is the relative mobility of modern television equipment. Now that the television camera and VTR are no longer studio-bound, certain effects that need complex machinery for simulation in the studio, like snow or fog, can be obtained simply by taking the camera outdoors during a snowstorm or on a foggy day. The other is the enormous communication power of television audio. In many instances, you can curtail or eliminate complicated video effects by combining good sound effects with a simple video presentation. The sound effect of pouring rain, for example, combined with a closeup of an actor dripping wet may very well preclude the use of a rain machine, which produces rain like streaks on the screen. To show a group of people sitting on the ocean beach, you don't need to set up a rear-screen projection of the ocean; a good sound effect of the surf over the closeup of the people basking in the sun will do the same job more easily. Or, better yet, take your camera and VTR to the beach, if you happen to have one available. On television, reaction is often more effective than action. For example, you can suggest an atomic bomb explosion by showing a closeup of an actor's face combined with the familiar sound of such an explosion. A matting in of the mushroom cloud becomes superfluous.
Nevertheless, a judicious use of special effects presupposes that you know what effects are available to you.
We can divide special effects (referring to video only) into three large groups: (1) electronic effects, (2) optical effects, and (3) mechanical effects.
Electronic Effects
Most of the special effects used in television are produced electronically. There are basically image combination effects, where two or more images are combined, such as a superimposition, or the adding of a title over a background picture, and image manipulation effects, in which the whole picture is affected through certain color, brightness, or contrast manipulations.
The image combination effects include (1) superimposition, (2) key, (3) matte, (4) chroma key, and (5) wipe. The image manipulation effects include (1) sweep reversal, (2) polarity reversal, (3) deeming, (4) video feedback, and (5) colorizing.
-----------------

11.1 If you have no key facility on your switcher, you can use a superimposition
for some of the more common special effects.
For a ghost effect, have your performer dress in the traditional white bedsheet and move slowly in place in front of a black threefold. Make sure that he remains in one spot so that the camera does not overshoot the black backing. The ghost image is then superimposed over the picture from another camera, which may be slowly panning through the set of the haunted house. Although the figure actually remains in one spot, the panning of the second camera will create the illusion of a ghost floating weightlessly through the room. If you cannot find anyone with the strong desire to play a ghost, you can make one out of a handkerchief. Tie the handkerchief phantom to a string and move it violently in front of a black easel card.
Mystical writing that suddenly appears on a blackboard while the surprised professor looks on is no problem in television production. One camera frames up on the blackboard and the professor. Another camera is focused on a black easel card on which you can write (with white chalk) the mystical letters. You must wear a long black glove so that your hand and arm become completely invisible when supered over the blackboard. If you want the lettering to appear on the camera-left side of the blackboard, the easel card writing must be framed on the left side of the viewfinder. If your writing is to appear on the right blackboard area, the card must be framed on the right half.
---------------------
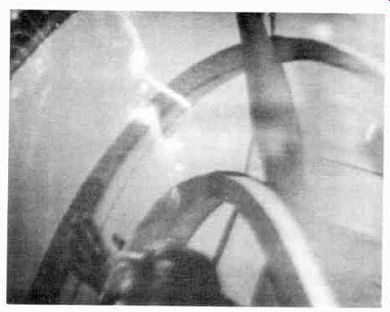
11.2 Superimposition.
Image Combination: Superimposition
A superimposition, or "super," for short, is a form of double exposure. The picture from one camera is electronically superimposed over the picture from another. In effect, both pictures are simultaneously projected on the monitor screen.
Supers are used for adding specific information and for creating the effects of inner events--thoughts, dreams, processes of imagination--rather than outer, everyday events.
The most common information super is the adding of titles over a background picture or event. If your switching system does not allow keying, you must resort to supering titles. One camera takes the background picture (any kind of live event, say, a long shot of a football stadium), and the other camera is focused on the super card, which has white letters on a black background.
Since the black card does not reflect any light, or only an insignificant amount, it will remain invisible during the super. Only the white letters will appear over the background picture from the other camera. The same principle applies to supering an isolated object over a background picture. Whatever it is, it must be placed in front of a plain black background (or any unlit area) so that only the lighted object will appear in the super. For example, if you want to have a burning candle appear in the midst of a mystical meeting, you simply put the candle in front of a black card or drape and super it over the shot of the set. In an information super, you should try to keep the super as clean as possible, which means that the viewer should be able to read the new information easily.
Regardless of background, however, you can super any two images as long as the video sources appear on different mix buses. In fact, when you are trying to express some inner event, such as a dream sequence, the superimposition may be quite complex. The traditional super of a dream sequence shows a closeup of a sleeping person, with his dream images supered over his face.
Here, we are no longer trying to convey specific information but rather suggesting a general impression of the sleeping person's subconscious. As we know, the subconscious does not tend to reveal itself in an orderly, logical manner anyway.
Or let's take a dance. If you want to show the intensity and intricacy of the dance's rhythm rather than its sequence of steps, a complex super of the dancer's body as seen from two different points of view (shift in angle and distance, for example) might prove highly effective. It no longer matters whether we clearly see the various steps of the dancer; instead, we are given a new screen event that lets us perceive the dance in a novel, intensified way. We no longer photograph a dance; we help to create it. (See 11.2.) But never super simply because the original event is dull. A super will intensify only when the event itself possesses enough energy and complexity to warrant such involved video treatment.
Key
The basic purpose for using a key is much the same as for a super: supplying additional specific information, such as a show title, to an existing background scene. Contrary to the super, there are several types of key effects: (1) normal, (2) edge, and (3) matte.
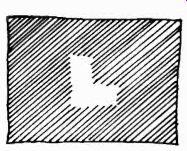
11.3 The normal key simply cuts the letters into the base picture as they
appear on the title card or slide.
Normal Key
In a normal key one picture is cut into the other electronically. The key looks similar to a super, except that the background picture does not bleed through the keyed-in picture. The most frequent use of a normal key effect is the insertion of letters, for example program titles or credits, over a base (background) picture.
A key card looks exactly like a supercard; it is usually a black card with white lettering on it (see Section 12). The letters for key inserts can also be produced electronically by a machine called character generator, about which we will talk more in Section 12.
In order to achieve a clean key, in which the white letters are cut into the base picture without any breakup or detriment to it, the card must be evenly lighted and the contrast increased by means of the clipper. A clipper is a knob on the switcher that selects the whitest portion of a video source, clipping out the darker shades (the blacks of the studio card). What remains of the key signal are the white letters, and these are then cut into the base picture. (See 11.3.) Edge Key Most larger switchers allow you to select among various edge modes. This means that you can present the letters as they are on the key card or slide, or give each letter a distinctive outline electronically. The more visible types of outlines, or edges, are used to key letters over a busy (containing much detail) background. For example, in the edge key (or symmetrical outline) mode, each white letter (or any other keyed symbol or form) will have a thin black-edge outline around it (11.4). In the drop shadow, or simply shadow, mode, the letters will obtain a shadow contour, appearing three-dimensional (11.5). In the outline mode, the letters themselves will appear in outline form, only their contour remaining visible (11.6). Matte Key In a matte key, the letters that are cut into the base picture can be filled with various shades of gray or a variety of colors.
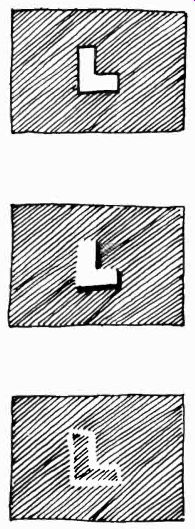
11.4 The edge key puts a black border around the letters in order to make
them more readable than with the normal key.

11.5 The drop-shadow key adds a prominent shadow to the letter (attached
shadow) as though three-dimensional letters were illuminated by a strong key
light.

11.6 The outline key makes the letters appear in outline form. It shows the
contour of the letter only.

11.7 Of course, all electronic special effects, such as the various key and
wipe configurations, are not simply an addition to the switcher functions;
they need special electronic equipment. Appropriately enough, this equipment
is called special effects generator.
The complexity of these generators depends upon their functions; there are the borderline generator, the pattern generator, the pattern positioner, and a color matte generator that can fill the keyed images with different colors. Chroma key effects need, again, their own chroma key generator.
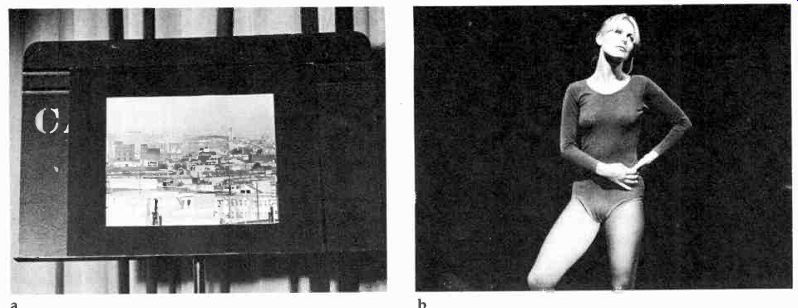
11.8 Electronic Matting: (a) In this black-and-white matting example, camera
1 focuses on a studio card showing a photo of a city skyline. (b) Camera 2
focuses on the dancer in front of a black background. The floor must also
be rendered black, either by painting it or by putting a black cloth on it.
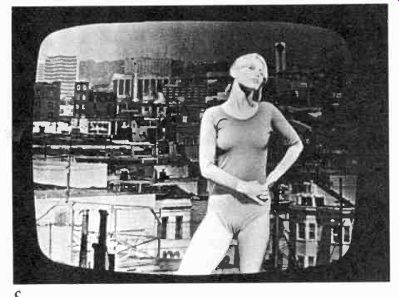
(c) When camera 2 is keyed over camera 1, the matte is completed; the dancer
seems to be dancing in front of the city skyline.
Matte:
Because matting is an electronic process very similar to keying, the terms keying and matting are often used interchangeably. Sometimes, matting refers to the "laying in" electronically of a background image, such as a scene of a fire, behind a foreground image, such as the newscaster. At other times, matting means the filling in of a keyed-out shape, such as letters, with other picture information, such as colors or textures. In any case, matting is an electronic image combination whereby the background scene does not bleed through the foreground scene, except where intended. How does a matte work? In a monochrome matte, any black or very dark shadow area of a foreground picture becomes transparent and lets the background image show through. Any bright picture area, however, remains opaque, and appears therefore as overlapping the background scene.
Here is an example. Let us assume that you would like to show a dancer perform on a rooftop with the city skyline as the background. One camera will focus on a photograph of the city skyline; the other on the dancer, who performs in front of a black, or unlit, background. Through matting, you can now continually cut the dancer's shape out of the photograph and fill the matted-out shape with the image of the dancer. As a result, the dancer appears to be dancing on the rooftop with the city skyline in the back. (11.8.) If the video switcher is equipped for "double re-entry"-which means that the matting effect can be routed again through the mix bus, or any mix bus effect through the effects bus (you can achieve a double effect)-and if a third camera is used (which may be the television film camera), further matting effects can be achieved. One camera takes the background, another provides the signal that cuts the foreground shapes out of the background picture, and the third supplies the material to fill in the cutout holes, which may be anything that has textural interest, such as rough cloth. With this technique you can create a number of surrealistic effects, as, for example, a number of heavy concrete blocks in the shape of a lithe female dancer moving on top of the ocean surf.
Such visual adventures are, of course, definitely special effects, and should be reserved for special occasions.
-----------
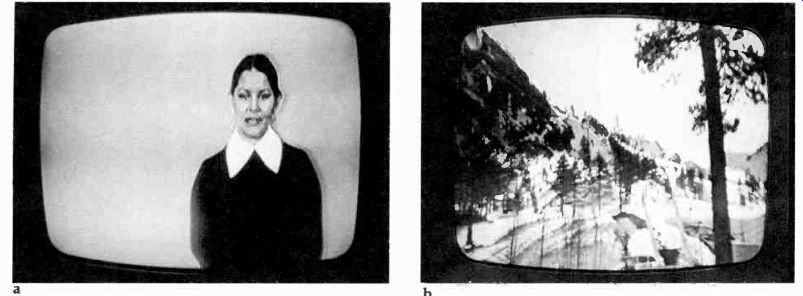

11.9 If you use one camera (1) to supply the key signal (the shape of the
cut-in) and feed this signal directly into a special keying signal input,
we speak of external key. The other cameras (2 and 3), which are fed into
the mix buses, can then be used to "fill" the shape of the external
key cut-in.
In internal keying, both cameras go through the mix/ effects bus, with one supplying the background image and the other the cut-in keying signal.
----------
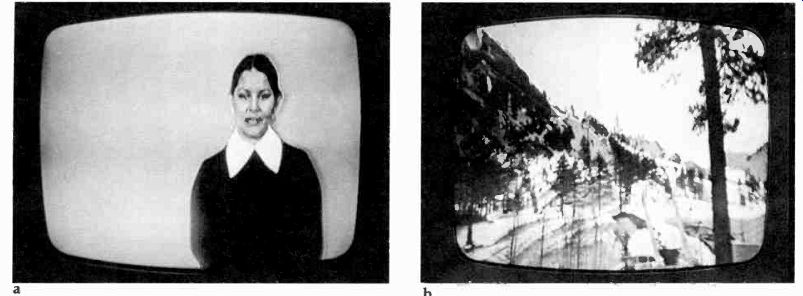
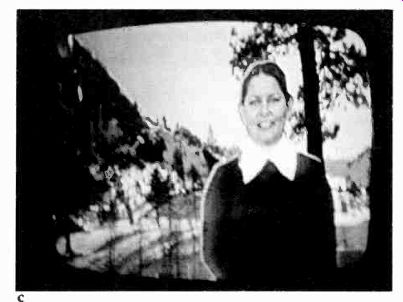
11.10 Chroma Key: (a) Studio camera 1 takes a picture of the woman standing
in front of an evenly lighted blue background. (b) The background for the
key effect is supplied by the film chain: a simple color slide of a mountain
landscape. (c) The completed chroma key effect transports the woman into the
landscape.
11.11 Vertical Wipe: In a vertical wipe, one picture is gradually replaced
from the bottom up or from the top down.

11.12 Horizontal Wipe: In a horizontal wipe, one picture is gradually replaced
from the side.

11.13 The more complicated wipes come in a variety of configurations. A group
of push buttons on the switcher show the various patterns available to you.
Chroma Key:
Chroma key is actually nothing more than a matte in color television. However, it has become such an important special effects technique that it deserves a slightly more detailed explanation.
Basically, the chroma key process uses a specific color, usually blue, instead of black for the background over which the matting occurs. Like the black, the blue becomes totally transparent during the matting and lets the picture of the second camera show through, without interfering with the foreground image. (See 11.10.) Blue is used since it is most opposite to the skin colors, thus reproducing them during chroma key matting relatively undistorted. Actually any other color could be used for chroma key matting, although no other background hue makes skin tones appear as natural as blue does.
As pointed out in Section 6, the chroma key area must be evenly painted (even saturation throughout the area) and especially evenly lighted. Any unevenness in lighting can interfere with the matting process.
Since anything in the foreground scene that approaches the blue chroma key background color becomes transparent during the matting, a newscaster, for example, should stay away from wearing blue in front of the chroma key set. A tie containing the same blue as the background will let the matted scene show through. Even some blue eyes become a problem during a closeup in chroma key matting, although, fortunately, most blue eyes reflect or contain enough other colors to keep them from becoming transparent. However, the shadow areas on the outline of very dark-haired or dark-skinned performers may occasionally turn blue (or reflect the blue background), causing the contour to become indistinct, to "tear," or to assume its own color. Again, as mentioned in Section 6, you can counteract this nuisance to some extent by using yellow or light orange gels in the back lights. Because the yellow back light neutralizes the blue shadows, it sets off, and separates the performer quite distinctly from, the blue background during the chroma key matting.
You can quite easily matte pictures behind the newscaster from any video source. The source can be the film chain, a VTR, or a live studio camera shooting a studio card. Frequently, the slides or cards that contain the background scene (such as a visual symbol representing the theme of the news story) have their own color. If the studio card is red, the newscaster will appear to sit in front of a red background during the chroma key matting. When you are not matting, the scene will show the chroma key blue background.
Chroma key matting is far superior to the monochrome (black-and-white) process, since it provides for exceptionally sharp contours and stable, jitter-free effects.
Wipe In a wipe, a portion or all of one television picture is gradually replaced by another. The second image literally wipes the first one partially or fully off the screen.
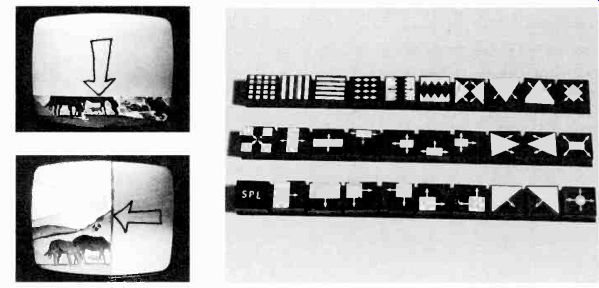
The two simplest wipes are the vertical and the horizontal. A vertical wipe gives the same effect as pulling a window shade down over the screen( Just as the window shade "wipes out" the picture you see through the window, the image from one camera gradually pushes the image from the other camera off the screen, either from top to bottom or from bottom to top. The horizontal wipe works the same way, except that the picture is pushed out sideways by the wipe image. (See 11.11 and 11.12.)
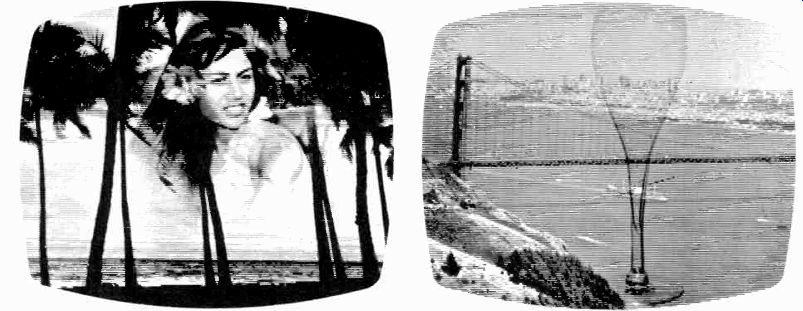
11.14 Soft Wipe: The soft wipe reduces the demarcation line between the two
images, without making the images transparent as in a super.

11.15 Linear Chroma Key: The linear chroma key permits the keying of transparent
objects, such as a wine glass, over a base picture. While the edges key solidly
over the scene, the glass itself remains transparent.
Wipe Patterns
The more complicated wipes can take on many different shapes. In a diamond wipe, one picture starts in the middle of the other picture and wipes it off the screen in the shape of a diamond. Or the wipe can start from the corner of one picture and shrink the other off the screen (diagonal or corner wipe). Box wipes and circle wipes are also frequently used. (See 11.13.) Operationally, you can select the appropriate wipe configuration either by pressing a wipe button or by turning a rotor selector to the respective wipe position. The speed of the wipe is determined by how fast you move the special effects levers, which are like a second pair of fader levers, wired for a different function. On some switchers, a mode-selector switch will assign to the regular fader bars the function of special effects levers.
You can further influence the wipe pattern by feeding into it an additional signal from another source, such as the audio signal of the accompanying sound. If, for example, you modulate a circle wipe with an audio signal, the volume of the audio signal will influence the size of the wipe (the circle will shrink and expand with the volume fluctuations of the sound). The frequency (the high and low pitch) of the audio signal will influence the contour of the wipe. In our case, pitch fluctuations will alternately make the outline of the circle smooth or uneven.
Most complex switchers permit wipes with a hard or soft edge. A soft-edge wipe, for example, will reduce the demarcation line to a minimum and allow the images to blend into each other, similar to a super. (See 11.14.)
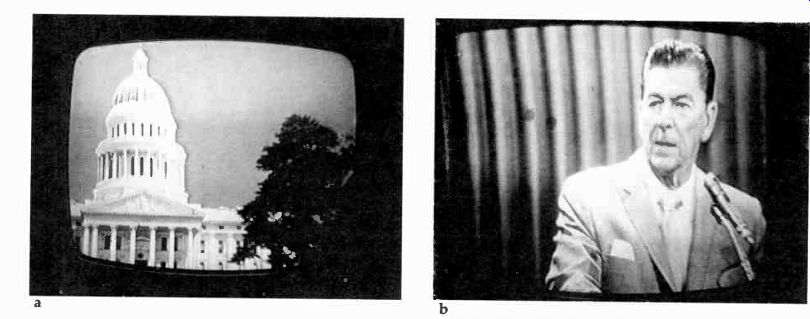
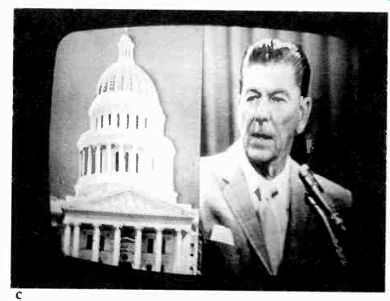
11.16 To set up for a horizontal split-screen effect, camera 1 frames the
object designated to become the left half of the split screen in the left
part of its viewfinder (a). Camera 2 frames the object designated for the
right half in the right part of its viewfinder (b). In the completed split-screen
image, the locations of subjects (a) and (b) are properly distributed (c).
Wipe Positions
Any of the wipes can be stopped any place during the process and can be adjusted to the horizontal and vertical size by splitting the special effects levers (one of which controls the vertical size, the other the horizontal size of the wipe pattern). Some switchers come equipped with wipe reversal modes and a wipe positioner.
In the wipe reversal mode, you can have a vertical wipe, which normally moves from top to bottom, reverse its direction so that it moves from bottom to top. Or you can put it in a mode where it reverses itself automatically every time you move the levers. The wipe positioner, often called "joy stick," can move a wipe, such as an arrested circle wipe, anywhere on your screen. For example, if you want to move the circle, which originated in screen center, to the upper left-hand corner of the screen, simply move the joy stick to your upper left until the circle is in the desired position.
Split Screen
If you stop a vertical, horizontal, or diagonal wipe in screen center, you have a split-screen effect, or, simply, a split screen. Each half of the screen will show a different picture.
To set up for an effective split screen with a horizontal wipe, one camera must put its image (designated for the left half of the split screen) in the left side of its viewfinder, the other in the right side for the right part of the split screen. The unnecessary part of each picture is then wiped out by the other (split-screen) image. Always check such effects on the preview monitor. (See 11.16.) A split-screen effect is frequently used to show an event from two different viewpoints on one screen.
It is commonly done in a baseball game, where you show the batter and pitcher on one side of the split screen and a man leading off first base on the other. Or, you can show widely separated events simultaneously, such as two people located in different cities talking to each other almost face-to-face. A quad-split is a screen split four ways.
(See 11.17.)
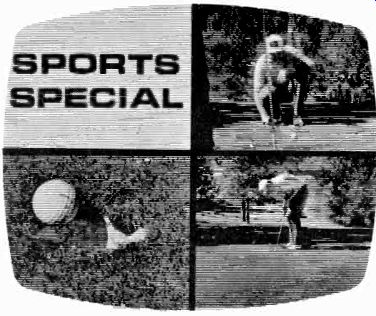
11.17 Some Switchers permit a quad, or four-way, split. You can then fill
each of the four screen areas with a different picture.
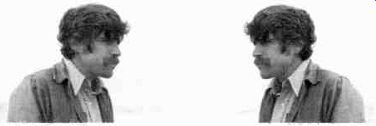
11.18 When the horizontal scanning, or sweep, is reversed, you will get a
mirror image of the original picture. Right and left are reversed.
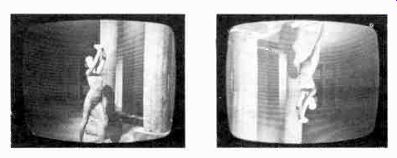
11.19 In a vertical sweep reversal, the picture is put upside down. If used
judiciously, such effects can be extremely powerful.
So far, we have talked about the special effects that combine two or more images (video sources) electronically. Now we will take a look at image manipulation, in which a single image can be presented electronically so as to achieve various effects. As indicated before, the major image manipulation effects include (1) sweep reversal, (2) polarity reversal, (3) debeaming, (4) video feedback, and (5) colorizing.
Image Manipulation: Sweep Reversal
Most monochrome cameras are equipped for reversing the horizontal and vertical sweeps, or scanning. By changing the horizontal sweep (through a switch in the camera or at the CCU), you will get the effect of a mirror image; right and left will be reversed (11.18). You could use this sweep reversal to correct an image taken off a mirror, for example.
The vertical sweep reversal projects a picture upside down. You can make a performer stand on his head or show a whole set upside down merely by flicking the vertical sweep reversal switch.
Such reversals, sometimes used for comedy scenes, have produced startling effects in modern dance, where the dancers all of a sudden seem to defy gravity, logic, and convention. (See 11.19.) You can reverse horizontal and vertical sweeps simultaneously, if needed. Standard studio color cameras have no provisions for sweep reversals, however.
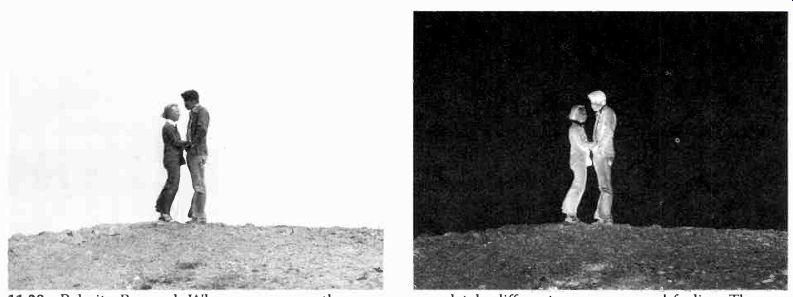
11.20 Polarity Reversal: When you reverse the polarity of the television
image, the event takes on a completely different appearance and feeling. The
structure of the event has changed.
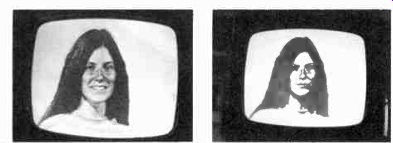
11.21 Debeaming: Through debeaming, the graphic expressiveness of this woman's
face is greatly intensified.
Polarity Reversal:
Polarity reversal is a turnabout of the grayscale: all dark areas turn light, and all light areas turn dark. In the monochrome television film camera, for instance, a polarity reversal switch permits the projection of negative film (from which no positive print has been struck, and which looks like a negative of a still photo). But more importantly, in monochrome television polarity reversal can produce powerful aesthetic effects. By this technique, you achieve more than a change in appearance. A structural change seems to occur. The screen event all of a sudden feels different. (See 11.20.) Polarity reversal in color television is not possible with standard studio equipment. It requires specially constructed equipment or time-consuming adjustments of the color camera.
Debeaming--Debeaming is the gradual reducing of the intensity of the scanning beam. The more debeaming you do, the less brightness variation you have, and the more the image will be reduced to stark black and white contrasts. The image seems first to glow, as if it would emit its own light, and then to burn itself up until nothing is left but a non-distinct, light-gray screen. Like the polarity reversal, debeaming has a powerful effect that seems to change the very structure of the event (11.21). Debeaming effects in color television can, of course, be even more dramatic. Some of the subtle colors that have blended harmoniously with the rest of the scene all of a sudden take on their own expressive life. They begin to dominate the scene first, and then consume it like a high-energy force. However, any indiscriminate use of such a powerful effect can just as easily and forcefully render the scene unbelievable, and thereby destroy, rather than intensify, your communication intent.
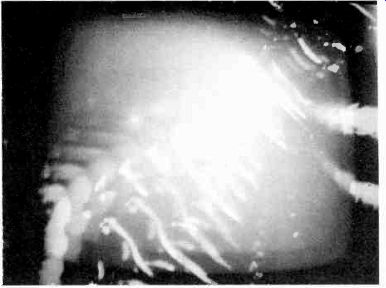
11.22 Video Feedback: By pointing the camera at the monitor that shows the
camera's picture, and by feeding this monitor image back into the same monitor,
you will achieve a video feedback effect that looks very much like the image
created by two opposing mirrors.
Video Feedback:
When you photograph with a television camera an image off a studio monitor, and feed the photographed image back into the same monitor, the resulting image is multiplied very much as with two opposing mirrors. If you move the feedback camera slowly about the face of the monitor, you can get highly intense, glowing images that weave back and forth.
By canting (holding somewhat sideways) a portable monochrome camera, for example, and by including part of the feedback monitor frame (to have a video reference), you can get unpredictable and highly interesting patterns. If you now move the camera ever so slowly in front of the feedback monitor, you will get an exciting variety of round, mandala-like feedback patterns.
(See Section 17.)
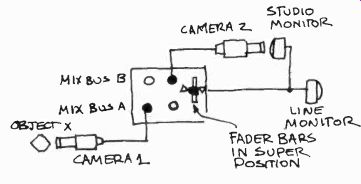
11.23 The setup of video feedback is relatively simple. Camera 1 photographs
object X and feeds it into the switcher on mix bus A. This picture is fed
into the studio monitor. Camera 2 photographs the studio monitor, which now
displays an image of object X. Camera 2 is fed into mix bus B. Cameras 1 and
2 are now superimposed and fed as a super into the line monitor, which now
shows the multiple images of object X as multiplied by the closed feedback
loop between cameras 1 and 2.
Video feedback is the visual equivalent of sound reverberation (echo) effects.
Colorizing
With the aid of a special colorizing generator you can create any number of color patterns and supply a black-and-white image with a specific hue (color) or, in some cases, with two or three hues.
Some colorizers shade all dark picture areas with one hue and all light ones with another. Needless to say, you can achieve highly unique color effects that would be difficult to get with a normal color camera. Some video artists prefer, therefore, to shoot their images in black and white for later colorizing. A more utilitarian application of the colorizer is to supply charts and graphs with various functional colors.
-------------
11.24 Some of these colorizers are custom built.
They are often called color video synthesizers since they can produce color images on a monitor without the use of a color camera.
--------------
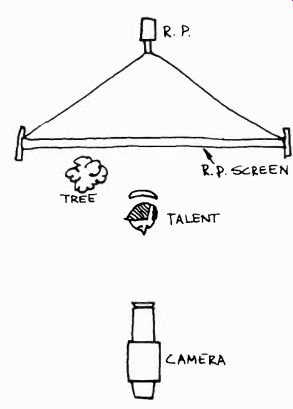
11.25 Rear Screen Projection: The rear screen projector throws a bright image onto the back of a translucent screen. The image is then picked up by the camera from the front, usually in combination with other scenic pieces and/or performers.
Optical Effects:
Optical effects include scenic devices prepared for the television camera, and attachments to, or manipulations of, the lens. Since the development of sophisticated electronic effects, the optical effects have lost their prominence in television production. Electronic effects are much easier to produce and far more reliable. Yet, in the absence of such generators, you may have to produce some special effects through optical image manipulation.
There are eight major optical effects: (1) rear projection, (2) front projection, (3) gobos, (4) mirrors, (5) lens prisms, (6) star filter, (7) matte box, and (8) defocus effects.
Rear Projection:
Contrary to a regular slide projector, which projects a slide onto the front side of a screen, the rear screen projector throws a slide image, or a moving crawl, onto the back (11.25). The translucent screen, however, allows the camera to pick up the projection from the front. This way, scenic objects and performers can be integrated with the R.P (rear projection) without interfering with the light throw of the projector.
The rear screen is a large (usually 10 x 12 feet, or roughly 3.20m x 4.00m) sheet of translucent, frosted plastic stretched by rubber bands into a sturdy wooden or metal frame. The frame rides on four free-wheeling casters for easy positioning.
The rear screen projector is a large, high-powered projector for large (4 x 5-inch) glass slides.
Preferably it has a short, undistorted wide-angle throw of a brilliant, high-contrast image.
Through a simple crawl attachment, the projector can transmit a moving image, such as a landscape or a street scene whizzing by, as seen out of a moving car, for example. Such moving background projections are often used in motion picture work where, when photographed with an actual scene in the foreground, they are called "process shots."
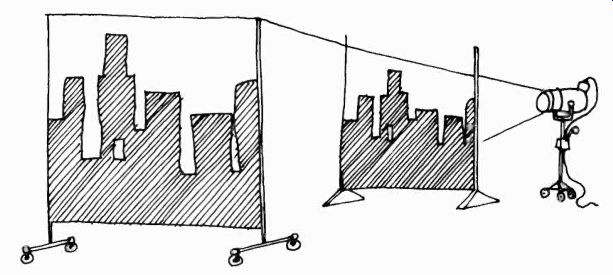
11.26 By placing a cardboard cutout, a sheet of plexiglass or plastic painted
with translucent paints, or even a three-dimensional object between a strong
light source and the rear screen, you can achieve many interesting effects.
---------

11.27 Most R.P. slides can be rented from rear screen manufacturers. Their
libraries usually contain important landmarks of the world, such as the Eiffel
Tower or Big Ben, as well as a variety of such other useful settings as snow
scenes, trees, mountains, and streets. You can make R.P. slides by painting
directly onto 4 x 5 glass plates or by blackening the entire slide with India
ink and then scratching designs on it. The extreme enlargement of the slide
drawing produces interesting effects.
Most rear screen projectors reverse the slide horizontally and vertically. In order to insert it correctly, hold the slide right side up, flip it upside down, and then flip it sideways.
-----------
If you don't have a large rear screen projector, you can try to use an ordinary 2 x 2 home slide projector. However, most of these lack the intensity necessary to overcome the inevitable spill light in front of the screen. But even without a projectors the rear screen lends itself to several interesting studio effects. If you place a cardboard cutout or a three-dimensional object between the screen and a strong light source, such as an ellipsoidal spot or a bare projection bulb, you can produce a great variety of shadow patterns on the screen. This technique is especially effective when integrated with a stylized set. (See 11.26.)
Rear screen projection is often integrated with other parts of the studio set. A few simple foreground pieces that match parts of the projected scene will produce more realistic pictures than the R.P. will alone.
The use of a rear screen is, unfortunately, not without serious problems: (1) the setup takes up considerable studio space and time; (2) the lighting is difficult to do; (3) the number of performers (normally no more than two) and their action radius in front of the R.P. are severely limited; (4) the fairly noisy blower motors of the projector may be picked up by the studio microphone; and (5) the R.P. has fast falloff-meaning that the brightness of the projected image falls off as soon as the camera moves away from its central position and assumes an oblique angle.
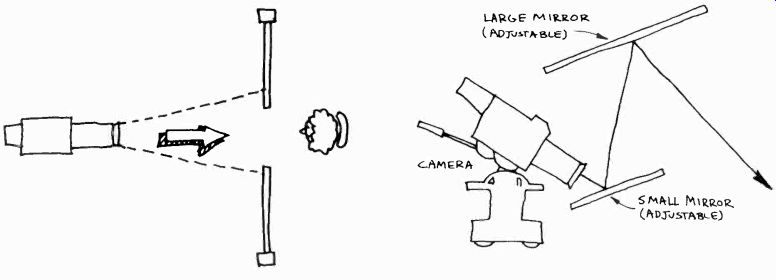
11.28 A television gobo is a cardboard cutout that acts as a special frame
for a scene. Gobos are used as decorative effects; they are not meant to be
perceived as an integral part of a highly realistic scene.

11.29 Periscope: The mirror periscope, consisting of two adjustable mirrors
hung in a movable frame, permits a variety of overhead shots of fairly static
scenes. When using it, you don't need to reverse the horizontal sweep in your
camera, since the image will be corrected by the second mirror.
Front Projection:
Elaborate front projection, as used in the theater, is not often attempted in small station operation since it is so easy for the performers to get be-tween the projection source and the background.
However, when the performers remain fairly stationary, it can be employed. Interesting background effects can be front-projected with special front projectors, or two or more standard overhead projectors, such as are used in nearly every school and college. Of course, projection of this kind demands as precise a studio lighting setup as rear screen projection. Very little if any light should spill onto the projection surface, which is often the cyclorama.
The most common type of front projection is the cucalorus projection, often called cookie.
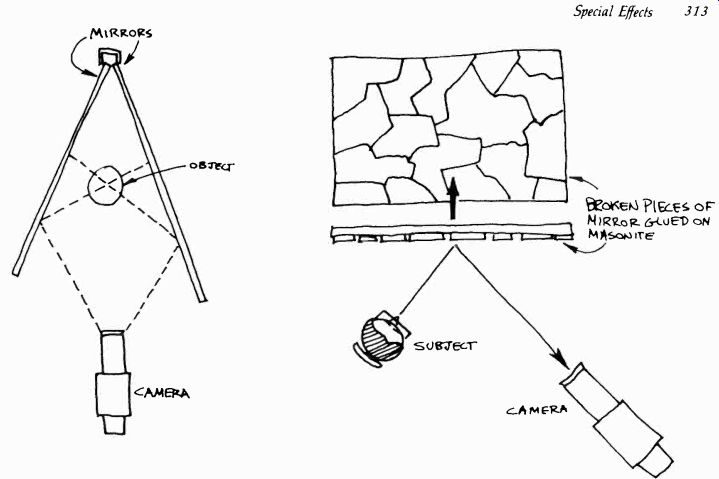
11.30 A multi-image, rosetta-like effect is achieved by mirrors reflecting
each other's images, like barbershop mirrors that hang on opposite walls.
Toy kaleidoscopes are based on this principle. You can duplicate the kaleidoscope
effect by taping two small mirrors or ferrotype plates along one edge, so
that the reflecting surfaces face each other. When the camera looks at the
object that is placed in the resulting v, you will get a rosetta-like pattern
of the object.

11.31 A cubist like effect can be obtained by reflecting a scene or an object
off a mirror mosaic. Simply break a mirror into several large pieces and glue
them onto a sheet of plywood or Masonite. When the camera shoots into this
mirror mosaic at an angle (so that the camera will not be seen in the reflection),
the reflected scene takes on a startling, cubistic effect.
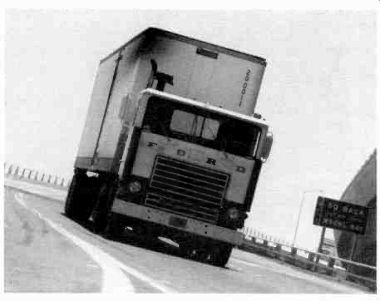
11.32 With a prism inverter, you can cant a shot.
This effect can contribute to the intensification of a scene, making it dynamic and dramatic.
Television Gobos:
In the motion picture industry, a gobo is an opaque shield that is put in front of a light source (similar to a movable barn door) to keep undesirable spill light from hitting specific set areas. A television gobo, however, is a cutout that acts as a decorative foreground frame for background action (11.28). If you have chroma key equipment, such gobo effects are generally matted into the scene electronically. The traditional gobos consist of picture frames for a nostalgic scene, or cartoon settings (oversized keyholes, windows, doors, old model cars) through which we can observe the live action.
Mirrors -- Mirrors are sometimes used to create unusual camera viewpoints. But they are a hazard in the studio, even if you are not superstitious, because they can reflect the lens of the camera that is shooting the scene. Any shots off a mirror reverse the image, and you cannot correct it unless you have horizontal sweep reversals in your camera system. Also, now that portable cameras have become so flexible, use of mirrors for unusual angle shots has become unnecessary.
In the absence of a portable camera or special lens attachments, however, you may find the mirror-periscope and multi-image mirrors helpful in achieving certain effects. (See 11.29, 11.30, and 11.31.) Lens Prisms There are special rotating lens prisms that can be attached to the camera lens. The most common are the image inverter prism and the multiple image prism.
The image inverter prism rotates an image into any of several positions. The studio floor can become a wall or the ceiling, depending on the rotation degree of the prism. While in black-and-white television you can very easily put an image upside down electronically, most standard color equipment does not permit a vertical sweep reversal. An image inverter prism can, however, produce the same effect. Furthermore, with a slight prism rotation, you can achieve a slight tilt, or canting effect. Such a disturbance of the horizon line can make a scene highly dynamic. (See 11.32.) The multiple image prism produces strictly decorative effects very similar to the mirror kaleidoscope effects.
Star Filter
The star filter is a lens attachment that changes high-intensity light sources or reflections into star like light beams. This method is often used to intensify the background for a singer, or a musical group. The studio lights as caught by the wide-angle camera, or the glitter on the singer's dress as seen by the closeup camera, are all transferred into prominent star like light rays crossing over the entire scene on the television screen. (See 2.13.) Matte Box While in film a matte box has a variety of functions-shielding the lens from undesirable light, holding a filter or a matte slide, such as the well-known cutouts of a view through binoculars-the television matte box is simply a device to block the view partially of a wide-angle lens, or zoom lens position. The matte box physically reduces the field of view without changing the apparent distance from camera to object. If, for example, you want to matte (via chroma key) a tiny Alice-in-Wonderland figure into a large, oversized room, you can have one camera focus on the room interior, the other on the chroma key set. This set consists of a large roll of (usually) blue cloth or seamless paper (see Section 12) that can be pulled down like a window shade from a batten near the lighting grid so that it even covers part of the floor. Have Alice stand on the blue chroma key material, and photograph this scene from an extreme long-shot zoom position. The matte box prevents this camera from overshooting the chroma key set on this extreme long shot (11.33).
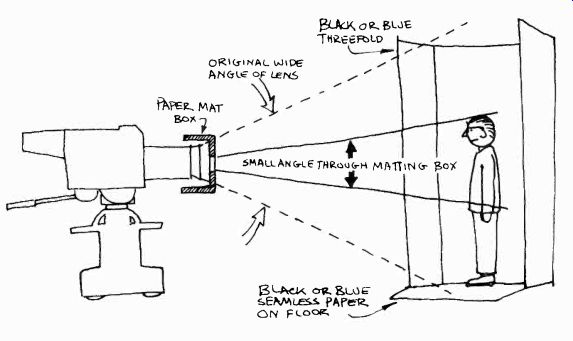
11.33 Matte Box: With the aid of a matte box, you can isolate an object in
an extreme long shot without overshooting the set. This technique is especially
important if you want to reduce the size of an object or performer for chroma
key matting.

11.34 Although there is a great variety of more or less complex matte boxes
on the market, you can make an inexpensive but useful one yourself. Simply
make a cardboard box that fits over the zoom lens (or a cylinder, if your
zoom lens is round), cut a small opening (either rectangular or round) into
the front part and paint the inside black. Then tape the matte box over your
lens. If you use a monochrome turret camera, you can make the matte box out
of a small paper cup that fits over the lens.
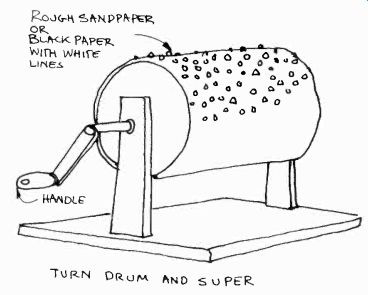
11.35 Rain: A rain drum consists of a small drum (about ten inches [25 cm]
in diameter), covered with rough black sandpaper or black paper with white "glitches" painted
on it. Turn the drum fairly fast (depending on how hard you want it to rain),
take a slightly out-of-focus closeup of the rotating paper, and super the
glitches over the scene. Make sure that you turn the drum so that the rain
is coming down instead of going up.
Defocus Effects:
The defocus effect is one of the simplest, yet most highly effective, optical effects. The camera operator simply racks out of focus and, on cue, back into focus again. This effect is used as a transitional device, or to indicate strong psychological disturbances or physiological imbalance.
Since going out of focus will conceal the image almost as completely as going to black, it is possible to change your field of view or the objects in front of the camera during complete defocusing.
For instance, you can go out of focus on a young girl seated at a table, change actors quickly, and rack back into focus on an old woman sitting in the same chair.
A slight defocusing can make the camera subjective; for instance, it may assume the function of the actor's eye to indicate progressively worsening eyesight. Also, you can suggest psychological disturbances by going out of focus on a closeup of the actor's face.
If you want only partial defocusing, with part of the picture remaining in focus, you can use what is known in the motion picture industry as "Vaseline lens." This is a regular camera lens whose edges have been "fogged" with petroleum ointment. However, you should construct a device that allows for this effect without smearing or damaging the lens itself. Simply take a piece of clear glass and tape it in front of the camera lens. Grease the edges of the glass with Vaseline, leaving a clear area in the middle. The outer edges of the picture will now appear out of focus (the degree of the "fogging" depending entirely on the thickness of the grease), with the center remaining in sharp focus.
Mechanical Effects
Most mechanical effects are needed only in the presentation of television plays. Although small commercial stations may have little opportunity to do drama, colleges and universities are frequently involved in the production of plays.
The techniques for producing mechanical effects are not universally agreed upon. They offer an excellent opportunity for experimentation.
Your main objectives must be (1) simplicity in construction and operation and (2) maximum reliability.
Remember that you can suggest many situations by showing an effect only partially and relying on the audio track-to supply the rest of the information. Also, through chroma key matting, you can matte in many an effect from a prerecorded source, such as film or videotape.
Nevertheless, there are some special effects that are relatively easy to achieve mechanically, especially if the effect itself remains peripheral and authenticity is not a primary concern.
Rain
Soak the actors' clothes with water. Super the rain from a film loop or a rain drum (11.35). Try to avoid real water in the studio, since even a small amount can become a hazard to performers and equipment. Best yet, cover a portable camera with a plastic bag, wait for real rain, and shoot outside.
Snow
Spray snow out of commercial snow spray cans in front of the lens. Have the actors covered with plastic snow or soap flakes.
Fog--Fog is always a problem. The widely used method of putting dry ice into hot water unfortunately works only in silent scenes, since the bubbling noise it makes may become so loud as to drown out the dialogue. If you have to shoot fog indoors, rent one of the large, commercially available fog machines.
Wind
Use two large electric fans. Drown out the fan noises with wind sound effects.
Smoke
Pour mineral oil on a hotplate. If the smell bothers the actors too much, super a stock shot of smoke over the scene.
Fire--Don't use fire inside the studio. The risk is simply too great for the effect. Use sound effects of burning, and have flickering light effects in the background. A film loop with fire matted over the scene can also be very effective. For the fire reflections, staple some silk strips on a small batten and project the shadows with an ellipsoidal spot on the set (11.36), or reflect a strong spotlight off a vibrating plastic sheet.
Lightning--Combine four or six photofloods or two photo flash units to a single switch. Lightning should always come from behind the set. Don't forget the audio effect of thunder. Obviously, the quicker the thunder succeeds the light flash, the closer we perceive the thunderstorm to be.
Explosions
As with fire, stay away from explosive devices, even if you have "experts" guarantee that nothing will happen. But you can suggest explosions.
Take a closeup of a frightened face, increase the light intensity to such a degree that the features begin to wash out, and come in strongly with the explosion audio. Or, better yet, debeam the face (or the whole scene) while the audio explosion rumbles on.
It should be pointed out again that one effect is rarely used in isolation. Effects, like any other production techniques, are contextual. They depend on the right blending of several visual and auditory elements, all within the context of the overall scene. The dialogue of the performers or actors is, of course, one of the prime means of reinforcing an effect, or making it believable in the first place.
11.36 Fire: To project flickering fire onto the set, move a batten with silk strips stapled on it in front of a strong spotlight.
Summary:
Special effects can be grouped into three large categories: (1) electronic effects, (2) optical effects, and (3) mechanical effects.
Electronic effects consist of image combination and image manipulation. The image combination effects include (1) superimposition, (2) key, (3) matte, (4) chroma key, and (5) wipe. The image manipulation effects include (1) sweep reversal, (2) polarity reversal, (3) debeaming, (4) video feedback, and (5) colorizing.
There are eight major optical effects: (1) rear projection, (2) front projection, (3) gobos, (4) mirrors, (5) lens prisms, (6) star filter, (7) matte box, and (8) defocus effects.
The mechanical effects include (1) rain, (2) snow, (3) fog, (4) wind, (5) smoke, (6) fire, (7) lightning, and (8) explosions.
All special effects should be used with great care; otherwise they will lose their uniqueness and effectiveness. Electronic effects, the most reliable and most easily produced, are used most frequently in television production.