A basic knowledge of the production requirements and potentials of videotape and film is important for mastering the techniques of television production.
This section will give you information on (1) the use of videotape in television production, (2) videotape recording systems, (3) types of videotape recorders, (4) operation of videotape recording, (5) the use of film in television production, (6) film specifications, (7) the television film chain, or film island, and (8) operation of film.
The process of editing videotape or film will be the subject of Section 10.
Videotape and film are the two major television program sources. Most of the programs you see on television have been prerecorded on one or the other.
While film is produced by its traditional film techniques and simply played back on television, videotape constitutes a major production element of television itself. Indeed, videotape has influenced television production techniques to a great extent.
=========================
Academy Leader
Also called the SMPTE Universal Leader. A piece of film marked with numbers ranging from 8 to 3, each one second apart. It is attached to the head of a film for the purposes of cuing up and aligning the film.
Alpha Wrap
An indication of how the videotape is wound around the head drum of a helical scan VTR. In this case, the tape is wound completely around the head in an alphalike configuration.
Audio Track
The area of the videotape that is used for recording audio information.
Beeper
A series of eight low-frequency audio beeps, exactly one second apart, put at the beginning of each take for videotape cuing.
Color Bars
A color standard used by the television industry for the alignment of cameras and videotape recordings.
Control Track
The area of the videotape that is used for recording the synchronization information (sync spikes), which is essential for videotape editing.
Cue Track
The area of the videotape that is used for such audio information as in-house identification or the SMPTE address code. Can also be used for a second audio track.
Double-System
The simultaneous recording of pictures and sound on two separate recording devices: the pictures on film, and the sound on audiotape recorder, synchronized with the film camera.
Dubbing Down
The dubbing (transfer) of picture and sound information from a larger videotape format to a smaller one.
Dubbing Up
The dubbing (transfer) of picture and sound information from a smaller videotape format to a larger one.
Film Chain
Also called film island, or telecine. Consists of one or two film projectors, a slide projector, a multiplexer, and a television film, or telecine, camera.
Freeze Frame Arrested motion, which is perceived as a still shot.
Helical Scan, or Helical VTR
A videotape recording of one- and two-head videotape recorders, whereby the video signal is put on the tape in a slanted, diagonal way (contrary to transverse scanning, which goes across the tape). Also called slant-track.
High-Band
Refers to the frequency of the video information. High-band videotape recorders operate on a high-frequency range (10 megacycles), which provides operationally higher quality pictures with less video noise and better resolution than low-band recordings. Most high-quality color machines are high-band.
Instant Replay
The recording of short event sections (such as key plays in sports) and immediate playback, sometimes in slow motion. Usually done with a video disc-recording device.
Kinescope Recording
Television program filmed directly off a kinescope (television picture) tube.
Low-Band
Refers to the frequency of the video information. Low-band recorders operate in a relatively low-frequency range, which suffices for monochrome pictures but introduces excessive video noise in color.
Magnetic Sound, or MAG, Track
Consists of a narrow magnetic tape that runs down one side of the film. It operates exactly like a normal audiotape.
Multiplexer
A system of mirrors or prisms that directs images from several projection sources (film, slides) into one stationary television film, or telecine, camera.
Omega Wrap
An indication of how the videotape is wound around the head drum of a helical scan VTR. In this case, the tape is wound halfway around the head drum, in an omega like configuration.
Optical Sound Track
Variations of black and white patterns, photographed on the film and converted into electrical impulses by an exciter lamp and a photoelectric cell. There are two kinds of optical tracks: variable area and variable density.
Quadruplex, or Quad
A scanning system of videotape recorders that uses four rotating heads for recording and playing back of video information. All quad recorders use 2-inch-wide videotape.
Runout Signal The recording of a few seconds of black at the end of each videotape recording in order to keep the screen in black for the video changeover.
Silent Film--Film without a sound track, or film run silent.
Single-System The simultaneous recording of pictures and sound on the same film.
Slant-Track
Same as Helical Scan.
Slate
A little blackboard, or whiteboard, upon which essential production information is written, such as title of the show, date, scene and take numbers. It is recorded at the beginning of each videotaped take.
Slow Motion
A scene in which the objects appear to be moving more slowly than normal. In film, slow motion is achieved through high-speed photography (exposing many frames that differ only minutely from each other) and normal (24 frames per second, for example) playback. In television, slow motion is achieved by a multiple scanning of each television frame.
SMPTE Society of Motion Picture and Television Engineers.
SMPTE Universal Leader See Academy Leader.
SOF Sound on film.
SOT Sound on tape. The videotape is played back with pictures and sound.
Stand-by A button on a videotape recorder that activates the rotation of the video heads or head drum independently of the actual tape motion. In the stand-by position, the video heads can come up to speed before the videotape is actually started.
Stop-Motion--A slow-motion effect in which one frame jumps to the next, showing the object in a different position.
Time Base Corrector
An electronic accessory to a videotape recorder that helps to make playbacks or transfers electronically stable. A time base corrector helps to maintain picture quality even in dubbing-up operations.
Tracking
An electronic adjustment of the video heads so that in the playback phase they match the recording phase of the tape. It prevents picture breakup and misalignment especially in tapes that have been recorded on a machine other than the one used for playback.
Transverse Scanning
The direction of the video signal scanning in quadruplex recorders. Transverse scanning puts the signal across (transverse) the videotape rather than in a helical (diagonal) or a lengthwise pattern.
Variable Area Track
An optical sound track on film. It modulates the light of the exciter lamp through various shapes of translucent areas so that, when received by the photoelectric cell, the light variations produce identical variations in the electric current (audio signal). Variable Density Track An optical sound track on film. It modulates the light of the exciter lamp through various shades of gray so that, when received by the photoelectric cell, the light variations produce identical variations in the electric current (audio signal).
Video Disc
A phonograph record-like disc that can store video (picture)
information of short event segments. Used for instant playbacks, slow motion, and freeze frames.
Video Leader--Visual (and auditory) material that precedes any color videotape recording. The SMPTE prescribes for the standard video-portion blank tape for threading; 10 sec. of color bars; 15 sec. of slate information; 8 sec. of numbers or black; 2 sec. of black ahead of the program information.
Videotape--A plastic, iron-oxide-coated tape of various widths (from 1/4-inch to 2-inch) for recording of video and audio signals.
Video Track--The area of the videotape that is used for recording the video information.
=========================
--------------
9.1 Immediate playback and instant replay are actually two different production activities that require different equipment. Immediate playback means that, as soon as the event is recorded on videotape, the tape is rewound and played back within a matter of a few minutes. Instant replay refers to the recording and playback of event sections, mostly key sports actions, within seconds, or even a fraction of a second.
Since it would take too long to rewind and recue the particular event section of a videotape, a video disc is used, which allows extremely fast cuing, slow motion, and even arrested motion in its playback.
--------------
Videotape in Television Production
Videotape is used principally for (1) time delay, (2) building of a whole show by assembling parts that have been recorded at different times and/or locations, (3) duplication and distribution of programs, and (4) records for reference and study.
Time Delay
Through videotape, an event can be recorded and played back immediately or hours, days, or even years after its occurrence. In sports, where it is known as `instant replay," this technique uses a video disc rather than videotape for recording and playback.
The immediate playback capability of videotape has several benefits. Instant replay, for example, can give the viewer another look at an important play right after it has happened. Or the playback of a videotape can give the athlete, or any other performer, the opportunity to see himself or herself in action right after the performance and correct possible mistakes. In television production, the immediate playback is an important learning device. As an announcer, you can observe yourself right after the performance, while your delivery and the problems connected with it are still fresh in your mind. As director, during the show you probably lacked the time and the state of mind to absorb the feel and relative quality of the total performance. You may remember one camera not framing correctly, the dissolve being too slow, or another camera's shaky zoom. But you may not even have been aware of the announcer giving the wrong address and telephone number over the last slide for his commercial tag. A playback immediately after your directing exercise, when you are more relaxed, will make it possible for you to perceive the camera handling, the general blocking, the cutting rhythm, and the announcer's delivery all together.
Time delay through videotape also means that the production can be scheduled at a time most convenient to the station personnel and the performers, and the program played back at a time most convenient to the viewer. Late night talk shows, for example, are recorded in late after-noon, mainly for the convenience of the guests who appear on them. But the whole production approach is geared to the late-night playback time.
Newscasts, which are telecast live in one time zone of the country, are videotaped in their entirety and played back at the same clock time in another time zone. Network news can, therefore, be seen at six o'clock local time regardless of time zone.
Building of a Show Videotape is used to build a show from various prerecorded tape segments. Similar to film production, the various scenes of a television play, for example, are videotaped at different times and often at different locations for later assembly through editing. Thus, the use of videotape permits more complex and especially more polished productions than live television. Major and minor production errors can be corrected by reshooting a particular scene. Contrary to film, which has to be processed before it can be viewed, the videotape recording of a scene can be replayed immediately after each take for close scrutiny. With time code editing (see Section 10), videotape can be assembled even more easily than film.
Program Distribution
Videotape can be easily duplicated and distributed to a variety of television outlets. Many production centers have syndicated their videotaped shows for distribution in major and minor markets. Because of improved playback facilities, videotape is used more and more instead of 16mm film for duplication and distribution of a variety of program materials, including commercials and public spot announcements.
Records for Reference and Study
Videotape is an excellent device for preserving a television event for reference or study, especially one-time happenings-sports, political gatherings, a difficult operation in a medical center, examples of supreme human achievement and failure. Such videotaped records can be stored, retrieved, and distributed via television with relative ease. The events are thus available for careful study by scholars all over the world. For extremely important projects, the recorded event can be translated into a television signal and transmitted via satellite to the new destination.
Usually, though, videotape records are dubbed onto a videotape cassette and mailed to the interested party.
Technically, the quality of the playback of a broadcast-type videotape is superior to that of the best film (even the 35mm format). On a home receiver, it is practically impossible to tell whether the program originates live or as a videotape playback, assuming that the videotape recording reflects the quality of the live event.
Videotape Recording Systems
Videotaping is quite similar to the audiotape recording process. The electronic impulses of television pictures (the video signal) and sound (audio signal) are recorded on the plastic videotape through magnetizing its iron oxide coating (dull side). During playback, the recorded video and audio signals are converted again into television pictures and sounds.
There are two basic systems of videotape recording: (1) the transverse scanning process, or the quadruplex video recording system, and (2) the helical, or slant-track, recording system.
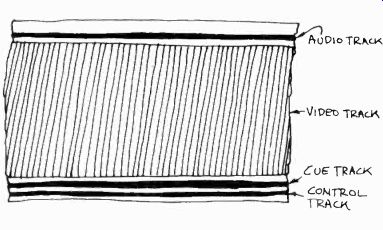
9.2 The 2-inch videotape for quadruplex videotape recorders normally has
four tracks: the video track (television pictures), the audio track (television
sound), the cue track (various code information or a second audio track),
and the control track (essential for synchronization).
Transverse, or Quadruplex, Scanning
In the transverse, or quadruplex, scanning process, four tiny rotating (14,400 rpm) recording heads put the video signal on a 2-inch-wide tape that moves past the rotating recording heads at speeds of 7 1/2 inches per second (ips) or 15 ips. In this process, 15 ips is the speed normally used for high-quality broadcast recordings.
The quadruplex videotape recorder (VTR) normally puts four different tracks on the 2-inch videotape: (1) the video track (the signal representing the television picture information), (2) the audio track (the signal representing the television sound), (3) the cue or address track, and (4) the control track (see 9.2). Some quadruplex recorders put on an additional sound track (five tracks total). The cue or address track is in effect a second audio track. You can use it, for example, to record the director's P.L. (phone, or private, line) for future reference, or in-house information, such as the identification number of the tape, or special product number. Most often, the cue track is used to carry an address code, an electronic signal that enables you to pick extremely quickly any spot in the videotape (address) for editing purposes.
We will take up the address code more thoroughly in Section 10. But you can also put regular audio information on the cue track, such as the second channel of a stereo pickup, or special sound effects.
The control track consists of evenly spaced blips or spikes, called the sync pulse, which work like electronic sprocket holes.1 The control track is essential for editing videotape, and we will discuss it in more detail in Section 10.
[1 Irving E. Fang, Television News, rev. ed. (New York: Hastings House, 1972), p. 305.]
The audio track can be recorded simultaneously with the video track, or separately. You can have parts or all of the video or audio tracks erased independently from each other. Sometimes you may find that it is easier to record the video information first and the audio track later.
This technique is especially advantageous if the audio track does not have to be tightly synchronized with the video, as in a running commentary over the video event, for example. When, in the playback of a videotape segment, the audio information is played with the video, we speak of SOT, sound on tape.

9.3 Helical Scan Videotape: The small-format helical scan videotape (1-inch
width and smaller) typically has three different tracks: the audio track on
the top edge of the tape, the slanted video track, and the control track at
the bottom. Some helical recorders put an additional audio track on the tape,
which then functions as a cue track.
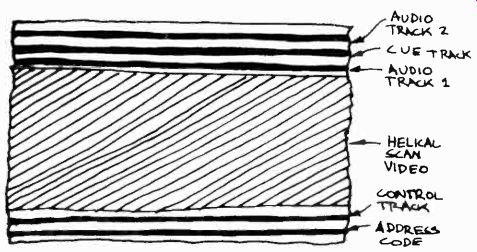
9.4 Two-Inch Helical Scan Videotape: The highly sophisticated 2-inch helical
scan videotape has a total of six tracks: the slanted video track, two audio
tracks, a cue track, an additional address code track, and a control track.
The majority of professional VTR's use the quadruplex, or transverse, scanning process.
Helical, or Slant-Track, Scanning
In the helical or slant-track scanning process, one or two recording heads that are mounted on a rotating drum, called "head drum," put the video information onto the tape in a slanted, diagonal, rather than transverse (up and down) manner.
The audio track is usually at the top edge of the tape, with the control track running along the bottom edge.
More sophisticated helical VTR's have additional cue or audio tracks. Some of the top-quality helical videotape recorders (such as the 2-inch IVC-9000) have up to five tracks in addition to the video: two audio tracks, a cue track, a control track, and a separate address code track.
The second audio track, in addition to the cue and separate address code tracks, has definite production advantages:
(1) Along with the regular program sound, you can record a second language, a very important extra in the broadcaster's quest to serve ethnic minorities. Until the television system operates in stereo-audio, you can broadcast the second audio channel, which now contains the program audio in a language other than English, over an FM channel that can be tuned in by the viewer on a standard FM radio.
(2) Even if you need only one audio track, you can edit the audio material on audio track No. 2, and then transfer the edited track to audio track No. 1 for the program audio, without ever running the risk of getting out of sync between audio and video. You can even edit complex lip-sync audio portions independently of the video.
(3) With the pressures for multilanguage telecasts and aesthetic requirements for better audio quality, stereophonic telecasts will become common practice in television production very soon. The second audio track will then become a necessity.
Since the diagonal scan of the video signal occupies a relatively long section of tape, the tape width as well as the tape speed can be reduced.
Tape Width Most good helical VTR's use finch tape, but there are also models that take 1/2-inch, or even 1/4-inch. Helical scan videotape cassettes generally use 3/4-inch tape. The top-quality helical broadcast VTR's, like the quadruplex machines, use a 2-inch tape.
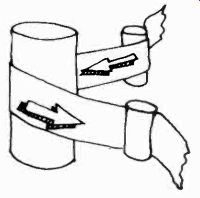
9.5 Helical, or Slant-Track, Scanning: In the helical, or slant-track, scanning
process, the tape moves past the rotating heads (head drum) at an angle. Because
the scanning occurs diagonally, it covers a longer area of the tape than its
width.
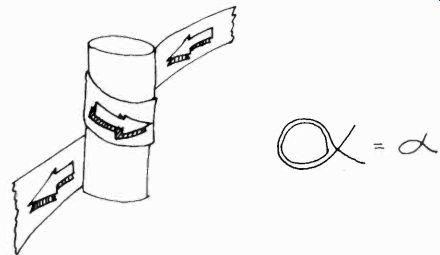
9-6 Alpha Wrap: If the tape has to be wound completely around the head drum,
we speak of an alpha wrap, because the wind suggests the configuration of
the Greek letter a.
If you have a small VTR machine that calls for 1/4-inch tape, do not be tempted to use the less expensive audiotape. Usually, the stress on the videotape is much greater than on audiotape, and the oxide coating requirements much stricter for videotape. In a videotape recorder, the audiotape will stretch and make the recording, for all practical purposes, unusable.
Tape Speed
The tape speeds of helical machines vary greatly, depending on the manufacturer or VTR model. Usually, they are all under the 15 ips customary for quality color recording with the quad machines. Some of the higher quality helical VTR's have tape speeds of 8 ips or 7 ips (6.91, to be exact); others go as low as 5 ips.
Most helical VTR's have variable tape speeds; you can slow them down from full speed to a freeze-frame effect (zero tape speed). Tape Wrap While in the quad machines, the tape passes past the four rotating heads in a straight line, the helical machines require a more complicated "wrap" in order to produce the necessary slant of the video track; the tape moves past the rotating head drum at an angle. (See 9.5.) Some machines require an alpha wrap, others an omega wrap. In the former, the tape is wound once completely around the head drum, forming a 360-degree wrap that resembles the Greek letter alpha (a). In the omega wrap, the tape covers only half the drum (180-degree wrap), and resembles the Greek letter omega (CZ). (See 9.6 and 9.7.)
Operating Performance
There are several production advantages of the helical machines over the quadruplex VTR's: (1) Because of simplified electronic design, they are generally less expensive; the one or two-head drum assembly is less expensive than the four-head. (2) The simplified electronic design, and the small tape width make the helical VTR's much smaller. Some models are so small that they can be easily carried by one person like a medium-sized handbag (see Section 17). (3) The low tape speed permits more program material on a single reel. (4) Storage space is considerably reduced. And (5) the narrow-format tapes cost much less.

9.7 Omega Wrap: If the tape wind covers only half the head drum, we speak
of an omega wrap, because it suggests the configuration of the Greek letter
S2.
----------------------

9.8 The word helical in "helical scan" comes from the Greek word
helix, meaning spiral, or a spiral wrap. The videotape wrap on the head drum
resembles a partial spiral and is, therefore, called helical.
---------------------------

9.9 Some progress has been made toward standardization, and therefore interchangeability,
of VTR equipment by the Electronics Industries Association of Japan (EIAJ),
especially in the 1/2-inch-format helical scan VTR's.
---------------------------
Unfortunately, there are also serious drawbacks, which make the helical videotape system less than ideal: (1) Except for some high-quality and high-cost 2-inch and 1-inch VTR's, the helical scan VTR's do not fulfill broadcast-quality requirements. (2) Because of the variety in head-drum configuration, tape speeds, and tape widths, the tapes made by various machines are not always interchangeable or compatible. That is, a tape that was recorded on one type of 1-inch helical scan VTR often cannot be played back on another type of 1-inch machine. (3) Some less sophisticated helical scan videotape recordings cannot be "dubbed up" (transferred) to the larger 2-inch quad machines. (4) The less sophisticated helical scan VTR's do not have the electronic stability that is necessary for clean electronic editing. (5) All quadruplex-recorded tapes must first be dubbed onto the helical tape before they can be reproduced on a helical VTR, even if it is the high-quality 2-inch model.
Videotape Recorders
There are three basic types of video recording devices: (1) reel-to-reel videotape recorders, (2) video cassettes and cartridge machines, and (3) video discs. Depending on their electronic sophistication and primary use, there are high-quality broadcast videotape recorders (reel-to-reel and video cassettes) and lower quality recorders that are primarily used for non-broadcast, closed-circuit television.
Reel-to-Reel VTR's
In reel-to-reel recorders, the videotape is fed from a supply reel past the video heads to a separate takeup reel. These machines are used to record and play back program material of considerable duration. With a maximum reel size of 14 inches for most quad (2-inch tape) recorders, you can record or play back uninterruptedly up to 96 minutes of program material at a tape speed of 15 ips, and 192 minutes at 71/2 ips. With a broadcast-quality helical-scan 1-inch recorder, you can record 31/2 hours when using the largest (12 1/2-inch) reels. Some closed-circuit helical scan models, which run at slower tape speeds, can record even longer programs without a reel change.
Most broadcast quadruplex machines are too large to be moved very easily. They are usually mounted in the VTR room or in a large mobile van. (See 8.12.) With the exception of the 2-inch helical scan broadcast videotape recorder, most other helical scan machines are portable. They range in size from a studio console down to a large shoulder bag. (See 9.12.) Most advanced videotape recorders have certain electronic accessories that improve the picture stability during recording and playback, and permit electronic editing. Because the basic functions of all videotape recorders are the same, namely, to record and play back television pictures and sound, the operational controls are similar on all machines, regardless of relative quality and make.
--------------------

9.10 Videotape recorders can also be classified according to their capability
of recording color or monochrome. We have, therefore, color or monochrome
videotape recorders. Whether or not a videotape recorder can record color
has nothing to do with its size. There are some large, broadcast-quality machines
that can record and play monochrome only, while some of the small portable
models with a 1/2-inch tape format can record and play back in color.
Among the color recorders, you may come across the distinction between high-band and low-band. High-band machines operate in a high frequency range, which means operationally higher quality pictures with less video noise and better resolution than low-band color. Monochrome machines are usually low-band.
--------------------
Electronic Accessories
The two most common electronic accessories are the time base corrector and electronic editing-or electronic splicing, as it is sometimes called.
The time base corrector helps to make the pictures from a videotape recording electronically as stable as possible. Tiny jitters and drifts in picture reproduction are automatically eliminated through time base correction. Operationally, a time base corrector helps to speed up the lockup time (the period from starting the tape recorder to the moment when the picture appears totally stable or when the tape machine is ready to record perfectly stable video images); it permits dubbing-up small-format helical scan tapes to quadruplex tapes without picture breakup or much deterioration, and the mixing of the recorded video signal with other video sources (camera, another VTR) without undue synchronization problems.
Electronic editing, or electronic splicing, makes it possible to build a program by adding segment to segment, or to insert certain program material, such as a commercial in the middle of a longer program, all without physically cutting the tape.
You can have electronic editors in various degrees of sophistication, depending on your production needs and size of pocketbook. The most advanced system is computer-assisted time code editing. It can be used with quad and advanced helical scan equipment. We will discuss electronic editing more thoroughly in Section 10.
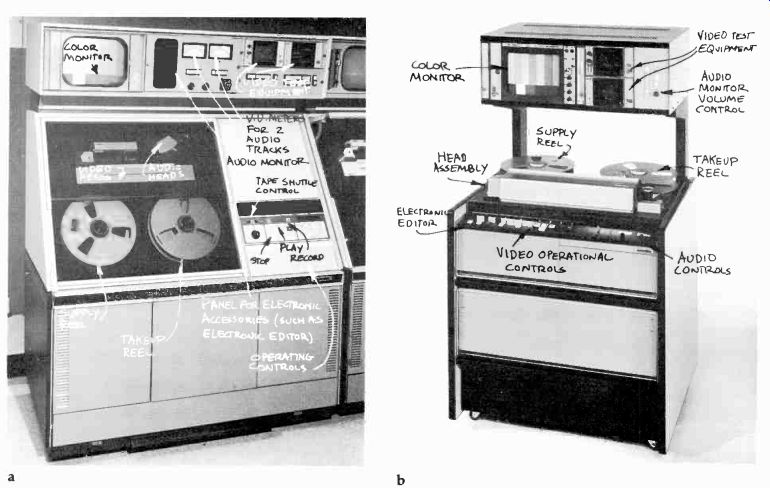
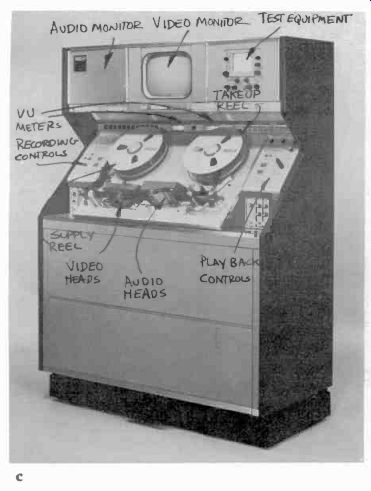
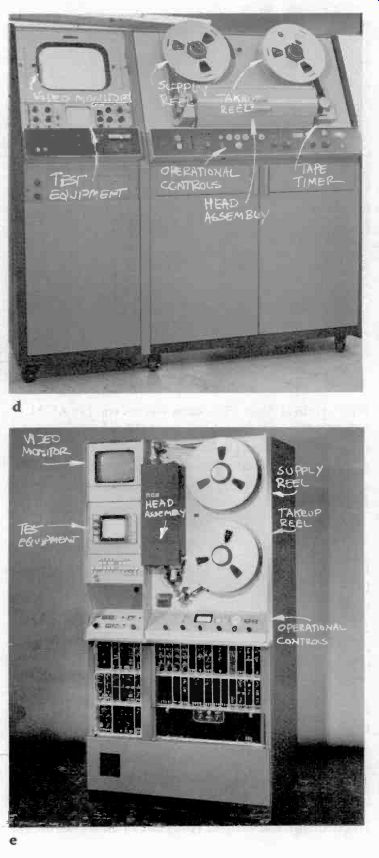
9.11 Quadruplex Videotape Recorders: (a) Ampex AVR-1 (top line); (b) Ampex
AVR-2 (high quality); (c) RCA TR7O-C (top line); (d) Ampex 1200-B (older,
less sophisticated model; (e) RCA TR-61 (less sophisticated model).
The large quadruplex VTR's are usually located in the VTR room, master control, or large remote vans. The electronic editor and essential test equipment are both part of the VTR unit.
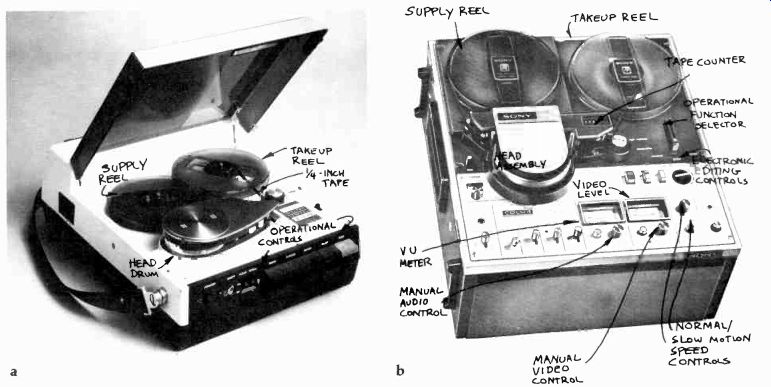
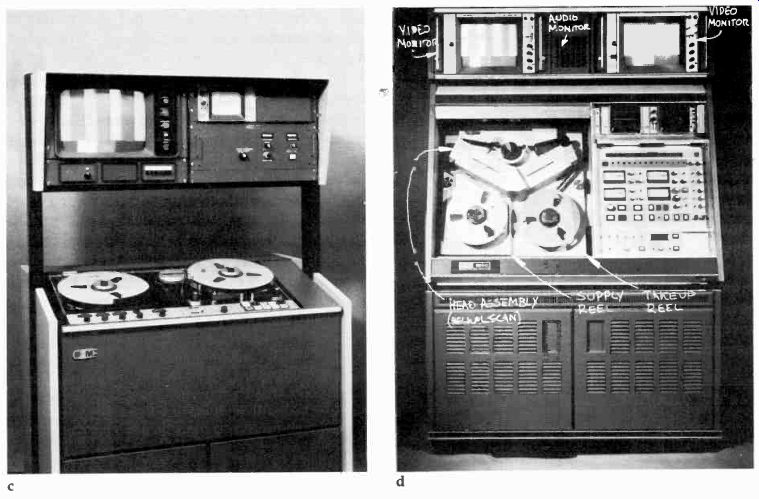
9-12 Helical Scan Videotape Recorders: (a) AKAI VT-150 (1/4-inch portable
color VTR; shoulder bag); (b) Sony AV-8650 (1/2-inch color recorder); (c)
IVC960 (broadcast-quality 1-inch helical scan color recorder); (d) IVC-9000
(top quality 2-inch helical scan high-band color recorder).
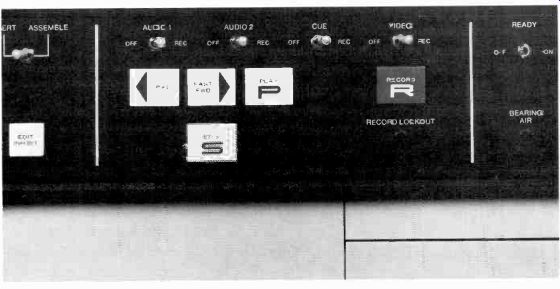
9.13 Operational Controls (Ampex AVR-2).
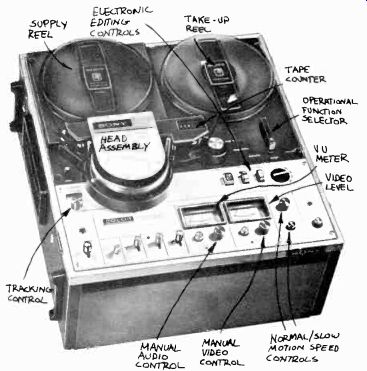
9.14 Controls for most helical scan VTR's include features, such as forward,
fast forward, record, and stop. Some of the more advanced models have separate
controls for slow motion and stop-motion, and stand-by (which starts rotating
the video heads without moving the tape). The arrangement of the controls
differs from model to model, but they fulfill identical functions. (Sony AV-8650.)
-------------------

9.15 If you use small-format helical scan machines for playback, you might need to operate the trading control. This helps you to adjust the video heads electronically so that tapes that have been recorded on another, similar VTR will play back with a minimum of picture jitter and misalignment.
---------------------
Operational Controls
The basic operational controls are similar for all videotape recorders, regardless of make. Like audiotape recorders, they have a button each for play, or forward (moves the tape past the recording heads for playback and record), fast forward (advances the tape at a high rate of speed without producing a recognizable video image), rewind (rewinds the tape at high speeds without producing a visible image), record (puts the machine in the record rather than playback mode [caution: the record mode will automatically erase all previously recorded material from the tape]), and stop (stops the reels almost instantly, depending on the quality of the reel brakes). Most machines have an additional standby, or ready, button, which makes the video heads rotate (getting them up to speed) before moving the tape. (See 9.13.) Most small-format (smaller than 2-inch tape format) helical scan VTR's have additional controls for variable tape speeds and for viewing a still frame or stop-motion (continuous viewing of recorded video fields; looks like jerky slow motion). (See 9.14.) The audio controls contain provisions for input (recording) and output (playback) audio levels for each audio track and cue track. High-quality recorders have VU meters for each audio and cue channel.
There are additional selector switches for tape speed, audio channels, and video and audio monitoring.
Machines that are equipped with electronic editing have additional editing controls. We will describe some of these in Section 10.
Video Cassettes and Cartridges
Video cassette and cartridge machines come, like the reel-to-reel tape recorders, in either quadruplex or helical scan systems and in a variety of tape formats, such as 1/4-inch, 3/4-inch, 1-inch, and 2-inch.
The videotape in the video cartridge or cassette is enclosed in a plastic box, which can be inserted either manually or automatically into the recorder for extremely efficient cuing, playing (in the play or record mode), and rewinding. The advantage of the cartridge or cassette over the reel-to-reel machine is the operational ease with which it can be played. All you have to do is push it into the slot of the recorder and press the record or play button. The machine will automatically cue the tape and put it on the air within an extremely short time. When the program is over, the tape will rewind itself and cue itself up again for another playback. In the automatic cartridge or cassette system, even the loading is done automatically.
The quadruplex video cartridge or cassette is used for all production situations where sequences of very short program material, such as a series of 10-second commercials, must be played back-to-back (see 9.17a). A simple back-to-back series of two 10-second commercials and a 20-second public service announcement would tie up three big VTR machines; a single video cassette machine takes care of this sequence automatically and with great precision.
The quad video cassette or cartridge recorders are used primarily for short program material during station breaks. You can program a sequence of short spots with the help of a small computer that is part of the more sophisticated 2-inch video cassette machines (see 9.17ó). Once you have started the first cassette, the other cassettes (up to an additional twenty-three) will play continually in the programmed sequence. The computer also displays the house numbers and the exact lengths of the individual cassette programs. You can check the upcoming program to see whether or not it is in the right sequence without actually having to preroll off the air the upcoming spot.
The lockup time of the cassette tape is so short that the start of the tape and the playback or record mode is almost simultaneous. You therefore need no preroll time for the cassette. All you do is push the start button on the "take" cue and the program is on the air. The 2-inch video cassette machines have proved so reliable that almost all film commercials are immediately dubbed over to the 2-inch cassette. The cartridges or cassettes have a maximum playing time of up to six minutes. Some of the 1-inch helical scan cartridge machines, however, handle program items as short as 10 seconds, and up to a maximum of 60 minutes.
On some machines, you can record on one cartridge while another is playing back some other program material. All automated cartridge or cassette systems permit sequential or random selection of the program items.
The most popular, manually operated helical scan cassette system uses the 3/4-inch tape format.
You can record the signal from the television camera, or directly off the home television receiver. Most 3/4-inch cassette units accept cassettes of 10, 15, 30, and 60 minutes. (See 9.18.) There is also a 1/4-inch video cartridge machine on which you can either record or play cartridge recordings. Depending on the machine,2 you can wind onto the cartridge reel any recording produced on a reel-to-reel machine.
[2. Only if the 4-inch reel-to-reel recorder operates on the EIAJ standard. ]
-----------------

9.16 As pointed out in Section
7, there is a difference between a cassette
and a cartridge. A cassette has two reels, a supply reel and a takeup reel,
encased in a plastic box. A cartridge has only one reel, which rewinds the
endless tape loop at the same time it comes off the reel for playback or record.
Unfortunately, the manufacturers of video equipment do not always make such a distinction. The quadruplex videotape "cartridge" recorder by RCA, for example, uses two reels for its tape transport and is, therefore, by definition a cassette recorder. In either case, the videotape is encased in a plastic box, called cart (for cartridge) or cassette, which facilitates cuing, play, and rewind operations.
---------------------
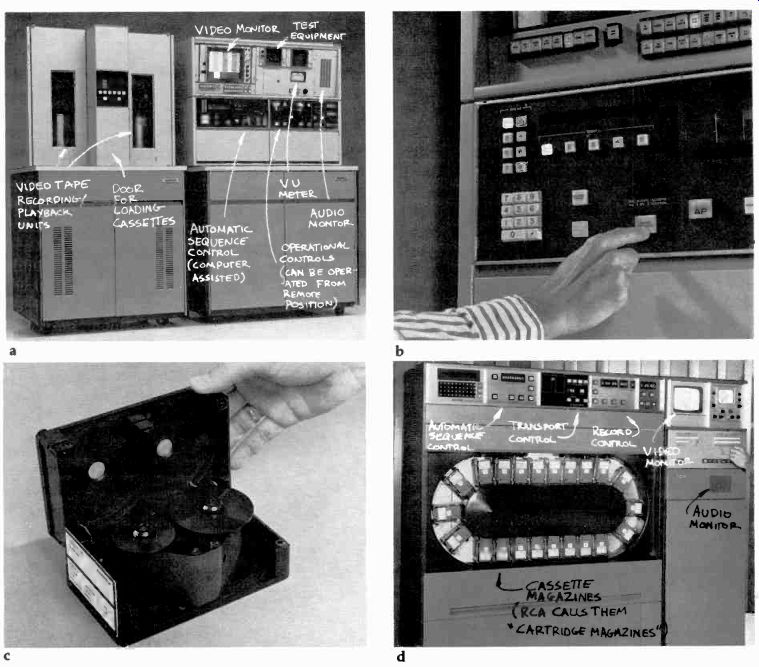
9.17 Videotape Cassette Machines: (a) Ampex ACR-25; (b) automatic sequence
control for ACR-25; (c) 2-inch videotape cassette and tape; (d) RCA TCR 100-A.
The 2-inch videotape cassette allows the back-to-back use of short videotaped
program material, such as a series of consecutive 10-second spots.
What would have been an impossible feat with two regular VTR's (loading, threading the tape, and starting the tape within five seconds, assuming a 5second roll) is now done by the cassette machine automatically, with ease and reliability. The cassette recorder selects the tape cassette, threads the tape, and cues it, within seconds. (The start button starts the tape roll and puts the picture "on the air" in one operation. No preroll is necessary for the cassette.
The cassette recorder can record off any VTR, or another of its cassettes.
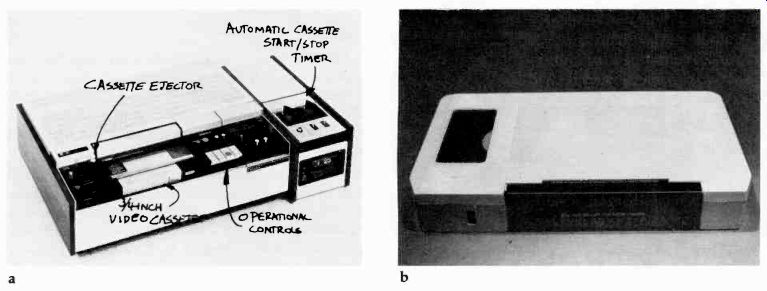
9.18 (a) Sony U-matic VO-1800 N-Inch Video Cassette and Timer: The 3/4-inch
helical scan cassette machine can hold cassettes with up to one hour of program
material. It has automatic cuing and preroll, and can record material from
a direct source, such as cameras, the television set, or from any standard
playback device of recorded material (film chain, VTR). The N-inch cassette
is the slant-track cassette standard. (b) A typical N-inch cassette.
Video Discs
The video disc is actually not a video tape recorder, since it uses a recording disc instead of the tape.
This device is used for the recording and instant replay of very short event sequences (up to 35 seconds). The 20or 35-second segment, which has been recorded in real time, can be played back at any rate, from real time through slow-motion speeds, to stop-motion (similar to a fast series of slides), to a freeze frame (stop-action). You can also play it backwards at any of the above modes; or you can record in time-lapse, which is very similar to frame-by-frame filming in animation. The time-lapse recording can then be played back at any of the speeds, from real time, to slow motion, to stop-motion. Thus, you can use the disc for video animation.
The most important feature of the video disc is the speed with which it can search out up to twenty different parts of the recorded segment within seconds (maximum of five) for instant replay. All you have to do is press a "cue" button at the spot you want the replay to begin. The disc will then automatically search out the cue and display a freeze frame of the cued action.
The versatility of the video disc makes it a valuable tool for experimental work. (See 9.19.)
Operation of Videotape Recording
Since videotape recording has become such a major factor in television production, even as the director you should have at least some knowledge of its principal technical and production aspects.
Such knowledge will expedite not only the actual operation of a small-format, or even larger, VTR, but also, if not especially, your communication with the videotape operator.
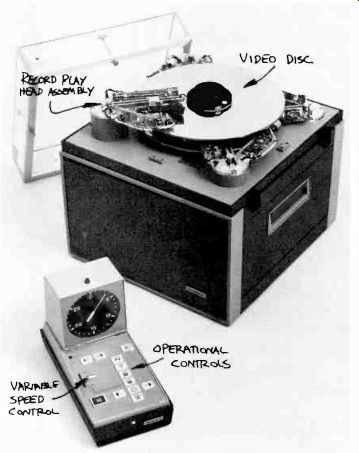
9.19 Ampex Video Disc: The video disc facilitates the recording and instant
replay of short (up to 35 seconds) show segments. It can search out any part
of the recorded action within seconds, and play it back at real time (normal
speed), or any variety of slow-motion speeds down to a freeze frame.
Technical Factors
1. Use only high-quality videotape. Low-quality tape will not only impair the recording, and therefore the playback of program material, but also "gum up" the video heads (by depositing large amounts of oxide coating).
2. Before using a new videotape for recording, you should furbish it by running it once through the recorder without recording anything on it. This will "polish" it by removing any undue collection of oxide coating. The video heads must be leaned immediately afterwards.
3. When threading the tape (different machines have slightly different threading procedures), make sure that the head motor is turned off. The stand-by button must be in the off position. Otherwise, you run the risk of getting the tape tangled up in the rotating heads.
4. After threading the tape, turn the takeup reel gently clockwise to see whether the tape moves freely from the supply reel to the takeup reel.
5. After each tape stop, turn the takeup reel gently to eliminate any possible tape slack and to restore its necessary tension.
6. Make sure that all recording and erase heads are clean. Clean them frequently.
7. Make sure that you have enough tape on the supply reel to last for the entire segment you plan to record.
8. Record only after the machine has "locked up," that is, fully stabilized for recording. With the help of a time base corrector, even the large quad machines lock up within a few seconds.
9. Before recording the actual program, test-record a small section of it. Play it back and check whether the recording is satisfactory. Pay attention to audio and video levels.
10. When the recording is finished, spot-check the recording before you release the production crew and performers. If you discover some recording problems, you can repeat part of the program much more easily with everybody still at his post than trying to recall crew and performers at another time.
Production Factors:
There are certain operational steps in videotape recording that are especially important for preproduction, the production itself, and postproduction activities. Since we will discuss postproduction more thoroughly in Section 10, we will limit ourselves here to the major preproduction and production factors of videotaping.
Preproduction:
If you simply record an entire event for time delay, all you really have to worry about is that you have sufficient tape to cover the whole event. If the event might run longer than the tape capacity of your largest reel, you need two recorders, or you will have to live with losing a few minutes of the event during reel change.
If, however, you plan to videotape in sections, preproduction planning becomes very important.
Here are some of the major points to consider:
1. Divide your script into the various scenes (organic small parts) you will need for later assembly. Mark your script carefully, exactly where you want a taping session to start and stop. Number the scenes.
2. Indicate the approximate times for each scene so that you can tell the videotape operator how much tape you need for each scene.
3. If possible, try to pick scenes that are organic. This means that you should choose your starting and stopping points not arbitrarily but rather where the action or the mood undergoes marked shifts. The longer and less interrupted the scene, the better. Television, by its very nature, requires a more lifelike rhythm than film.
The shooting of a show in too many segments jeopardizes the natural flow and build not only of the show but also of the performer, who might lack the necessary continuity for his pacing and emotional buildup. Ill-matched and chopped-up show segments and performances are very noticeable on the concentrated television screen space. [3]
4. Triple-check on the availability of a videotape recorder, or recorders, for the period of your scheduled taping sessions.
[3. Herbert Zettl, Sight-Sound-Motion (Belmont, Calif.: Wadsworth Publishing Co., 1973), pp. 244-269.]
Production
If you have spent adequate time on the taping preparations during the preproduction activities, your taping sessions should go quite smoothly, barring major equipment disasters. Just before the taping, check about the anticipated duration of the scene or scenes you intend to videotape. Insist on a few short recording tests, if the operator has not done this on his own.
Videotape Cuing Procedure
For each videotape you need some initial technical and program identification, so-called tape leader information.
You also need to know how to predict accurately the end of a tape, especially if you are replaying one that was recorded somewhere else.
Each videotape must carry program information that identifies the program, and production and technical information that helps the videotape operator adjust the machine to the electronic requirements of the tape for accurate playback.
Furthermore, you need a device that allows you to roll the tape and put it on the air at the precise second. The SMPTE (Society of Motion Picture and Television Engineers) has issued a standard for the initial videotape information, sometimes called the video leader (a term borrowed from film). There is a video leader for monochrome videotapes, and another for color. (See 9.20 and 9.21.) Contrary to the film leader, which you can buy in bulk and splice onto any film you intend to televise, the entire videotape leader must be recorded continuously with the same equipment with which the program is recorded. If you adjust your videotape recorder according to the technical information given in the videotape leader, you can be reasonably assured of a proper program playback. If, however, you were to edit in color bars from another tape, or stop the machine between each leader segment, the technical information of the leader would no longer reflect that of the program, and the leader information would be worthless for the program playback.
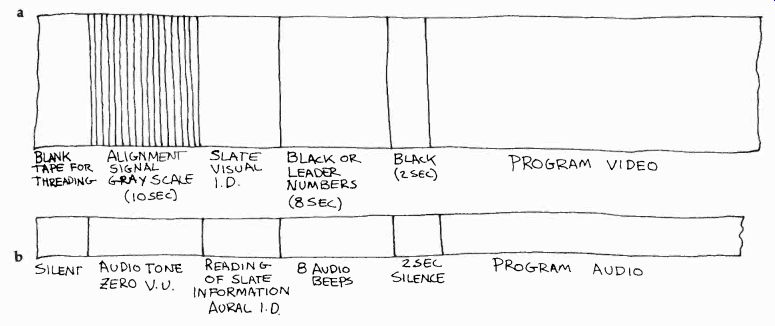
9.20 Monochrome Video Leader: (a) video; (b) audio.
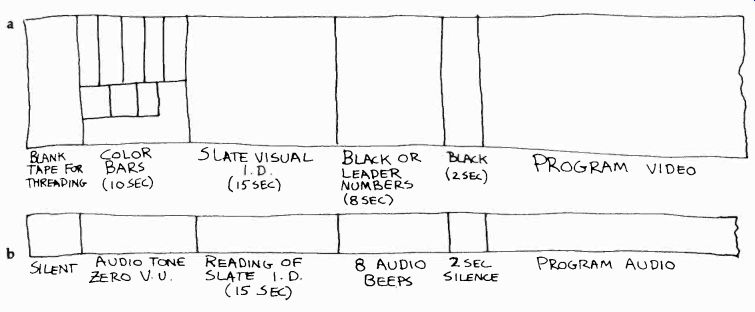
9.21 Color Video Leader: (a) video; (b) audio.
For the visual program identification, you record on tape an identification slate, a small black-or whiteboard in aspect ratio, which shows the title of the show, the scene and take number, the date of the recording, the anticipated duration of the recording, and such other optional information as anticipated playback, location of recording, and in-house identification numbers. (See 9.22.) Make sure that all four corners of the slate are visible when you record it; this will help the videotape operator in further alignment of his machine, especially during playback.
During the recording of the slate, the information on it is read aloud for recording on the audio track either by the floor manager, who holds the slate in front of the camera, or by the audio board operator, who reads the information off the line monitor.
After the slate has been recorded for a minimum of ten seconds (you need to wait longer if it contains an unusual amount of program information), you take it to black and start the beeper cuing system.
The beeper normally consists of a series of eight low-frequency audio beeps, exactly one second apart, that are recorded on the audio track of the videotape. The last two seconds before the program recording are left silent, as a safety cushion for the following program audio. Make sure that your program video and audio start exactly Iwo seconds after the last beep, otherwise you will not be able to use the beepers as an accurate playback cue.
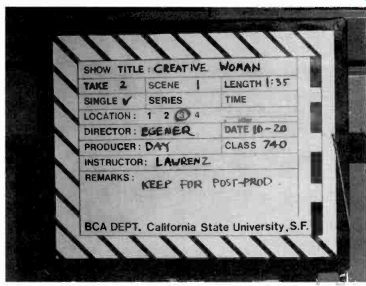
9.22 The slate, which is recorded at the beginning of each take, shows vital
production information, such as the title of the show, the scene and cut (take)
numbers, the playback, and so forth.
--------------------

9.23 The scene refers to the program portion you have
selected and numbered in your script for one continuous taping; the take
number refers to the number of times you repeat the same scene.
-------------------------
Assuming that the beeper is correctly executed, it will enable the videotape operator to locate any recorded program segment quickly regardless of where it occurs on the tape. All the operator must do is listen to the beeps during the fast forward mode of the tape recorder. Because of the highly accelerated tape speed during fast forward, the beeps will appear in the audio monitor as a fast series of high-pitched tones. The operator can stop the recorder and recue the tape on any one of the eight beeps (depending on the cuing system) for playback.
Sometimes a video cue is used in addition to the beeper. Unless you have time-code facilities (see Section 10), you can record flashing numbers--similar to those on public buildings that show the time and temperature-from a "leader box." The leader box projects numbers from 10 to 3 in 1-second intervals onto its frosted glass surface. The box, which is synchronized with the audio beeps, goes automatically to black (as does the audio) for the last two seconds before the beginning of the program portion. When the tape is played back, you can see the numbers flash by on your VTR preview monitor, similar to the academy film leader.
The putting on of this type of video leader has proved quite cumbersome, however, and the video cue leader has never gained wide acceptance in television production. With the availability of a time code, the leader box is no longer useful.
In the absence of a time code display, the most accurate cuing device is the tape timer, which displays seconds, minutes, and hours of elapsed time. The tape timer permits fairly accurate pre-rolls and program end cues. If, for example, your station operates on a 7-second preroll for color and a 5- or 4-second preroll for monochrome (to allow the tape to get up to the operating speed where the pictures have maximum electronic stability), the videotape operator will locate the first picture (frame) of the recorded program and then wind the tape back seven seconds for color. (Incidentally, this spot should coincide with the fifth beep from the end, the last two seconds being silent.) The preroll standards are especially important if you use a short videotape as an insert in a live newscast, for example. You must preroll the color tape seven seconds before you actually need it on the air. (Anywhere from one and one-half to two lines of news copy.) The tape timer is also helpful to tell you when the recorded program is coming to an end. Although you should time all videotape playbacks with your stopwatch, the tape timer is often a welcome safety backup. Some stations put an audio end cue on the videotape. This may, for example, be a 5-second continuous tone emanating from the cue track. As soon as you hear the end cue tone on the cue track audio monitor, you can alert everybody for the program changeover.
Let's go through a typical tape roll for recording. The exact calls may vary from station to station; however, the basic procedure for starting the tape, recording the leader material, and ending the recording should agree at least on major points. Here is an example: Ready VTR one (if you have more than one VTR, you must call the number of the machine), ready bars, ready slate on two (camera 2), ready beeper.
Ready to roll VTR one. (At this point you should wait for some confirmation of the "ready" status from the VTR operator or the T.D. before you actually call for the roll.) Roll VTR one. (Before giving any more cues, you must now wait until the videotape machine has reached the necessary speed for the signal to lock in, that is, to stabilize so that the recorded video signals will not produce flutter and tears in the pictures. Normally, the videotape operator will give you the "in record" or "speed" confirmation.) Bars. (You should look at your stopwatch to make sure that you record a minimum of ten seconds. Generally, the video operator will record the ten seconds of bars automatically without a cue from the director. If a reference tone is recorded with the bars, the audio operator will feed a zero-level tone-one that peaks consistently at zero VU-to the VTR.) Ready two, take two. (Assuming that the slate is on camera 2. You cut to camera 2 after a minimum of ten seconds of color bars.) Read slate. (Either the floor manager or the audio console operator reads the slate information over a hot mike onto the main audio track of the videotape recording.) Ready black, ready beeper.
Black. Beeper. (The audio console operator now activates the beeper. There are only eight beeps on the tape. The last two seconds are silent. Either the A.D. [associate director] or the audio console operator will count backwards with the beeps, from ten to zero.) Fade in one, or Up on one. (Camera 1 is now on the air and you have begun your videotaping session. Have you started your stopwatch?) At the end of the videotape recording, you go to black and stay there for another ten seconds or so, in order to record the runout signal. This signal indicates that the tape is producing black rather than video noise at the end of the recording. Such a safety cushion is especially important if you do not switch to another video source immediately after the end of the recorded program, or if you want to edit on additional program material.
Don't forget to call for the stopping of the tape at the end of the recording. Some videotape operators will let the tape run until the director, or the T.D., tells them to stop it.
Spot-check the recording before you dismiss the crew and the performers.
Film Use
There are five major ways in which film is used in television: (1) as motion picture features, (2) as television film features, (3) as news films, (4) as local features, and (5) as commercials.
Motion Picture Features
Motion picture features include all film originally produced for theater presentation-all full-length feature films, the shorter travel films, educational features, and industrial features that have not been manufactured for television consumption.
Television Film Features
Television film features include motion pictures specifically produced and shot for television.
Most popular westerns, police stories, and some situation comedy series are filmed for television.
News Films
News films include all films produced by national, international, or local news services or departments for daily television news shows.
Locally produced news film is very important in small station operation. The newscaster himself might on occasion double as film camera operator during "off hours" and shoot local news events. News departments of larger stations usually employ several full-time camera operators and up to twenty or more part-time camera operators-so-called stringers-who are located at strategic spots within the coverage area of the station. The stringers shoot everything newsworthy at their locations, with the hope that their television station will use the films on the air.
More and more, however, news film is replaced by portable video equipment.
Local Features
Local features include all films produced locally outside of news films, such as interviews, documentaries, or special material for editorial telecasts. Local news photographers usually take care of the local film productions. Sometimes, freelance photographers are hired for especially ambitious local productions.
An additional, formerly very prominent use of film is the (almost extinct) kinescope recording. Here a specially designed film camera shoots film images that appear on a kinescope tube (small, high-resolution television screen). A kinescope recording is similar to a videotape recording, except that the video and audio signals are fed into the kinescope recorder rather than the videotape recorder.
The end product is a 16mm film. However, compared to a film that has been shot directly, the kinescope recording shows a lower picture quality.
On occasion, videotape is changed into film via kinescope recording. This process, called "electronic transfer," is employed to make television material more accessible to film-oriented operations, such as schools, or to aid in frame-by-frame study or unusually careful editing. Kinescope recordings are of little use in today's small station operation.
Commercials
Many commercial spots are produced and distributed on film. However, since the videotape cassette machines make the playback of even short commercial inserts relatively easy, more and more commercials are produced and distributed on videotape.
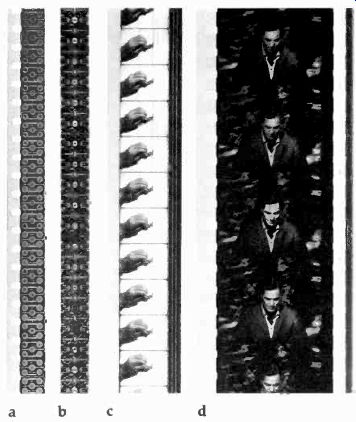
9.24 (a) 8mm; (b) Super-8mm; (c) 16mm; (d) 35mm.
-----------------

9.25 The especially wide 70mm film is never used in television.
All 70mm prints are reduced to either 35mm or 16mm before telecasting.
----------------
Film Specifications:
Major specifications include the width of the film and whether or not the film includes sound.
Film Width:
Film is labeled according to its width: 8mm and Super-8mm, 16mm, and 35mm. Most television stations use 16mm film, although the improved quality of Super-8mm has become a serious contender. Some stations work with Super-8mm for their entire news film operation. (See 9.24.)
Major network origination and some "O and O" stations (Owned and Operated by one of the major networks) have 35mm film facilities, which permit the use of high-quality theater prints for broadcasting. But the film standard for most television film operation is 16mm. The slightly better picture quality of 35mm film simply cannot outweigh the many advantages of using 16mm film. For example, 16mm film is much easier to ship, store, and handle than 35mm film; it is cheaper than 35mm; almost all locally produced film is either 16mm or Super-8mm and, therefore, could not be played back on 35mm equipment. Since 16mm is still the most widely used film format in television, we will use 16mm film as the standard in our further discussions. If your television operation requires you to work with another film format, you can easily apply the principles of 16mm film to it.
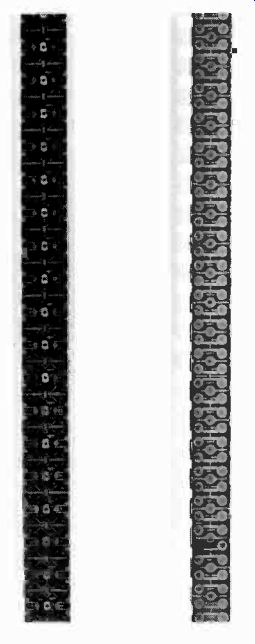
9.26 Super-8mm film has a picture area that is 50 percent larger than the
normal 8mm frame, and therefore produces a sharper and brighter picture.
The larger picture area is gained by a change in size and arrangement of sprocket holes.
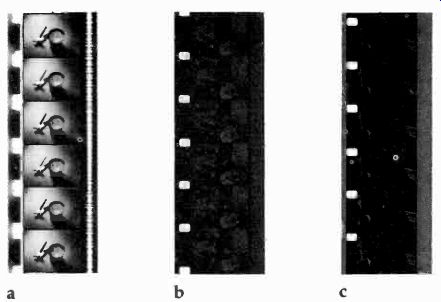
9.27 (a) Variable Area: The variable area sound track is an optical track
whose light-transmitting areas differ, thus modulating (changing) the light
of the exciter lamp. When received by the photoelectric cell, the light modulations
are converted into electrical energy, the sound signal. (b) Variable Density:
The variable density sound track operates similarly to the variable area sound
track, except that the light variations of the exciter lamp are caused by
varying degrees of film density (opaqueness) rather than areas. (c) Magnetic:
The magnetic sound track consists of a tiny magnetic tape that runs down one
side of the film, often called "mag stripe." A second magnetic stripe
runs parallel to the actual sound stripe on the opposite side of the film.
This "balance stripe" is merely to compensate for the extra thickness
so that the film runs evenly through the projector.
----------------------

9.28
To obtain sound from an optical sound track, a constant light source shines
through the track into a photoelectric cell, which converts the light variations
(caused by the area variations, the wiggles, of the variable area, or the
density variations, the various degrees of gray, of the variable density track)
into electrical impulses. These are amplified and sent to the loudspeaker.
------------------------
Silent and Sound Film:
Film can be "silent," with no accompanying sound printed on it, or it can be SOF (sound on film) whereby, along with the pictures, the film carries an audio track.
Many locally produced films are shot silent.
The production advantages over SOF are numerous: (1) Silent film is easier to shoot. You can walk with your camera anywhere and shoot practically anything without having to worry about sound requirements, additional cables, microphones, and tape recorders. (2) You can shoot silent film entirely out of sequence with little consideration for a matching sound track. (3) Editing and splicing silent film is easier than SOF (see Section 10). (4) Live narration, background music, and sound effects are more flexible when played over silent film from a different source.
Of course, if the sound is as important as the pictures in the coverage of an event, you need to shoot SOF. For example, silent film would be of little use if you were to do a remote film interview of an important government official for the evening news. To have the newscaster summarize voice over what the official is saying, while we actually see the official talking, makes no sense at all. In this case, SOF coverage is a must, unless you have good-quality portable videotape available. Often used to capture the actual sounds surrounding an event, SOF gives the story a high degree of authenticity, even if the event could be shot silent. Regardless of how skillful an audio engineer you might have for the re-creation of sound effects of a four-alarm-fire story, for example, the actual sounds still carry more impact.
Sound on Film (SOF)
SOF, sound on film, is an accurate definition: the sound is on the film with the pictures. In film, the audio track is called the sound track.
There are two major types of sound tracks: (1) optical and (2) magnetic. Good television film projectors can play back either one. Some of the more sophisticated models can even switch automatically from optical to magnetic, or vice versa.
The optical sound track can be a variable area, or a variable density, track. The magnetic sound track consists of a small strip of iron oxide, similar to a small audiotape, that runs down one side of the film. (See 9.27.)
The sound track can be put on the film in two different ways. One is to record pictures and sound simultaneously on the same length of film; this method is called single-system sound recording.
Another is to record pictures and sound at the same time but on separate recording devices. The pictures are recorded on film (very much like silent film), while the sound is recorded on a magnetic audiotape recorder that runs in sync with the film camera. Because this method uses two separate recording devices (one for pictures and one for sound), it is called double-system sound recording. Picture and sound are later combined on the same film in the printing (developing) process.
The single system is more economical, since it needs only one recording element (the film). But it has several drawbacks: (1) Its sound is inferior to double-system. (2) Because the microphone is attached to the camera system (which includes the audio amplifier), the camera mobility is severely restricted. (3) Since the audio track is already attached to the film, editing is more difficult than with the double system, which permits separate editing for sound and picture. And (4) it allows less shooting and editing flexibility than double-system sound recording.
The Film Chain, or Film Island
The basic film chain or film island consists of at least one film projector, a slide projector, a multiplexer, and a television film camera, or, as it is frequently called, a telecine camera (from television and cinematography). Occasionally the film island with its components is called the telecine system. Most film chains contain a second film projector. Let's take a brief look at each of these components: (1) the film projector, (2) the slide projector, (3) the multiplexer, and (4) the film camera.
Film Projector
The television film projector is especially designed so that the (16mm) film speed of 24 frames per second will correspond to the 30 frames of the television picture. This synchronization is accomplished by the television film camera scanning the first film frame twice, the second three times, the third twice again, and so on. If a film projector is not synchronized with the television system, you will detect a slight flutter in the television picture and, sometimes, black shutter bars moving up and down the screen.
When using Super-8mm film, you can usually vary the speed of the projector until you get a clear, flutter-free picture.
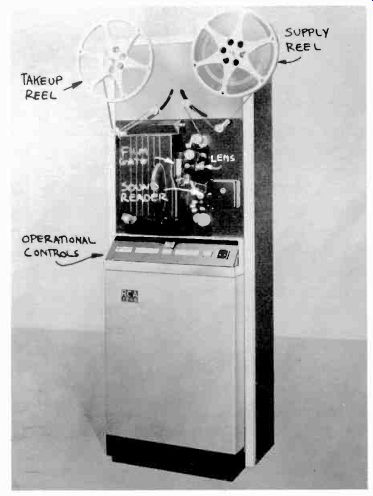
9.29 RCA TP-66 Film Projector: The professional television film projector
adjusts the 24-frames-per-second 16mm sound speed to the 30-frames-per-second
electronic scanning of television. It can be remotely started and stopped,
backed up in reverse, and stopped for still-frame projection without burning
up the film. The largest reels can accommodate almost two hours of continuous
film programming.
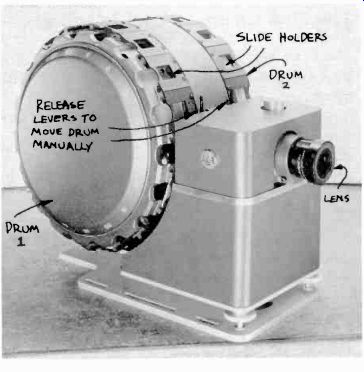
9.30 RCA TP-7 Slide Projector: The dual-drum slide projector holds a total
of 36 slides, which can be rapidly advanced or, with special additional equipment,
randomly selected. In case the lamp burns out, you can pull the lamp assembly
quickly into the spare-lamp position. The slide projector accepts regular
2 x 2 slides, even in the traditional paper mountings. However, because the
cardboard tends to buckle under severe heat and thereby go out of focus, all
slides used should be mounted in a more heat-resisting frame.
Most film projectors can accommodate large 20-inch (4,000-foot) reels (some even 5,000-foot reels) that allow a continuous projection of almost two hours of film programs, and very tiny ones (50-foot reels) for the commercial spots. Although the film projectors have automatic film tension compensators, it is a good idea to use a takeup reel of the same size as the supply reel. This way, you maintain uniform film tension and drastically reduce the danger of film breakage. (See 9.29.) Film projectors usually have a number of de-vices that facilitate operations:
(1) The threading mechanism is usually kept as simple as possible so that, with some experience, you can thread the film within seconds. Of course, film cartridge machines make loading even faster.
(2) The projectors can bring the film with its sound up to full speed within a fraction of a second. This "zero preroll" eliminates a preroll countdown. But longer preroll starts are still prevalent. (See the section on operational factors.)
(3) All film projectors have a remote start-and-stop mechanism, which can be activated manually, or triggered by computer control. Some of the more complex projectors have automatic cuing systems, whereby the film can be programmed in advance to stop and cue itself for the next segment in as many places as desired. This automatic cuing is accomplished by attaching small pieces of special tape to the film at the specific cuing points. The film projector senses these tapes and performs the necessary functions automatically.
(4) Most film projectors have a pickup device for both optical and magnetic sound. Some projectors can switch automatically from one type to the other.
(5) Most projectors can show a single film frame for extended periods without danger of burning the film.
(6) The film can be run in reverse direction.
(7) The projection lamp and the sound-exciter lamp exchange themselves automatically if they happen to fail during the film projection.
As mentioned above, most film islands have two film projectors to ensure maximum continuity of programming. As soon as the film of the first projector has run out, the second projector can be started and switched on the air. Sometimes you may find it convenient to have all the program film (such as a motion picture feature) on one projector and all the commercial film spots on the other. In case your program runs late for some reason, you can always switch to the commercials at the scheduled time, while letting some of the feature film run through off the air in order to make up for lost time (by the way, not a good substitute for accurate timing).
Slide Projector:
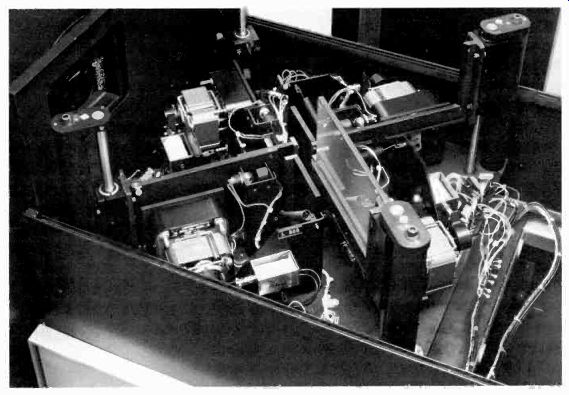
9.31 Multiplexer: The multiplexer consists of a series of mirrors or prisms
that direct the light of the various program sources, such as film projectors
or slide projectors, into the television film (also called telecine) camera.
Transparency slide projectors have slides arranged on two vertically or horizontally arranged dual drums. The latter are called carousel drums. The more popular, vertically arranged dual drums have a slide capacity of 36 slides (18 each) (see 9.30). Dual-drum slide projectors permit reloading or changing slides while the machine is in operation. Most new drum slide projectors are designed for forward and reverse action. Some are equipped with a random selection device, through which you can punch up any slide without waiting for the drums to rotate until the desired slide finally appears in the gate. In case the projector lamp burns out, you can pull a large handle and put the spare lamp into operation.
Sometimes, standard 35mm single-drum carousel slide projectors, the kind you use at home, are used on the film chain.
Slides are generally easier to use than studio cards. First, keeping them in order is much simpler than handling loose cards on various easels.
Second, they can be changed on the air more cleanly and rapidly than studio cards. And third, the use of slides will not tie up a studio camera.
The disadvantage of using slides rather than studio cards is that the fixed television film camera cannot move on the slides.
Multiplexer:
The multiplexer is a series of mirrors or prisms that direct the images from several projection sources, such as slides and film projectors, into a single fixed television film, or telecine, camera (9.31). Without the multiplexer, each film projector and each slide projector would need its own film camera. The mirrors, which direct the various video sources into the single camera, and the projectors themselves must be carefully aligned so that nothing of the picture information gets lost in this image-bending process . Most multiplexers are therefore heavy and sturdy and are mounted on a heavy concrete slab in order to withstand the inevitable vibrations caused by moving machinery and people.
Some multiplexers have provisions for two telecine cameras. You can then either increase the number of input sources (by adding a Super-8mm film projector to the two 16mm film projectors, or an additional dual-drum slide projector) or use the second camera for previewing the image from the upcoming projector while the signal from the other projector is still on the air. The openings for the projectors leading to the multiplexer mirrors are called "ports."
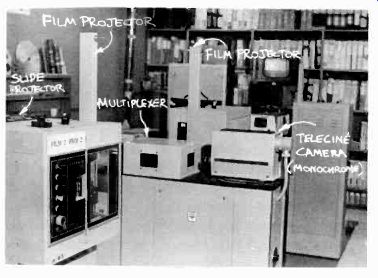
9.32 Monochrome Telecine Camera.
The Telecine, or Television Film, Camera
The telecine, or television film, camera can be monochrome or color. As with studio cameras, most are color. The monochrome telecine camera is a simple vidicon camera (9.32). The color telecine camera usually works on the three-tube principle, similar to the studio cameras (9.33). The tubes are either vidicon or Plumbicon.
Most telecine cameras have automatic brightness and color correction features, which adjust to the various degrees of color temperature, saturation, contrast range, or general density of the films or slides projected.
Since a complete film island takes up a considerable amount of space, constant efforts are made by manufacturers to reduce the size of the projection and multiplexing equipment and to combine the instruments in one unit. Whatever the arrangements may be, the basic principle of multiplexing the various video sources into one or two telecine cameras remains unchanged.
If your film island has only one telecine camera, you cannot preview or use a second video source while another one is on the air. For example, you cannot super a slide over a film if both are on the same island. In order to do so, you would need to put the film on the film projector of one film island, and the slide in the slide project of another (assuming that each island has one camera only).
Operation of Film--Film is such a widely known and widely discussed subject that we will limit ourselves in this section to its major operational factors only as they relate to television production.
Specifically, we will look at (1) film quality check and storage, (2) film projection, and (3) film cuing and timing. Film editing will be taken up in Section 10.
Quality Check and Storage
When you receive a film from outside, check it before putting it on a projector. There are machines on the market that check the film in one operation for bad splices, torn sprocket holes, and other injuries. If you don't have such a machine, run the film through your action viewer and check for the above-mentioned defects. Locally produced film will (hopefully) have undergone such scrutiny by the people in charge of film in the news department. In any case, if you are in charge of telecine operations, it might be wise to check every piece of film that is to be projected, time and circumstances allowing. Be sure to clean the film (by running it through a film cleaner) before projecting it.
Film quality check also includes a cursory screening as to color consistency. If you notice a marked change in color quality (from a warm, reddish overall hue, to a cold, bluish hue, or from intensely saturated colors to washed-out colors, for example), warn the video engineer. Although the automatic color correction will compensate as much as possible for such changes, the video engineer may have to correct drastic color changes manually.
Lastly, check for content. Although television has become somewhat liberated as to what is considered proper for home viewing, some unsuitable material may, nevertheless, have escaped the scrutiny of the traffic department, which usually takes care of such matters. But don't play censor.
Alert the program manager or the traffic department if you perceive a piece of film as too offensive for broadcasting.
Like videotape, store the film in a dry, cool, dust-free place. Place it in tightly closed cans in order to keep it from drying out, since a very dry film becomes brittle and breaks easily in the projector. Label each film carefully with the title, category (feature, commercial), and house number.
Film Projection
When threading the film, follow the threading diagram that is usually supplied by the manufacturer. It is often attached to the projector. Here are a few items that deserve attention:
1. Before threading the film, make sure that the television film projector is on local control, rather than remote control. If you leave it on remote control, it may be accidentally started by someone from a control room, and you may get your fingers caught in the projector mechanism.
2. Be sure to thread the film firmly over the sound drum, and to adhere to the prescribed loops. Otherwise your film will be out of lip-sync.
3. Even if you are in a hurry, thread the film carefully. A careless threading job may result in severe film damage.
4. Once you have threaded the film, start the projector and run the film for a little while to make sure that you have loaded the projector correctly. Back up the film again to the number 4 (or whatever cue you have designated) of the academy leader.
5. Just in case your film should break, have the splicing equipment close at hand. Usually, a simple splicer and high-speed rewind equipment are located right next to the film islands.
6. If your projector does not have an automatic switchover from optical to magnetic sound, make sure that the sound pickup device on the projector corresponds to the film sound track.
7. Treat all film gently.
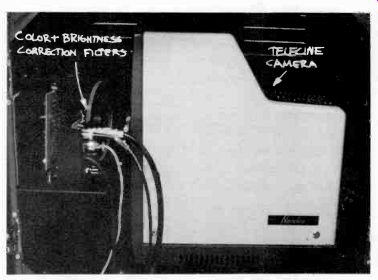
9.33 Color Telecine Camera.
Film Cuing and Timing
With film, as with videotape, you need to employ some cuing and timing procedures in order to start and stop the film as programmed. Precise cues and timing are especially important if the films are integrated in a longer program, such as short news films within a newscast, or short commercial spots at a station break. We will briefly look at (1) some of the customary cuing procedures for film starts, (2) the academy leader, (3) end cues and timing.
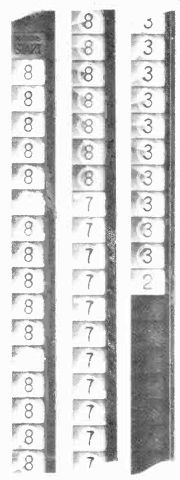
9.34 Academy Leader: The Academy leader, or SMPTE universal leader, assists
in the accurate cuing and picture alignment before the film is actually projected.
The numbers, from 8 to 3, indicate 1second intervals. The last two seconds
of the leader are black in order to avoid showing numbers on the air if the
film is punched up early. A clocklike dial at each number frame shows how
close you are to the completion of each countdown second.
Cuing. Although most television film projectors gain full picture and sound speed within a fraction of a second, television films are often started as much as four seconds ahead of the first film frame. The reason for the traditional "4-start" (4-second film start) is partially habit, partially a technical guarantee for the video to stabilize before the film is shown on the air. Another reason is the high degree of control during transitions from another video source to film, as, for example, the transition from a live introduction by an on-camera announcer to the film. A 4-start gives the performer the needed time to wind up his commentary just before the film appears on the screen. Also, the 4-start will tell you (the director) that the film is indeed rolling before you switch it on the air.
In order to make the 4-start (or any other type of pre-rolling) possible, you need to splice a special leader at the head of each film to be specially cued. This leader is traditionally called the academy leader or, more accurately, the SMPTE universal leader.
Academy Leader. The academy leader consists of a strip of film showing numbers from 8 to 3 at equal 1-second intervals and a dial rotating around the academy leader numbers at each second (see 9.34). The leader contains additional information that aids in synchronizing several film strips during the editing process. The leader (which is available commercially) is spliced at the head of any film that needs cuing. You splice the leader at the film to be shown with the "picture start" frame and the highest number farthest away, and the lowest number (number 3) and the two seconds of black closest to the beginning of the film to be cued.
If two films follow each other without interruption, you need the academy leader only at the head of the first film. The second film can be spliced directly to the "tail" (end) of the first one.
But if you plan to switch to another video source between the two films, such as the newscaster between two news films, you will need to put an academy leader at the head of the first film, and between the preceding and following films. The second leader makes it now possible to stop the projector for any length of time and to cue up the second film so that it can be pre-rolled at a precise cue.
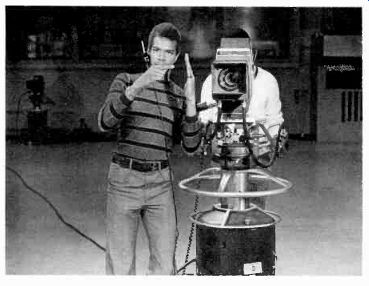
9.36 Roll Film.
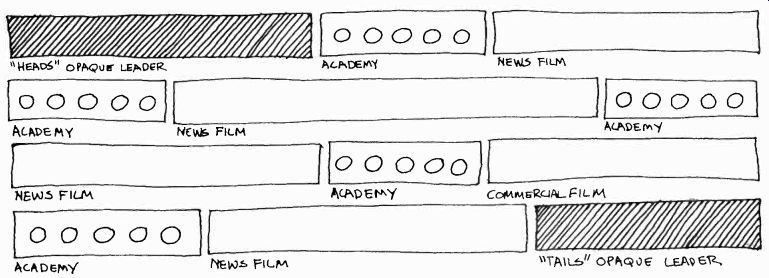
9.35 This schematic shows how various leaders must be used in the final "makeup" (editing)
of a newsreel containing several news films and a commercial insert.
The head of the reel consists of an opaque and an academy leader for easy threading of the projector and accurate cuing. Then comes the first news film.
Since you are cutting back to the newscaster, you need another academy leader for cuing the second news film (assuming that you work with an academy pre-roll). After the second news film, you cut back again to the newscaster; another academy leader is therefore required for cuing the third news film. Since the newscaster introduces the film commercial on camera, you need another academy leader (you must cut back to the newscaster for the live introduction to the film commercial). After the commercial, you come back to the newscaster for on-camera copy, which means that the fourth and last news film must be cued by an academy leader once again. At the end of the reel you need an opaque leader, to keep the television screen in black just in case you are slightly late in cutting back to the newscaster for the final story.
It is a good idea to place a 3-foot opaque leader in front of the first academy leader and a 2-foot opaque leader at the end of the last film on the reel. The front leader (sometimes called "head leader") will help in threading the film into the projector without using up the academy leader (which you need for cuing); the end leader (sometimes called "tail leader") will keep the television picture in black for a few seconds, giving everybody a chance for a smooth changeover to the next video source in case the end cue (usually a time cue or a word cue if SOF is used) has been missed. The head and tail leaders are usually marked with an inking pen as to program title, house code or number, date and time of airing, and whether the leader is "heads" or "tails" (wound so that the beginning [heads] or the end [tails] of the film is on the outside of the reel). If you use instantaneous starts, you do not need an academy leader, except perhaps at the very beginning of a film reel in order to help the video engineer with the alignment. All you then do is put a short piece of black leader (opaque leader) between the films that are interrupted by another video source. You simply roll the black leader down to the first frame of the next film and start the projector directly on cue (eliminating the pre-roll altogether). The advantage of the "black leader method" is that you do not have to calculate any preroll time into your cuing. You start the projector directly on cue. The disadvantages of this method are: (1) You don't have any verification in your preview monitor of whether or not the film has been accurately cued. With the academy leader, your preview monitor will show a big "4" on the screen (or at whatever number you want your preroll to occur). (2) Without the academy leader, you have no warning if the film projector does not work. If, due to equipment malfunction, the film does not roll, the academy leader (which does not move) will give you enough warning not to switch to the film and to stay with the live camera picture. (3) The black leader does not allow any preparation time for the changeover. As soon as the T.D. starts the projector through remote control, the image is (or is not) on the air. (4) The instantaneous start does not always give the video and audio enough time to stabilize fully.
Let's do a film roll with a 4-start and a live introduction from the studio by the performer.
Here is a workable sequence:
1. The telecine operator or T.D. (through remote control) cues up the film on academy leader number 4.
Make sure that the actual number appears on the preview monitor each time.
2. The director signals to the T.D.: Ready film. Roll film.
3. The T.D. starts the film projector by remote control. At the same time, the floor manager gives the performer a roll-film cue by holding his left hand in front of his face and moving his right hand in a cranking motion (see 9.36).
4. The director gives the academy leader countdown aloud over the P.L. system: Four-three-two-one-take (or dissolve to) F-one (assuming that the film originates from film island No.1). If you have only one island, you may say: Take film.
5. At count four, the floor manager gives a visual cue to the talent (see 9.37).
6. The performer is winding up his film introduction, synchronizing his introduction exactly with the countdown.
7. The floor manager gives the take film cue and the T.D. switches the film on the air.
8. The audio person kills the performer's mike and brings up the film's audio track. The performer must have finished talking, or the introduction will be upcut in favor of the film audio (assuming that the film introduced is a commercial; if it is an SOF news film, the newscaster's introduction usually overrides the sound track of the film). Sometimes the performer will watch the countdown on a special preview monitor, or take his or her film cue from the camera tally light, which goes out as soon as the film is switched on the air.
With the instantaneous start, the director rolls and puts the film on the air at the very end (last word) of the performer's introduction. The performer does not need a special film roll cue or any countdown. He simply reads the film introduction or whatever copy precedes the film roll and then hopes to find the film on the studio monitor when he is through.
End Cues and Timing
The most accurate and most frequently used end cue for the exact spot where you should switch to another video source (usually the very end of the film) is a time cue.
Each film must be accurately timed in minutes and seconds-or if necessary hours, minutes, and seconds-so that you can not only integrate it into the overall program time but also get the all-important end cue.
In order to time the film, you run it through either a film timer, which gives you a reading in hours, minutes, and seconds of elapsed film time, or a footage counter, which gives you the length of the film in feet. If you use a footage counter, you will need to use a conversion chart to convert the length of the film into running time. Make sure to time the film from the first picture frame to the last to be shown, not including the academy or opaque leaders.
If at all possible, don't time the film by running it through a regular 16mm projector that you might use for previewing the film. The projector speeds differ sufficiently to render such timing inaccurate, even for a relatively short piece of film.
When you roll a film, you start your stopwatch as soon as the first frame appears on the monitor.
You then go by the stopwatch and call for a switch to the following video source as soon as your stopwatch indicates the end of the film. Let's assume your first news film (silent) timed out to exactly 58 seconds. There is narration over the silent film by the newscaster. Table 9.38 shows how you, as a director, would get into and out of this film during a newscast.
Hopefully, you will have cut back to the newscaster before you hit the black leader or, worse, get into the scratches and identification marks of the academy leader of the following film. As soon as you are back on the new video source, reset your stopwatch for the upcoming film. If the newscaster is early with his narration, you simply run the film silent to the end. If you have prescreened the film and know that the last few seconds of it are not essential to the story, you may want to cut out of the film and back to the newscaster on his narration. If you cut out of the film too early too often, however, your overall timing of the newscast may be off (you will run short) and you may have to stretch with filler material at the end of the newscast. On the other hand, if the newscaster runs long with his narration, you simply cut to him while he is finishing the narration on camera.
-----------------

9.38 Director's Cues: Example.
-Audio
Newscaster finishes preceding story and intros film.
Speaks cue word.
Newscaster reads the copy over the silent film off camera.
The newscaster should have reached the end of the voice-over narration.
----Video Newscaster The telecine preview monitor shows the academy leader flash by.
The film appears on the line monitor.
The newscaster is on the line monitor.
Your Actions
Watch for the word in the script you marked for a roll cue (assuming you use a 4-start). Roll film. Four-three-two-one-take F-one.
Start your stopwatch. You read along with the newscaster in your script.
Now don't take your film timing from the newscaster's narration. He may be off with his timing and finish his narration after the film has already ended.
Look at your stopwatch. Give warning cues. Thirty seconds to one (assuming that camera 1 will be coming back on the newscaster). When your stopwatch* reads 45 (elapsed) seconds, you give the ten seconds to one cue. At 55 (elapsed) seconds you give your ready one cue. And an experienced director cuts to 1 at 57, or even 56 seconds, figuring in the delay from signal to switching execution by the T.D. Take one.
* Assuming that you use a standard stopwatch, or run your digital watch in the forward mode.
--------------
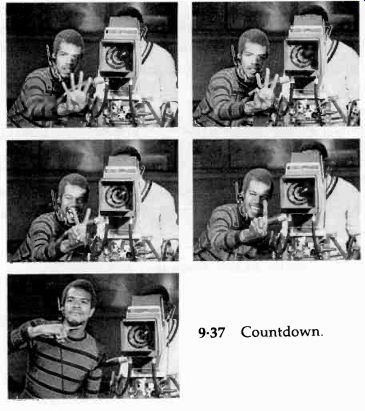
9.37 Countdown.
When running an SOF, you will have an additional end cue, the last few words that appear on the sound track of the film. Your out-cue is then not entirely the time (which nevertheless remains a valuable cue), but the word end cue. Your script might have the following information.
Video Audio
FILM 1:20 SOF MAG (for ENDS: ". . . looking 1 : 20 magnetic sound) forward to it."
Your roll and initial timing procedures are identical to those of the previous silent film. At the end of the SOF, however, after your 10-second cue, you now listen carefully to the end cue: ". . . looking forward to it." After "it" you cut to the next video source, even if your stopwatch may be a second or two over or under the end-time of 1:20 minutes. SOF commercials have prominent audio end-cues. A 10-second commercial spot may cost the client $10,000. For that much money, your client expects, and should get, his full 10 seconds' worth. Cutting a second off a commercial, simply because you missed the end cue and don't want to be caught with a blank screen, can be a costly mistake.
The old, and foolproof, method of cue-marking a film with a special punch that puts tiny holes into the corner of a few film frames, is generally no longer used. Although the cue marks are supposed to appear as white dots in the extreme corner of the film frame so that they would not be seen on the home screen (because of the picture area loss through transmission), many of them were nevertheless visible.
As pointed out in the section on film projectors, you can use automatic start and end cues for self-cuing the projector to start and stop at a specified place. You simply put a small piece of conductive pressure-sensitive tape on the film, which is then read by the projector's self-cuing device. In computer-assisted operations, the film projectors are usually started and stopped and the film is put on the air at the appropriate time by computer.
If you are on camera, you will receive the roll cues for the start of the film and the necessary end cues from the floor manager. However, especially when reading narration over a silent film, you may want to use a stopwatch to time yourself to the length of the film.
-----------

9.39 If you still use the cue-marking system, you should put two marks on
the film, either in the upper or lower righthand corner. The first cue is
a warning cue, and appears as a white dot anywhere from four to two seconds
before the end of the film.
The second cue mark appears as close to the end of the film as possible.
For cue marking you must use a special cue marker. There are several types available, some of which look like a train conductor's ticket puncher.
Most cue markers perforate four frames of the film with round or triangular holes. It is best to start by placing the last cue mark about four inches from the end of the film. The first cue mark is then placed ahead of the second, at a distance depending entirely on the time span desired between cues (usually four seconds).
------------
----------
Color AUTOMOBILE SPEED AND CONTROL WITH DAN WHITE (Running Time :60 sec.) VIDEO TIME AUDIO DAN WHITE MY NAME IS DAN WHITE AND I USE SPEED AND IN DRAGSTER :06 CONTROL TO MAKE MY LIVING, LIKE THIS BURN OUT :04 (WILD SOUNDS OF DRAG RACING) DAN WHITE'S WITHOUT GOING FAST, ALL THESE TROPHIES TROPHY ROOM :09 WOULDN'T BE HERE. WITHOUT CONTROL, I WOULDN'T BE HERE. YOU KNOW WHAT COMES FIRST. D.O.T. REPORT-12 AN INDIANA UNIVERSITY STUDY FOR THE DEPARTMENT OF TRANSPORTATION REPORTS THAT FOUR OUT OF FIVE ACCIDENTS ARE CAUSED BY DRIVERS WHO DON'T HAVE THEIR HEAD OR THEIR VEHICLE UNDER CONTROL. RACE :03 SPEED IS IMPORTANT ON A DRAGSTRIP. TRUCK AND TRAILER :02 BUT WHEN I'M DRIVING ON THE ROAD TO A RACE.... FAMILY CAR :06 OR JUST DRIVING MY FAMILY TO THE STORE I TRAVEL AT SAFE REASONABLE SPEEDS. DRAG ACTION :08 DON'T TAKE CHANCES AT INTERSECTIONS. WHEN RACING, IF I JUMP THE YELLOW LIGHT I'M A LOSER. NEAR ACCIDENT :04 IF YOU JUMP THE YELLOW LIGHT, CHANCES ARE YOU'LL BE A LOSER. DAN WHITE'S YOU MAY NOT HAVE TO WIN TO MAKE A LIVING, TROPHY ROOM :06 BUT YOU SURE HAVE TO LIVE TO BE A WINNER. :60
9.40 Film Script.
--------------
Most film scripts written for local stations have no particular format. They consist of double-spaced typewritten commentary that matches the lengths of the individual film scenes and consequently the overall length of the film. You should obviously prescreen each film so that you can practice the voice-over narration and your timing, and, in case of a film breakdown, continue with a fairly accurate ad lib commentary.
Most news films from major news services come supplied with scripts of standard format, indicating the picture sequence, the running film footage, and the running film time (see 9.40). Even if you did not have time to prescreen and are forced to read the copy "cold" (without rehearsing) or "blind" (without even seeing the film in a monitor), you can still match your narration to the film pretty well simply by watching the elapsed time on your stopwatch.
Summary
Almost all television programs derive from either videotape or film.
Videotape is used principally for (1) time delay, (2) building of a whole show by assembling parts that have been recorded at different times and/or locations, (3) duplication and distribution of programs, and (4) records for reference and study.
There are two basic systems of videotape recording: (1) the transverse scanning process, or the quadruplex video recording system, and (2) the helical, or slant-track, recording system. The quadruplex videotape recorder (VTR) normally puts four different tracks on the 2-inch wide videotape: (1) the video track, (2) the audio track, (3) the cue or address track, and (4) the control track. Most small-format (1-inch or less tape width) helical videotape recorders put three tracks on the videotape: (1) the video track, (2) the audio track, and (3) the control track. With the exception of the 2-inch helical scan videotape recorders, the quadruplex recorders produce higher quality videotapes than the helical scan recorders.
There are three basic types of video recording devices: (1) reel-to-reel videotape recorders, (2) video cassette and cartridge machines, and (3) video discs.
When a program or program segment is videotaped, the program and each segment are preceded by a video leader, which gives program identification and technical references for video and audio.
Film is used principally as (1) motion picture features, (2) television film features, (3) news films, (4) local features, and (5) commercials.
Major film specifications include the width of the film and whether or not it includes sound.
Film is generally labeled according to its width: 8mm and Super-8mm, 16mm, and 35mm. It can be silent, with no accompanying sound printed on it, or it can be SOF (sound on film) whereby the film carries an audio track alongside the pictures. SOF can be optical or magnetic.
The basic film chain, or island, consists of at least one film projector (usually 16mm for small stations), a slide projector, a multiplexer, and a telecine, or television film, camera.
These are the major operational factors for film use: (1) film quality check and storage, (2) film projection, and (3) film cuing and timing.
Like the videotape leader, the SMPTE, or academy, leader, aids in accurate cuing and picture alignment before the film is actually projected.
For film projectors with automatic start- and end-cue devices, the academy leader is generally omitted.