VIDEO SWITCHING
The control room contains the monitors and the switching console, which the director uses to see and select the video portion of the production. Each camera will have a monitor here showing its shot. Next will come a monitor to show slides and another to show film. If there are additional slide projectors or film projectors, there will of course be additional monitors.
Next will be a monitor for every VTR (video tape recording) machine. A monitor will show what is currently being broadcast, hence is generally referred to as the air monitor. Another monitor will show the output of that particular studio and control room and is generally called the line monitor. Another monitor will be a preview monitor, used to look at a shot before putting it on the output line of that studio. At stations with a network affiliation, there is a monitor showing what is running on the network. Other extra monitors may show the output of another studio, the program being broadcast by another station, or any other such thing which station personnel have decided is necessary. These final monitors are, logically, referred to as auxiliary monitors. The line-up of monitors might look some thing like the set-up shown in Fig. 39.
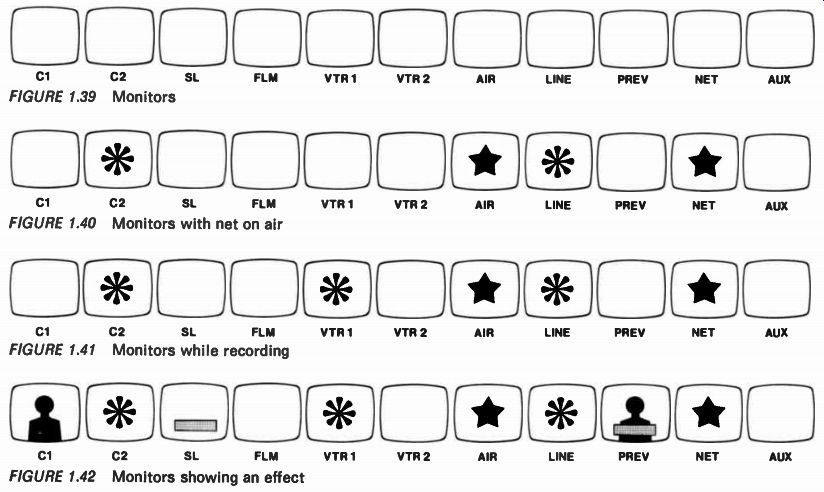
Fig. 39 Monitors
Fig. 40 Monitors with net on air
Fig. 41 Monitors while recording
Fig. 42 Monitors showing an effect
Obviously, not all control rooms have, or need, all these monitors. Some need even more. But the monitors are the primary video sources in the control room, and obviously a lot of these monitors might be showing the same thing. Let's look at an example.
Suppose you are in the control room of a network affiliate some evening at 8:15. There is a show being videotaped in the studio while the network is broadcasting a movie. The director has just called for the shot on Camera 2. See Fig. 40 for what the monitors would show.
Camera 2 and the Line have the same shot and Net and Air have the same shot. If the director wants to see the output of the videotape machine s/he's recording on, VTR 1 might show the same picture as Camera 2 and Line.
Let's go a bit further. Suppose the next shot is to be Camera 1 with a name put over it, and the name is on a slide.
The director wants to preview this, so the monitors would look like Fig. 42.
We could go on adding elements, but you can easily see how much there is to look at on the control room monitors.
Yet people in the control room learn to look at them all at a glance, see everything, and even call for minute corrections without losing track of all the other things going on.
These monitors represent the multiple eyes of a television production. If something looks bad here, you can bet it will look bad if it gets broadcast to the people at home. Yet if the scene is fine on the monitor, even though the out-of-sight edge of the setting is on fire, those folks at home will think everything is fine. Generally then, the control room people need only look at the monitors-they don't need to see the burning flat because they can still show the audience a good picture. Let the studio crew handle the fire! Next we come to the switcher itself. Here is the device which enables you to put one of those monitor pictures on the line. The switcher may be operated by the director or by a technical director. In either case, its operation is based on a simple one-two choice. We can elaborate on that one-two choice, and go far beyond it, but right now let's consider the basics.
Suppose you have one camera. You can choose to be on or off the line with it. If you are off, you are in what is termed black-no picture at all. If you are on the line, you have what- ever picture that camera has showing. To make this choice, you will have buttons to push. One will be marked "Black" and the other "Camera 1." Push whichever one you want and that's what shows up on your line monitor. If you add another camera, you can choose either no picture (Black) or some picture (Camera 1 or Camera 2). If you choose some picture, you can choose Camera 1 or Camera 2. So you still have a one-two choice.
Now suppose you add a film chain. You have the picture-no picture choice, then a camera-film choice. You can guess we can add other buttons to match the various monitors we have discussed and that takes us away from our basic one-two choice, so let's set up an example row of buttons and talk about what we can do.
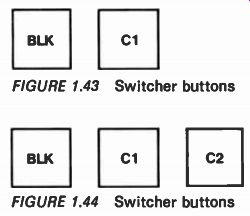
Fig. 43 Switcher buttons
Fig. 44 Switcher buttons
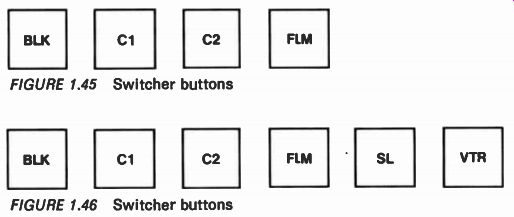
Fig. 45 Switcher buttons
Fig. 46 Switcher buttons
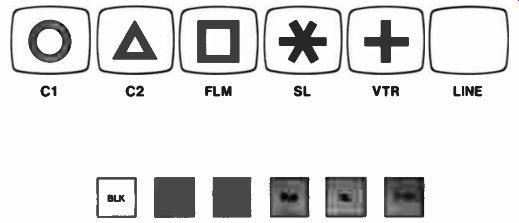
Fig. 47 Black on line
In Fig. 46 we can have no picture on the line, or Camera 1, or Camera 2, or Film, or a Slide, or a VTR just by pushing the appropriate button. Each button except BLK will have a corresponding monitor for people to look at. In Fig. 47, for example, BLK is pushed and the line shows nothing. Push the Film button and you have the situation in Fig. 48. Now push the C 1 button and you will have the picture shown in Fig. 49. These instantaneous changes of picture on the line monitor are called cuts. In this sequence, we cut from black to film and we cut from film to Camera 1. One way, then, to change what a viewer sees is to cut from one source to another.
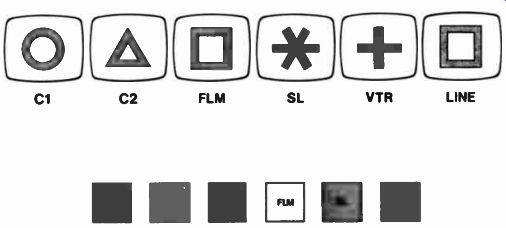
Fig. 48 Film on line
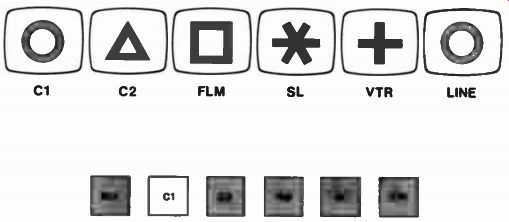
Fig. 49 Camera 1 on line
Besides adding more buttons, how else can we add to the capabilities of the switcher? Suppose, instead of one row of buttons, we have two, as in Fig. 50. Next, let's add a way to activate first one row, then the other. There's our basic one-two option again: you can have either the top row or the bottom row active. The way we will choose is with a fader bar. You'll see why it's called that shortly. Right now, the fader bar is opposite the top row (generally called the top bank) of buttons, so they are the ones which are active. Just as when we had only one bank, we can cut between sources to change what's on the line monitor. The lower bank, however, is not active and whatever we push on it does nothing to affect what's on the line monitor. If we move the fader bar down opposite the lower bank, it becomes active and we can cut by pushing buttons there, and this will now change the picture on the line monitor.
But the top bank is now inactive and causes no changes.

Fig. 50 Two banks of buttons

Fig. 51 Two bank switcher
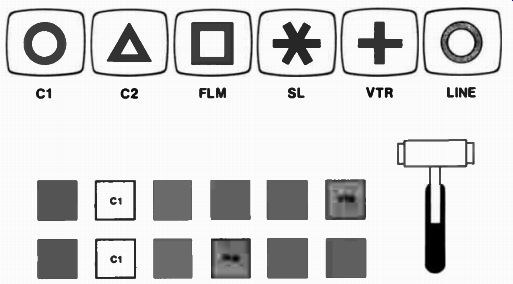
Fig. 52 Switcher and monitors
Let's take an example. Suppose Camera 1 is punched on both banks as in Fig. 52. You have Camera 1 showing on the line monitor. If you move the fader bar to the lower position, you still have Camera 1 on the line monitor. (See Fig. 53.) Suppose now you push Camera 2 on the upper bank. That won't change anything on the line monitor as shown in Fig. 54.
Now, if you move the fader bar to the upper position, the top bank becomes active and Camera 2 shows up on the line monitor.
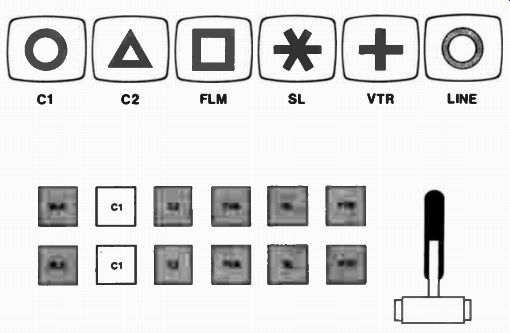
Fig. 53 Fader bar lowered
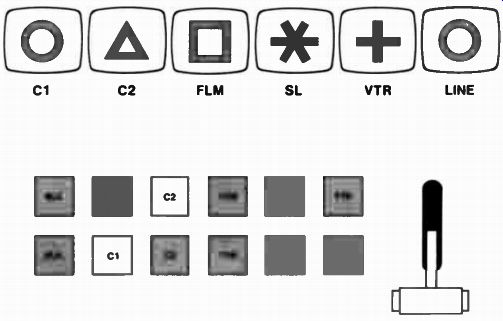
Fig. 54 Ready to dissolve to 2
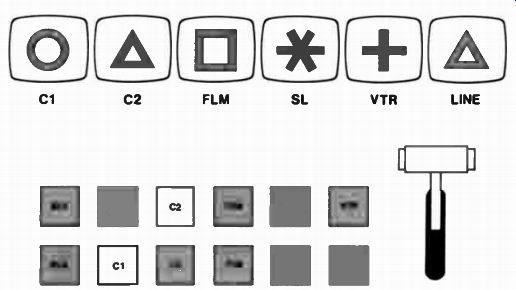
Fig. 55 After dissolving to 2
But what happens as you go from the lower position to the upper position? The scene on the line monitor was Camera 1, and it got dimmer and dimmer. At the same time, Camera 2 very dimly appeared and got brighter and brighter. It's as if one picture was dissolving away while another was "dissolving" in.
Hence, this kind of picture change is called a dissolve. When the fader bar is halfway between the two banks, you see one picture superimposed over the other. This is called a super, which will sometimes be useful to you. Remember though, you can "see through" a super; if a hand is supered over a face, you can still see all the features of the face.
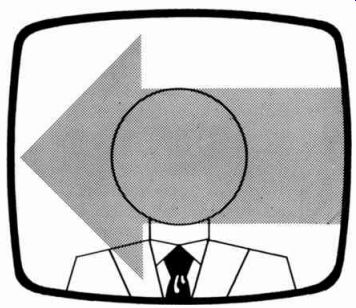
Fig. 56 A super
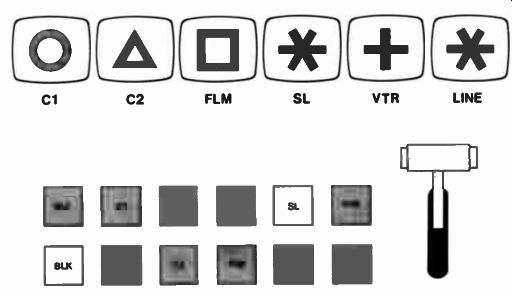
Fig. 57 Slide on line
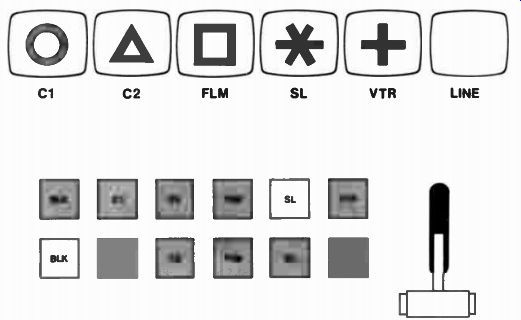
Fig. 58 Faded to black
There's one other picture change, much like a dissolve, that we will use. Look at Fig. 57. If you move the fader bar to the lower position so black is on the line monitor, the picture from the slide will slowly fade away to be replaced by-nothing. This change into black is called a fade. The reverse, moving from black to a source, is also a fade. In the first in stance, you are fading from a slide to black, and in the second you are fading from black to Camera 1. It's this move, a fade, which gives the fader bar its name.
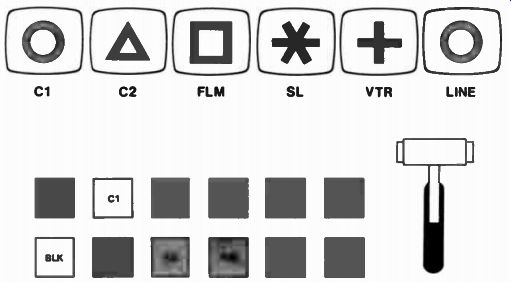
Fig. 59 Faded up on 1
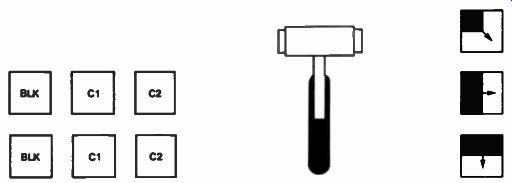
Fig. 60 Special effects buttons
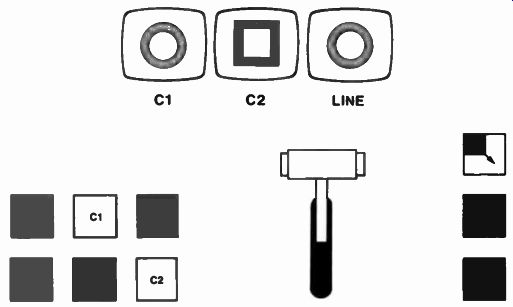
Fig. 61 Ready for a corner wipe
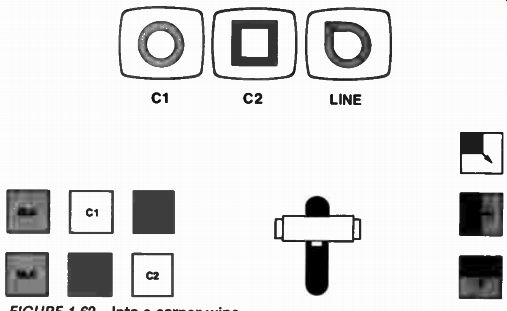
Fig. 62 Into a corner wipe
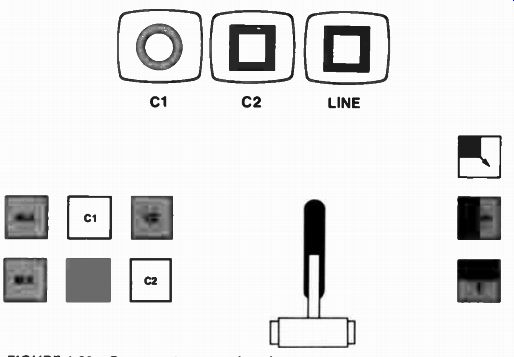
Fig. 63 Corner wipe completed
The basic switcher, then, has two banks, buttons for a variety of video sources, including black, and a fader bar to get from one bank to another. You can change the picture on the line monitor (which is the output of your studio and control room) by cutting, dissolving, or fading.
Now let us add some sophisticated equipment which lets us electronically change our pictures. Simplest of all are wipes.
We know we can go from one video source to another by cuts or dissolves, but there are also decorative and sometimes functional ways to go between sources. For example, suppose your switcher looks like Fig. 60. Those three buttons on the side show you what sort of picture change you will get.
Suppose you push the buttons illustrated in Fig. 61. Be cause the fader bar is at the top, the line monitor will show Camera 1. Now move the fader bar toward the bottom and watch what happen in Fig. 62. The picture from Camera 2 starts to come into the upper left corner in exactly the pattern shown on that top button of the column of three. The farther you move the fader bar, the more that corner moves over the picture from Camera 1 until finally, with the fader bar all the way at the bottom, the corner fills the whole screen and you see only Camera 2's shot.
You have wiped Camera 2 over Camera 1. Push the fader bars back to the top and the corner retreats, revealing Camera 1 again. Likewise, the other buttons in the column of three give you wipes moving down across the screen or from left to right across the screen.
Obviously, there are other shapes which you can have for wipes-stars, circles, checkerboards, etc., but they all work on this same principle. Often, too, you will find an extra switch which makes the wipes always go in the same direction. That is, in our example above, the corner descended from the upper left and showed Camera 2. With this extra switch thrown, even though you move the fader bars from the bottom bank to the top, Camera 1 would reappear in a corner descending from the upper left instead of being revealed by a retreating corner. Obviously, too, you can have many more buttons and many more video sources, and they can all be put into wipes like these. A word of warning here. Use a wipe only if you have a good reason. An example might be a shot of a pitcher with a corner inserted at the upper right to show a runner off first base. But without a reason, wipes look phony and are clearly gimmicks.
Next let's look at mats and keys. First, though, remember what a super is. It shows two pictures at once but lets you see through the elements of each. Suppose you have a shot on Camera 1 of a man whose name is unknown to the audience.
And suppose you have a slide with his name on it. You can super one over the other as illustrated in Fig. 64. But notice you see the man showing through the letters of his name. There are devices to get around that. First let's consider a matt.
Notice in Fig. 65 we have no fader bar, but we have the addition of several new buttons and dials. This is a special portion of the switcher, called the special effects board. To get a matt, we push the button labeled "mat" and the shot of the man on Camera 1 and the name on "S1." Now, instead of getting things showing through, we get clear, solid letters over the man, completely blanking out whatever is behind them. All this is done electronically. We control it by turning the knobs labeled "Key Sense," "Intensity," "Saturation," and " Hue." First let's turn "Key Sense." Notice the letters will disappear or spread out like blotted ink to cover the whole picture. Set "Key Sense" to get the clearest letters. Next turn "Intensity." The letters go from very dark to gleaming white. Now turn "Saturation." The letters go from a muddy black to a very vivid color.
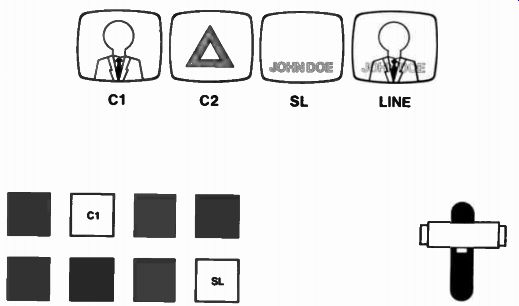
Fig. 64 A name supered
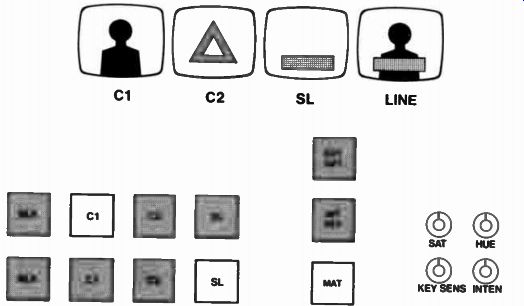
Fig. 65 A name matted in
Turn " Hue" and you can change that color. By manipulating these last three knobs, you can make the letters any color you want. (On black and white equipment, you can only change the letters from black through shades of gray to white and so will not have the knobs for saturation and hue.) But you get clear letters with nothing showing through, and that's better than a super. Quite often, though, the edges of a matt "fry." Look closely and the edges of the letters appear to be moving back and forth. To avoid this, we can use an internal key.
The internal key is set up exactly the same way as a matt except you push the "int key" button instead of "mat." Again, key sense controls how clear the letters are. But in this in stance, saturation, hue, and intensity have no effect on the letters. The letters are exactly the color they are on the slide, but the edges are clean, stable, and unmoving. That's an ad vantage, but now you can't change colors. You gain a little, you lose a little.
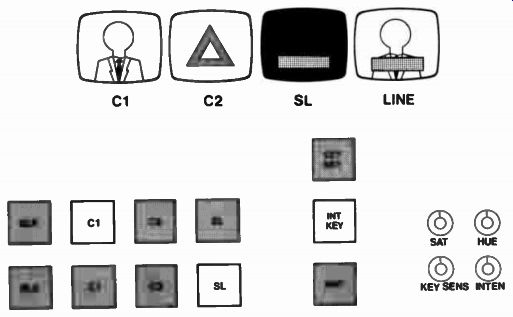
Fig. 66 A name keyed in
It's time for a pause to discuss the "name" slide. First of all, it must be white letters on black. In a pinch, I'll admit a very dark background with very light letters will work, but not as well as white on black. You need white letters because electronically the black is being ignored or dropped out. Once it's gone, an other picture can come through where it was, but not where the white letters still are. That way you get clear titling.
Now back to the keys. You noticed the "int key"-"ext key" difference. We have done something with internal key, but what does it mean? This special effect uses material "internal" to its closed world of person and name slide; it uses those two video sources and that's all. External key adds something "external" to that set-up. Let's see what. And to do that, we need another bank.
In Fig. 67, as before, we have the letters over the man, but now we have something new showing in the letters. By adding a third bank, a place where we can push another button without losing those already pushed, we add an "external" element to the picture. In this case Camera 2 shows up in the letters. We took away the black to let the person show through.
Now we are taking away the white of the letters to let some thing else show through. We didn't take away the shape of the letters, just their color. And as you add more buttons, you can show more things in the letters. Suppose you have a host introducing a movie. Suppose you have "MOVIE" on a slide with the "0" all filled in with white. Push the buttons as in Fig. 68 and the movie itself will show through the "0" of the word.
Remember, though, only that portion of the movie which is on the "0" portion of the screen will show; you won't see the whole movie picture.
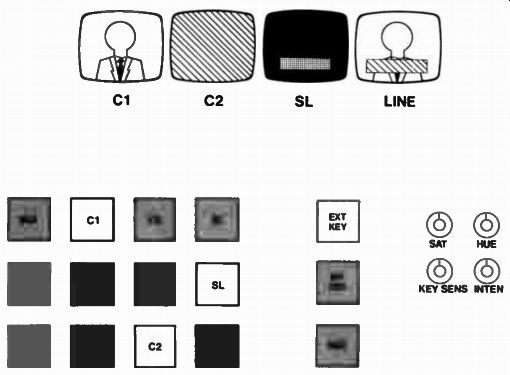
Fig. 67 Another sort of key
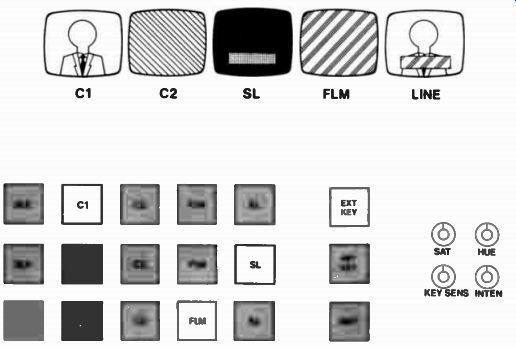
Fig. 68 A use for external keying
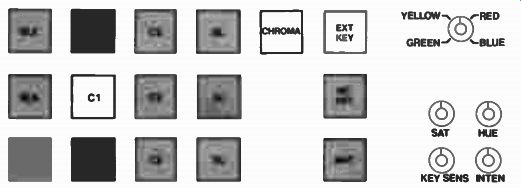
Fig. 69 Chroma-key

Fig. 70 Monitors in chroma-key
What if you had a person against a black background? Could you drop out the black and thus make the person look like s/he was in front of some scene? Yes, you can, but in color television, we find it easier to work from a color other than black. And that brings me to the last of our special effects.
Chroma-key is, as you can guess, a type of key, an external key to be exact, that deals with color. It is a way to remove any color you want from the scene so something else can be inserted. Quite often you need a special button to activate it, so let's add a "Chroma" button and see how it's set up.
First, we push "ext key," as it is an external key. Next we activate chroma key by pushing the "Chroma" button. Then we push "Camera 1" on the middle bank, if that's the camera on which we will lose a color. Adjust the key sense knob so the color is cleanly taken out. Right now we are in a very similar position to an external key when the white of the letters has been removed but nothing put in its place. We have a scene with some things saved and some shapes saved. The monitors might look like Fig. 70. Now when we push "Camera 2" on that lowest bank; that's like adding something into those empty letter shapes of a normal external key. Here, however, it goes into the space where we've taken a color out. Now the monitors look like Fig. 71.

Fig. 71 Final chroma-key effect
How about that extra knob in Fig. 69 pointing to blue? That's where we pick the color we want to lose, and generally we pick blue because there will be less blue in the picture than any other color. As a matter of fact, only 11 percent of the camera's response is blue, while 59 percent is green and 30 percent is red. And since every item of the color we choose will disappear, including clothing or eyes, we want to disturb the picture as little as possible. Blue, then, works best. If you choose red, and a redhead walks on the scene . . . . Those are the basic effects of a switcher. One problem re mains. Fig. 72 shows the basic switcher from Fig. 51.

FIG. 72 A switcher How do we get to these special effects, and where do
they come from? We have to add a button for "Effects," and a whole
other board to handle all the effects. It might look like Fig. 74.
Normally, we would work off the lower two banks, but for an effect, we would push the effect button and then we would get whatever was set on the effect board. Wipes would be con trolled by the fader bar on the effects board; keys and matts would be controlled by the buttons and knobs to the right of the three banks of buttons. If we add an effects button to the effects board, and add another effects board, we could set up an effect within an effect. Such a switcher is called a double re entry switcher. As we increase the number of buttons and sources and boards, you can see we can increase the functions of the total switcher till it gets too big for anyone to handle.
But it all works off the basic ideas we have talked over here.
One last word about monitors. You will, of course, have one for each video source. But what of special effects? You will also have one called "preview," and on it you can look at the effect you have set up and see if it's really what you want.
Always check an effect on a preview monitor before you put it on the line.

Fig. 73 During the news
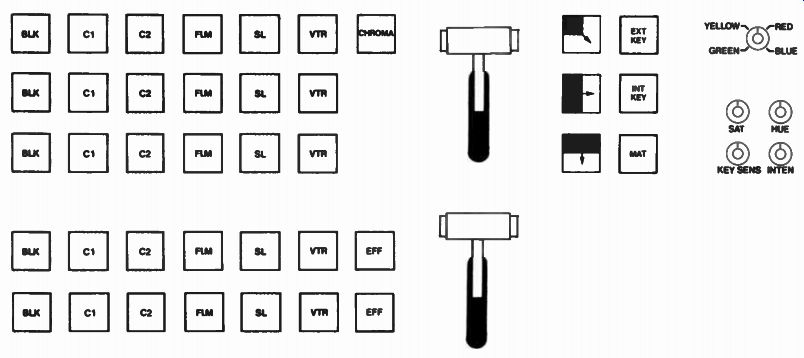
Fig. 74 A full board
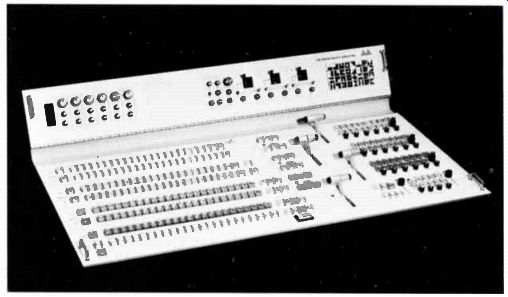
Fig. 75 A complex video switcher
We have, of course, been discussing a general situation.
Not all switchers will be arranged as I have shown. Some will have special capabilities not touched on here. Not all control rooms will have the monitors I have mentioned. Yet every where the ideas will remain the same. Know the ideas and you can master any switcher you encounter.
The switcher, however, deals only with video, and that's only half the story. Audio is vitally important to the television personnel. To understand how important, think back to times when the sound has gone out during one of your favorite television shows. You can't really follow what's happening. If the picture goes and you can still hear, you can stay up with the story line and know where you are when the picture returns. So the audio console in the television control room is a very important piece of equipment.
THE AUDIO CONSOLE
Everything you find out about audio for radio can be used in television. I can add a few things that are seldom used in radio, but audio remains pretty much the same in both fields. You will still be concerned with a clear, true pick-up and with the proper mike for the particular condition. You will still be using an audio control panel like the one in radio. So instead of duplicating the material from radio, let's assume you can refer to it and go on from there.
As audio person, it's your responsibility to run down the script and determine what your sound sources are. You will have people in the studio, a theme on a record or a cart, per haps something on reel to reel tape, a constant tone on one pot by which you can set the levels of your VU meters, and one thing you don't have in radio. That's the sound track from VTR or films. But that's like any other recording; it comes in on a particular pot and you handle it just like all other sounds. So once you determine what your sound sources are, it's up to you to get ready to handle them. You'll cue up the records, check levels for carts, and set all the right switches on your board.
The people in the studio need mikes, just as in radio, so you have to get the proper ones and place them properly.
It's in the placement that television generally differs from radio. In radio it doesn't matter where the mikes go, so long as they pick up the sound properly. In television, you sometimes have to worry about the mikes not being seen at all, and you always have to worry about whether or not the appearance of mikes will look bad. Viewers are quite used to seeing mikes on desks during talk shows and newscasts. They are also used to seeing people like singers and reporters holding mikes. Even the lavalier mike is accepted around the necks of hostesses on women's shows or personalities being interviewed. But in a drama or a comedy, the viewers don't expect to see guests sitting at a dinner table and trying to keep lavaliers from falling in the food. So let's talk first about the mikes you don't see, and then about those you do.
By looking at the script (if you don't know before that) you can tell if you are working on the type of show where you have to hide the mikes. If this is a big dramatic presentation, you may have to work with the set designer some days before the rehearsals start just to find places for mikes. A flower pot may be specially designed to hold a mike. A pile of books on an end table may cover a mike. A mike may be attached to a side of a window which always faces away from the cameras. Each set presents its unique places, and it's up to you and the set designer to find them. These places, of course, must be near the action or the words will sound distant and muffled. As the action moves around, there have to be other mikes close enough to pick up the changing sound patterns. That's no easy trick, so you may use a boom mike. Here you have what seems the perfect answer. It's a movable mike, capable of following the actors wherever they go. What if they go in opposite directions? Then maybe you need two booms. That's awkward, and hard to manage in the congested space of a studio in production. And what if the major actor moves to a spot where the long arm of the boom is between him and a light? He ends up with this long horizontal shadow across his face. Boom shadows are probably the biggest disadvantage. They always fall in places you don't want. There are ways to handle the shadows, and sometimes they work well enough even if not perfectly. One way is to bring the boom straight in from in front of the set. That way the shadow can be avoided by a simple step to the right or left.
If the boom comes in from the side, an actor has to move a long way forward or backward to get out of its shadow, and that's seldom possible. Another way is to have the lights up high, particularly the ones causing the shadow. That puts the shadow down on the floor instead of up on the set. Usually only one or two lights really give you bad shadow problems, so they can often be raised. Sometimes, though, they are your major lights and simply can't be budged. Then you have no choice but to move the boom. Or move the set. Move the set, though, and you'll probably have to change the lighting.
So as audio person, you'll have to work closely with the set designer and the lighting crew to get exactly what you want, or at least something close to what you want. Sometimes, in desperation or in a rush, you will end up throwing an omni directional mike like a lavalier over the light grid and letting it hang down to pick up whatever sound is below it. That does create a sort of cone of sound for that mike. The only problem is that this arrangement picks up every sound in the cone. Feet shuffling on the floor, pencils rolling on desk tops, script pages turning, and sometimes the sounds of cameras and the floor manager moving around. So if you have to use this set-up, tell everyone and warn them to be extra quiet.
Now what about the mikes you do see? Most often, you will be using a lavalier. These mikes either hang from a cord around the neck or have a small clip for fastening them to clothing.
The major point to remember is to keep the mike from rubbing against clothing and to keep the cord from swinging free. Both movements will create strange, loud sounds like static. You may have to tie a knot in the cord so as to make the mike hang higher, or clip it to a different piece of clothing, but keep it away from coat lapels, neck scarves, and so on. Then tuck the cord under a belt or even fasten it with masking tape behind the performer's back to keep the cord from swinging. Also, don't put the mike under any layers of clothing. This lets the clothing rub over the mike and make noises, and it muffles the sound.
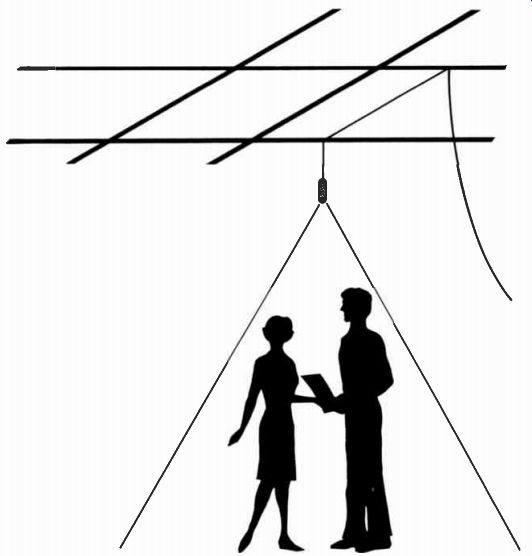
Fig. 76 A cone of sound
Other mikes which are visible are desk mikes and hand mikes. The desk mike should be off to one side and low so as not to be distracting, but not so far away that you can't pick up sounds. When you're placing the desk mikes, think about which way the performer will face when s/he talks, not about where the front of the set is. Quite often the performer will be talking to someone at the side and not out to the front of the set. So the mike should go off to the side. Hand mikes don't present you with this problem, as the performer holds them. If your talent is inexperienced, you'll want to explain how to hold the mike and where to point it and how far away to hold it.
But generally its use is so obvious you'll have no problems.
If you are placing mikes for a performer who won't be holding them, that's generally because s/he is fairly static but with both hands occupied, for instance with playing a guitar.
Think about where the sound comes from. You'll need a mike pointed at a singer's mouth, and you'll need one pointed at the hole of the guitar. Don't be misled by instruments; mikes should go where the sound comes from. The keys of a piano don't pro duce the sound, the sounding board does, and it's at the back of an upright or underneath a grand. And in general, you'll want a mike for the instrument and a mike for the performer. That way you can balance the two for the clearest sound. In placing mikes around a performer, talk with the director. You don't want a mike and its stand right across one of the key shots.
Support for a mike can generally be angled a dozen different ways so as to clear the shot s/he wants.
Here's a simple word of warning-be sure you know which outlets the various mikes are plugged into. That saves you a lot of trouble when you get back in the control room.
Once all your mikes are out and all the other sound sources are figured out, you'll want to get levels. Over the headset or over a studio loudspeaker, ask a particular person to say some thing or to play something. Open that one mike and set a level.
Then go on to the next. Be sure you check them all because you know the one you don't check will be the one that isn't working. When you ask people to say something, stop them if they start to count. That won't give you the same level as talking. Insist they talk. You'll get very tired of hearing people ask, "But what do you want me to say?" but try to bear up. Tell them to recite a poem they know or repeat part of the Gettysburg Address. Generally, mike checks like this will be a bit softer than they will be on the air. But you can make adjustments to compensate for that in the rehearsal. If you have a lot of mikes and other sound sources, you may want to write down the pot number, what that pot controls, and what the level set tings should be. This can be particularly useful if you have three different records to work with, and each one runs at a different level. Jot down what each level is, and you can cue the right one up at the correct level much faster. Also, if for some reason you take a mike under, you don't have to remember what the original level was. You can just look at your list. That's an ad vantage when you have fifteen other things to think about and remember.
Most of the concern in the control room will be with the audio console and the video switcher. These two, after all, control the great bulk of the program. But an absolutely in dispensable addition is the film island. It's called an island be cause it's off separated from everything else. From that island you can run slides or motion pictures to add to the events you are seeing with your studio cameras. You thus have another video input.
PROJECTION
In order to see anything on a television screen, there has to be a television camera involved. So just like the studio cameras, you have a camera to look at slides or film. It isn't mobile, and it doesn't require a cameraperson. First of all, let's look at the set-up for slides.
Television uses 35-mm slides, which are just like the ones your friends have taken on their vacations which show Aunt Tillie in front of the Taj Mahal. As a matter of fact, the slide projector which your friends use to project their slides on a screen is just like the projector used to get slides on a television screen. There is some sort of drum to hold the slides (and the types of drums vary a good deal), a lamp which shines light through the slides, and a lens arrangement to project and focus the image of the slide. The major difference is in where this image goes. Your friends throw this image up on a large screen in front of everyone so the slides can be seen. In television, the image is thrown at a camera. By adjusting both the lens of the projector and the lens of the camera, the image can be focused on the pick-up tubes of the camera. That way you get a good, sharp picture of the slide on a television screen.
Now, it may seem this violates the rule about shining lights into the camera, but remember you have to have a certain amount of light in order for the camera to see. So really, you are always letting light of some sort into the camera. Only straight, undiluted light can injure it, and in this situation we have a slide between the light and the pick-up tubes, so there won't be any injury to the camera.

Fig. 77 A slide chain
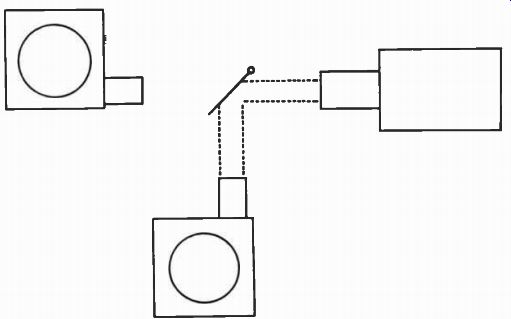
Fig. 78 Mirror for second slide projector
Let's go back to Aunt Tillie. Remember the black on the screen as you friend changed from her picture to the next one of Uncle Fred arguing with the rickshaw driver? In television, you don't want to have that black as you change from one slide to the next. So there is a way to have the second slide all ready to be shown and capable of being put on the air instantly.
Like magic, it's all done with mirrors. Suppose you have one drum showing its slides right into the camera. Put another drum off to one side, put in a mirror at a 45 degree angle across the straight path from the other drum, and suddenly the camera is seeing the slide from the side drum. It's a simple matter now to make the mirror swing in and out of that straight path so the camera sees first the side drum, then the straight drum, then the side drum .. .. All you need is a switch somewhere within easy reach of the director or the technical director, and that mirror can let you see one slide followed immediately by an other. While you are seeing the slide on the straight drum, the side drum can be rotated to the next slide. When you go to the side drum, the straight drum can move to its next slide. So you can have a continuous showing of all the slides in order and have no black on the air in between.
Film works a good deal like the slides. If your friends take home movies, they may show you Aunt Tillie and Uncle Fred falling into the moat of an old castle. The projector they use is very like the projector used in television, but again the image is focused on the camera's pick-up tubes rather than on a screen. The projector will most likely be for 16-mm film at the television stations instead of the 8-mm size of your friend's home movies or the 35-mm (or bigger) size used at the local movie house. There's little reason why television stations couldn't use other sizes as far as technical considerations of projectors go, but larger film is too expensive and smaller film doesn't always give as clear a picture. So most stations use 16-mm film.
There's one further difference between projectors for television and those for home use.
The ones at home (and in movie houses, for that matter)
show you twenty-four pictures in one second. But for television, since our electricity works on sixty cycles a second, we have to use a number related to sixty. The projectors, then, have to be rigged to change from twenty-four to sixty. Now follow closely, because here's how they do it. They show the first picture for a sixtieth of a second. Then they show that same picture again for a sixtieth of a second. Then they show the second picture for a sixtieth of a second, again for a sixtieth of a second, and a third time for a sixtieth of a second. That's two pictures shown for five-sixtieths of a second. Then the cycle starts all over again-twice, then three times, twice, then three times. You can get twelve packages of five-sixtieths of a second into a full sixty-sixtieths of a second (one second), and each of the twelve packages has two pictures in it, so you get twenty-four pictures into a second cut up into sixtieths. Neat, but not simple. So home projectors won't work perfectly in television. If you bring one into the studio, show a film, and put a regular camera on the image, you'll get funny bars and black showing on the television picture. Put the film on a television projector, and everything's fine.
Suppose you want to show a full-length movie on television.
It may very well be on three or four separate reels. You can do one of two things to cover the time when you run out of one reel, take it down, and load up the next one. You can cover by breaking for a commercial, or by going to the host in the studio who ad libs till you are ready, or even by punching up a slide which says, "We'll be right back . . . ." Obviously, there are times when you won't want to cover with anything. So the best thing is to go back to "magic"-put in mirrors. Then you can, just like with the slides, go directly to another projector which already has the next reel loaded and set.
The mirrors, just like the projectors, are special for television, both for the slides and the projectors. Most mirrors have the reflective silver coating on the back of the glass be cause that protects it from scratches, smudges, dust, and so on.
But that puts a flat surface between the silver and the viewer, and that flat surface is the front of the glass itself. The glass surface can reflect some images you don't want in television, so the mirrors are silvered on the front. That exposes them to damage pretty easily, so you want to be extra careful around them. With front-silvered mirrors, you get only one image but you have to clean them carefully, keep objects away from them that might scratch them, etc.
I haven't said anything yet about how to load slides or film because I can only speak generally. Slide drums and film projectors work in similar ways, but each model seems somewhat different from the next. Generally, though, slides need to be turned upside down and backwards before they go in the drum.

Fig. 79 Film
Film is a bit more complex. Those holes in one side of the film are called sprocket holes, and they fit over toothed wheels on the projector.
First the film comes down off the feed reel. Then it goes to a toothed wheel, is locked onto it with a cover, makes a loop, goes behind the lens, makes another loop, goes over another toothed wheel, goes down to a sound head (to pick up the audio), then to a last toothed wheel, then around to a take-up reel. The crucial spots are the loops before and after the lens, and the distance from the lens to the sound head. On 16-mm film, the sound track is twenty-six frames (small pictures) ahead of the action. So while the action is at the lens, the sound has to be exactly twenty-six frames ahead of it at the sound head.
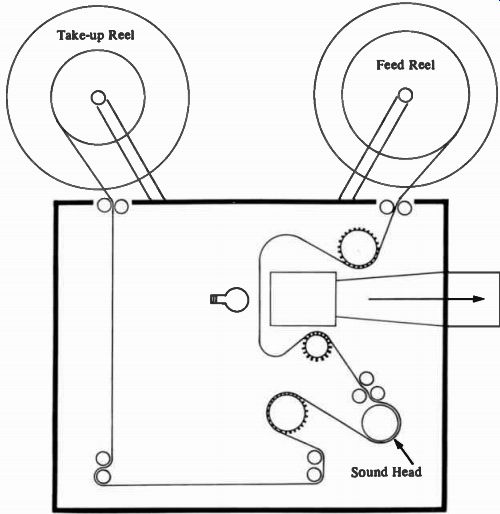
Fig. 80 Projector and film path
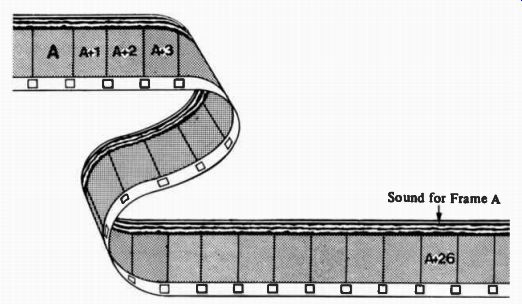
Fig. 81 Sound on film
If the sound is twenty or thirty frames away from the action, you get lips moving with different sounds coming out. We've all seen that and know how silly it looks and how distracting it is. So that twenty-six-frame distance is very important, and each projector will have some method to get exactly twenty-six frames from lens to sound head. As to those loops I mentioned, they can be of differing sizes as their purpose is to add some slack to the film. Film doesn't pass smoothly behind the lens, but moves down in jumps, one frame at a time, so you need some slack to allow for the jumps. Without these loops, the film pulls, gets scratched, or even tears. It can also jump on the air, giving that blurred, up-and-down jumble we have all seen from our local stations.
There's one other thing to mention about film. You have seen those countdown numbers before a film starts. That's called academy leader, and it gives you a visual reading of how many seconds till the picture starts. Generally, the director will have the film stopped on 3 or 4 so s/he knows s/he has to roll the film three or four seconds before s/he wants it on the air.
That's to allow the projector to get up to speed so the sound and picture match up. The point is to roll the film and not put it on the air till the numbers disappear, which they do at 2.
Then you know the film is up to speed.
Film isn't the only source of moving pictures that you have.
Video-tape provides the same sort of thing, but in a different way. It, like film, is another video input you can use, so let's talk about what it is and how it works.
VIDEOTAPE
A videotape machine works a lot like an audiotape machine- it uses bits of rust glued on a long strip of plastic to remember both pictures and sound and reproduce them later. I don't sup pose anyone in his right mind can tell you why this works.
They can give you all sorts of information about oxide particles and impulses and magnetic fields, but the fact remains that you get full-color pictures and high-fidelity sound out of bits of rust, glue, and plastic. The "how" it works is easy; the "why" is nearly impossible.
That's OK though, because all we need to know is the "how." The "why" might satisfy our curiosity, but the videotape will go on giving us pictures and sound whether or not we know why. So let's talk about "how." Videotape looks a lot like audiotape, except it's generally wider. Some systems have been designed that work off the one-quarter-inch tape we generally think of as audiotape, but the pictures aren't the world's best. They can't be used for broadcasting because they simply do not have enough clarity, Someday maybe they will, but not now. The size of tape for broadcast quality is now generally considered to be two inches.
For years that has been the standard size in the industry be cause that much tape was needed to get sufficient information recorded to allow a good picture to be reproduced. It's like writing home for money. If you're limited to two words ("Send money."), your parents probably won't get the full picture and probably won't send you any. But if you write a complete letter telling all your problems, they may see what you're talking about and send you at least some of what you need. So with videotape, a certain amount of information just plain needs a certain amount of space. Suppose, though, both you and your parents had some sort of magnifying device so you could write on smaller pages and still get as much information across.
You'd get the same reaction but use less space. Videotape is developing the same way. More and more, ways are being found to put the essential information on one-inch tape. Lots of places, including some broadcast operations, are using one-inch tape now. It's less bulky, easier to store, and just as useful. So you will probably work with both sizes. And you will undoubtedly encounter three-quarter-inch and maybe even one half-inch tape. Three-quarter-inch tape is being used in video cassettes for fast recording of news events. These video cassettes are boxes of small lengths of video tape, generally enough to run for several minutes, although cassettes running a half hour, or even longer, are also common. The entire cassette slips into a recorder so you don't have to thread the tape through any long pattern. Once the recorder is loaded with a cassette, all you have to do is punch buttons to get it to run, to record, to playback, and so on. These three-quarter-inch and one-half-inch sizes of tape don't give you room enough to get as high a quality picture as two-inch tape; but various additional machines in the system, like processing amplifiers, will allow you to broadcast from a three-quarter-inch cassette, and the home viewer won't be able to tell the difference. Besides, the recorder for cassettes can be much smaller and lighter than anything used for two-inch tape. News can now use this size of videotape as well as film. Someday, you may even find one-quarter-inch tape good enough, or one-eighth-inch, or . . . . But right now, you will most likely face two-inch, one-inch, and three-quarter-inch tape.
What is videotape? It's a thin strip of plastic with oxidized metal particles glued to one side. When it is on a recorder, it passes by magnets which rearrange those particles into certain patterns. At one point, the magnets rearrange to create an electronic representation of a picture, and at another point, the magnets rearrange to create an electronic representation of sound. So videotape is a way to save certain patterns of metal particles. It's these patterns that can cause electricity to be varied and modified later on, and these modifications can create the pictures and sound we want. Now we have the metal particles, the magnets to put particles in patterns, and a machine to pass the particles by the magnets. What else do we need? We need pictures and sound coming into the machine. The cameras and mikes turn what we see and hear into electrical signals which are varied and modified as the pictures and sound change. If we send those modified electrical signals into the machine, it can get the signals to the magnets, which can then use the modifications to make the patterns in the metal particles. Later, if we do that in reverse, the patterns in the metal will make the magnets modify an electrical signal so it can affect something very like a camera (but at this point called a receiver) to create the pictures and sound we originally had in the studio. It's all very neat, even if it is incredible.
The upshot is that a videotape recorder will store pictures and sound on videotape and will reproduce those pictures and sound when the videotape is played back on the recorder. As you might guess, the machine is pretty sensitive and has a lot of fine adjustments. Changes in temperature and humidity affect it, kicking it in the side affects it, and dirt affects it.
Tobacco smoke puts particles in the air which settle on delicate parts and mess up reactions. Bits of metal oxide from the tape get rubbed off on the magnets and cause them to make bad patterns. So you need to respect the machine itself and the room where it operates. Keep the place clean, keep it cool, and keep it relatively dry. The magnets are located in the recording heads, so clean the heads every so often. Keep the tapes away from heat and dust and other magnets. Since the patterns were put on by magnets, any other magnet can re arrange the patterns. If you put a tape near a magnet, you will lose some of the picture and sound you need. It sounds easy to avoid magnets, but remember that every electrical current flow creates a magnetic field. Even around a light cord there will be a weak magnetic field. So you want to be sure you store tapes away from main power lines or heavy pieces of electrical equipment. The weak fields around light cords won't do much, but it's safer to avoid them anyway.
Now comes the question of what to put on that tape. Obviously, you will want to put on something worth saving. It may be a show to be aired later, or it may be a commercial, or it may be a bit of material which will be used as part of a live show later on. In all of these cases, you simply have a reel of tape on the recorder, start the recorder, do your bit, then stop the recorder. Those are the bare bones, but what about the flesh? Suppose you are recording a thirty-second commercial to be aired over and over on your station. The reel of tape is on the machine, an engineer is standing by waiting to start the machine and be sure it's recording properly, and you have a studio full of people who know what to do to make an advertisement for underarm neatness.
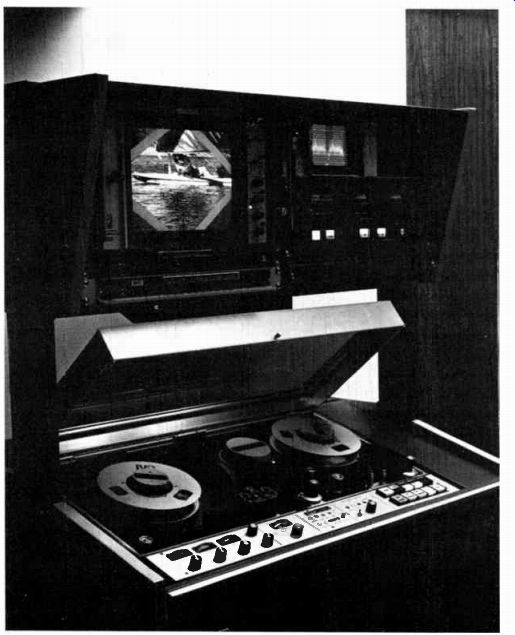
Fig. 82 A videotape recorder.
What do you do first? You ask the engineer to start the machine recording. When s/he says it's recording, you put what are called bars and tone on the line. Bars are a series of differently colored bars making up a picture you can put on the line. These bars look different to an engineer; s/he sets the adjustments of the recorder to certain points judging by how those bars look technically. S/he does the same thing with tone. Tone is an audio signal of a certain loudness which s/he needs in order to set adjustments. So both bars and tone are references for the engineer-points s/he refers to in making sure everything is running right. So the first thing recorded on the tape is a certain time period of bars and tone. When the tape is played back, this time period lets an engineer get adjustments that match those used in recording. That way, every thing works together.
The next thing you put on is slate. The purpose of slate is to identify the subject matter so an engineer later doesn't have to watch the whole recording to be sure s/he has the right one.
So slate is a listing of the title (or content), the director's name, the date recorded, and whatever else may be pertinent, like the time the recording lasts. In this example, that's thirty seconds. Where does slate come from? It may be a formal piece of equipment on which this information is written, or it may be as informal as a piece of paper with everything on it.
You get it on the recording by having a camera shoot a picture of it. Quite often, slate is accompanied by a sound of someone counting backward from eight or so to two. This, too, can be formal and be a flashing number of 8, 7, 6, etc. accompanied by a beep at each number. The point is like that of academy leader in film-it lets you know how many seconds till the picture starts. At 2, as with film, you lose all picture and sound. Then at zero, the commercial, or show, or insert starts. At the end, you have no special series of things to do. You fade to black, kill the audio and ask the engineer to stop the recording. Always be sure you at least get an immediate spot check to see if everything really did get recorded. Machines being what they are, everything can seem perfect but for unknown reasons nothing will be recorded, or it will be recorded badly. If you are doing something short, like our thirty-second commercial, you can watch it all. If you just did an hour show, you may want to check three or four random spots in the show just to see if everything looks right. You can be pretty sure from a random check how the recording went. It's unlikely the machine would stop recording, then start again between the spots you randomly pick.
But suppose something does go wrong. Suppose the ma- chine dropped out of record during a crucial scene. Or suppose part of the set fell over at the end of the show, or you accidentally called for the wrong camera and got a swish pan.
What can you do? You can edit. It used to be people actually cut the tape into pieces, left out the bad part, and pasted the remainder back together. This has a number of drawbacks, not the least of which is its difficulty. Since you can't see a picture on the tape, nor even very clearly the patterns in the metal, it's almost impossible to cut at exactly the right spot. And once the tape is pasted back together, it's thicker where it's joined than any where else. This extra thickness does bad things to the heads.
So a process has been developed that allows you to edit electronically, and no real cutting is involved.
The trick is all in the electronics, because you have to go out of playback at a specific time and into record. You have to save a portion of a scene and that requires playback. Then at a particular instant you have to put something new in the scene, and that requires recording. So somehow the machine has to switch functions in an instant without adding any extra electronic bumps or wobbles. This switchover is done in one of two ways-by assembly editing or by insert editing.
Assembly editing is the assembling of bits and pieces that aren't electronically related. What does that mean? Well, normally a videotape recording has the picture, the sound, and a third part called a control track. That track is like the sprocket holes on film except it's all electronic. Imagine it as a series of beeps evenly spaced. The machine moves the tape along smoothly so a beep comes up every second, let us say. If a beep is slightly over a second in arriving, the machine knows it is running slow and so speeds up the tape. If the beep arrives in less than a second, the machine slows down. Think of a record running too fast, or too slow, and you'll instantly have an idea of what a fast or slow videotape would be like. Now, in assembly editing, the pieces are put together without regard to where the beeps are on the control track.
The pieces weren't made together, so they can't match control tracks or much of anything else. At the spot where the machine changes instantly out of playback and goes into record, it adds a new piece of material with a new control track that may have its beep a second and a half away. After that point, the beeps will come at the normal interval of a second apart, but it's the first one that's rough. It can throw the machine off, the picture can roll, lose color, or any number of bad things. A good machine, a good engineer, and a good bit of planning can minimize these problems; and with a bit of good luck, the initial beep will be very close to the right time. That way, the edit looks fine and the machine doesn't get thrown off.
Insert editing gets around that. Instead of changing totally to record, the machine only changes the video and audio parts into record. That way, the control track remains the same throughout. At the edit point, the machine still has a constant reference of beeps so the picture won't roll, the color won't drop out, and so on. That sounds ideal and makes you wonder why anyone bothers with assembly editing. It's cheaper. The machine that just does assembly editing isn't as complex so it's cheaper. And the edits, if properly done, look just as good.
Assembly editing takes more time and care, but it works well for a lot less money. Of course, if you can afford it, insert editing is preferred. Sometimes you must have it. If you expect to do videotape animation, which is a matter of shooting a number of different scenes in one second, you have to be able to get good edits every time. That's got to be done by insert.
So there are ways to correct mistakes made in taping. Remember that editing takes a lot of time, even if everything goes well. You'll never have enough time for what you do, so try to do as little editing as possible. Never depend on editing to create a show for you.
You don't put any material down on tape spontaneously, fresh out of your head. Some time, someone has to sit down and write out what's supposed to happen. That writing gives you a script.

Fig. 83 Assembly editing