MAKE A PANEL-CUTTING JIG---Can your table saw cut it? Discover how this jig can make your next speaker-building project a breeze.
-------
With the right table-saw setup, you can perform woodworking tasks with much greater ease.
By Bill Fitzmaurice
Over the years I've heard from quite a few readers regarding power tools--most ask how they can build top-quality projects without spending thousands of dollars on tools. A recent inquiry, in particular, wanted to know how to build a DR12 horn in the absence of an eight hundred-dollar table saw, perhaps by having a lumber yard pre-cut the parts.
The problem with that scenario is that my projects involve a lot of "trim-to-fit" steps, so pre-cut parts are not a viable option. The good news is that I do not own an eight-hundred-dollar table saw either, and that you can build just about any cabinetry with a two-to-three-hundred-dollar table saw, or even better, buy a used one for a hundred bucks or so.
This will understandably shock those of you who regularly peruse tool catalogs, knowing that you can easily spend five hundred dollars on a rip fence alone, let alone a saw on which to mount it. But the truth is that even a mediocre saw can turn out perfectly square and true panels of just about any size as long as you have a panel cutting jig. My old trusty jig, after 15 years use and hundreds of projects, needed replacing recently, so I took pictures of the process to show you how you can make what I consider to be the most important piece of equipment in my shop.
JIG CONSTRUCTION
The first step is cutting a piece of ply wood to serve as the jig. I used a piece of ¾” Baltic birch, for its inherent stability, cut to about 3 0 ohm× 4 0 ohm inches. Don't go to any great lengths to make this piece perfectly square--it doesn't mat ter. Alternately, you may opt for ¾” MDF, and for a fancy look maybe even top that MDF with Formica.
The advantage of Baltic birch is that you can cut the runners you'll need from it as well. The runners fit into the two slots that run across the top of your saw table; the standard slot size is ¾ ? wide, ³/8 ? deep. I wouldn't make the runners from standard five- or six-ply ply wood, but ten- or eleven-ply Baltic birch works well. Alternately, you could make the runners from solid wood, preferably a hardwood such as oak.
In any event, cut the runners 3/8” thick, a few inches longer than the length of your jig (Photo 1). Another good reason to use Baltic birch is that nominal ¾” plywood is about 1/64” thinner than advertised, so the runners will slide freely through the slots on the table. If you use ¾” stock, you'll probably need to sand them a bit.
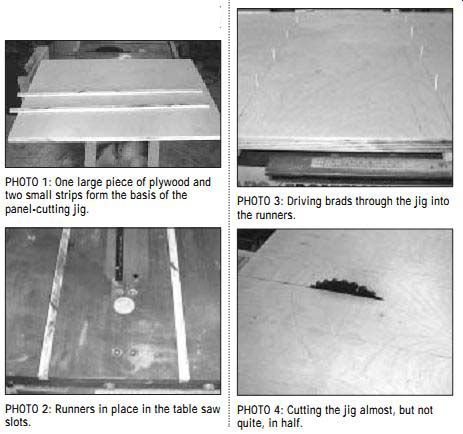
PHOTO 1: One large piece of plywood and two small strips form the basis of the panel-cutting jig. PHOTO 2: Runners in place in the table saw slots. PHOTO 3: Driving brads through the jig into the runners. PHOTO 4: Cutting the jig almost, but not quite, in half.
When you have your runners cut and sanded (if necessary), place them in the slots (Photo 2). Lower the saw blade fully below the table. Run beads of wood glue on top of the runners, place the plywood atop them, and drive 1” brads through the plywood into the runners (Photo 3). The plywood is centered on the saw blade; in the case of a 4 0 ohm wide jig, that leaves 2 0 ohm to either side of the blade.
Remove the jig and raise the blade fully. Start the saw. Place the ends of the runners (these extend a few inches past the jig's leading edge so that you can easily align them with the slots) and slowly push the jig across the table, cutting through the jig to within about 2” of the back end of the jig (Photo 4).
PUSH-BAR
Next comes the push-bar, which must be made of hardwood; I made mine from ¾ " oak, 4” wide by 3 0 ohm long. Mount this at the rear of the jig, screwed and glued to the plywood. Determine its mounting by placing a framing square along the saw blade to derive a perfect right angle to the blade, and clamp the push-bar to the jig so aligned (Photo 5).
Use the clamps to hold the parts in alignment and drive at least six screws from the jig underside into the push bar, pre-drilling and countersinking.
If you happen to have a piece of hard wood at least 2” thick for the push-bar, you're done. If not, you'll need to laminate some more stock to the back of the push-bar to stiffen it further (Photo 6).
Note that the stiffener need not extend the full height of the push-bar, as you end up cutting the lowermost inch or so in the final step, anyway. That final step is to run the jig fully across the blade, cutting partly through the push bar (Photo 7).
USING THE JIG
Using the panel-cutting jig is the utmost in simplicity. Put the part you wish to cut on the jig, one edge firmly against the push-bar, and push the jig across the saw table. The resulting cut will always be at a perfect 90° angle.
You may use the jig for cutting panels as large as 36”× 48” or so. If you need to cut larger panels, just make a bigger jig. But don't reserve it for large parts only; you'll find yourself using the jig any time you need a right-angle cut, no matter how small the piece.
One benefit of the jig is that it allows you to easily square all four sides of a panel, which is critical for fine work.
Plywood these days seldom comes from the factory perfectly squared; four passes atop the panel-cutting jig will give you better-than-factory accuracy. Another benefit is safety.
Those of you who are astute--or perhaps litigious, will note that there is no blade guard on my saw. In fact, you will seldom find a blade guard on any professional's table saw. Accidents happen when digits and limbs come into con tact with blades, and the best way to prevent that is to never handle the piece of wood that you are cutting. Pros always use hold-downs, push-bars, feather-boards, and jigs so that hands never come near blades.
With the panel-cutting jig, you push the jig across the saw, not the work piece. Working with small parts, you may clamp the work-piece to the push bar. You may make perfectly true angled cuts by screwing the work-piece to the jig across the cut line at the correct angle, holding it firmly in place while being cut. You may even cut and square large assemblies with ease (Photo 8). The best part of this project is the cost, easily less than $30. You will achieve accurate cuts better than with even the most expensive rip-fence.
You'll also increase the safety factor of your projects, and you'll be amazed how much faster the measuring and cutting process is compared to using a rip-fence. Precision work does require precision tools, but not necessarily a lot of money to acquire them.
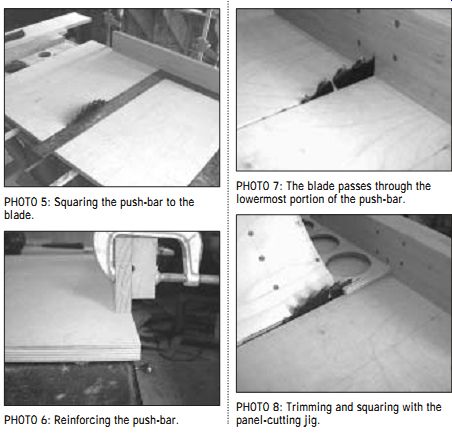
PHOTO 5: Squaring the push-bar to the blade.
PHOTO 6: Reinforcing the push-bar.
PHOTO 7: The blade passes through the lowermost portion of the push-bar.
PHOTO 8: Trimming and squaring with the panel-cutting jig.
-------
Also see: