
Construction details are given for a digital counter that can be programmed to count any number between zero and 15 before resetting.
-J. A. "Sam" Wilson.
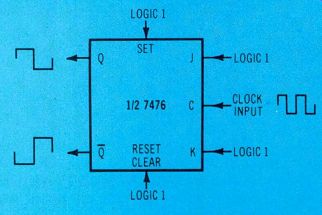
Figure 2 Flip flops in 7476 ICs will toggle when wired with these signals
and logic levels.
[...] or K (or J and K together) is switched to logic 0, the flip flop remains in the high condition, and the clock signal has no effect.
If the SET terminal is switched to logic 0, the flip flop will go to a high condition (Q = 1). It will remain in the high condition so long as the SET terminal has a logic 0.
If the RESET terminal is switched to logic 0, the flip flop will go to a low condition, and remain there until the RESET terminal is changed to a logic 1.
Troubleshooting Question #1
A 7476 toggled flip flop is in the high condition, but the input clock signal has no effect. Which of these terminals might be wired wrong: J; K; SET; or RESET?
Experiment #1
In the circuit of Figure 1, connect all of the SET terminals to logic level 0 (ground or common).
All of the LEDs should be on (high), because the flip flops are in the high condition. Verify that the LEDs are lighted.
Restore the circuit to the original condition for counting.
Experiment #2 Also in the circuit of Figure 1, wire all of the RESET terminals to logic level 0. The flip flops now should be in a low condition, with none of the LEDs lighted. Verify the LED conditions, then restore the circuit to the previous counting condition, Experiment #3.
In the circuit of Figure 1, change the wiring ONLY of the first flip flop K terminal as shown in Figure 3.
Try the switch in both positions and notice what happens to the count. With the switch at the "A" position (a high at the K terminal), the counter should operate normally.
When the switch is changed to the "B" position (a low at the K terminal), all of the flip flops stop counting!
Important Note: With ripple counters, all of the flip flops can be prevented from counting, if counting of the first one is stopped. The second flip flop can't change until the Q terminal of the first flip flop goes from logic 1 to logic 0. Of course, this applies to the down stream flip flops as well.
Programming Ripple Counters
Until this time, the binary counters operated continuously, counting from zero up to 15 and then starting at zero again and counting to 15 again, and so on, as long as the power was applied. (The four binary numbers have values of 8, 4, 2, and 1, so 15 is the limit with four flip flops.) However, by applying some of the basic theory we have learned, we can force the circuit of Figure 1 to count to any number between 1 and 15 before starting over.
Suppose we want the counter to operate to the seven count (0111) and then start over at zero (0000).
It's done by arranging the count of eight (1000) to trigger a RESET of all flip flops.
Troubleshooting Question #2
What logic levels are at the Q terminals in Figure 1, when the counter is displaying the number 8?
Programming a Seven Count
The method shown here to program four toggles to count to 7 and then begin again at zero is not the most simple or the least expensive, but it always will work! Later on, I will show you some other methods.
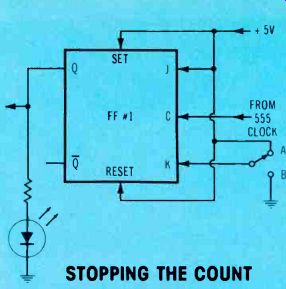
Figure 3. Toggling counts can be stopped by switching J, K, or J-and-K to
logic 0. When the toggling stops, the logic levels remain as they were. In
this example, the K input is switched to A for sequential counting and to
B for a frozen count.

TABLE 1--LOGIC LEVELS FOR THE CIRCUIT OF FIGURE 4.
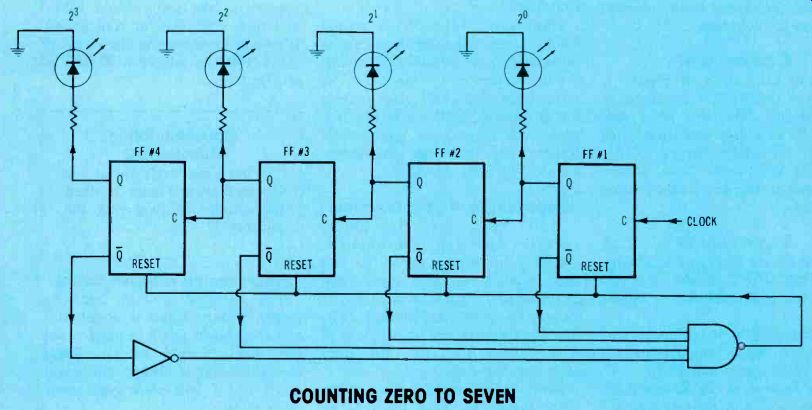
Figure 4. Addition of a 4-input NAND to control the RESET state allows the
circuit to count to 7, reset to zero, count to 7 again, etc. When all of
the NAND inputs are high at the count of 8, the output of the NAND at the
RESET terminals goes low, thus resetting all 4 binary digits to 0.
Remember that a display of zero (logic 0000) can be obtained at any time by delivering a logic 0 simultaneously to ALL of the flip flop RESET terminals. Also, a NAND gate has a logic 0 output, when all of the inputs have a logic 1.
Combining these two statements points to a possible solution (see Figure 4). When the count is 8, the Q terminals have logic 1000. And, you know from Troubleshooting Question #2 that the Q logic levels are 0111. Therefore, the required four input highs for the NAND can be obtained from the Q outputs of FF#1, FF#2, and FF#3 plus the inverted Q output of FF#4.
When the counter advances one count beyond 7, the LEDs normally would light to show an 8 (1000 at the LEDs). But, at the 8 count, all four NAND inputs are high (1111), so the NAND output delivers a low to all of the RESET terminals. This clears the 4 flip flops to low outputs (0000) almost instantaneously-so rapidly in fact, that the LED read out does not show a 1000 readout for number 8.
Since the flip flops have been stopped at low outputs by the RESET low, the counting can't begin until the RESET terminal is brought high. The NAND inputs (for the 0000 zero count) are 0111; therefore, the NAND immediately changes to a high output, and the zero count is brought step by step up to seven, where on the next count it is reset back to zero.
This description covers slightly more than one complete counting cycle, and the cycles continue until the power is removed.
Table 1 shows the logic levels in the Figure 3 circuit, proving that only the eight count has a low output from the NAND, which is necessary to reset the counting back to zero.
Also, notice that the Q output column counts down from 15 to 8, while the Q output (and LEDs) count up from 0 to 7. The same circuit could be used for a 15-to -8 countdown, if the LEDs were connected to the Q outputs.
Simplifying the circuit In Figure 4, a minor change can eliminate the inverter (NOT gate).
We know that the Q output digital level is always opposite the level at the Q output, and vice versa. Therefore, we can wire the fourth NAND input direct to the Q output of FF#4, instead of to the Q output through an inverter (see Figure 5). In other words, the internal inverter of the flip flop is used instead of the external one.
Incidentally, there's an easy way of changing the wiring slightly so the NAND is not needed for counting to 7 and resetting. How ever, there's a serious limitation.
Can you figure it out before next month?
Troubleshooting Question #3
Suppose you are testing the circuit of Figure 5, but instead of resetting after the 7 count, it counts to 15 before reset ting. Which is likely to be the cause of the malfunction: (1) a defective flip flop; (2) an incorrect clock signal; or (3) a defective NAND? Experiment #4 When a counter is not functioning properly, it's often easier to locate the problem by stepping the counter slowly one digit at a time while a logic probe measures the various highs and lows. However, the contact bounce of conventional switches sometimes obscures the results by adding extra unwanted pulses.
To obtain single logic changes, a bounceless switch (Figure 6) re places the clock signal.
Follow this method of advancing the counter manually:
Construct the bounceless switch of Figure 6.
Use a logic probe to verify the high and low outputs obtained when the switch is operated.
If your probe can identify glitches, then verify that the output has no glitches.
In Figure 5, disconnect the clock signal from the FF#1 clock input, and connect the output of the bounceless switch to the clock input.
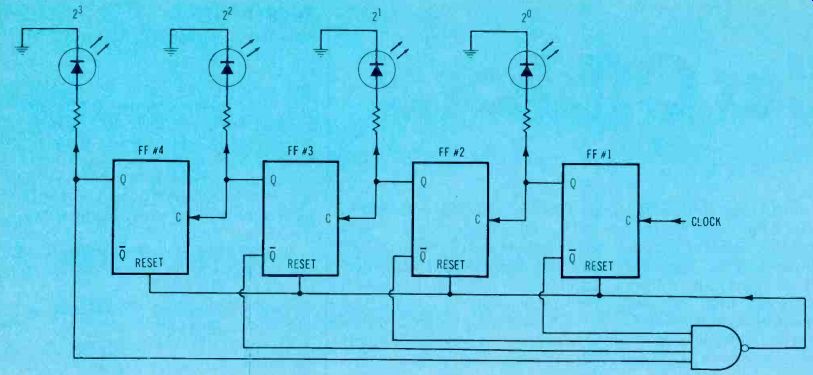
Figure 5. The NOT gate of Figure 4 can be eliminated by taking the NAND
input from the 0 output of FF#4, rather than from the Q output through the
NOT.
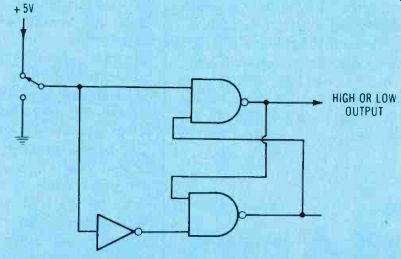
Figure 6. Build this bounceless switch (actually a D-latch) to advance the
counting circuit manually.
Operate the bounceless switch slowly to step the counter. Observe that the count changes when the bounceless switch output goes from logic 1 to logic 0, as is typical of TTL devices. (Use your logic probe to determine when the high-to-low transition takes place.)
Open the output circuit of the NAND, and connect the RESET leads to a permanent high (the +5-volt supply). This eliminates the resetting after the 7 count, and the counter will count to 15, and then repeat. Beginning with zero count, step the counter with the bounceless switch and notice that the NAND output is high until the count reaches 8. At that point, the NAND output should go low. This is normal operation. (If you were troubleshooting a defective counter, any wrong responses would indicate a bad NAND, or improper inputs to the NAND. Check the inputs with the logic probe.)
Reconnect the counter for the zero-through-7 count.
Use the squarewave output of the 555 timer circuit to operate the counter at about one count-change per second, and observe the count.
It should count up to 7, reset to 0 count, and then count up to 7, etc.
Experiment #5
Design a way to wire the counter so it counts from 0 decimal (0000 binary) up to 11 decimal (1011) before resetting.
Don't use any NOT gates (inverters), but include the 4-input NAND gate, in the same general way as Figure 5.
Next Month:
The answer to Experiment #5 will be given first next month, followed by additional notes about programming counters both up and down.
Finally, a digital readout for the counter will be described.
Answers To The Troubleshooting Questions
Question#1
Probably the SET terminal is wired to a logic 0 instead of the proper logic 1, causing the toggled flip flop to be stuck in the high condition. Less likely is the possibility that the J and/or K terminals might have a logic 0, and assuming that the flip flop happened to have a high when first energized. It's not likely the RESET is wrong.
Question #2
The Q logic levels always are opposite to those of the Q outputs. An 8-count at the LEDs and the Q outputs is 1000; there fore, it is 0111 at the Q outputs.
Question #3
The most likely cause of the counter continuing to 15, rather than resetting after 7, is a defective NAND gate. If one of the flip flops is defective, the circuit could not count to 15. Also, the clock signal must be okay, else the counter could not count at all (or, the 0-to-15 count would not be normal). Of course, there is a remote possibility that one of the Q outputs is defective, or not reaching the NAND.
(adapted from: Electronic Servicing magazine, Sept. 1978)
Next: Oct. 1978
Prev:
Also see: Sam Wilson's Technical Notebook