By F.P. Zantis
There are many electronics/electrical practitioners who have implicit faith in their measuring instruments and believe anything displayed on the these, particularly if the display is digital. There is more to measuring electrical quantities, however, such as knowledge of the instrument being used and the purpose of the measurement. With those in mind, it is possible to select the most suitable instrument for a given measurement. Judging and interpreting the measurements are the next important steps.
Basically, each and every measuring instrument produces errors.
The magnitude of such errors and how to arrive at meaningful results is the object of this new series of articles.
In all measurements a number of errors may occur that can, however, be avoided or at least minimized by a proper knowledge of them. Such errors fall under four headings.
1. Systematic errors.
Systematic errors are in direct proportion to the quality of the instrument and are the result of inaccuracies in the design, construction, final assembly and calibration of the instrument. The more care the manufacturer has taken in these areas, the smaller the errors will be (and the higher the price of the instrument).
2. Environmental errors.
Environmental errors are caused by geo graphical position, temperature, humidity, and electric and magnetic fields. One of the most common is the electro-magnetic field around a mains transformer (see Fig. 1), which may make a measurement at best meaningless and at worst impossible. Even the earth's magnetic field can distort a measurement: the electron beam in an oscilloscope, for instance, is deflected by it. The degree of deflection is determined by the position of the oscilloscope in the laboratory or workshop and is evidenced by the horizontal trace not being exactly parallel with the horizontal graticule lines. Screening the oscilloscope does not help and a good-quality oscilloscope is therefore provided with a trace rotation control.

Fig. 1.

Fig. 2.
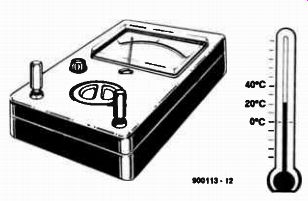
The effect of ambient temperature should also not be underestimated (see Fig. 2.). Test equipment is normally calibrated at +20 °C. When the ambient temperature differs from this by more than ±10 °C, temperature-de pendent errors are likely to occur.
With analogue instruments, it may also be important whether it is used upright or lying down (see Fig. 3).
3. Human errors.
Human errors occur when the user is not quite clear about the purpose of the measurement or does not know enough about the test equipment he is using, or both. Typical are not knowing the input resistance when voltage measurements are carried out (error caused by incorrect loading of the voltage source) and incorrect setting of the instrument. Carelessness in taking or recording readings is another cause of errors.
4. Application errors.

Fig. 3.
Application errors occur when the equipment used is not suitable for the measurement to be carried out. For instance, the use of an instrument whose internal resistance is comparable to the input resistance of the circuit under test.
Also, reading errors are very common, particularly when analogue instruments are used. Such instruments should always be read with the eye at right angles to the pointer to avoid parallax errors. Some instruments have a mirror directly below the meter scale to ensure that the pointer is read correctly (it should not be seen in the mirror).
Errors in practice

Fig. 4.
Most measuring instruments are still based on analogue techniques and have analogue displays. This is so for very good reasons as will be seen later in the series.
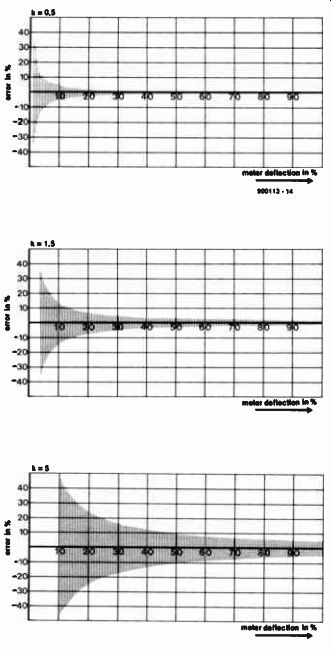
The accuracy of analogue instruments is normally given as a percentage (absolute error) of full-scale deflection (FsD). Note that the a.c. and d.c. ranges of multimeters usually have different accuracies. This means, for instance, that the pointer of an instrument with 1.5% accuracy and set to its 10-V range may at any given reading be off the true value by as much as 150 mV. If, therefore, a voltage is measured as 1 V, the true value may lie between 0.85 V and 1.15 V. That represents a maximum relative error of 15%! If, in the same range, a voltage of 9 V is measured, its true value may lie between 8.85 V and 9.15 V. The maximum relative error is then 0.15/ 9x100% = 1.67%. From these two examples it is seen that at the lower end of the range measurements are guesswork, in the middle of the range they are merely unreliable, and only at the upper end of the range does the relative error compare with the stated accuracy. This means that for greater accuracy the proper range (that is, the one where the greatest deflection is obtained) should be selected. Figure 4 shows the relative error in percent for three instruments that have absolute errors of 0.5%, 1.5% and 5%, respectively, of full scale deflection. In all cases, note the rapid rise of the relative error for small pointer de flections.
Matching measurand and measurement range
The importance of selecting the correct measurement range will be shown by the following example. Assume that an alternating voltage of about 20 V is to be measured and that two measuring instruments are avail able. Of these, one has an absolute accuracy of 0.5% and FSD ranges of 1 V, 10 V and 100 V, while the other has an absolute accuracy of 1% and FSD ranges of 3 V, 30 V and 300 V. The first instrument must be set to the 100 V range and the relative error will be 0.5/20x100% = 2.5%. The second instrument is set to its 30 V range, where the relative error will be 0.3/20x100% = 1.5%. It is thus seen that the less accurate instrument in this case gives the more accurate result! This is an important point to bear in mind when buying an instrument: the ranges available should be compatible with the expected measurands. When you are normally engaged in power electronics, you need different ranges from those required in radio/Tv engineering.
Digital instruments
In digital instruments, the accuracy is normally related to displayed value. Further more, because of the analogue-to-digital conversion, the accuracy of the final digit must be added. Normally, the accuracy of the displayed value is ±1 digit, although there are instruments with an accuracy of ±2 digits and more.
The overall accuracy of a digital multi meter is typically
• for direct voltage measurements: 0.1% of measurand ±1 digit;
• for alternating voltage measurements: 2% of measurand ±7 digits;
• for direct current measurements: 0.35% of measurand ±1 digit;
• for alternating current measurements:
0.9% of measurand ±3 digits.
If the measurement of the alternating voltage of around 20 V in the earlier examples had been carried out by this digital instrument, the readings would have been 20x1.02 + 7x0.1 = 21.1 V and 20x1.02 - 7x0.1 = 18.9 V respectively. The relative error would have been 1.1/20x100% = 5.5%. This shows that digital instruments are not necessarily more accurate than analogue ones as quite a few people believe. Note that the graphs in Fig. 4 apply to digital instruments as well.
Measurand and instrument
The measurand may have any one of a multitude of waveforms. Because of that, different instruments, or different methods of measuring, will give different results when such quantities are measured. Only when the basis of the measurement is known can the reading have any significance. For instance, a moving coil meter without rectifier will show the arithmetic mean of a quantity.

Fig. 5.
However, the arithmetic mean of a pure alternating voltage (or current) is 0, so that there is no deflection of the pointer (see Fig. 5). If that meter is used to measure a composite voltage (or current), it will only show the value of the d.c. component Care should be taken, however, because if the level of the superimposed alternating voltage (or current) is high, the meter may be over loaded in spite of that quantity not affecting the reading.
To measure an alternating voltage (or current) with a moving coil meter, a rectifier should be connected in series with the meter.
This is the case, for instance, when an analogue multimeter is set to one of its a.c. ranges. The instrument will then display the mean d.c. value of the rectified quantity (see Fig. 6). The arithmetic mean of a rectified sinusoidal voltage, U, = 0.318Um„, and this
[... 42 ]
the r.m.s. value. When a triangular quantity is measured, the error is negligible: the true value is then only 0.36% larger than that displayed.

Fig. 6
It might be expected that all this is true for digital instruments as well, but unfortunately that is not always so. Depending on the method of test, deviations may occur that can not really be foreseen. Some (relatively expensive) of these instruments can display the true r.m.s. value of a voltage or current.
These instruments compute the r.m.s. value independently of the waveform.
Another factor that should be borne in mind is that, apart from the waveform, the frequency of a voltage or current plays a role. Most digital multimeters measure alternating quantities correctly only if the frequency is not higher than 400 Hz. Analogue instruments of about the same price perform rather better: right into the kHz range.
The r.m.s. measurement in many standard d.c. instruments is made possible by a variety of special circuits. These compute the r.m.s. value from the applied alternating voltage and convert it into a direct voltage, which is read in the usual way. These circuits are normally based on special ICs: a typical one is shown in Fig. 7 (see also Ref. 1 and Ref. 2). When measurements are carried out with an oscilloscope, the instantaneous value of the measurand can be seen at a glance, so that at least the peak value of a voltage or current can be determined quickly. Deter mining the r.m.s. value is, however, possible only if the waveform is regular and the appropriate conversion factor is known.

Fig. 7.
Further reading:
1. "RMS-to-DC converter", Elektor Electronics, July 1986, p. 38.
2. "True RMS DVM", Elektor Electronics, December 1989, p. 40.
3. Electronic instruments and measurement techniques" by F.F. Mazda, ISBN 0 521 26873 7, Cambridge University Press (Elektor Electronics, November 1987)
4. Modern Electronic Test Equipment, by Keith Brindley, ISBN 0 434 90567 4, Heinemann-Newnes (Elektor Electronics, November 1986).
Also see: 400-Watt Laboratory Power Supply Part 1: Circuit Description