AMAZON multi-meters discounts AMAZON oscilloscope discounts
Low-capacitance probes are extremely useful for tracing wave forms in high-impedance, high-frequency and wide-band circuits (such as are found in TV receivers) without distortion from overloading or frequency discrimination.
It is important to note that scopes vary in input impedance. This statement applies, not only to scopes made by different manufacturers, but also to those of one manufacturer and even units of one model. The service technician, therefore, must ad just his probe to his particular scope. A variable resistor in the probe is used to obtain the desired attenuation of the input signal and a variable capacitor in the probe provides adjustable frequency compensation. This type of probe when used with a scope is particularly valuable for TV sync signal tracing and general tests in video, sync and sweep circuits.
Circuit loading
Circuit loading can occur when the impedance of the circuit under test is sufficiently high so that the sum of the input capacitance of the scope, the probe and its test cable, shunts the higher frequency components of the waveform to ground.
Probe attenuation
The low-capacitance probe attenuates the signal under test by a factor as great as the factor by which it multiplies the input resistance of the scope. For example, suppose the resistor in the probe is 33 megohms and that the input resistance of your scope is 3.3 megohms. The attenuation factor of the probe then is 33.3 /3.3= 10/1. This means that the attenuation factor of the probe is ten-to-one. Using the same probe, but a scope whose input resistance is 2.2 megohms, the attenuation factor is 33/2.2= 15 /1. In this case we have a fifteen-to-one attenuation. The lower the input resistance of your scope, the greater will be the reduction in strength of the signal voltage you are testing. If you do not know the input resistance of your particular scope, you can get it by writing to the manufacturer of the instrument.
While you can use any factor you wish, an attenuation of 10 is considered the best compromise for factors such as input impedance and attenuation, besides being most convenient when a scope calibrator is used. It is therefore recommended that a resistor having a value ten times greater than the input resistance of your scope's vertical amplifiers be used in your low-capacitance probe. There is no objection to using other resistor values to obtain any desired attenuation factor, but keep in mind that perfect frequency compensation will generally not be possible if the attenuation factor greatly exceeds 15. If the attenuation is too high, the waveform seen on the scope may be too small.
Measuring probe attenuation
If you know both the value of resistance in the low-capacitance probe and the input resistance of your scope, the attenuation factor can be calculated in the manner described in the preceding paragraphs. However, if you do not have this information, you can easily measure the value of probe attenuation. Connect a pair of jumpers between the vertical input terminals of your scope and a sine-wave generator (audio generator) set at about 1,000 hz. Adjust the output of the generator until the peak-to peak deflection fills a convenient number of divisions on the scope graph. Without further adjustment of the generator or scope controls, disconnect the jumpers. Now connect the probe tip to the output of the audio generator. The ground clip of the probe should go to the ground terminal of the generator. Similarly, the output leads of the probe should connect to the vertical input and ground terminals of the scope. Actually, what you have done is substituted your low-capacitance probe for the jumpers. The sine-wave signal will now be seen once again on the scope screen, but because of the use of the probe will be considerably weakened. Divide the number of vertical divisions occupied by the pattern when direct connections were used by the number of divisions occupied by the pattern when the probe is used. The answer is the probe attenuation.
For example, if, when using direct connections between the audio generator and the scope, the displayed sine wave occupied 40 squares but only 4 squares when the probe was used, then the attenuation factor is 40/4 = 10/1.
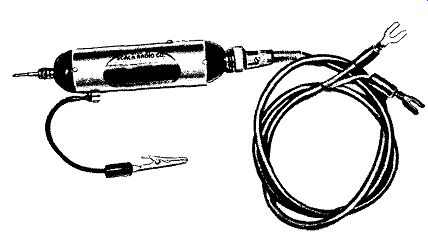
Fig. 501. A 10-to-1 low-capacitance signal-tracing probe.
A low-capacitance probe comprises a shielded resistor-capacitor network which increases the effective input impedance at the probe tip by a factor of 10 or more and, in so doing, attenuates the input signal to the probe by a similar amount. In certain TV servicing operations this necessary attenuation of the signal is a useful feature of the probe. In other applications, the attenuation is not required and is recovered by advancing the vertical gain control of the scope.
Numerous technical factors are involved in the construction of a satisfactory low-capacitance, high-impedance probe. The attenuation factor is generally made 10-to-1 so that, once a scope has been calibrated for measurement of peak-to-peak voltages, the use of the probe does not destroy this calibration factor; a zero is merely added to the initial calibrating factor. Such a low capacitance probe must be compensated against frequency and phase distortion. In other words, the time constant of the probe must be made equal to the time constant of the scope input circuit.
A low-capacitance probe must be constructed not only to have minimum stray capacitance to the probe shield, but must also be designed to attenuate voltages to protect suitably the scope input circuit whenever you test waveforms having high-amplitude peaks.
A commercial type 10-to-1 low-capacitance test probe is shown in Fig. 501. Two screw adjustments are provided. One of these is used to obtain the proper frequency compensation for the probe and the other to get the correct amount of signal attenuation.
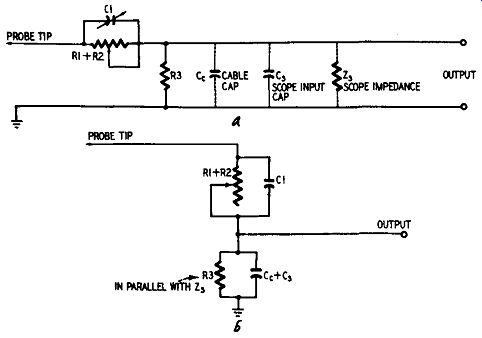
Fig. 502-a,-b. Circuit factors involved in the design of a low capacitance
probe. The circuit, a, is rearranged as in b, to show divider action. See footnote
for explanation of probe adjustment.
Probe design
When designing a low-capacitance, 10-to-1 voltage-divider probe, the capacitance of the cable and the input capacitance and impedance of the scope must be considered. These form a part of the divider network as shown in Fig. 502-a,-b. R3 is necessary to provide a divider network for the d.c. component present at the point under test.
----
Examining Fig. 502-a,-b once again, we will have for proper response (bandwidth):
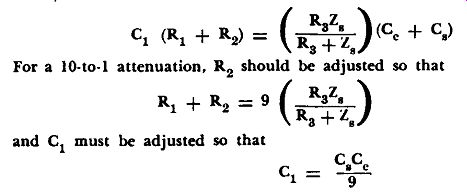
---------

Fig. 503. Component values for a typical low-capacitance probe.
The circuit shown in Fig. 503 gives component values for those who wish to construct their own low-capacitance probes. Trimmer capacitor C1 should be capable of being adjusted to a value equal to the combined capacitance of the probe cable plus the input capacitance of the scope. The input capacitance of the scope depends upon the make. For this reason you may have to use a larger value trimmer capacitor than that shown in Fig. 503.
The cable should be chosen for low capacitance, a type such as RG 59 /U being satisfactory. Since the cable does add capacitance, keep the cable length below 3 feet.

Fig. 504. The capacitor in series with the probe tip blocks d.c., permits
passage of a.c. waveforms.
The low-capacitance probe shown in Fig. 503 does not use a blocking capacitor. Special low-capacitance probes are available which do not offer a d.c. path to ground. A circuit of such a probe is shown in Fig. 504. The .05-µf capacitor is used to keep d.c. out of the input to the scope, yet the capacitance of this blocking unit is sufficiently large to permit passage of low-frequency waveforms.
You can build the probe into a housing of the type shown in Fig. 505. The compensating capacitor and the potentiometer do not have knobs, but can have slotted shafts for screwdriver adjustments.
This arrangement avoids the annoyance of protruding knobs and minimizes the possibility of accidentally misadjusting the probe.
Use of probe in high-impedance circuits
A low-capacitance probe should be used in any video, sweep or sync circuit in which the input capacitance of the scope is sufficient to load the circuit under test and thereby produce high-frequency distortion and phase shift.
In Fig. 506 we see a low-capacitance probe being used to check the horizontal sync waveforms in the automatic gain control circuit of a television receiver. A close-up, cut-away view of this same probe is shown in Fig. 507.

Fig. 505. External details of probe housing. Two variable adjustments are
provided.

Fig. 506. Photo of low-capacitance probe at work checking waveforms in a TV
receiver.
Another important application is the testing of video amplifiers by means of 100- khz square waves (the preferred method of video-amplifier testing). Unless the scope is applied to the signal input of the picture tube by means of a low-capacitance probe, the response of the video amplifier will appear to be faulty at the higher video frequencies. In other words, the input capacitance of the scope will load the output circuit of the video amplifier abnormally and round off the square wave considerably.
The operator should note, however, that the scope must have a better response than the video amplifier under test. If the vertical amplifier is limited in response, the next best procedure is to apply the output from the video amplifier directly to the deflection plates of the cathode-ray tube in the scope. In either procedure the socket should be removed from the picture tube to eliminate this source of excessive capacitive loading during test.
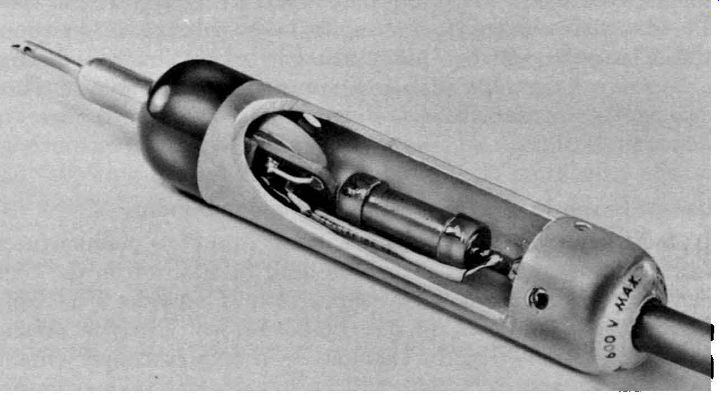
Fig. 507. Cut-away view of the interior of a low-capacitance probe showing
placement of parts.
Use of probe in high-voltage circuits
Although the chief function of the low-capacitance probe is to provide low input capacitance, and hence to minimize circuit loading, the probe also finds application in TV trouble-shooting procedures on the basis of its 10-to-1 attenuation factor. It can, for example, be used to test the waveform across the horizontal deflection coils. In typical TV receivers this waveform has a peak to-peak voltage of 1,400. This is beyond the voltage-handling capability of the usual service scope. Even if this voltage does not damage the scope input circuit, the horizontal amplifier will be overdriven in many cases and the waveform on the scope screen will be distorted accordingly. Use of the 10-to-1 probe cuts this voltage down to 140, which is well within the voltage-handling capability of a scope.
When speaking of high voltage in a TV set, most technicians automatically think of the e.m.f. at the second anode of the picture tube or at the filament side of the high-voltage rectifier tube.
However, voltage, in the form of pulses, must also be considered.
As an example, the pulse voltage at the plate of the horizontal output tube is very much higher than the d.c. voltage at that spot.
The d.c. plate voltage (including the boost voltage) will be about 400. The pulse will be approximately 3 to 6 kilovolts. Placing a scope (or v.t.v.m.) at such test points without using a capacitor type voltage-divider probe will immediately damage the test instrument.
Use of probe in circuits with high d.c. component
One commercial type low-capacitance probe* is manufactured with a shunt resistor in the probe head in addition to the compensated series resistor. This shunt resistor provides a d.c. voltage divider to cut down the d.c. component which may be present with the a.c. signal, as for example, in a booster-damper circuit.
In many TV receivers there will be found a d.c. booster output of 600 to 650 volts, to which is added the peak voltage of the a.c. waveform under test. Such high d.c. voltages are sufficient to dam age some scope input circuits when a substantial peak a.c. voltage is also present. The construction of the probe avoids this possibility of damage to the scope.
Probe response vs. scope response The frequency and phase characteristics of the low-capacitance probe can far exceed the capabilities of most scopes avail able to the service technician. Accordingly, distortion at higher frequencies will be localized to the vertical amplifier of the scope rather than to the probe.
There are some scopes in use which are not provided with compensated step attenuators. Such scopes will develop less bandwidth at higher attenuations. Furthermore the input resistance and capacitance of such an input circuit is not constant and cannot be matched by the probe at all attenuator settings. Keep in mind that a probe cannot improve the characteristics of your scope. In other words, the probe is no better than the scope with which it is used.
"Allowing for'' scope distortion It is sometimes claimed that a scope with limited response characteristics can be used in wide-band receiver circuits by "allowing for" the scope distortion. Although this procedure may have some limited utility in special cases with which the operator has great familiarity, the dangers involved are very great and serious trouble shooting should not be undertaken upon such a basis. The operator will also recognize the fact that if a scope has 1 % response at I mhz, for example, waveform details developed by components between 1 and 2 mhz will be completely lost and the "allowing for" procedure is actually little more than crystal ball gazing.•
[[[•The chief exception to this observation is utilization of a scope which has the IRE roll-off characteristic. Although of limited bandwidth, a scope with this amplifier characteristic will reproduce video waveforms without severe distortion except that narrow spikes caused by faulty circuit operation will be greatly shortened. In particular, a limited-bandwidth scope with the proper roll-off characteristic has the merit of not developing within itself such spikes or overshoots when waveforms having frequency components considerably beyond the bandwidth of the scope itself are under test. ]]]
Notes on calibration of the scope
Effective (r.m.s.) voltages can be applied accurately only to the measurement of symmetrical sine waves. The amplitudes of trapezoids, pulses and other irregular waveforms are generally expressed in terms of peak-to-peak, positive or negative peak voltages, which can be read on a scope.
It is easy to measure peak voltages if you know the relationship between such voltages and a sine wave. The easiest way is to calibrate your scope in terms of a sine wave. To do this, it is necessary to have a graph in front of your scope screen. Such graphs, made of plastic, generally come with the scope when purchased, or can be obtained separately. These plastic graphs are easy to attach or remove from the face of the scope tube.
A comparison between a trapezoid and a sine wave is shown in Fig. 508. Trapezoidal waveforms are found in vertical and horizontal sweep circuits of TV receivers. By calibrating a scope in terms of a sine wave, you can measure peak-to-peak, positive peak, and negative peak values of a nonsymmetrical waveform (such as a trapezoid).
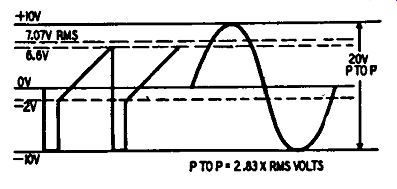
Fig. 508. The amplitudes of trapezoids, pulses, and other irregular waveforms
are generally expressed in terms of peak-to peak, positive-peak, or negative-peak
voltages, which can be read on a scope.
The low-capacitance probe is most useful when the scope has been calibrated in terms of peak-to-peak volts per square. A scope is usually calibrated from a sine-wave source because such sources are readily available and also because the relationship between the r.m.s. value of a sine wave and its peak-to-peak value is known.
In most service procedures the voltage difference between the r.m.s. and peak-to-peak values of a nonsinusoidal waveform will not be known and trouble shooting will be done upon the basis of peak-to-peak voltages alone. Once a scope has been calibrated in terms of peak-to-peak voltage, any waveform may be applied to the input of the scope and its peak-to-peak voltage can be read from the screen of the scope.
To calibrate a scope it is essential to know that the peak-to-peak voltage of a sine wave is 2.83 times its r.m.s. (effective) value.
The r.m.s. value of a sine wave is usually indicated by conventional a.c. service voltmeters. The peak-to-peak voltage of a 6.3 volt r.m.s., a.c. wave is equal to 17 peak-to-peak volts (6.3 X 2.83 = 17 .83, or 17 volts approximately).
To calibrate your scope, use the 6.3-volt post of the test instrument for your sine-wave source, as illustrated in Fig. 509. If your scope does not have such a voltage terminal, any 6.3-volt filament transformer will do or you can use the filament voltage of the TV set itself. (Do not connect to low-or-high-voltage rectifier filament.)
--------------
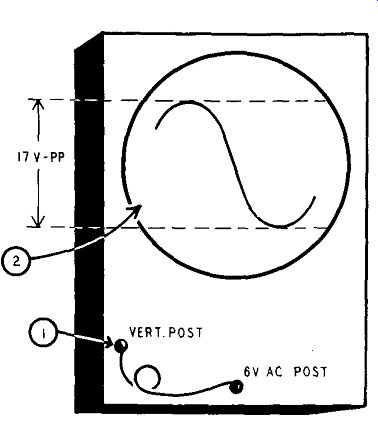
Fig. 509. (1) Connect the 6-volt a.c. post to the vertical post with a jumper
(or use direct probe). (2) This will produce a screen pattern whose peak-to
peak value is 17 volts (6 volts r.m.s. x 2.83=17 volts peak-to peak). (3) The
height of the 17 volt peak-to-peak wave on the screen depends upon the setting
of the vertical gain control and the setting of the attenuator (vertical sensitivity
switch).
For example, with the vertical sensitivity switch set to X1 position, adjust the vertical sensitivity control until a 17 volts peak-to-peak pattern occupies a total of 17 squares. Remove the jumper.
Now, as long as the sensitivity and gain controls are left untouched, the scope is calibrated so that each vertical square equals 1.0 volt.
The same procedure could have been used with the vertical sensitivity switch set to X10 position. This puts the vertical gain control at a lower setting.
------------------
No matter what a.c. voltage source you use for calibrating the scope, the procedure is the same. Connect the a.c. voltage between the vertical input terminal of the scope and the ground terminal. Advance the vertical gain control (vertical attenuator) until the sine waveform on the screen occupies 17 squares.
Each square then represents 1 peak-to-peak volt.
Although we have given here an example of calibrating the scope for a value of I peak-to-peak volt per square on the graph, you can calibrate for other values as well. For example, the scope can be calibrated for a sensitivity of 10 or 100 peak to-peak volts per square. This is very much like having a voltmeter with a multiplier control so that you can read 1, 10 or 100 volts. It is desirable in such procedures to utilize a decimal calibration factor (factor of 10) since the screen can be read that much more rapidly. Furthermore, if the probe is a 10-to-1 type, this provides a decimal attenuation factor when used and in effect multiplies the calibration factor of the scope by a factor of 10.
For example, if the probe has been calibrated at 10-peak-to peak volts per square, the calibration will become 100 peak-to peak volts per square when the probe is attached to the scope.
Most service scopes are provided with 10-to-1 step attenuators.
Such a step attenuator also ties in with decimal calibration-it either multiplies or divides the calibration factor of the scope by 10 when advanced or dropped a step.
During calibration the vertical gain control can be set in any convenient position. Once set, it should not be touched again.
Should the vertical gain control be turned accidentally, the scope will have to be recalibrated. Some scopes come equipped with a vertical sensitivity control in addition to a vertical-gain control.
The vertical sensitivity control is a voltage-divider network, similar to that used on a v.t.v.m. or multitester. Like these instruments, the voltage divider ordinarily has X1, X10 and X100 scales. You can set your scope control to any one of these positions when you calibrate. If you use the X1 position, the scope will be calibrated at I volt per square. In the X10 position, the scope scale will be 0.1 volt per square and it will be .01 volt per square when you set the vertical sensitivity control (or attenuator) to the X100 position.
Now suppose you calibrate with the vertical sensitivity control set to X10. The scope scale will be l volt per square in this position, and 0.1 volt per square in the X100 position. Naturally, in the Xl position you will be reading 10 volts per square. Most plastic graphs used with scopes are removable. Make sure that the X-axis of the graph is horizontal; then do not touch it.
Basic properties of nonsinusoidal waveforms
The waveform shown in Fig. 510 is a peaked sawtooth wave, consisting of a sawtooth component and a peaking-pulse component. This is a typical sweep waveform. Its proportions serve to illustrate the basic properties of nonsinusoidal waveforms.
When no signal is applied to the scope input, the trace on the screen indicates the 0-volt level. ·when the peaked sawtooth wave is applied to the scope input, the waveform distributes itself about the zero axis. The distribution is such that the positive area above the axis is exactly equal to the negative area below the axis. This distribution is required because the quantity of positive electricity in a waveform is exactly equal to the quantity of negative electricity, and the scope indicates the quantity of electricity as an area. The waveform of Fig. 510 has a positive peak voltage of 6.6, a negative. peak voltage of 10, a peak-to-peak voltage of 16.6, a sawtooth component of 8.6 volts and a peaking-pulse component of 8 volts.

Fig. 510. A trapezoid has a sawtooth and a square wave component.
Adjusting the probe
There are a number of techniques that you can use to get the probe ready to work. Adjusting these probes is really a two-step process: The probe must be set for the proper amount of attenuation, and it must also be tuned for proper frequency compensation. After you have set the probe properly you should check it periodically to make sure that it remains in adjustment.
To secure the correct attenuation factor of the probe, connect the vertical input of the scope directly to a 60-cycle sine wave source and adjust the vertical gain on the scope for any convenient number of squares. This completed, disconnect the a.c. source from the scope and connect the probe lead in its place. Now connect the probe tips to the a.c. supply that was removed from the scope and adjust the potentiometer in the probe until you get the desired amount of attenuation of the waveform. A 10-to-1 attenuation is both desirable and very convenient.
The frequency compensation of the low-capacitance probe can now be adjusted by using a square-wave generator, the sawtooth output of your scope, or a television receiver. Whichever of these techniques you decide upon, the probe must first be adjusted for correct attenuation.

Fig. 511-a,-b,-c. An improperly adjusted probe will show the waveforms in
a and b. Correct adjustment will give the results shown in c.
Square-wave generator method
If you have a square-wave generator, connect the output leads of the probe cable to the vertical input terminals of the scope.
Connect the probe tip and ground lead to the output terminals of the square-wave generator. Set the generator to some frequency between 10,000 and 50,000 hz. Adjust the probe trimmer capacitor with a screwdriver or an insu½ated alignment tool until the square-wave output of the generator is properly reproduced on the scope screen.
Incorrect trimmer adjustment is indicated by a badly rounded or a badly peaked square wave as shown in Figs. 511-a and 511-b.
A correctly adjusted probe will produce the waveform illustrated in Fig. 511-c. To make this test your scope should have a flat response to a frequency 10 times greater and 10 times smaller than the fundamental frequency of the square wave in order to reproduce it with good fidelity.
Sawtooth method You can use the sawtooth output of your scope multivibrator to adjust the frequency compensation of your probe. In some commercial scopes the sawtooth voltage is available at a front-panel jack. If the sawtooth is not brought out to the front panel, take the scope chassis out of its cabinet. Connect the output leads of the probe to the vertical input of the scope. Touch the probe tip to the input grid of the horizontal output stage. Set the scope for internal sweep and the sweep frequency to about 1,000 hz.
Adjust the vertical and horizontal gain controls of the scope until the pattern fills about two-thirds of the screen. The sync control on the scope should be set to the minimum value that gives good lock-in of the waveform.
If the probe trimmer is not properly adjusted, the pattern will appear as in Figs. 512-a and 512-b. Note the hook at the end of the trace. Adjust the probe trimmer until this hook disappears and the pattern is as shown in Fig. 512-c. On some scopes, the waveforms illustrated in Figs. 511 and 512 will be found trans posed from left to right or inverted or both. Such positioning will have no effect on the adjustment of your probe and can be disregarded.

Fig. 512-a,-b,-c. Improper adjustment of probe trimmer produces hooks shown
in a and b. Probe is adjusted when hook disappears (c).
Television receiver method
Using a properly operating television receiver tuned to a strong signal, touch the probe to the output of the video amplifier. On the scope observe the video signal input to the picture-tube socket with the picture tube removed. Adjust the compensating capacitor in the probe until the equalizing pulses that you see on the scope screen are equal in amplitude to the vertical sync pulses. Set the capacitor so that the pulses are neither rounded nor peaked.
Whichever method you use, you will have adjusted your probe for the amount of attenuation you want and you will also have tuned it for correct frequency compensation.
Extending voltage range of probe
By using a low-capacitance, voltage-divider probe and also by taking full advantage of the vertical gain and sensitivity controls of your scope, you can measure an extremely wide range of voltages. The maximum input voltage range of the scope is extended to approximately 1,500 volts peak-to-peak, where the greatest magnitude of the waveform is either positive or negative, and to 3,000 volts peak-to-peak for symmetrical waveforms.
If you need to measure a voltage and you suspect that the peak to-peak magnitude is greater than 1,500 volts, or if you don't know the relative proportions of the negative and positive parts of the wave, then you should connect a capacitor to the probe tip. The working voltage of the capacitor should be equal to (or higher) than the peak-to-peak voltage you expect to measure. The voltage you test will distribute itself between this capacitor and the one in the probe. The capacitor should have a value of about .005 µf.
You'll have trouble with the capacitor flopping around if you try simply to wrap the capacitor lead around the probe tip. Make the capacitor into an adapter unit, with one capacitor lead going to a female connector (such as a pin jack). This can then be slid onto the needle-point end of the probe. The other end of the capacitor can be soldered to a tiny clip or point, whichever you prefer. Mount this very simple unit in a small plastic tube and keep it with your set of probes.
Tracing the TV sync signal
With a low-capacitance probe you can trace the progress of sync pulses (both horizontal and vertical) all the way from the output of the video sound detector right up to the inputs to the vertical and horizontal oscillators. The procedure here is almost the same as though you were signal tracing in an ordinary radio receiver.
You can start with your low-capacitance probe (connected to your scope) at the output of the video second detector, follow the sync pulses through the video amplifier, sync separator, sync amplifiers, and then through the differentiating and integrating networks. In this way you can quickly determine which circuit is causing loss of sync.
You can also use this probe for testing the efficiency of a sync discriminator and reactance tube circuit in horizontal a.f.c. systems. The probe will help show the waveshapes indicated in the circuit diagram for the receiver. Knowing the required waveshapes at various points of a Synchrolock circuit, Synchroguide or any other type of horizontal a.f.c. system, and using your low capacitance probe and scope, will speed up trouble shooting.
Since a TV receiver is a pulse-operated device, proper wave shapes are required for trouble-free operation of the set. While a d.c. voltage check is useful and desirable, it is entirely possible for a particular tube to show normal operating voltages but still not operate properly because of faulty triggering or pulse voltages at the input. Since the probe is the device that transports the pulse from the TV set to the scope, obviously the probe must do nothing to change the shape of that pulse. If the probe does affect the pulse waveshape, then quite obviously the scope will not show you a condition as it actually exists at the point under test.

Fig. 513-a,-b. Difference in waveforms reproduced on scope screen when using
low-capacitance probe (a) and direct cable (b).
For example, a blanking and sync pulse might appear as shown in Fig. 513-a when using a low-capacitance probe. If, instead, a shielded direct cable is used, then attenuation of the high frequencies might appear as shown in Fig. 513-b. When using a direct shielded cable, high-frequency loss is indicated by rounding of the pulse edges, a condition not existing in the receiver and caused by the cable. Misleading information of this type can cause loss of valuable servicing time.
Testing the vertical blocking oscillator It is often necessary to make a check of the pulses at the control grid of the vertical blocking oscillator. In this circuit the oscillator grid leak is sometimes as high as 10 megohms. The technician who attempts to test such a circuit will find that the input impedance of a direct cable to the scope is far too low for this application. Its capacitance will shunt the oscillator tank circuit and will cause a loss of signal voltage, perhaps seriously disturbing circuit operation.
Use of a low-capacitance probe will eliminate the first of these troubles, but it will usually introduce another. The input resistance of the probe, being less than 10 megohms, will drain away too much of the d.c. bias voltage, again seriously disturbing circuit operation. Just as a simple example, let us suppose that the grid leak of a particular vertical blocking oscillator is 5 megohms and that the probe placed at the control grid also has a resistance to ground of 5 megohms. The two resistances are now effectively in parallel, thus cutting the d.c. bias voltage on the tube in half.
When this difficulty is encountered, the technician must use a blocking capacitor in series with the low-capacitance probe.
Naturally, such a precaution is not necessary if the probe has a blocking capacitor built in as part of the unit.
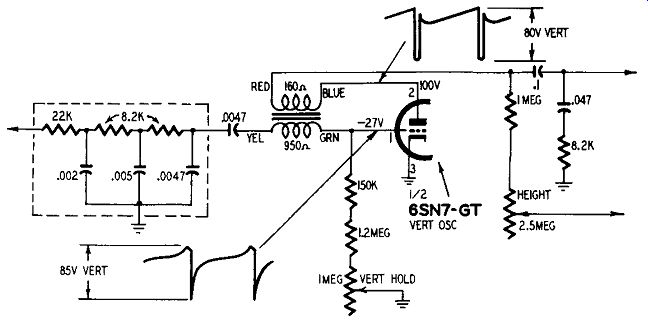
Fig. 514. Typical input and output waveforms in vertical-blocking oscillator
circuit. These can be checked with low-capacitance probes.
A vertical blocking oscillator in a TV receiver can be easily tested with a v.t.v.m. simply by setting the test instrument to read d.c. volts and putting the clip leads across the grid-return resistor.
The amount of bias voltage measured will give you an idea of how energetically the oscillator is working. While this test is an easy and quick one, it tells you nothing about the shape or amplitude of the vertical pulse coming into the control grid of the tube from the integrating network. Actually, the vertical oscillator does not need this pulse in order to operate, hence a v.t.v.m. bias check doesn't give the full picture.
If you will examine the illustration of the vertical blocking oscillator circuit shown in Fig. 514, you will see that the pulse input to the control grid of the tube is rather sharply spiked.
Although these waves come along at the rate of 60 per second, each waveform has high-frequency components. These high-frequency components can easily be lost, resulting in waveform distortion, if ordinary test leads or shielded cable is used for connection to the scope. The low-capacitance probe reduces the amount of capacitance introduced by ordinary, shielded direct cable, to one-tenth. This means that the high-frequency components of the pulse are not bypassed and are shown on the scope screen.
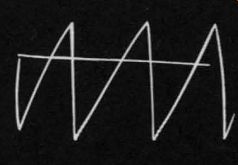
Fig. 515. Photo of current waveform in horizontal yoke.
Testing deflection coils
An ordinary resistance check of the two windings of the yoke will often (but not always) reveal a defective unit. A good test to make is with the TV set turned on and the yoke functioning under actual operating conditions. Resistance checks, if made, should be done before the set is turned on. When the TV set is working, a very high peak-to-peak voltage exists across the deflection coils. In a typical receiver this will amount to about 1,500 volts peak-to-peak across the horizontal deflection coils. This voltage should never be applied directly to the input of a scope, since it may very well "blow" the capacitor at the vertical input to the scope. In any event, the vertical amplifiers of the scope will be overloaded, producing a distorted waveform on the screen.
The voltage-divider action of the probe will reduce the voltage to a safe value.
Unlike radio testing, TV testing is concerned with shapes of waves in very many cases as well as with various types of voltages.
For example, a normally operating TV receiver may produce the typical waveforms illustrated in Fig. 515. This photograph shows the normal current trace in vertical or horizontal yoke windings.
Note that the current waveform is a sawtooth. The voltage appearing across the yoke is a trapezoid, similar in shape to that shown in Fig. 510.
To see the trapezoid, connect the ground clip of your probe to one side of the deflection coil being tested and touch your probe lead to the other side. The trapezoid will appear on the scope screen. Make sure that your scope cabinet does not touch the metal chassis of the TV set being tested. You can then adjust the linearity and sweep controls of the TV set to get the best trapezoid.
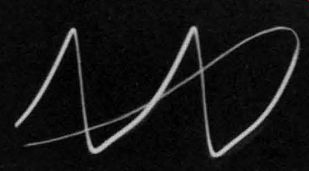
Fig. 516. Distorted current waveform in horizontal yoke indicates trouble
in sweep circuit.
It is much easier to make such adjustments, however, by watching the sawtooth current wave, rather than the trapezoidal voltage wave. You can convert the sawtooth current wave to a voltage wave by sending the current through a resistor. This can be easily done by inserting a 5-to l 0-ohm 5-watt resistor in series with either lead going from the horizontal output transformer to the yoke.
To see the sawtooth waveform, connect the ground clip of the probe to one side of the resistor and touch the probe tip to the other side. Do not ground your scope. Do not connect the scope to the chassis of the TV set. Make sure that the scope and TV chassis are separated and can not touch. After the sawtooth appears on your scope screen, adjust the linearity and sweep controls of the TV receiver until the rise portion (forward sweep) of the sawtooth is as straight as possible. You can use the same resistor and make the same linearity checks of both vertical and horizontal sweep. The technique is the same in both cases.
If you will carefully examine the sawtooth shown in Fig. 515, you will see that there is only slight nonlinearity plus a trace of ringing at the start of each sawtooth. A "sick" receiver may pro duce the waveform shown in Fig. 516. This illustration shows distortion in the horizontal yoke current. The nonlinearity of this waveform will result in compression of the left-hand side of the picture.
Every little variant has a meaning all its own. The problem of the technician is to learn to read this new language and to be able to spot the receiver component responsible for any existing waveform distortion. Generally speaking, then, when ever you have service checks to make in video, sync and sweep circuits, you should use a low capacitance probe and a scope.
Since a high-impedance probe of this kind will not upset the circuits under test, the waveforms that you see will be those that exist at the test points.
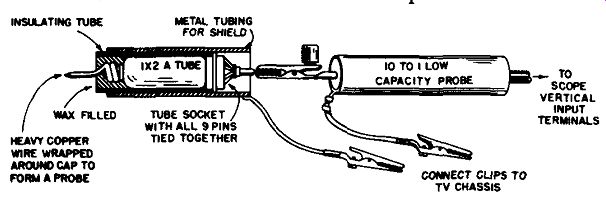
Fig. 517. Technique for using a tube as a high-voltage capacitor.
High-voltage adapter
There are circuits in a TV receiver m which either the a.c. or d.c. voltage or both may far exceed the rating of the probe.
In these cases, it is essential to use a probe with a 100-to-1 attenuation factor instead of 10-to-1. High-voltage probes are described in the next section. For example, if you want to make tests at high-voltage pulse points such as the horizontal amplifier plate or the plate of the high-voltage rectifier, you must use a 100-to-1 probe. If you do not have such a probe, you can quickly modify your 10-to-1 probe by putting a high-voltage capacitor in series with it. In place of a high-voltage capacitor (rated at 20,000 volts) you can use a 1x2-A as shown in Fig. 517.
No filament or plate voltage is required for the tube. The interelectrode capacitance of the tube will act as a high-voltage capacitor. Solder all nine pins of the tube socket together. Trap a small piece of heavy copper wire around the tube cap and shape the wire into the form of a probe point. Place the tube into a small section of bakelite tubing. Fill the tubing with wax so that the 1X2-A is held securely in place. You can also use Duco cement or equivalent. Put a metal shield around the insulating tubing. Connect a clip lead to this metal shielding.
An alligator clip should be soldered to one end of this lead.
There are just a few precautions. Whenever you run a check at a high-voltage pulse point be sure to connect the alligator clip lead of the 1X2-A probe to the chassis of the TV set. Your 1X2-A must be in good condition. A tube with a broken filament can cause an internal short, resulting in damage to the probe or scope. The purpose of the shield around the 1x2-A probe is to prevent spurious pick up from the field surrounding the horizontal output transformer.
The 1x2-A adapter should not be used as a substitute for the 100-to-1 probe, but rather as a temporary device until a 100-to-1 probe can be constructed or purchased.
Building a low-capacitance probe
A low-capacitance probe must be used to reproduce faith fully high-frequency waveshapes (15 khz and higher) and to pre vent loading of the circuit under observation. Such a probe can be readily constructed with a few parts.

Fig. 518. Here is a simple, easy-to-build, low capacitance probe. Variable capacitor,
T, can be a 3-30 µµf trimmer. The capacitance of the cable should be 140 µµf.
The probe circuit is shown in Fig. 518. Mount the parts on a small piece of insulating material such as bakelite or plastic. Do not depend upon soldered connections to hold the parts in place. The probe housing may be a miniature i.f. transformer can or a tube shield salvaged from an obsolete radio receiver. After the components have been mounted on the board, wrap it with a small piece of cellophane or durable Kraft paper. This will pre vent shorting of the parts against the inside of the metal can.
A shielded cable must be used with the probe since it will prevent stray pickup. The length of this cable is very important since its capacitance is used in the design of the probe. The total capacitance of the cable must be 140 µµf. In the illustration we show a cable having a capacitance of 35 µµf per foot. For our purposes, then, we would need a cable having a total length of 4 feet.
You can use any type of coaxial cable you wish provided the total capacitance is 140 µµf. You could, for example, use RG9U rated for 30 µµf per foot. The cable length would then be 4.66 feet. If you use a cable having a lower capacitance than 30 µµf per foot, you may find that the cable length will be excessive and unwieldy.
The probe is so constructed that the signal at the input terminals of your scope will be 1/15th of its value at the point under test. This means that your scope should have a minimum vertical sensitivity of 0.05 r.m.s. volt per inch. Most scopes will meet this requirement.

Fig. 519. A correctly adjusted probe will produce this waveform.
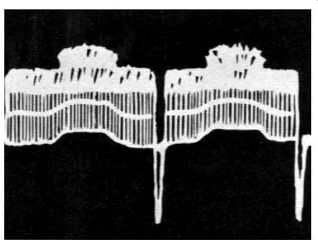
Fig. 520. Here we see the effect of insufficient trimmer capacitance.
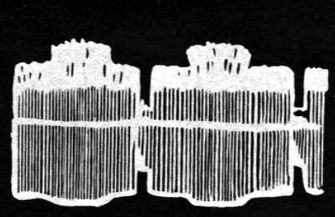
Fig. 521. If the probe trimmer capacitance is too high, this is the result
you will get.
Adjusting the probe
The probe must be adjusted to match the input impedance of your particular scope. You can do this by any one of the techniques described earlier in this section. A simple method is to use a TV receiver known to be in good working order.
Connect the probe to the output of the video detector by put ting the probe tip at one end of the diode load resistor and connecting the alligator (ground) clip of the probe to the other end of the resistor. Connect the probe output to the vertical input terminals of the scope. Set the scope sweep to approximately 30 hz. Adjust the trimmer capacitor of the probe so that the vertical blanking pulses and horizontal blanking pulses line up as shown in Fig. 519. If the capacitance of the trimmer is too low, the waveform will appear as in Fig. 520. The waveform will be shown in Fig. 521 if the capacitance of the trimmer is too large.
AMAZON multi-meters discounts AMAZON oscilloscope discounts