WE come now to the crucial phase of recording-the moment when all the effort and expenditure of time and money are to be vindicated by producing actual recordings of as good quality as possible.
Some manufacturers, particularly those who make the less expensive "home" recorders, make much of the fact ( ?) that making a good recording is easy for anyone, whether or not he has any knowledge or experience. "Just turn up the volume," they say, "and lower the re cording arm to the disc, and you will have perfect results." This statement is not true. Even with modern developments it is emphatically not that easy. Recording is, on the contrary, a painstaking precision job requiring knowledge and experience. There is little physical labor connected with recording, but adjustments--mechanical and electrical--must be made correctly and frequently checked. Volume must be controlled accurately ; microphone placement and radio tuning must be done with care, and every other detail must be scrupulously carried out. When the recordist learns to do these things'-- and they can be learned--recording will be pleasurable and uncomplicated.
If he does not take the time and trouble to learn, his records will be amateurish--suitable, perhaps, for party entertainment or as a sort of toy, but they will never really satisfy anyone.
Recordings of very satisfying quality can be made on almost any equipment, even the least expensive home recorder, but particularly on custom-made jobs such as the average radioman can build with the help of information in this guide.
At this point it is assumed that the system has been bought or built, that tests and final adjustments described in the preceding Sections have been made, and that a final frequency run and listening check have been completed satisfactorily. The recording procedures given are applicable to almost any type of equipment.
The average recordist will not have an acoustically treated studio ; probably a living room will be pressed into service. But its acoustics can be markedly improved very simply. Human hearing is binaural.
Our ears being separated by a small distance, we can judge, not only how far we are from a sound, but also the direction from which the sound is coming. If sound is coming from our left, for instance, the left ear will hear it with slightly greater volume than the right. Through experience we have learned to detect this slight difference in volume and to interpret it automatically in terms of direction. The situation is somewhat analogous to the stereoscopic effect obtained with two eyes.
The microphone is monaural, the equivalent of only a single ear (just as the camera is a single eye), and the stereoscopic effect is not present. The microphone, therefore, cannot distinguish direction, although it can reveal distance by relative volume.
In the average room, bare walls, floors, and wood furniture all reflect sound waves and cause small echoes. To normal binaural persons these echoes are almost unnoticeable; they come from diverse directions and appear natural and are automatically taken into account when determining the direction of a sound. But to a microphone all these echoes seem to come from the same direction ; they present a miscellaneous con glomeration of repetitions of the same sound which, in the loudspeaker, appears as a multiplied echo, an unnatural and often an annoying one.
In building sound studios most of the small echoes are eliminated and the remainder are diminished. Some, of course, are left so that the sound will not appear to be coming from a telephone booth or from the grave. The amount of echo which a studio of a room contains is known as its liveness. The opposite effect, that of considerably less echo than normal, is known as deadness.
In early broadcasting, rooms were usually completely lined by sound-absorbent material such as heavy draperies and they were almost completely dead. Today, the advances in the science of acoustics have led to elaborate treatments to control desired degrees of liveness and deadness.
Treatment for almost any room other than a large hall is neither difficult nor expensive. First, determine the condition of the room by having someone speak into the microphone from at least 3 or 4 feet away, raising his voice to get about the same microphone output as for normal microphone distance of 6 to 12 inches. Listen critically on a loudspeaker in another room, a normal room. If any excess echo is apparent, it can be reduced by hanging heavy cloth over bare wall surfaces, or by putting rugs on bare floors. Often, however, some particular portion of the room will be found satisfactory as is. When treating a room, do it by slow degrees. First cover some obvious cause of echo, then listen again; repeat this procedure until unnatural effects are eliminated, but stop before the room becomes unnaturally dead. The amplifier and loud speaker used should, of course, have as good characteristics as the re cording equipment. If desired, small record cuts may be made for each test and played back--not in the treated room, but in a normal one! Once the room has been treated and found satisfactory, it can generally be left the same for all future recording. However, the same tests and treatment may be gone through each time a different program type or musical- group is to be recorded. If this is done, use as the test the particular material to be recorded. Generally, musical recordings are benefited by greater liveness than that required for speech alone.
Notice that the very best phonograph records are those in which there is a perceptible echo, giving a "large hall" effect. European symphonic and operatic records are particularly excellent in this respect.
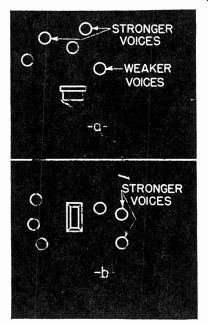
Fig. 1201-a--Placement of several speakers with dynamic micro phone;
b-with ribbon microphone.
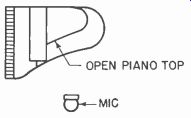
Fig. 1202--Microphone placement for piano recording.
Microphone Placement
Microphone placement is a subject on which very few exact rules can be formulated. The first cardinal principle, however, agreed upon by all modern broadcast and recording technicians, is that, no matter how many tempting amplifier input channels and microphones are on hand, no more microphones should be used than the minimum necessary to do the job. It used to be fashionable, for example, to use a separate microphone for each section of the orchestra and for each soloist. Today it is agreed that very few run-of-the-mill programs need more than 2 microphones for the actual program material. Not only is it difficult to use several microphones in the same room without appreciable inter action among them, but, by having the musicians control their own expression and the speakers do their own fading, the performers them selves have a more accurate idea of how they sound. In addition, a recordist has enough to do without having to watch constantly the mixing of several channels.
When recording speech, the speaker should be at least 12 inches from most ribbon or velocity microphones, and at least 6 inches from any other type. Microphone technique is simple but important. For instance, if the speaker raises his voice momentarily to make a point he should bring his head back slightly rather than depending on the operator and the gain controls to keep average level constant.
If several speakers are to be recorded, they must be arranged before the microphone in accordance with their vocal volume. Except for special effects, everyone should speak at natural volume, neither shouting or whispering. In radio and recording, emphasis and expression can be achieved most effectively by controlling the pitch of the voice and the pauses between particular words, as well as variation of speaking speed.
The late President Roosevelt was perhaps one of the finest exponents of this technique.
In recording several persons, place the weakest voice where normal gain setting gives normal volume indicator level. Then place each additional speaker at a distance which will produce the same indication-- far, if his voice is loud, and near if it is soft. This balancing should be done with care. Once the positions have been set, each person must maintain his position. If necessary (and possible), mark Xs' on the floor with chalk. It goes without saying that all persons must face a live side of the microphone. Typical setups for several speakers, using dynamic and ribbon microphones, are shown in Figs. 1201-a and b.
Certain special effects may be obtained by purposely varying the speaker's position. For instance, if the speaker is supposed to be leaving, he can gradually turn his face away from the microphone as he speaks the last few words, and even walk away slightly. This is called a fade.
If the voice is to be lowered, as in a confidential tone, the speaker should lean forward into the microphone. To call someone at a distance, the voice should be raised and the face turned half away. All these and many other effects will be discovered in practice, but each should be rehearsed carefully, with the recordist watching the volume indicator.
For recording a grand piano, standard technique is to open the top and place the microphone a few feet from the piano and facing the uplifted sounding board, as shown in Fig. 1202. The distance should be determined by trial, both from a quality as well as from a volume standpoint. Generally, increasing the distance will increase the echo effect; this is usually undesirable with piano. For upright and spinet pianos, there is no standard technique and proper positioning must be determined by experiment. In most cases results will not be as good as with grands, but acceptable results may often be secured by opening the top or removing the large front board beneath the keyboard. If this is done, there will usually be some frequency discrimination, depending on whether the microphone is placed at the left or the right of the piano.
For piano recordings, the volume indicator is not as effective as for other recordings. Except for magic-eye types, there is a small lag be tween the beginning of a sound and the full registration of the meter and, since the piano is a percussion instrument (for electronic purposes only), the initial percussive impact of the hammers on the strings will create" an instantaneous peak which will not be shown on the indicator.
As a result, piano records cut at normal indicator reading will often distort on these percussive peaks because of cutter overload--especially with crystal cutters--and experiments should be made to deter mine the proper gain setting for reduction of this effect.
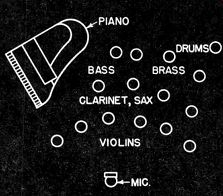
Fig. 1203--A typical dance band setup.
The largest amount of experimentation must be done with musical groups. Standard orchestra seating for public playing does not necessarily agree with recording requirements. The horns, for instance, must be far enough from the microphone to prevent their comparatively high level from overriding the strings or soloists. It is often good practice for soloists to use the same microphone as the band or orchestra, in which case the relative distances must be carefully determined for proper balance.
Usually, the best place for the microphone is in front of. and slightly above the orchestra. A single microphone almost always will be sufficient. Introducing others may cause interaction troubles, where the microphones may be so connected that the sound output of one is exactly 180 degrees out of phase with the other and cancellation is produced. In special cases where the piano is used for solo passages but is combined with the orchestra for most of the playing, a separate micro phone may be located over the piano. When that is done, the recordist or control operator must be something of a musician, for he will determine the musical balance whenever this microphone is used. Highly directional types are best for this work. When the piano is used for solo work only, it can be placed in front of the orchestra and an extra microphone is unnecessary. A typical dance band setup is shown in Fig. 1203.
Singers are also a special problem. Distance from the microphone is a question of vocal power. Never place a powerful singer close and then reduce gain very greatly. Gauge distance by leaving microphone gain at normal setting and moving the singer.
When more than one microphone must be used, locate them some distance apart with their directional patterns either opposing or at right angles, the object being to avoid picking up sound on one micro phone which is intended for the other. Fig. 1204 illustrates typical right and wrong positions.
Making the Cut

Fig. 1204--Right and wrong ways to place two ribbon microphones for
best pick-up.
Use a monitor system, if one is available, in arriving at these placements and balances, then check by making test cuts. The following is recommended procedure for all cutting, tests as well as complete recordings:
1. Select a good stylus and test it by following cutting instructions 2 to 6 below (without feeding any audio to the cutter), then playing back the blank grooves on a phono graph. The cut should be silent, and the grooves should be shiny under a single light source.
2. Place a good blank on the turntable and position the mechanism over the turntable. Place the cutter over the beginning of the record (or whatever surface has not been used, in the case of test cuts), but not nearer to the perimeter than 1/4 inch. (When recording inside-out start at least 1/4 inch out from the label for 78 r.p.m., or at least 4 inches from the center at 33 1/3 r.p.m.)
3. Start the turntable and give it a few seconds to attain speed.
4. Engage the cutter mount with the lead screw (unless this happens automatically at some point).
5. Gently lower the stylus onto the revolving disc.
6. Check immediately to see that the chip is being disposed of properly. One result of lowering the cutter too quickly can be the improper throwing of the first part of the chip, and its entanglement with the stylus. If this happens, brush it away carefully.
7. Open gain controls or switches to feed audio to the cutter.
The best practice is to use variable controls rather than switches, for this. There is almost always a small amount of general air noise and agitation in a room, and, if it is abruptly switched in, it is noticeable on playback. Fade in smoothly.
8. Signal the performers to begin. Note that this procedure has given the cutter time to engrave a few blank grooves at the beginning of the disc--which is desirable.
9. Do whatever input mixing is necessary throughout the record, and keep one eye glued on the volume indicator.
Do not try to keep all material at the same level, but any reasonably large rises or drops in program level should be compensated for to some extent by operation of the appropriate gain control. Keep the indicator reading at reference level on peaks and somewhere between minimum and reference reading at other times. Over-all level should be kept as high as possible to produce a good signal-to-noise ratio in the finished disc, but do not over compensate to the extent that normal musical expression will be completely wiped out. This monitoring process is known technically as manual compression, and that is exactly what it is. (The slang term is riding gain.) Volume changes are compressed into smaller variations, but not eliminated. It is unfortunate that this must be done because some realism is sacrificed (which is why volume expanders are used in some playback amplifiers), but the cutter must be neither overloaded nor fed so low a level that no appreciable stylus movement will occur.
10. Keep an eye on the chip. (With one eye on the volume indicator and one on the chip, the recordist will run out of eyes, but most people manage anyhow !)
11. As the end of the record draws near, signal the performers. Do not cut closer than 1/4. inch to the label at 78 r.p.m., nor closer than about 4 inches from the center at 33 1/3 r.p.m. (If recording inside-out, don't cut closer than inch to the rim.)
12. As the performance ends, close the gain controls, let the stylus cut a few blank grooves, then conclude with a lock groove if the machine is capable of it. If not, simply lift the cutter after cutting the blank grooves.
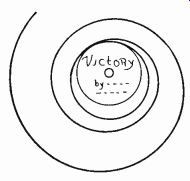
Fig. 1205--Eccentric groove at end of commercial phonograph record.
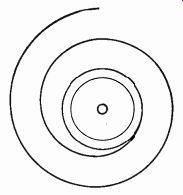
Fig. 1206-Appearance of lock groove at center of disc.
Here are some important cautions. They can, of course, be disregarded on occasion, but generally they apply:
1. Never start or stop the turntable while the stylus is resting on the disc. (This rule must never be broken or the stylus will be !)
2. Never use a bad stylus.
3. Always make at least 2 test cuts before each recording.
The first should be made blank to test the stylus, and the second should be modulated with a sample of the program material. Where special effects or balances are necessary, make a test cut of each one. Using discs for test purposes is cheaper in time, temper, and money, than ruining complete recordings through improper balances and placements.
4. Use the same type of disc and stylus for the tests as for the final job.
5. Never allow volume to exceed the no-distortion limits of the cutter and amplifier.
6. Never allow anyone to touch a live microphone during cutting.
7. Never place a microphone on a piano which is to be played or on any vibrating surface.
8. Never allow anyone to handle the recording equipment un less he knows all about it (self-protection, and better than an insurance policy).
9. Make sure that all preliminary adjustments made according to the procedures detailed in previous Sections are still effective before cutting.
Lock Grooves
Anyone who has ever played a record made by an inexperienced person is familiar with the action of the pickup when it reaches the end of the record. The needle reaches the end of the last spiral groove and, having no place else to go, flies out into the center of the turntable, plowing up the label and, if there is no mechanical stop, digging up the grooves on the opposite half of the surface. Commercial phonograph records have a so-called eccentric groove at the end (Fig. 1205), but this is made during processing and is impractical for instantaneous recordings.
There is, however, a very simple way of making a lock groove with any mechanism which allows the cutter to be disengaged from the lead screw without being raised from the record. Fig. 1206 shows the last few grooves of a disc so treated. The grooves are perfectly spiral until the last groove. Then the cutter has not moved inward as usual, and a perfect circle results. When the playback needle reaches the circular groove, it rides around in it until the pickup is removed. There is no possibility of the disastrous effects mentioned above.
To make a lock groove, allow the turntable a few extra revolutions after the program material has ended ; then disengage the lead screw so that cutter movement stops. Allow the turntable slightly more than one additional revolution, and then raise the cutter off the record without en gaging the lead screw. To perform this operation successfully requires a little practice, but the technique is not difficult. Don't allow the turn table much more than one revolution with the lead screw disengaged be cause each time it traverses the same groove the stylus cuts deeper and will eventually reach the base material and blunt itself. If less than one revolution is allowed, the circle will be incomplete, and the attempt at a lock groove might as well have been omitted.
If the particular mechanism at hand does not allow lock-grooving, let the cutter make as many blank grooves as room allows at the end of the disc. That will give the playback operator time to lift the pickup before the pickup arm flies off.
Spiraling
Another allied technique is spiraling. On many records, especially the large ones made at 33 1/3 r.p.m., several selections or announcements may be recorded on the same side. It is desirable to separate these, so that selected ones may be played without having to hunt for them.
The spiraling technique is this : allow a couple of blank grooves at the end of a selection, then disengage the lead screw without lifting the cutter. Immediately push the cutter by hand about inch inward and immediately re-engage the lead screw, proceeding with the next selection.
Do not push the cutter too fast: about 6 or 7 times the speed at which it is normally actuated by the lead screw is sufficient.
Spiraling is difficult to do manually, since it is very easy inadvertently to create a lock groove by failing to perform the "immediate" operations immediately. Some machines are provided with a spiraling crank at the outside end of the lead screw. (Such a recorder is shown in Fig. 406, Section 4). To spiral, simply turn the crank by hand. This makes the lead screw turn faster than normal and there is no possibility of error. Hand-spiraling requires practice, and because of the chance of error, it should be done only when absolutely necessary.
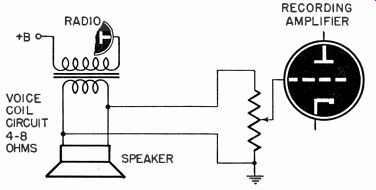
Fig. 1207--One method of coupling radio receiver .to recording amplifier.
Making Radio Recordings
Recording radio programs, speeches, or musical selections is an excellent way to build a library. Most radios can be connected to the recording amplifier input in either of 2 ways. The first method involves placing the amplifier input directly across the speaker voice coil of the receiver, as shown in Fig. 1207. If the speaker is to be disconnected or switched out for any reason during recording, a dummy load resistor equal to the voice-coil impedance should be substituted. This bridging allows the high-impedance input of any amplifier to be fed by any low-impedance source which is properly terminated in its characteristic impedance. The very large loss of level in this process explains why the high power level normally used for a loudspeaker may be coupled directly to an amplifier input. High frequencies may be lost with this arrangement, and any distortion in the audio system of the receiver will be passed on.
The second, and better method, is to connect the amplifier input directly to the output of the second detector load resistor, as in Fig. 1208. Here the recording amplifier simply replaces the receiver's audio section. (See also Section 8). Fig. 1208-Another radio connection, which bypasses receiver audio system.
With either of these arrangements, a.c. - d.c. receivers are not recommended, since their chassis are often tied to one side of the power line. They are also usually of poor fidelity, which is another good reason for not using them. If such a set must be used, insert a 1 to 1 ratio isolating transformer between it and the recording amplifier or use 0.05 uf condensers in series with both sides of the audio line.