PERHAPS you have an old TV, equipment or speaker cabinet of pleasing design that you'd just as soon keep, but time has taken its toll and the finish on the thing has become shabby looking. Maybe it is scarred, nicked, scratched, or coming apart at the seams, but you still have a warm spot in your heart for the old warrior and would like to do something with it.
There is usually a great deal that can be done to brighten and refurbish the old vet, so let's investigate the kinds of defects likely in used cabinets and what can be done about them.
The common types of cabinet defects can be put into two categories: the first consists of various injuries resulting from use, wear and tear or transit damage. These, while occasionally serious enough to warrant discarding the entire cabinet, are usually relatively minor and rather simple to correct, although often they are unsightly. The second category comprises breakdowns or failures in the cabinet resulting simply from old age or from construction or finishing methods that were not what they might have been from the start.
Burns
Burns are one of the commonest of injuries (Fig. 801). About 99% of them will appear on cabinet tops, and about 98% will be cigarette burns. The ones along the edges of the top will be the result of parking a lighted cigarette on the edge of the cabinet.
The ones in the middle of the top are generally caused by a lighted cigarette falling out of an ashtray.
Burns are easy to detect-they'll pretty much shout at you.
Ranging from a small discolored spot to a large blackened area at least 2 inches long and ½ inch wide, the size is the clue as to how much trouble it will be to repair the damage. Though a burn may appear superficial, when you start to scrape away the charred material you may have to go a lot deeper than you anticipated to get all the scorched wood out.
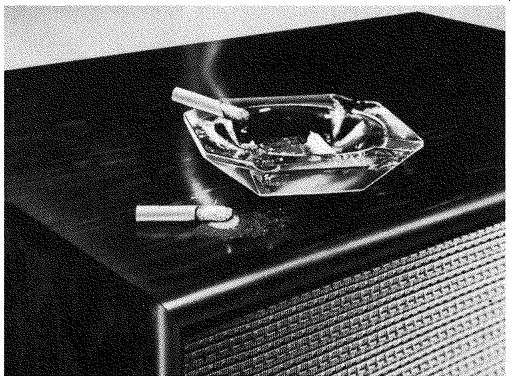
Fig. 801. Most cabinet burns are caused by cigarettes.
There are two ways to treat a burn, but the first step for both is scraping. All of the charred material, both finish and wood, must be removed. Do the rough work with a sharp knife-a paring knife with a curved blade, a jack knife or a curved Exacto knife is good.
When you have removed all of the burned finish and scraped out all the blackened wood, smooth the spot with very fine sand paper, 2/0 to 4/0, and stain it to match the surrounding area.
Now you have to decide which way to retouch, and this decision is based on how deep a hole there is in the surface after scraping.
If the depth of the scraped-out spot is ¼ inch or less, use what is known as French polishing. Make a small pad of cheesecloth or gauze about I½ inches square and about 20 layers thick. Wet this pad with white shellac and squeeze out the excess so that the pad is soggy but not dripping. Then pull up the four corners in your fingers to make a round-ended pad and apply three or four drops of linseed oil. With a brisk motion rub the shellac into the affected area. At first apply very little pressure, but after a few seconds the shellac will start to harden and you can rub with about the same pressure used when polishing hard wax. Keep repeating this process, working shellac into the burned area and around the edges until it is built up level with the rest of the top. When you are done, the spot you have been doctoring will be glossy. If the rest of the piece is satin-finished, dull the repaired spot with either extremely fine steel wool, 4/0, or pumice.
French polishing is fine for a shallow burn, but what do you do if you've got one that is deep, 1/8th inch or more? After the burned area has been scraped, sanded and stained to match the surrounding color, do what is called "burning in." For this you need the following equipment: an alcohol lamp, a small flexible spatula (a light, springy artist's palette knife would be excellent) and a shellac stick, either transparent or of a color to match the piece under repair. (Fig. 802).
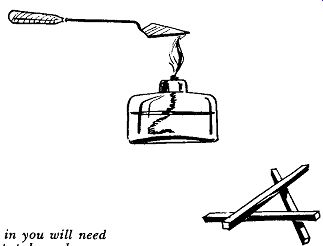
Fig. 802. For burning in you will need an alcohol lamp, a spatula and
some shellac sticks.
Heat the palette knife over the alcohol lamp. By touching the heated knife to the shellac stick you will melt a small amount of material so that you can place it in the hole to be filled. Repeat this process, filling the hole a little at a time until it is level with the surrounding area. Be careful not to overheat the knife as this will cause the shellac to burn creating carbon that will smudge the repair. All that is needed is enough heat to melt a little of the shellac stick at a time. When the hole is filled, use the heated knife to smooth the surface around the edges (Fig. 803). Again be careful not to overheat the knife or it will blister the surrounding finish. Complete the smoothing operation by sanding lightly with the finest possible paper, about 4/0 to 6/0, and top off with French polishing, or rubbing with steel wool or pumice to con form with the surrounding texture.
Water and beverage stains
These will appear as opaque or semi-opaque milky areas, generally on cabinet tops (Fig 804). They may be in the form of rings left by the bottoms of wet glasses, or as irregularly shaped areas caused by spilled beverages that were allowed to stand.
There are two ways to remove white spots. One is by rubbing them, and the other is by chemical action. Since such spots do not generally penetrate through the finish, it is best to try rubbing them out first.

Fig. 803. Burn holes can be filled with shellac.
On a dull finish, use very fine steel wool and oil; on a semi-gloss finish pumice and on a high-gloss finish rottenstone. Merely rub the spot with the appropriate abrasive until it disappears.
If rubbing doesn't seem to affect the spot much, then switch to a chemical treatment since the spot is apparently fairly deep.
The danger of chemical methods is that, if the chemicals are too strong or are left on too long, they'll take the finish off the area entirely.
One method uses ammonia. Dampen a soft rag or cheesecloth with ammonia, then wring the pad as hard as you can. Now, very gently, quickly and lightly brush the ammonia across the white spot. For bad white spots on lacquer finishes, do the same thing with lacquer thinner. Remember-work quickly and lightly lest you take all the finish off along with the spot, in which case you've got a job of French polishing to do to put the finish back on.
Scratches
Little ones, big ones or both, scratches can be found on every used piece of furniture. In many cases the primary trouble with the appearance of an old cabinet is a myriad of little scratches which, all added together, give it a terribly dull, defeated-looking appearance. Most of them can be removed easily and rapidly.
Rubbing with 4/0 steel wool, pumice, rottenstone and oil, furniture or even automobile-rubbing compound, depending on the amount of gloss desired in the final result will remove most scratches.
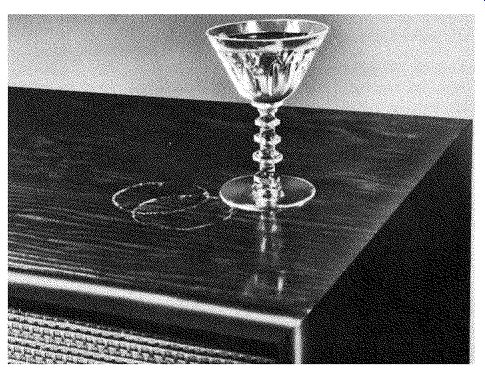
Fig. 804. Beverage stains will appear as rings or milky areas.
Where you are doing a routine polishing job, don't even try to get all the scratches out. You'll get most of them with a brief rubdown and you will get the effect you want-appreciably brightening the appearance of the cabinet without a lot of work.
For a dull satin finish, use steel wool; on a semigloss use pumice and oil or pumice and water. For a high-gloss finish, use furniture rubbing compound. If you can't find this, use automobile rubbing compound. It is just about the same. If you cannot find either, use rottenstone and oil. The high gloss is, of course, the most exacting finish to clean because it will show much finer scratches than either of the others.
When you are through rubbing the scratches, go over the whole piece with a good-quality furniture polish to complete the job properly.
In many cases you'll find that by rubbing only the top and then applying furniture polish to the entire cabinet, you will get the desired effect. Far and away the largest proportion of scratches will be on tops.
In cases where you really want to get out all the scratches and some deep or stubborn ones will not respond to rubbing alone, you will have to French polish and then rub.
Nicks and gouges
These, or course, result from the dozens of ways in which a cabinet can be hit or scraped, either in transit or in use around the house. The simplest of them will require more labor to repair than scratches, and they can be big and deep enough to be impossible to repair completely. If they are really big, you can reduce the unsightliness considerably, but don't give anybody the idea that you can make them disappear entirely.
All deep depression injuries require the same treatment. The first step is to clear away all loose splinters and chipped finish in and around the area. Stain where restoration of color is required and proceed to burn in with an alcohol lamp, spatula and shellac stick as previously described. Where possible, use transparent rather than colored shellac sticks for burning in, since the trans parent type allows grain and color to show through, making a better match with the surrounding area.
After burning in, finish by smoothing and polishing as with other types of injuries.
Crushes
Crushes usually are due to transit damage and most often result from a cabinet being dropped on a comer. Like deep nicks and gouges, they can generally be vastly improved but cannot always be repaired completely. One word of caution: When you see a crushed comer examine the joint alongside the damaged area and the other joints. Make sure that none of them have sprung and started to open. If they have started to go, then the structure of the entire cabinet is in serious trouble and it may have to be discarded.
Crushed corners or edges are another type of damage treated by the use of shellac stick and burn-in. Particularly in the case of a crushed corner, you'll have to use your judgment as to how far to try to rebuild it. It is usually inadvisable to try to build a badly crushed corner back to its full original shape, since the resulting corner would be fragile and consist entirely of shellac.
Build bad crushes back, say ¼ inch or a bit more, and stop there. The damage won't be completely hidden, but it will be much less obvious and the repair will be more likely to stay in place.
Loose or broken hardware
This category includes a collection of miscellaneous problems--hinges that are wobbly due to loose screws, hinges bent out of shape, bent lid supports that won't open or won't support, door catches that won't catch, drawer slides that won't slide, and so on.
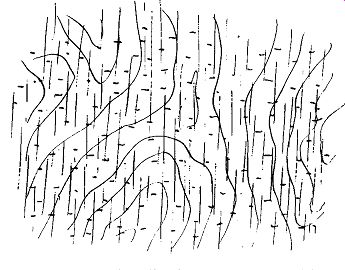
Fig. 805. Excessive vibration can cause a finish to craze.
Some of the trouble that arises from these causes is secondary in the form of scratching and scarring due to continued use of the cabinet after the hardware has become defective.
As a general rule, the best thing to do with bent or broken hardware is to take it off and replace it. A bent or broken hinge, catch or lid support will never be quite right if you try to repair it. On an original antique piece with antique hardware that can not be substituted you have no choice but to attempt to repair it, but otherwise don't waste your time.
One of the most common troubles with hardware will be not that the hardware itself is damaged, but merely that the screws holding it in position have stripped their threads in the wood and loosened. Rather than replace with larger screws that may not fit the hardware it is better to remove the screws, fill the holes with plastic wood and while the plastic wood is still soft, re-drive the screws. Caution: Drive only until the screw heads are flush no more, or you'll pull the plastic wood right back out. Give the plastic wood time to set, and you'll find the hardware is tight again.
Cracked, crazed or alligatored finish
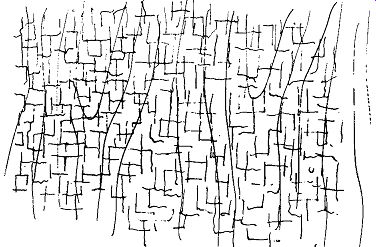
Fig. 806. Alligatoring is usually found in the finishes of old cabinets.
These terms denote various types of deterioration found in aging finishes, although occasionally these conditions may appear on a relatively young piece of furniture. For example, a cabinet subjected to considerable vibration, such as a speaker enclosure, may have a tendency to craze before it is very old (Fig. 805). Cracks in the finish can be depended upon to occur over any cracks or checks in the underlying wood. Alligatoring is so called because the finish crazes in a pattern similar to that of alligator skin. (Fig. 806). It is usually a disease of old age. You have probably seen it on old pianos. From time to time it can occur on a relatively new piece of furniture if the finishing was done in too cold a room.
With any of these conditions you may want to take a long pause before deciding whether to try to repair the finish, strip the old finish off and refinish or throw the whole piece in the fireplace. A moderately crazed finish can sometimes be restored by the use of 50-50 mixture of linseed oil and turpentine plus a good deal of elbow grease. There are also commercially available scratch-fixing and crack-eradicating mixtures that will often work wonders on crazed or cracked surfaces. Also an overall French polishing will often do the trick. It's a lot of work, but it can give you a lovely looking surface on a piece that has become a dismal mess.
In the case of an alligatored finish a combination of treatments first with crack eradicator and then French polishing may remove them. But if the alligatoring is very bad, your best solution is to strip the whole thing and refinish, or discard the cabinet.
Grille cloth
A very common cause of shabbiness in a cabinet that is basically sound and in good condition is a baggy or torn grille cloth. To make the cabinet look miserable the cloth need not necessarily be ripped, frayed or even pulled loose. It may merely be dirty and discolored. Grille cloth is not expensive, particularly considering how much the replacement of a tired one can do toward sprucing up the entire appearance of a cabinet.
Loose, peeling or blistered veneer
Veneer will most often start to peel or loosen along an exposed edge, a place where atmospheric dampness can get in under it (Fig. 807). The most common places will be along the back edge
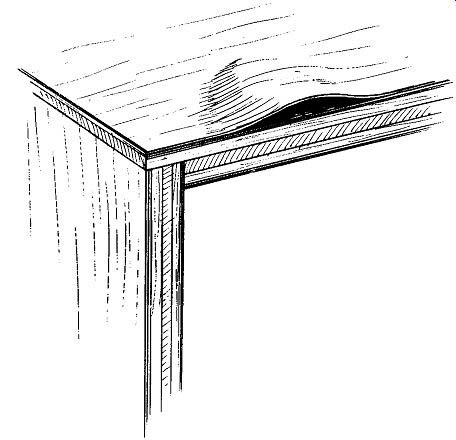
Fig. 807. Veneer will usually loosen or peel along the edges of a cabinet.
of the top or sides, along the bottom edge of the sides or along the hinge sides of doors. A good preventive for this is to seal such edges thoroughly with lacquer or varnish. Once they have started to peel, of course, it may be too late. However, if they haven't gone too far, they can be repaired, after which it is a good idea to seal the edges thoroughly to prevent a recurrence.
If the veneer is loose for lengths of 2 or 3 inches, but is still all there, you can repair it. But if a major area of a side or top got thoroughly soaked and the veneer is checked, blistered and loosened up over a large area-don't even try.
A small area of loose veneer can be easily corrected by forcing some glue in under it, using either a brush or a squeeze bottle.
Apply pressure to hold the veneer tight against the core while the glue sets. This can be done with clamps or by resting the entire weight of the cabinet on the affected side. If you use a squeeze bottle, be careful not to get too much glue in. It will come squirting back out when you apply pressure.
In the occasional case of a panel on which the veneer has stayed tight around the edges but has blistered somewhere toward the middle, you've got quite a tricky situation. It does not usually respond well to treatment. However, you can take an extremely sharp, thin-bladed knife and make a slit through the veneer running lengthwise with the grain right down the center of the blister. Now, holding down one side of the blister with your finger, squirt glue in under the other side, then repeat the process in reverse. Next, take a little roller and roll the glue from the center line where your cut is and where you squirted in the glue out toward the edges of the blister underneath the veneer. When the glue is well distributed, apply pressure, allow the repair to dry, and see what sort of results you've got. If you were able to get the glue thoroughly distributed under the blister, it will take well. If not, you may find a half dozen little blisters instead of one big one. That is the chance you must take in trying to meddle with the thing. The cabinet was probably useless as it was so you will not have done any real damage.
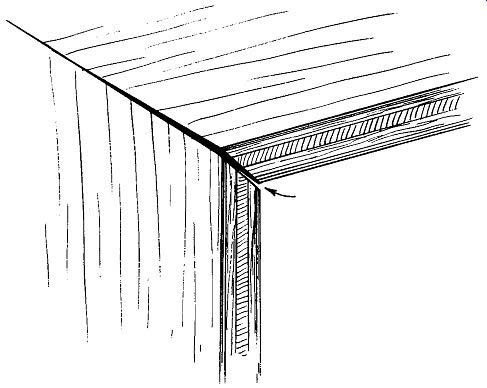
Fig. 808. An open joint can be caused by stresses set up in the wood.
Open joints If a cabinet is cracking open along a joint and hasn't been dropped or abused, the chances are the cause is either that time and humidity have set up warping stresses in one of the panels, causing them to separate along a joint. Or else the glue has dried out, become brittle and let go. If the glue has given way, you haven't too much of a problem; if warpage has set in, you've got a bit of trouble (Fig. 808). The basic cure for an open joint is glue and pressure. Whether you'll be able to help the joints with internal glue blocks (tri angular wood strips placed inside the joints), or cleats and screws depends on the type of cabinet and the location of the open joint. For example, the inside of a speaker cabinet is never seen nor for that matter is the inside of the tuner or amplifier compartment of an equipment cabinet. In such cases there is a good chance of effecting a successful repair even if the panels are warped because you can get inside to install glue blocks or cleats and screws to reinforce and pull the joint back together. If, however, the open joint is in a readily visible area, they cannot be used, and you'll have to rely entirely on glue and pressure.
Try to clean out the old glue from the open joint before forcing in additional glue. Lumps of old glue remaining in the joint will make it difficult if not impossible to clamp the joint closed and keep it that way.
To get adequate and continuous pressure the ideal clamping tools are cabinetmaker's pipe or bar clamps. If these are not avail able, another way of developing a quite respectable pressure on the joint is to run a heavy rope around the cabinet. The comers of the cabinet must be protected with, first, a thick wad of tissue or other soft paper or soft rags and then, on top of that, L-shaped blocks of wood. When all of the comers are adequately protected, take up on the rope by putting a rod or pipe through it and twisting it in the manner of a tourniquet. Although a bit cumbersome, this method will develop considerable pressure.
Loose legs
More loose legs result from misuse than from old age. After all, if you load a cabinet full of heavy equipment plus a lot of records and then start dragging it across the floor, you cannot very well blame old age or faulty construction for loose legs that were subjected to lateral strains they were never intended to stand.
Of course, legs can also loosen as a result merely of holding up a heavy load for a long time.
To tighten a loose leg the first question is to find out what is loose. This in turn will depend on how the leg was attached in the first place. When a cabinet has four separate legs independently fastened, a common method of attaching them is with hanger bolts. A hanger bolt, you will recall, has a thread like a lag bolt at one end and a machine-screw thread where the head ought to be. It is mounted by driving the lag-bolt thread into the leg; then the machine-screw thread runs into a plate that in turn is wood screwed into the bottom of the cabinet.
Possible sources of trouble here are: 1) The plate is loose from the bottom of the cabinet; 2) The leg is partly unscrewed from the plate; 3) The hanger bolt is loose in the leg.
In the first two cases the solutions are obvious. If the plate is loose from the cabinet, tighten the screws. If the hanger bolt is loose in the plate, turn the leg to tighten it. If the bolt is loose in the leg, either the bolt has come loose by stripping the threads in the leg or the leg is split.
In either case the best thing to do is to replace the leg. If, how ever, this is not possible-perhaps you cannot get a leg that matches--then you have to try to repair it.
Take the hanger bolt out of the leg and determine whether the trouble is a stripped thread or a split leg. If the thread is stripped, squirt glue or an all-purpose adhesive into the hole, run the hanger bolt back in, then let the whole thing set until your adhesive is thoroughly dry and hard, and remount the leg. If the leg has been split, squirt glue in the hole and run the bolt back in. This will force glue out into the split. Now clamp the split closed, let it dry, and remount.
If the legs are not individual but attached to each other by a frame forming a base or bench under the cabinet and this arrangement has become loose, you'll find you are dealing either with broken dowels running from the frame into the legs or glue failure.
Lay the cabinet on its back and take the whole base off. Examine the base for loose joints. Any joints that are loose should be knocked completely apart. Now look for broken dowels or splits in the rails near the dowel holes. If all the parts are OK, clean the old glue out of the dowel holes, re-glue, reassemble and clamp to dry. Any broken dowels should be replaced. If possible, use a hardwood such as birch for the replacement dowels. The common pine doweling is not very strong, and the loads that go in audio cabinets are often heavy.
If one of the rails has been split, force glue into the split and put a separate clamp on that part when you reassemble the whole base.
Loose molding
This is another case of cleaning out old glue and then re gluing. It is often desirable to hold moldings in place with very tiny wire brads rather than by clamping. It is often difficult to get a clamp onto a small molding and, if you do, you may crush it. The brads used should be extremely small. Their purpose is not to hold the molding permanently; that is the job of the glue.
The brads are merely to hold the molding while the glue sets.
In discussing repairs to the wood structure of cabinets very little mention has been made of screws and nails. This is because furniture is basically held together, not with fasteners, but with glue. Granted that, particularly in the case of speaker enclosures, the structure is reinforced with screws, the basic fastening is still glue. This is what was relied upon to hold the cabinet together originally, and this is what you can rely on to repair it.
Refinishing
Proper refinishing is a big job. Contemplate doing it only to a piece that you really love very dearly. The worst part of the job is stripping the old finish off and preparing to refinish. The first requirements are liberal quantities of paint remover, a scraper and a good deal of persistence. Different paint removers are used in slightly different ways, so follow the directions on the can and be sure to get all the old finish off, especially around moldings, doors and legs. You'll never get a decent new finish unless you get all of the old finish out from under it. Once the old finish is completely removed from a piece the refinishing procedures will be the same as for finishing a new piece.
After you are through with the paint remover and have taken off all of the old finish, wash the cabinet with turpentine or benzene to get rid of any paint0 removing chemicals that may still be on the wood. Then sandpaper as for a new piece and, the better your sanding, the better your final results will be.
You will have no trouble staining the cabinet if you did a good job of getting off the old finish, but any spots where the old finish has not been fully removed will not take the stain.
If you were thinking of bleaching--don't. Bleaching an old piece will give spotty results.
The filling, sealing, finishing and rubbing operations in re finishing an old piece will be exactly the same as if you were applying the initial finish on a new unit, and you can expect just as good results.
A final word of caution when refinishing an old cabinet: After you have completed the removal of the old finish, examine the entire unit very carefully for any structural defects and remedy these before starting the finishing work.