
FINISHING hi-fi furniture involves the same processes as finishing any other type of good-quality furniture. It is no more difficult, but it is not one whit easier. If you know how to finish a bureau or a coffee table correctly you know how to finish a hi-fi cabinet.
There is more plain hard work involved in furniture finishing than there is technical knowledge or skill. The quality of the end product is directly proportionate to the amount of time spent sanding, polishing, rubbing and steel-wooling. There is no point in trying to think up ways to speed up or avoid these tedious jobs. They've all been thought of and tried-unhappily.
Instead of spending your time scheming, spend it rubbing-the results will more than justify the effort.
One fellow summed it up neatly. Surrounded by brushes, paint, varnish, scrapers and so on, he was overheard murmuring unhappily, "I don't know why it is, but the minute I sit down nothing gets done." Some of the brute force needed can be alleviated by the proper use of power tools that can be rented if you do not own them. However, it's still a matter of elbow grease.
Aside from work, the most important factor in getting a good finish on a piece of furniture is the manner in which it is pre pared. It is just not possible for the finish to be any better than the surface underneath.
We will assume now that the cabinet to be finished is completely assembled with all the required parts in place. In speaker cabinets this means that baffle boards and backs have been fitted, speaker holes and ports cut. In equipment cabinets, drawers, lids, doors, drop fronts, slides, hinges, catches, etc. are all fitted and in working order.
This involves checking the fit of all moving parts. Make sure that a door, for example, does not rub anywhere as it closes. If there is the slightest hint of a door binding anywhere, take it off, shave it, then re-hang and check it again.
When doing this final fitting, remember that in damp weather wood tends to swell a bit, so a fit that just clears in dry weather may bind when it gets damp. So if you're checking on a dry ...

Fig. 701. When preparing large surfaces wrap sandpaper around a block
of wood as shown. (Courtesy Grand Rapids Varnish Corp.)
... day allow a little for swelling--1/32 inch around a door will be enough. It can he a fair-sized job to shave a door and retouch it after you've completed the finishing of the whole cabinet. This is the reason for the extremely careful check of fits before the finishing is started.
With everything satisfactorily fitted, take a look at the cabinet.
Isn't it pretty? Fine! Now tear it all apart. Everything that can possibly be removed comes off. All doors, drawers, control panels, backs, lids, baffle boards, hinges, knobs, catches, slides and anything else that moves, comes off. Take out the screws very carefully so that you do not destroy the threads in the wood.
You will want to put them all back in exactly the same places after finishing. Remember, the final check of the fit was made with hardware as it now is, so when you make your final reassembly after finishing put each item back in precisely its present position.
If you have handled your materials carefully in the process of construction, you probably won't find any deep scratches or gouges in the surfaces. But there will be a lot of minor scratches.
These are inevitable and must be removed prior to applying any finish. Also, the entire surface must be much smoother than it is as it comes from the lumber mill.
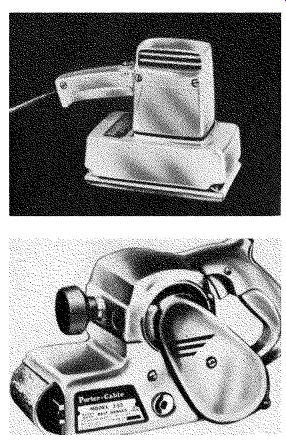
Fig. 702. Several types of sanding machines can be used in furniture
finishing: an orbital sander (above) ordinarily cannot be used for final
finishing: the belt sander (below) can be used for the final sanding.
(Courtesy Porter Cable.)
Sanding

Fig. 703. Curved and carved portions of the cabinet must be finished
by hand. Do not use a sanding block. (Courtesy Grand Rapids Varnish Corp.)

Fig. 703 (continued). This photo shows hand-finishing of curved end
using 6/0 sandpaper.
Use a fine sandpaper from the beginning, somewhere between 0 and 2/0 garnet paper. The veneers are not very thick, and it won't take much to go clear through. All you want to get off are the scratches. Always sand in the same direction as the grain, never across it. Wrap your sandpaper around a block of wood when doing large flat areas (Fig. 701).
To be acceptable, a sanding machine must have either a flat head on which an ordinary piece of sandpaper is mounted, or it must be a belt sander. The flat-head types usually have an orbital motion. The orbital types are all right for preliminary sanding, but should be followed by a final hand sanding with extremely fine sandpaper, about 4/0 to 6/0, to take out any little scratches that may be left by the orbital movement. With a belt sander even the final sanding can be done by machine, provided a belt with a fine enough grit is used (Fig. 702). Curved parts such as moldings, turnings and beadings cannot be done by machine. They must be done by hand (Fig. 703). Don't put a sanding disk on your electric drill and try to use it for sanding furniture. If you do, the results will be appalling.
In your final sanding be sure to go over everything; for example, the edges and backs of doors, the inside of a record changer well or the inside of record storage compartments.
Anything that can be seen at any time is important, and the better this last sanding is the easier it will be to achieve a really good finish.
Inspect every square inch to be sure you haven't missed any nicks, scratches or rough spots. Supplement visual inspection by running your fingertips over everything. Often they will find a rough spot that cannot be visually detected.
After inspection, if you are satisfied that you've done a good job, clean away the dust, and get ready to start applying the finish.
Pre-coloring
The first step is pre-coloring by staining or bleaching. Stain when you want to darken the color of the natural wood; bleach when you want to lighten it. If you want to leave the color of the wood alone, skip both operations and begin with filling.
Staining
A stain is a type of dye, and must be mixed in a liquid vehicle before it can be used. The three types are: water, oil and alcohol stains. Each has certain advantages and disadvantages.
Of the three the water stain is the most used. It penetrates well, is easy to prepare and goes on with good uniformity. There is one trouble with water stain, however. It tends to raise the grain of the wood a little, making it necessary to sand the piece lightly after staining to remove the "peach fuzz." Oil stain does not have this fault. It will not raise the grain, but it does not penetrate as well. Its penetration is particularly poor on the denser woods with wide pore spacing, such as oak, but it is fine on softer woods with closer pores. Oil stain takes longer to dry than water stain, but it does eliminate the de-fuzzing operation.
For highly resistant woods, an alcohol stain is best. It has the highest penetrating power and is also the fastest drying. Due to its extremely rapid drying, it is more difficult to apply uniformly, but with a little practice on scrap wood this problem can be mastered.
The first thing to do when staining is to decide what color you want. Since a wide variety of prepared stains are available, you will find a satisfactory color without too much trouble. If you cannot, get one that is too dark and thin it, or get two that are close (one darker and one lighter) and mix them.
Any specific stain will have a different effect on each type of wood and their density and pore structure contribute to the effect of the stain.
This leaves you with the problem of finding out how a particular stain will affect a specific kind of wood. Apply some of the stain to scraps left over from the material used to make the cabinet, and see what the result is. If it comes out too dark after it dries, thin the stain and try again. If it is too light, go back and get some darker stain.

Fig. 704. Wiping off an oil stain can be accomplished easily with a
soft cloth or some cotton waste. (Courtesy Grand Rapids Varnish Corp.)
Remember one thing however, when finally deciding the color of your stain. A piece of wood that has been stained only will appear a shade lighter than one that has been stained and lacquered. So if you are in any doubt about your stain, put some lacquer, shellac or varnish on a stained sample, and see what you get then. This is the only way to really see a final color in advance.
As soon as the color is settled, you've done the hardest part.
The actual staining is easy.
In the case of water or alcohol stains just brush or wipe them on and let them dry. Be sure to allow enough drying time before moving on to the filling operation. Water stain can be a bit deceptive in this regard, particularly in humid weather, when it will sometimes feel dry when it is not. Under such conditions play safe and give it extra time.
Oil staining is a bit different but still very simple. An oil stain will be a fairly thick, gooey mixture. Brush or wipe it on with a rag, wait 5 minutes or so, and then remove the excess with cotton waste or cheesecloth (Fig. 704). The length of time an oil stain is allowed to penetrate will have an effect on how dark the stain will be, so do not work too large an area at one time, and try to keep the standing time about equal on the various parts. Remember, an oil stain takes longer to dry than either of the other two types. Allow it to dry thoroughly before moving on to filling.
Bleaching
Avoid bleaching. This is a pretty strong statement but it is the best policy to follow. If you want a light finish, start off with a blond wood-a lot of grief can be avoided this way.
Bleaching, even when it is done correctly, does not always result in a uniform color. The process cannot be trusted-it does not guarantee stable results in that dark streaks may later appear in a finish that originally bleached uniformly.
If for some reason you must bleach here is how you do it.
Most bleaches consist of two different compounds that are to be applied to the wood, one after the other. These are standard mixtures available from finishing supply houses. The procedure is simple: Apply the first compound and let the piece stand for 15 or 20 minutes, then apply the second. After that, let the whole thing dry. At the end of the first stage the piece will have partially lightened, but you will not see the full bleach until the second mixture has been put on and dried.
After a piece has been bleached and dried, to remove the excess bleaching chemicals from the wood it must be thoroughly washed with a dilute solution of oxalic acid, acetic acid or a dilute solution of vinegar (about I quart of white clear vinegar to 1 gallon of water) . The piece must again be thoroughly dried.
It will also need a light sanding similar to the de-fuzzing after a water staining, and for the same reason. The water will have raised the grain.

Fig. 705. When removing the filler, work across the grain with a semi-circular
motion. (Courtesy Grand Rapids Varnish Corp.) DIRECTION OF GRAIN CIRCULAR
MOTION
Because the bleaching process is time-consuming and, in addition, tends to be somewhat unreliable as to results, most so called bleached furniture commercially available isn't actually bleached at all. A simulated bleached finish is used. An opaque or semi-opaque blond lacquer is first applied to the raw wood, after which the pores are filled with a toned filler. From there on, sealer and finish coats are applied, the same as for any other finish. The final finish closely resembles a true bleached one, but the process is faster and the results are more uniform and stable.
Filling
If you have not done any pre-coloring (staining or bleaching)
of your wood, the finishing process will start here. If you have pre-colored, filling will be the second step. You literally fill in the little tiny pores in the surfaces of the wood. If unfilled, they show in the final finish as innumerable little pocks, practically impossible to eradicate. Filling is much easier! A few very fine pored woods do not require filling-birch, maple, gum or beech, but walnut and the mahoganies need it as do oak, limba, primavera and most of the other woods you are likely to use.
Wood filler comes in a variety of colors. Choose the color that most closely matches the color of your wood. If the color you need in a filler is not available, tone one of the premixed ones with the correct stain.
Filler, which comes as a thick paste, must be thinned and mixed as directed to about the consistency of thick cream. When mixed, it can be either brushed on or wiped on with a rag. A generous coat is applied and allowed to stand until the surface "flats off" or starts to look dry. Wipe the excess filler with coarse rags or waste. Wipe across the grain to drive the filler into the pores of the wood, which is where you want it. This is the only time in the entire finishing process when you work across the grain. In every other operation work with the grain (Fig. 705). After wiping, the filler should be allowed to dry for a minimum of 6 hours, or overnight. If it is not thoroughly dry when you start to apply the finish coats, it will pull out of the pores, and you will be no better off than if you hadn't filled the piece at all.
Pickling
This is similar to filling but not quite the same. It is most often done on oak or similar coarse-pored woods, although I can recall with some displeasure having seen it done to walnut.
The procedure is to apply plain or toned white paint or white lead to the wood, and then wipe across the grain so as to leave the pores filled with the paint. Since the paint is more opaque than filler, its effect on color is more pronounced. On oak, for example, it shows up as strong white streaks marking the pores.
This is the well known limed-oak effect so popular a few years ago.
Sealing The sealer is really the first coat of the final finish. The essential difference is that, since the sealer goes on over raw wood, it tends to be absorbed into the wood more readily than do later coats. Therefore, the material used for the sealing coat is about 50% thicker than that used for the final coats. Under a lacquer finish use a lacquer sealer; under varnish or shellac use shellac sealer. After the sealer has dried, sand it lightly with extremely fine paper, about 6/0.

Fig. 706. A spray gun makes applying the finishing materials somewhat
easier. However, skill is required when this tool is used.
Final finish coats
In commercial work the material used for final finishing is invariably either natural or synthetic lacquer applied by spray.
Varnish is much too slow drying. Shellac, although rapid drying, is comparatively soft, and therefore leaves much to be desired in durability.
Where possible, lacquer is the choice for the home craftsman as well. It combines the advantages of both varnish and shellac, without the disadvantages of either. It has the durability of varnish combined with the rapid-drying property of shellac and, being a water-clear liquid, it has less effect on color than either.
If you are doing your finishing at home and have a spray setup available, practice with the gun on scraps first before starting on the cabinet. The two most common defects in spraying are "orange peel" and "runs." Orange peel is a type of rough surface texture resulting from either inadequate atomizing of the lacquer in the gun or from holding the gun too far from the work. Runs are caused by spraying too much lacquer on one area. The excess lacquer forms driblets that run downward from the over-sprayed area. They are both unsightly and difficult to remove. Fig. 706 illustrates the proper way to use a spray.
Another problem that sometimes arises in spraying is "blushing." This condition, characterized by the appearance of semi opaque milky areas, is generally caused by excessive humidity in the air. When this happens, quit spraying and wait for a dry day.
Lacquer can also be applied with a brush. It will not go on as smoothly, but a little extra rubbing will make up the difference.
Apply the lacquer sparingly to the brush and work rapidly because of the speed with which it dries. Do not brush over the same area repeatedly or you will cause laps and streaks. When applying one coat over another, it is even more important to work quickly lest the solvent in the second coat soften the first.
Fig. 707 illustrates the technique used when applying lacquer with a brush.
As with spraying, a bit of practice makes a world of difference.
Stay away from pressure cans for finish coats. The lacquer will be too thin for anything but touchup work.
If you haven't spraying facilities and brushing lacquer sounds too tricky for your first try, then switch to varnish. It has been used for centuries by the finest furniture craftsmen with excellent results. Much slower drying, it allows more working time but, for the same reason, it needs much more drying time between coats. You'll also no longer have to worry about working a second coat rapidly over a first. Once varnish has fully dried, its own solvent will no longer soften it, so there is no reason why you should not expect excellent results with it.

----- DIRECTION OF GRAIN; HOLD BRUSH BY FERRULE FOR BETTER CONTROL
Shellac will not give the durability of either lacquer or varnish. Also be particularly careful not to let either water or alcoholic beverages stand on a shellac finish. Water will leave a white spot, while anything containing alcohol will simply dissolve shellac. The volatile oil in shellac is alcohol, and it is what is used to remove an old shellac finish. So wipe up that spilled martini! One further word with regard to shellac. The usual commercial shellac is either a 4- or a 5-pound cut. This should be diluted practically 50% with denatured alcohol to thin it sufficiently for furniture application.
In furniture finishing a lot of thin coats are better than one or two thick ones. They will go on more smoothly, dry better and require less rubbing. Usually three coats on top of the sealer will be enough to build up a finish, but you might need more. The rule is; when in doubt, add another coat. It cannot harm and it can help.
Rubbing
For a plain gloss finish, you can stop after building up to final thickness, and eliminate rubbing. You can even use a flat lacquer or flat varnish for the last coat and obtain a flat finish without rubbing. Either one is adequate for large built-in wall installations, but for free-standing furniture to really look right it must be rubbed.
Many people prefer a matte or satin finish, others prefer a high gloss, but in either case the first step is the same. This consists of thoroughly rubbing over all surfaces. For lacquer or varnish finishes use a wet-dry abrasive paper dipped in a solution of soap and water to keep it from clogging. Minnesota Mining No. 400-A or equivalent is the paper for this purpose. The dipping in soap and water should be done repeatedly so that you are always rubbing a wet surface. The objective is to rub out all of the minute irregularities left by brush or spray. Rub with the grain, using a light even pressure. Check progress from time to time by wiping the surface with a clean rag. When you see a uniform surface with no little highlights or "hot spots," you are done (Fig. 708). Remember-you cannot use water on shellac. For rubbing shellac, use ground pumice and oil. Pumice can also be used on the other two finishes if you would rather, or if you should have trouble finding the wet-dry paper.
After the first rubbing is complete, the final step depends on whether you want a satin finish or a high gloss. For satin finish, go over everything again with very fine steel wool. Don't take your wife's scouring wool from the kitchen. It is not fine enough.
Try to find some 4/0 or finer.
For a high gloss finish, get some furniture rubbing compound and rub until you get the uniform high gloss you want. If you have trouble locating furniture compound, try some automobile compound. It is almost exactly the same. If you are unable to find either, try rottenstone.
Retouch
The next section deals with this subject in detail, but it is appropriate to mention here some things you may find necessary to complete a new cabinet.

Fig. 708. Rubbing is an essential feature of furniture finishing for
matte or high-gloss finishes. (Courtesy Grand Rapids Varnish Corp.)
If you have done a reasonably careful finishing job, any defects you will find now will be minor. In rubbing you may have here and there rubbed through the finish along an edge or corner. This is not an uncommon occurrence and shows up most on dark finishes in the form of a light line along the edge that has been rubbed through. It can be removed by touching over it lightly with a bit of the original stain followed by lacquer. A very small artist's brush is good for this purpose or you can use a small cloth pad if you are careful.
Another type of defect that you might find is a small nick or dent that may have been in the wood before any finishing was done, and which was not previously removed. These can be removed by a process called "burning in." This method of removing such blemishes is given in detail in the next section in connection with treating nicks and dents on old furniture.
For furniture new or old the procedure is the same.
Reassembly
Whether it is a speaker or an equipment cabinet you have just completed, some sort of reassembly is necessary. In the case of speaker enclosures, this may mean merely a baffle board and a back, but equipment cabinets may involve doors, drawers, lids, control panels and who knows what all hardware. Work slowly and carefully to be sure you are getting everything back exactly as it was when you completed the fitting. If you find that the threads in the wood have been stripped in a couple of screw holes, push a dowel into the wood ahead of the screw, then run the screw in. As the dowel expands, the screw will tighten in place.
Another reason for being careful now is that you do not want to drop or mar any parts since they are all finished. If you should damage anything, the next section will tell you what to do.
After the cabinet is reassembled, it should get a coat of hard wax as a protective measure before it is put into service. A number of hard wax compounds available contain a goodly percentage of Carnauba wax. One of these should be used at this point. The lighter liquid or self-polishing waxes are all right for later but they do not have enough body for the original protective coating.
Oil finish
No discussion of finishing would be complete without a mention of the oil finish which is widely used on walnut. It is also used extensively on teak. This type of finish results in an extremely matte, dulled surface which emphasizes the natural characteristics of grain and figure in the wood, and it requires that a high grade of material and workmanship have gone into the making of the piece. Where a normal full finish is applied, a good finisher can cover a multitude of minor defects in both material and craftsmanship that will show through an oil finish.
There are two ways of doing an oil finish. It is applied directly to the raw wood or over a filler. When filler is used, it is applied in the same manner as if a lacquer or varnish finish were to follow. Filling under oil will result in a sort of compromise between the slightly raw effect of oil alone and a very dull conventional satin finish.
The oil used in an oil finish is linseed and is applied hot to improve penetration. Apply the hot linseed oil, let the piece stand for about 20 minutes, wipe off the excess oil and let the piece dry over night. This procedure is repeated about three times. An oil finish will generally take a re-oiling once a month for 2 or 3 months, after which it can go 6 months at a time without attention.
An oil finish will darken with time so do not expect a newly oiled piece to match exactly an old one, even though the same species of wood has been used. Also do not expect an oiled piece to match a lacquered or varnished one. It will be a bit darker from the beginning and will darken a little more with time.