Now that you have learned the major aspects of television cameras and their lenses, you need fo know how fo operate a camera. In this section we will take up four main topics, all of which relate to camera operation: (1) camera mounting equipment, (2) the most common camera movements, (3) how fo work a camera in a production situation, and (4) some aspects of picture composition.
You will find that, although high-quality cameras may become considerably smaller and lighter than they presently are, you will still need a camera mount for smooth and efficient studio operation.
Camera Mounting Equipment
Ease and fluidity of camera movement are essential in television production. Three basic units have been developed that enable us to move the camera freely and smoothly about the studio: (1) the tripod dolly, (2) the studio pedestal, and (3) the studio crane.
The Tripod Dolly The tripod dolly consists of a metal tripod usually fastened to a three-caster dolly base. The three casters can be used either in a freewheeling position, which ensures quick and easy repositioning of the camera in all directions, or locked into one position for straight-line dollying. If you don't want the dolly to move, you can lock each caster into a different direction so that each one works against the others. In effect, you have "put the brakes" on your tripod dolly. (See 4.1.) Various cable guards in front of the casters help to prevent their rolling over or hitting the camera cable. Make sure that you screw the cable guards close to the studio floor, especially when using a small-diameter minicable on your camera.
That the tripod and the dolly base are collapsible makes them the ideal camera mount for most remote operations. The tripod can also be adjusted to the height of the camera operator, but this manipulation takes time and energy. Quick and easy elevation of the camera is, therefore, not possible. (See 4.2.)
==============
Arc--To move the camera in a slightly curved dolly or truck.
Balance Relative structural stability of picture elements (objects or events). Balance can be stable (little pictorial tension), neutral (some tension), or unstable (high pictorial tension). Bust Shot Framing of a person from the upper torso to the top of the head.
Cam Head A special camera mounting head that permits extremely smooth tilts and pans.
Closeup Object or any part of it seen at close range and framed tightly.
The closeup can be extreme (extreme or big closeup) or rather loose (medium closeup). Closure Short for psychological closure. Mentally filling in spaces of an incomplete picture.
Crab Sideways motion of the camera crane dolly base.
Cradle Head Cradle-shaped camera mounting head. Permits smooth up-and-down tilts and horizontal pans.
Crane 1. Camera dolly that resembles an actual crane in both appearance and operation. The crane can lift the camera from close to the studio floor to over ten feet above it. 2. To move the boom of the camera crane up or down. Also called boom.
Depth Staging Arrangement of objects on the television screen so that foreground, middleground, and background are clearly defined.
Dolly 1. Camera support that enables the camera to move in all directions. 2. To move the camera toward (dolly in) or away from (dolly out or back) the object.
Headroom The space left between the top of the head and the upper screen edge.
Knee Shot Framing of a person from the knees up.
Long Shot Object seen from far away or framed very loosely. The extreme long shot shows the object from a great distance.
Medium Shot Object seen from a medium distance. Covers any framing between long shot and closeup.
Nose Room The space left in front of a person looking toward the edge of the screen.
Over-the-Shoulder Shot Camera looks over a person's shoulder (shoulder and back of head included in shot) at another person.
Pan Horizontal turning of the camera.
Pedestal 1. Heavy camera dolly that permits a raising and lowering of the camera while on the air. 2. To move the camera up and down via studio pedestal.
Tilt To point the camera up and down.
Tongue To move the boom with the camera from left to right or from right to left.
Truck To move the camera laterally by means of mobile camera mount.
Two-Shot Framing of two people.
=============
The Studio Pedestal
With the studio pedestal, you can dolly very smoothly, and elevate and lower the camera easily while on the air. The more portable field-studio pedestals still allow easy up-and-down movement, but not when the camera is on the air.
This up-and-down movement adds an important dimension to the art of television photography.
Not only can you adjust the camera to comfortable working height, but you can also look up at an event or down on it. We have known for centuries that looking up at a thing or an event makes it appear more powerful; looking down on it makes it less powerful than it would appear from eye level. With the studio pedestal you can, at least to some degree, bring about these points of view.
Of the great variety of available studio pedestals, we will consider only the most commonly used: (1) the lightweight field-studio pedestal, (2) the counterweighted studio pedestal, and (3) the pneumatic studio pedestal.
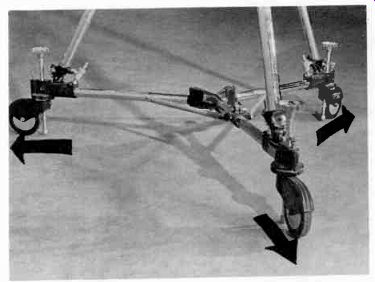
4.1 Locking Position of Tripod Dolly Wheels.
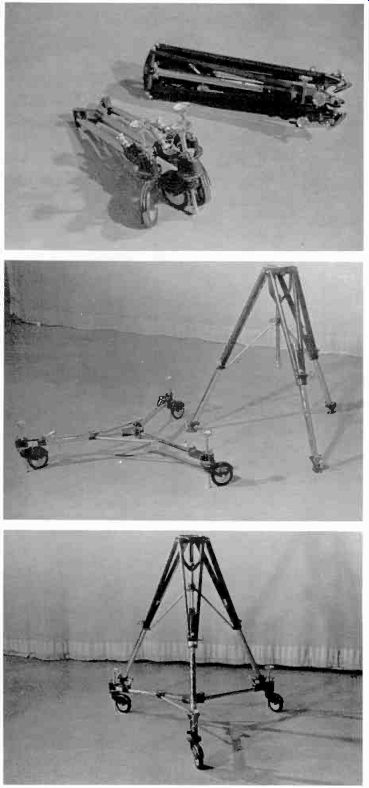
4.2 Tripod Dolly Collapsed and Assembled.
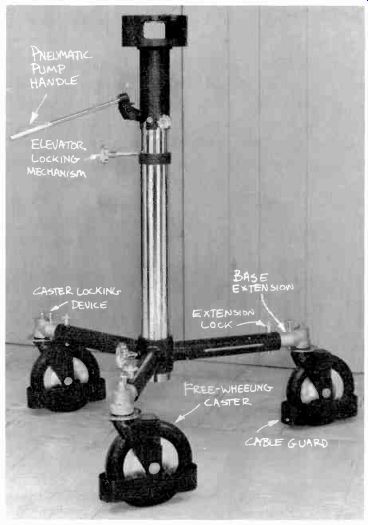
4.3 Lightweight Field-Studio Pedestal.
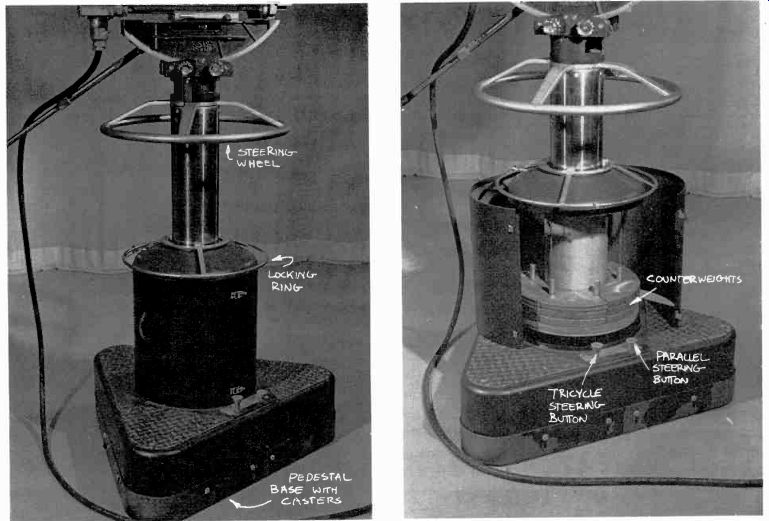
4.4 Counterweight Studio Pedestal.
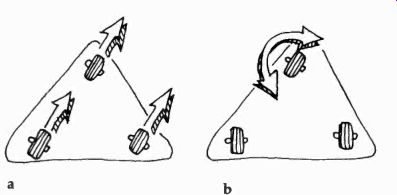
4.5 Pedestal Steering: (a) parallel; (b) tricycle.
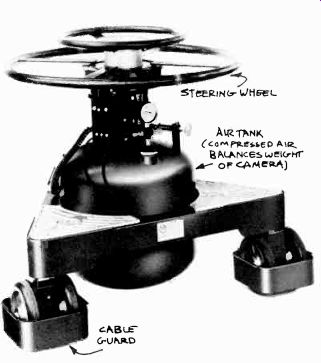
4.6 Pneumatic Studio Pedestal.
The Lightweight Field-Studio Pedestal
This pedestal is a cross between a tripod and a studio pedestal. The dolly with its sturdy, oversized casters can be easily separated from the pedestal.
As with the tripod dolly, the casters can be either independently freewheeling or locked into up to six specific index positions, including the braking position. Most field-studio pedestals have adjustable cable guards.
The pedestal itself can be raised and lowered, either by a hand crank or pneumatically through compressed air. Neither method is smooth enough to allow the camera to be raised or lowered while on the air.
Whenever you use a tripod dolly or a field-studio pedestal on a remote, be especially careful with the assembly and operation of the camera mount. Since everybody is in a hurry during remote operations, the usual safety precautions are unfortunately not always upheld. Although field-studio pedestals are designed for heavy color cameras, the terrain on which you have to dolly is never quite as smooth as your studio floor. A sudden stop may cause the camera to tip over, or at least receive a heavy jolt. (See 4.3.).
The Counterweighted Studio Pedestal
This pedestal has proved to be one of the most reliable and workable pieces of studio production equipment. You can lower and raise the camera while on the air, and you can steer the pedestal smoothly in any direction with one control, the large steering wheel. The pedestal column, which raises and lowers the camera, can be locked at any vertical position by a special device, usually a locking ring at the top of the counterweight base (see 4.4). Generally, you work the pedestal in the parallel synchronized, or crab, steering position.
This means that all three casters point in the same direction. If, however, you want to rotate the pedestal itself in order to get the whole piece of equipment closer to the easel, you must switch to the tricycle steering position in which only one wheel is steerable (see 4.5). The counterweight dolly is, however, not without disadvantages. It is very heavy to move about, especially when loaded down with a color camera, big zoom lens, and perhaps a teleprompter to boot. Because it is so heavy, it cannot be taken readily on remote location. While the camera can be elevated to about 6 1/2 feet (approximately 2m) above the studio floor, it can be lowered to only about 4 feet (approximately 1.20m). This is low enough for most normal productions, but it can become a serious handicap if you want to use the camera creatively-in a drama, for example. From this height, you cannot tilt up the camera enough to look at somebody who is standing on the studio floor.
The Pneumatic Studio Pedestal
This pedestal operates quite similarly to the counterweighted studio pedestal. In fact, some models look so much alike that it is hard to tell at first glance which kind it is. They both have a large steering wheel that activates the synchronized or tricycle steering mechanism, and a smaller ring for locking the elevator column. But, because the pneumatic pedestal uses a column of compressed air to counterbalance the weight of the camera instead of actual weights, it is much lighter than the counterweighted pedestal. The advantage of the pneumatic pedestal is that you can maneuver it around much more easily. The disadvantage is that you need an air compressor to replenish the air that inevitably escapes even when you don't operate the dolly for some time.
Some pneumatic pedestals have an air tank for additional air and an electric brake that locks the pedestal into place at a particular camera height (see 4.6).
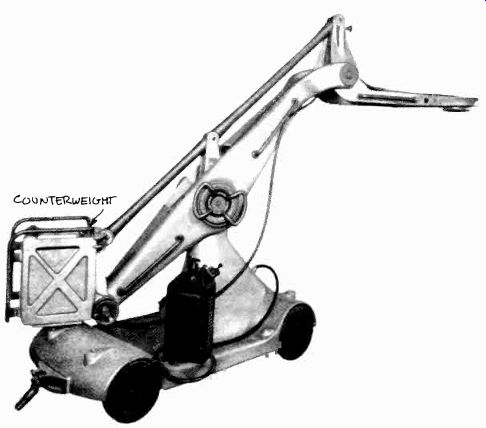
4.7 Studio Crane.
The Studio Crane
There are several types of studio cranes in use. All of them work on similar principles. Although a crane is desirable for creative camera work, it is of little use in small studio operation. In most cases, limited floor space and ceiling height prohibit the use of a big one (3 x 13 feet, approximately 1 x 4 meters, base). Also, a crane needs at least one dolly operator in addition to the camera operator; if motor-driven, then it needs two extra-the driver and the boom operator. These are sound reasons for its unpopularity in small stations. In colleges and universities, however, where studio facilities and manpower may very well accommodate the presence of a crane, important research in production techniques may necessitate its use.
A studio crane permits fast and multiple camera repositioning. The camera can be lowered to approximately two feet (61cm) off the studio floor and raised to about ten feet (approximately 3m). The crane boom can be panned a full 360 degrees, still allowing the camera a panning radius of 180 degrees. All movements can be carried out simultaneously, allowing excellent opportunities for creative camera work. (See 4.7.) When a studio crane is used, it is desirable to install a monitor directly on the crane for the dolly operator to watch. The coordination of camera operator and dolly operator is essential for smooth and effective camera handling, and the latter will be greatly aided in his job if, in addition to listening to the director's signals, he can actually see the pictures the camera is taking.
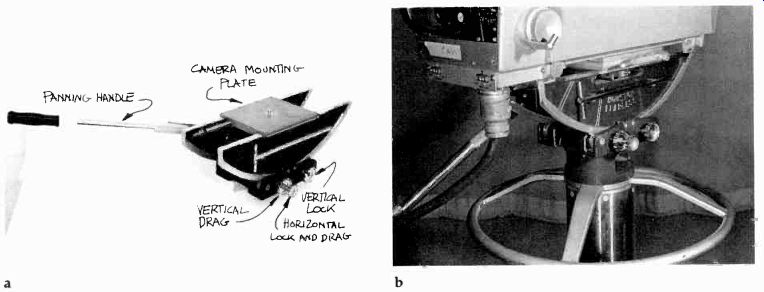
4.8 (a) Cradle Head. (b) Cradle Head with Camera Mounted.
Camera Mounting Heads
The camera mounting heads connect the camera to the tripod or camera pedestal. The mounting head allows the camera to be tilted vertically and panned horizontally. Two types of mounting heads have proved to be most useful: (1) the cradle head, and (2) the cam head.
The cradle head assures fairly good camera balance, since the center of gravity of the camera is evenly distributed for most tilting angles. If the heavy camera tilts or pans too freely on the cradle head, you can control the vertical tilting by adjusting the tilt drag, and the horizontal pan by adjusting the pan brake. You can (and should) lock the head for the tilt and the pan whenever you leave the camera unattended.
The disadvantages of the cradle head include a somewhat limited tilt range, and a certain difficulty in keeping the drag properly adjusted during heavy use (see 4.8). The cam head uses two cams, one on either side of the mounting head, for balancing even the heaviest of cameras during tilting and panning.
The cam head is better than the cradle in that it keeps the camera perfectly balanced during the entire tilt and allows for a greater tilt angle. Like the cradle head, the cam head has individual tilt and pan drag and locking controls. (See 4.9.) Some cradle and cam heads use the wedge mount, which simplifies the job of attaching the heavy camera to the camera mounting head. A plate with the male wedge is attached to the underside of the camera, and then slid into the female wedge plate, which has been bolted onto the cradle or cam mounting head. Once you have adjusted the wedge for proper camera balance, all you have to do is slide it into the mounting-head wedge plate and the camera will arrive at the properly balanced position. You will find that the wedge plate is especially helpful during remotes, where you constantly mount and dismount cameras. (See 4.11.)
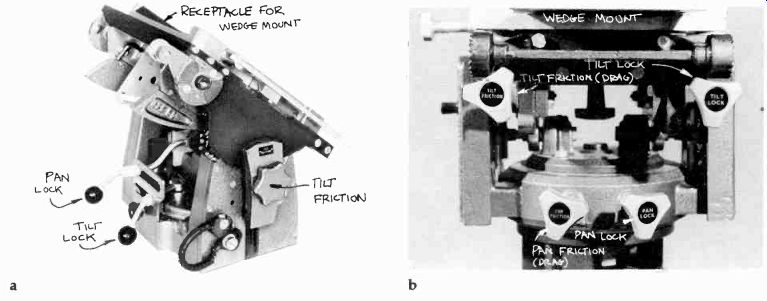
4.9 (a) Vinten Cam Head. (b) ITE Cam Head.

4.10 The most popular cam heads are the Houston Fearless and the slightly
more sophisticated and flexible Vinten.
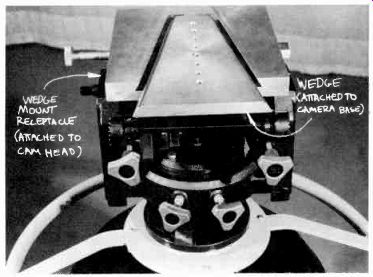
4.11 Wedge Mount.
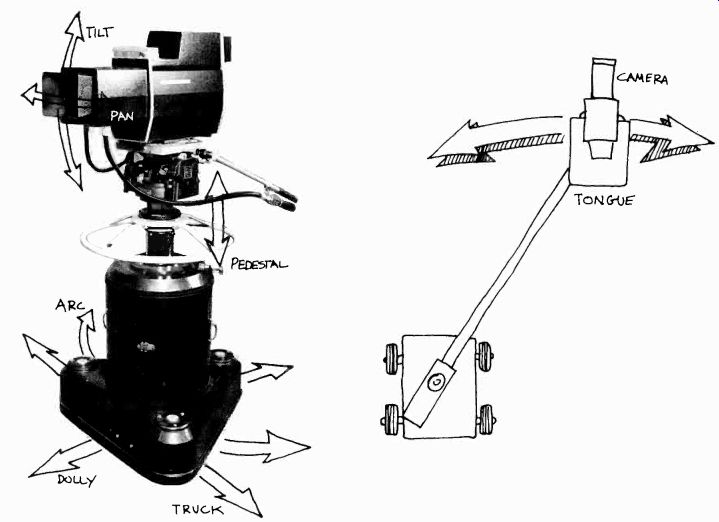
4.12 Principal Camera Movements.
The Most Common Camera Movements
Before learning to operate a camera, you should become familiar with the most common camera movements. "Left" and "right" always refer to the camera's point of view. (See 4.12.) Pan: Turning the camera horizontally, from left to right or from right to left. To "pan right," which means that you swivel the camera to the right (clockwise), you must push the panning handles to the left. To "pan left," which means to swivel the camera to the left (counterclockwise), you push the panning handles to the right.
Mt: Making the camera point down or up. A "tilt up" means that the camera is made to point up gradually.
A "tilt down" means that the camera is made to point down gradually.
Pedestal: Elevating or lowering the camera on a studio pedestal. To "pedestal up," you raise the pedestal; to "pedestal down," you lower the pedestal.
Tongue: Moving the whole camera from left to right or from right to left with the boom of a camera crane.
When you tongue left or right, the camera usually points into the same general direction, with only the boom moving left (counterclockwise) or right (clockwise). Crane or Boom: Moving the whole camera up or down on a camera crane. The effect is somewhat similar to pedestaling up or down, except that the camera swoops over a much greater vertical distance. You either "crane, or boom, up" or "crane, or boom, down." Dolly: Moving the camera toward or away from an object in more or less a straight line by means of a mobile camera mount. When you "dolly in," you move the camera closer to the object; when you "dolly out, or dolly back," you move the camera farther away from the object.
Truck: Moving the camera laterally by means of a mobile camera mount. To "truck left" means to move the camera mount to the left with the camera pointing at a right angle to the direction of the travel. To "truck right" means to move the camera mount to the right with the camera pointing at a right angle to the direction of the travel.
Crab: Any sideways motion of the crane dolly base or its smaller cousin, the crab dolly. A crab is similar to a truck, except that the camera mount does not have to stay lateral to the action all the time; it can move toward or away from the action at the same time.
"Crabbing" is used more in film than in television.
Arc: Moving the camera in a slightly curved dolly or truck movement with a mobile camera mount. To "arc left" means to dolly in or out in a camera-left curve or to truck left in a curve around the object; to "arc right" means to dolly in or out in a camera-right curve or to truck right in a curve around the object.
Zoom: Changing the focal length of the lens through the use of a zoom control while the camera remains stationary. To "zoom in" means to change the lens gradually to a narrow-angle position, thereby making the scene appear to move closer to the viewer; to "zoom out" means to change the lens gradually to a wide-angle lens position, thereby making the scene appear to move farther away from the viewer.
How to Work a Camera
In this section, we will concentrate on some of the basic steps of how to work (1) a studio camera and (2) a portable camera. Like bicycling, you learn how to work a camera by doing it. There is no substitute for practice. The following guidelines are intended only to facilitate the learning process.
Working the Studio Camera
When operating a camera, you must go through some basic steps before, during, and after the show or the rehearsal.
Before
1. Put on your earphones and check whether the intercommunication system is functioning.
2. Unlock the pan and tilt mechanism on your camera mounting head and adjust the drag, if necessary. Check whether the camera is balanced on the mounting head.
Unlock your pedestal, and pedestal up and down.
Check whether the pedestal is correctly counterweighted. A properly balanced camera remains put in any given vertical position. If it drops down or moves up by itself, the pedestal is not sufficiently counterweighted.
3. See how much camera cable you have, and whether it is tightly plugged in at the wall outlet and the camera head. Is the cable coiled so that it will uncoil easily when you move the camera? If not, recoil it.
4. If your camera is already warmed up and correctly aligned by the video engineer, ask to have your camera uncapped, or whether you can uncap it. You will now see in your viewfinder the pictures your camera actually takes. Is the viewfinder properly adjusted?
5. Check your zoom lens. Zoom in and out. Does your zoom lens "stick," that is, does it have problems moving smoothly throughout the zoom range? What exactly is your range? Get a feel of how close you can get to the set from a certain position. Does the shot box work? Preset for a few zoom positions and see whether the zoom lens actually moves to the preset position. Is the lens clean? If it is unusually dusty, use a fine camel's hair brush and carefully clean off the larger dust particles. With a small rubber syringe or a can of compressed air, blow off the finer dust. Don't just blow on it with your mouth. You will fog up the lens and get it dirtier than it was.
6. Rack through your focus. Can you move easily and smoothly into and out of focus?
7. If you have a teleprompter attached to your camera, check all the connections. Since this mechanism is usually operated by a member of the floor crew, ask him or her to check it out.
8. Lock your camera again (pedestal, and panning and tilt mechanism) before leaving it. Don't ever leave a camera unlocked even if it is for only a short while.
During
1. Put on earphones and establish contact with the director, technical director, and video control. U lock your camera and recheck tilt and pan drag, and the pedestal movement.
2. Preset your zoom at each new camera position. Make sure that you can focus over the entre zoom range.
3. Preset your zoom positions if operating with a shot box. Preset your focus if working with automatic focus control. Don't move your camera after you have preset your shot box; if you must move, preset your zoom positions again.
4. When checking your focus between shots, rack through your focus a few times so that you can determine at which position the picture is the sharpest.
5. If you anticipate a dolly with your zoom lens, make sure that the lens is set at a wide-angle, position. With a turret camera, use a wide-angle lens for your dolly.
When dollying with a zoom lens, preset your focus approximately at the midpoint of the dolly distance.
With the zoom lens at the wide-angle position, your depth of field should be large enough so that you need to adjust focus only when you get close to the object or event.
6. You will find that a heavy camera pedestal allows you to dolly extremely smoothly. However, you may have some difficulty getting it to move, pr stopping it without jerking the camera. Start slowly to overcome the inertia, and try to slow down just before the end of your dolly or truck. If you have a difficult truck or arc to perform, have a floor-person help you steer the camera. You can then concentrate on the camera operation. In a straight dolly, you can keep both hands on the panning handles. If you have to steer the camera, steer with your right hand. Keep your left hand on the focus device. With a turret camera, keep your left hand on the panning handle and steer the camera with the right hand. If the focus gets critical (when the camera begins to move close to the object or event), put your right hand back to the focus knob and move the camera with the panning handle.
7. If you pedestal up or down, make sure that you brake the camera before it hits the stops at the extreme pedestal positions.
8. When you operate a freewheel dolly, always have the wheels preset in the direction of the intended camera movement. This will prevent the camera dolly from starting off in the wrong direction. Make sure that the cable guards are down far enough so that you don't hit the camera cable with the casters.
9. Be sure you know the approximate reach of your camera cable. Know how much you have before you start a dolly in or a truck. Cable drag on the camera can be irritating when it prevents you from achieving a smooth dolly. Although the mini-cables (such as the triaxial cables) have reduced drag to a minimum, you may still find that in a long dolly the cable tugs annoyingly at the camera. Don't try to pull the cable along with your hand. To ease the tension, you may want to carry it over your shoulder, or tie it to the pedestal base, leaving enough slack so that you can freely pan, tilt, and pedestal. On complicated camera movements, have a floor-person help you with the cable; otherwise, the dragging sound may be picked up quite clearly by the microphone. If your cable gets twisted during a dolly, don't just drag the whole mess along. Have a floor-person untangle it for you.
10. At all times during the show, be aware of all other activities around you. Where are the other cameras? The microphone boom? The floor monitor? It is your responsibility to keep out of the view of the other cameras, and not to hit anything (including floor personnel or talent) during your moves. Watch especially for obstacles in your dolly path, such as scenery, properties, floor lights. Be particularly careful when dollying back. A good floor manager will help to clear the way and will also tap you on the shoulder to prevent you from backing into something.
11. In general, keep your eyes on your viewfinder. If the format allows, you can look around for something interesting to shoot between shots. Your director will appreciate good visuals in an ad lib show (in which the shots have not been previously rehearsed). But don't try to out-direct the director from your position. He is the only one who knows at any given point what the other cameras are doing.
12. Watch for your tally light to go out before moving your camera into a new shooting position, presetting your zoom, or racking lenses.
13. During rehearsal, inform the floor manager or the director of unusual production problems. If you simply can't prevent a camera shadow, the lighting must be changed. Your camera may be too close to the object to keep it in focus. Or the director may not give you enough time to preset your zoom again after your move into a new shooting position. Alert him if your zoom is in a narrow-angle position (zoomed in fairly close) and he has you move the camera while on the air.
Sometimes it is hard for the director to tell from his preview monitor at exactly what zoom position your lens is.
14. If you work without shot sheets, which give you the exact sequence of shots for your camera, try to remember the type and sequence of shots during the rehearsal. A good camera operator has the next shot lined up before the director calls for it. If you work from a shot sheet, go to the next shot immediately after your previous one. Don't wait until the last minute.
The director may have to come to your camera ("punch it up" on the air) much sooner than you remember from rehearsal.
15. Mark the critical camera positions on the studio floor with some masking tape. If you don't have a shot sheet, make one up on your own. Mark particularly your camera movements (dollies, trucks) so that you can set your zoom in a wide-angle position. Be sure to line up exactly on these marks during the actual show.
16. Try to avoid unnecessary chatter on the intercom.
Use your talkback system only in emergencies.
17. Listen carefully to what the director tells all the camera operators, not just you. This way, you will be able to coordinate your shots with the shots of the other cameras. Also, you can avoid wasteful duplication of shots by knowing approximately what the other cameras are doing.
------------------

4.13 If you work with a turret camera, make sure that your tally light is
out before changing lenses.
Change your lenses as quickly as possible, and as quietly. Careless lens racking can be very noisy, especially when your camera is close to a hot (switched-on) microphone. Be very careful with your racking if you have long lenses on your turret because abrupt lens changes can easily damage the mechanism. Be sure to have the lens positions clearly marked on your turret so that you can rack to the required lens without having to go through the whole rotation.
-------------------
After
1. At the end of the show, wait for the "all clear" signal before you lock your camera.
2. Ask the video engineer whether your camera may be capped.
3. Now lock your camera mounting head and your pedestal and push the camera into a safe place in the studio. Don't leave it in the middle of the studio; a camera can be easily damaged by a piece of scenery being moved or by other kinds of studio traffic.
4. Coil your cable again as neatly as possible in the customary figure-eight loops.
Working the Portable Camera In all major phases, the operation of the portable camera is quite similar to that of the studio camera. There are a few steps, however, that need special attention. Again, we will discuss the principal operational steps before, during, and after the telecast or rehearsal.
Before
1. Before you pick up the portable camera head and the camera control backpack, check all cable connections.
2. Check the main camera cable that leads from your backpack to the remote truck. How much cable do you have? Is this length within the permissible limit? If not, your picture quality will suffer. Some cameras have built-in compensators for a variety of cable lengths.
Are you compensating for the correct cable length?
3. Make sure that you know the action radius of your camera cable. If your camera isn't wireless (some backpacks have a transmitter built in, or contain a videotape recorder), where exactly can you walk with it? In the heat of the show, you may forget just where you can go until you are jerked to a stop by the camera cable.
Familiarize yourself with the action of the event and your own action radius.
4. If a microphone is plugged into the mike outlet on your camera, are the connections secure? Check whether the announcer has enough cable to perform his duties relatively independent of your position.
5. If you operate a backpack videotape recorder, make sure that it is working satisfactorily. Test-record some scenes.
6. If your camera is battery-powered, make sure that the battery is fully charged before the show. Double-check the battery just before you go on the air.
7. As always, make sure that your intercommunication system is working. Good intercommunications are essential to successful remote operations.
8. Now, check your zoom lens. Does it zoom smoothly and keep focus over the entire zoom range? Familiarize yourself with the zoom range relative to the event. (Since your viewfinder is relatively small on your portable camera, make sure that it is in perfect working condition. Adjust the viewfinder controls for optimal picture quality.)
During
1. At all times, try to keep the camera as steady as possible. Try to zoom as smoothly as possible. Unless told otherwise, zoom slowly; after all, it is the event you want to show the viewer, not your zooming technique. Try to keep in focus at all times. If you get out of focus, try to focus up again smoothly. It is better to take a little more time to get into focus than to rack right through the focus into another out-of-focus position.
2. If you walk while the camera is on the air, try to keep the camera as steady as possible. Aim your camera with the whole upper body; have your legs absorb all the wiggles and bumps.
3. Make sure you have enough cable for your move, and that the cable does not get tangled up along the way.
4. Walk only in a wide-angle lens position. If you are asked to move to another location while your camera is on the air and in a narrow-angle lens position zoomed in fairly close), you must zoom out to a fairly wide-angle lens position before you can move. Otherwise, the wobbles of your camera will be so exaggerated that the picture will be unusable.
5. Preset your zoom again from every new camera position.
6. Don't panic if you lose your subject temporarily in the viewfinder. Keep your camera steady, look up out of the viewfinder and see where the subject is, and aim your camera smoothly into the new direction. Or, simply zoom out to a wide shot until you have reoriented yourself to the new situation. With your zoom lens in the extreme wide-angle position, you are often closer to the object than your viewfinder image indicates.
Watch, therefore, that you don't bump into something or somebody with your zoom lens, especially if you walk your camera into a crowd or other tightly spaced group of people.
7. If the microphone of the announcer is plugged into your camera, make sure that you don't outrun the announcer.
8. Watch the tally light inside your viewfinder hood at all times. Even when you are off the air, don't go through unnecessary wild maneuvers. It is very hard to predict when the director will need to have your camera punched up. With a portable camera, consider yourself at all times in a "ready" position.
9. Some portable cameras have several warning signals built into the viewfinder hood, such as battery charge, amount of videotape left, and so forth. Try not to ignore them, even if the event you are covering happens to be very exciting.
10. When shooting under low light level conditions, watch your focus carefully. The low light level necessitates a wide lens opening, which in turn reduces the depth of field. Also, you will find that keeping in focus while walking the camera is more difficult in dim light than in bright light. Avoid any fast camera movement.
Under low light conditions, even the best Plumbicon tubes are not entirely lag free. Any fast object or camera motion will therefore produce the undesirable comet-tailing.
11. If you have a videotape recorder connected with the portable camera, frequently check the amount of tape left. Even the most beautiful camera work doesn't do any good if your tape has run out.
12. Finally, keep on top of the event. On a remote, the director does not always know what is going on.
He has to rely on an alert crew. If you witness an action that seems like a significant development, show it to the director. He still has the choice of taking or not taking the shot, depending on his view of the overall event context.
After
1. Don't just drop the camera and backpack on the ground because you heard the "all clear" over the intercom. Walk back to the camera control position and carefully put the camera down and take off the backpack.
Don't unplug anything unless you are specifically told by the technical director or video engineer to do so.
Since a warm camera is especially sensitive to shock, be very gentle in moving it around.
2. Roll up or coil your camera cable. Don't pull the camera connectors through the dirt. Carry them, or wrap them in a plastic bag for extra protection.
3. Don't forget to have the camera batteries recharged as soon as possible.
Picture Composition
Your basic purpose in framing a shot is to show things as clearly as possible, and present them so that they convey meaning and thought. What you do essentially is to clarify and intensify the event before you. Although it is the director who is concerned with the overall clarification and intensification of an event for the viewer, the camera operator should nevertheless know how to provide the director with optimally effective shots.
Television pictures are, like any other pictures, subject to the conventional aesthetic rules of picture composition. But there are factors peculiar to the television medium that influence your framing process to a certain extent.
1. The size of the television screen is small. To show things clearly, you must show them relatively large within the frame of the screen. In other words, you have to operate more with closeups (CU) and medium shots (MS) than with long shots (LS) and extreme long shots (XLS). Since the home viewer cannot see the whole event in its overall context, you must try to pick those details that tell at least an important part of the story. Shots that do not obviously relate to the event context are usually meaningless to the viewer.
2. You must always work within a fixed frame, the television aspect ratio of 3:4. If you want to show something extremely tall, you cannot change the aspect ratio into a vertical framing.
3. The pictures on the television screen are two-dimensional. You must create the impression of a third dimension through special arrangement of objects within the frame and the demonstration of relative size: objects closer to you are bigger, objects farther away seem smaller. Overlapping planes, a limited depth of field, and special lighting effects can also contribute to the illusion of a third dimension. A good three-dimensional effect always needs a clear picture division into foreground, middleground, and background.
4. The object in front of the camera (which is a substitute for the viewer's eyes) generally moves about. This means that you must consider motion as well as static arrangement of objects within the frame. About 10 percent of the picture area gets lost through the television transmission and reception process (see discussion on essential area in Section 12). You must compensate for this loss by framing somewhat more loosely than what you have visualized. Some camera operators draw black lines on their monitors to indicate the essential framing area.
----------------------
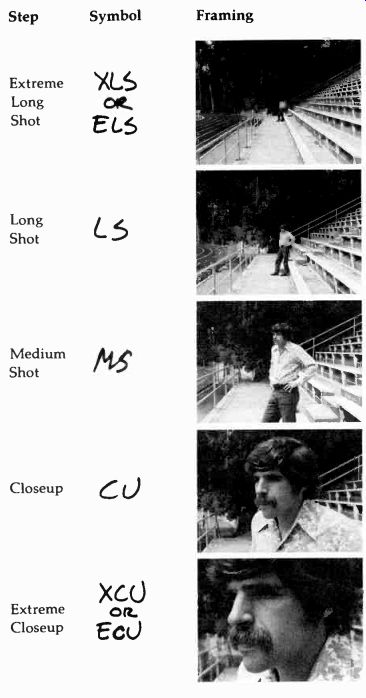

4.14 Field-of-View Steps: Note that these shot designations are relative and that several steps lie between each designation. If you start with a rather tight medium shot, which may be similar to our closeup framing, your extreme closeup may end up considerably tighter than the one shown here.
Step Framing
Extreme Long Shot
Long Shot
Medium Shot
Closeup
Extreme Closeup
------------------------
Most likely you are already familiar with the basic principles of picture composition. You can probably tell, for example, whether a color photograph is well or badly composed, whether it is properly balanced, whether it contains aesthetic tension, or whether it is dull. Learn to look at pictures from a design point of view.
In the following discussion of television framing, no attempt is made to give you an exhaustive treatment of media aesthetics;1 nevertheless, understanding the few compositional principles and conventions should aid you in framing optimally effective shots with sureness and ease.
These principles include (1) field of view, (2) organizing the screen area, (3) organizing screen depth, and (4) organizing screen motion.
Field of View
The field of view of the camera is basically organized into five steps (see 4.14). There are five other customary shot designations (see 4.15). Organizing the Screen Area When shooting objects or people that do not move, you organize your screen area very much as the still photographer does with his camera, or the painter with his canvas. What you are basically doing is structuring, composing, the two-dimensional Meld of the television screen.2 The most important organizing principle is balance. Balance implies that the objects within the screen are arranged not in a completely stable way but in such a way that we perceive their relationship to one another and the borders of the screen as stable (stable composition), neutral (neutral composition), or unstable (labile composition). (See 4.16 through 4.19.)
[1 For such a treatment, see Herbert Zettl, Sight-Sound-Motion (Belmont, Calif.: Wadsworth Publishing Co., 1973).
2 Zettl, Sight-Sound-Motion, pp. 99-172.]
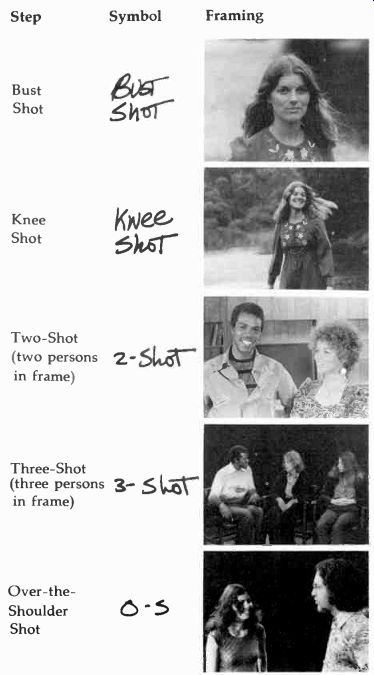
4.15 Other Shot Designations.
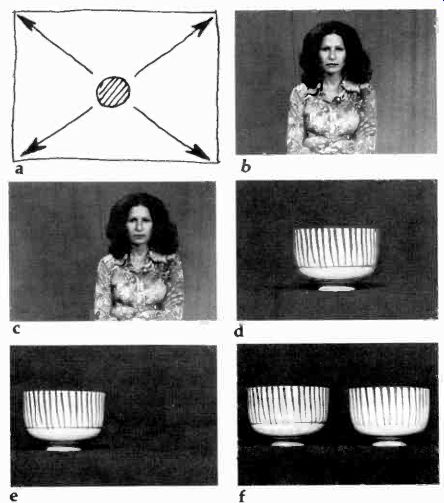
4.16 The most stable picture area is screen-center (a). If you want to convey
stability, or show or emphasize a single object as directly as possible, put
the object into screen-center. Through this position, the screen area is symmetrically
balanced. Put a speaker who is talking directly into the camera into screen-center
(b). To place her slightly off-center (c) will not make her or her message
any more interesting than it is already; it will merely detract from what
she has to say.
If you show a commercial product, such as a single object, place it screen-center (d). The message about the product is direct; there is no need for visual gimmickry.
Framing the product off-center (e) does not improve the message; all it does is communicate an aesthetic error.
Or, (f) you may want to stabilize your picture by symmetrically balancing an object on one side of the screen with a duplicate, or a similarly prominent object, on the other side.

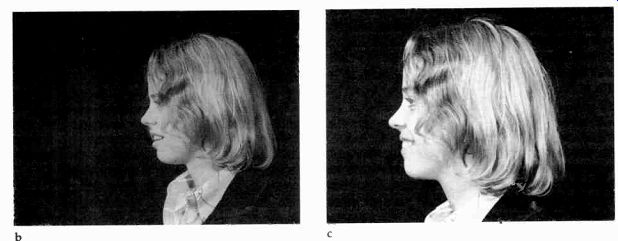
4.17 (a) When other forces enter the picture--such as the force of someone's
looking into a particular direction (other than straight into the camera)--you
must compensate for them by placing the person somewhat off-center. Your balance
now achieves a neutral state. (b) The more profile the performer turns, the
more space you must leave in front of her. This space is generally called "nose
room." (c) If
you keep the performer centered while she is looking to the side, your picture
will become annoyingly unbalanced.
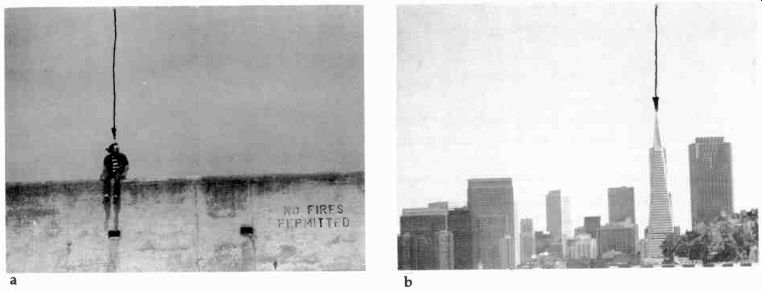
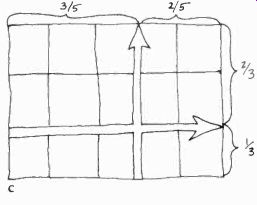
4.18 When framing landscapes or other large vistas with distinct vertical
objects-people, trees, telephone poles, spires-you will find that by letting
the prominent horizontal and vertical lines divide the picture non-symmetrically
(or asymmetrically), your picture will look more interesting than with a symmetrical
arrangement (a, b). Division ratios of roughly % to 34 or X to 24 are the
most common asymmetrical neutral states of balance (c).
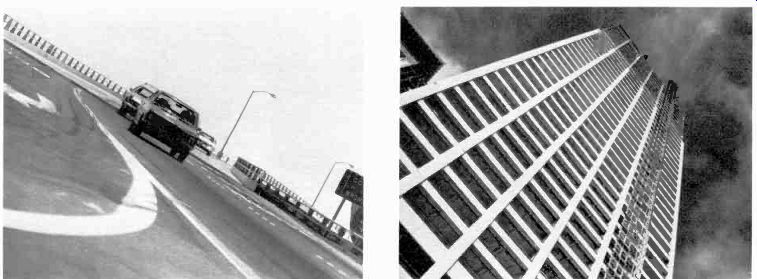
4.19 Any camera angle that is drastically different from our ordinary visual
experience will render an otherwise balanced picture unstable. Tilting the
usually level horizon line will create this effect. An un stable balance usually
conveys heightened event energy.
Another important organizing principle is closure (or psychological closure, as it is technically called). In closure our mind fills in spaces that we cannot actually see on the screen (see 4.20 through 4.27.) We constantly apply psychological closure in our perceptual process. Take a look around you. You actually see only parts of the objects that lie in the field of your vision. There is no way you can ever see an object in its entirety from a single stationary position. Through experience we have learned to supply in our minds the missing parts. This procedure we call psychological closure, or closure for short. Since the television screen is relatively small, we often show objects and people in closeups, leaving many parts of the scene to the imagination of the viewer. Thus, the television viewer frequently is forced to apply psychological closure.
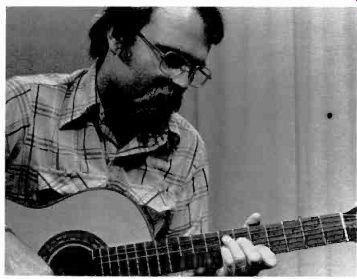
4.20 In this shot, we certainly perceive the whole figure of a person although
we actually see only a relatively small part of him. But the shot is framed
in such a way that we can easily apply closure, that is, fill in the missing
parts with our imagination.
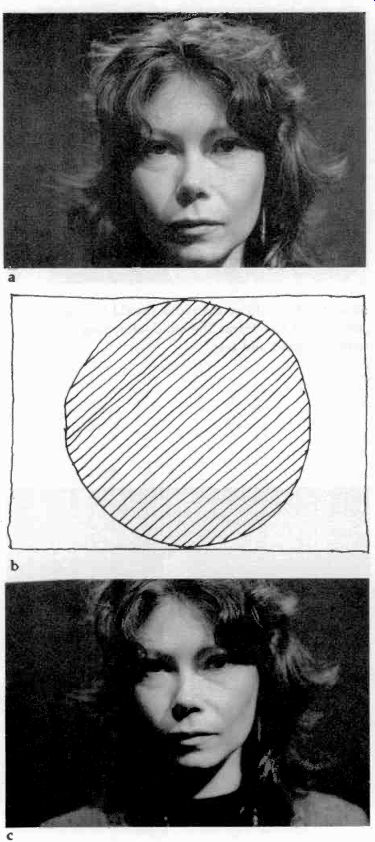
4.21 (a) This shot is badly framed because we can apply closure within the
frame-that is, perceive the detail as a complete picture. (b) We can see a
complete thing within the frame, and this prevents us from continuing the
figure beyond the frame. (c)
This tight closeup is more properly framed. We can easily extend the parts of the head beyond the screen.
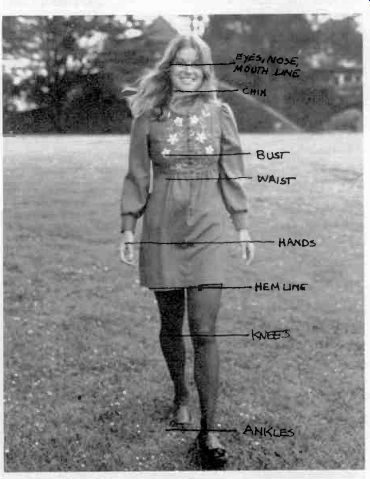
4.22 In general, try not to have natural cutoff lines, such as neck, shoulders,
hemline, or feet, coincide with the screen edge. Rather, try to have these
cutoff lines fall within or without the screen.
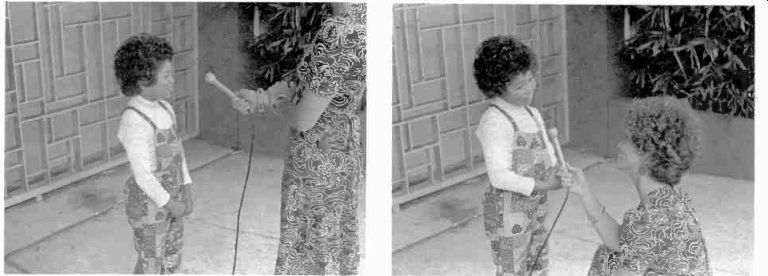
4.23 Try to compensate for awkward differences in height, even though you
are applying the cutoff principle. If, for example, you have a tall woman
talk to a small child, either the woman should stoop down to the child or
the child should be put on a riser. Don't just frame the child, chopping off
the woman's head and feet.
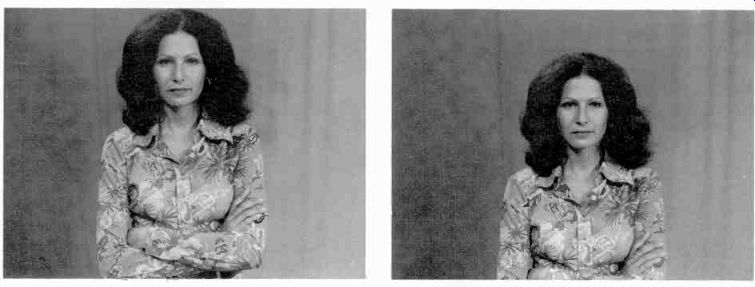
4.24 Because we usually have space above us, indoors as well as out, you
should leave space above people's heads in normal closeup, medium, and long
shots. Don't have the top of a person's head glued to the top part of the
screen. You must leave some headroom.
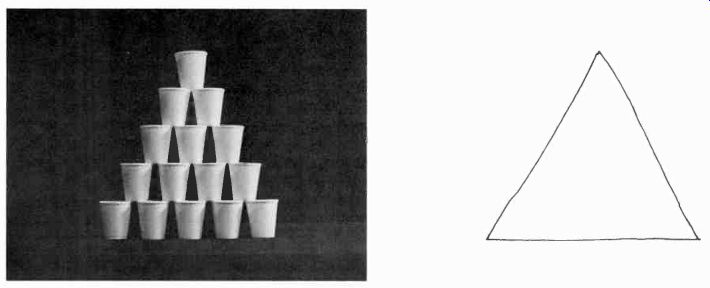
4.25 We tend to see similar things together and to put them into simple geometrical
shapes. You can use this organizing tendency to group similar objects into
easily recognizable patterns. This group of cups forms an easily perceivable
pattern: a triangle.
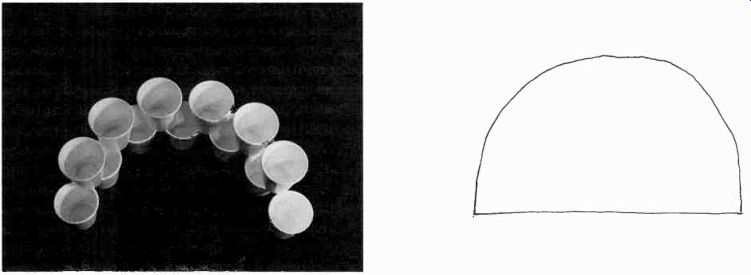
4.26 These objects organize the screen space into a prominent semicircle.
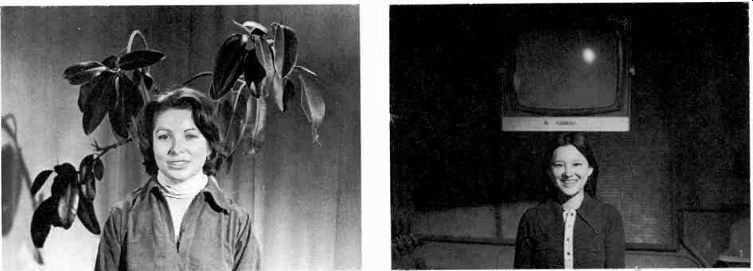
4.27 This tendency for closure into simple patterns, however, is not always
positive. The desire to see screen space organized into simple patterns frequently
works even against reason. Try to avoid odd juxtapositions of performers with
background objects, such as giving the appearance of plants growing out of
people's heads.
How about this for a balancing act? A good camera operator would have avoided such a distracting juxtaposition simply by trucking a slight distance to one side or the other, or by dollying in or out.
Organizing Screen Depth
Since the standard television screen is a flat, two-dimensional piece of glass upon which the images appear, we must create the illusion of a third dimension. Fortunately, the principles for its creation have been amply explored and established by painters and photographers for a long time.3 Also, we have already talked about the various lens angles (wide, normal, narrow) and the depth of field, and how they affect the illusion of a third dimension on the television screen. We know that a strong foreground, and distinctive middle- and backgrounds contribute greatly to screen depth.
Here are a few examples of how to frame objects so that the three grounds-foreground, middle-ground, background-are especially clear and intense. (See 4.28.)
[3. Zettl, Sight-Sound-Motion, pp. 173-220.
4. For further information on the aesthetics of the moving image, see Zettl, Sight-Sound-Motion, pp. 243-326.]
Organizing Screen Motion
Contrary to the painter or still photographer, who deals with the organization of static images within the picture frame, the television camera operator must almost always cope with framing images in motion on the television screen. Composing moving images requires your quick reaction and your full attention throughout the telecast.
Although the study of the moving image is an important part of learning the fine art of television and film production, we will at this point merely point out some of its most basic principles. 4 (See also 4.29 through 4.32.)

4.28 If you include a prominent foreground piece in your shot, you will immediately
distinguish more clearly between foreground and middle- and backgrounds than
without the foreground piece (a, b, c). With wide-angle lens distortion, you
can exaggerate this type of depth staging to an extreme. Be careful, however;
don't just depth stage for the sake of depth staging. You should have proper
motivation, whether it is for clarifying an event, or for intensifying it.
Compose your shots in such a way that they tell most about the selected event
detail, and that they tell it in line with the overall event context.
4.29 In following lateral movement, lead the moving object or subject. Don't trail it.
4.30 If you have a two-shot and one of the persons moves out of the frame, stay with just one of them.
By zooming back in order to catch them both, you may overshoot the set, or reveal the boom microphone.
4.31 If two persons block each other in a two-shot, correct the situation through a slight arc or truck to the right or the left.
4.32 If you are to animate a static scene through camera movement, such as a photo of a seagull in flight, pan against the direction in which the object is expected to move (and was actually moving when the photo was taken). Otherwise, the object seems to travel backwards.
Movements toward or away from the camera (downstage or upstage) are stronger than any type of lateral motion. Fortunately, they are the easiest to frame. You simply keep your camera as steady as possible and watch so that the moving object will not go out of focus as it approaches your camera.
Remember that a wide-angle zoom lens position (or a wide-angle lens) gives the impression of accelerated motion toward or away from the camera, while the narrow-angle zoom lens position (or the narrow-angle lens) slows the motion for the viewer.
If you frame lateral movement-that is, motion to screen left or screen right-you should lead the person or the moving object with your camera.
The viewer wants to know where the object is going, not where it has been. Also, the forces of an object moving toward the screen edge must be absorbed by leaving some space ahead of the moving object.
If you are on a closeup and the object moves back and forth, don't try to follow each minor wiggle. You might run the risk of making the viewer seasick; at least he will not be able to concentrate on this sort of motion for very long. Keep your camera pointed at the major action area, and let the subject move in and out of your frame. Or, zoom out (or pull back) to a slightly wider shot.
Whatever you have to do in organizing screen motion, do it smoothly. Even when you move your camera fairly fast, the viewer should not become aware of its motion but simply perceive the object motion within the intended context.
Most often, you are simply to report the object motion as clearly as possible. Don't create unnecessary (and therefore distracting) motion with your camera, unless you intend to achieve a special effect.
Summary Camera mounting equipment is necessary for ease and fluidity of camera movement in the studio.
There are three basic mounting units: (1) the tripod dolly, (2) the studio pedestal, and (3) the studio crane.
The camera is attached to the camera mount through a mounting head. The most useful and widely used types are (1) the cradle head and (2) the cam head.
The camera mounting device and the mounting head enable the camera to pan, tilt, pedestal, tongue, crane or boom, dolly, truck, arc, and, with the aid of the zoom lens, zoom (although the camera does not need to move during the zooming). When working the camera, the operator should follow certain steps before, during, and after the show or rehearsal.
Besides understanding the mechanical operation of the camera, the camera operator must be familiar with the basic principles of picture composition so that he or she can frame a scene or portions thereof with sureness, and produce pictures that have visual clarity and impact.
Some major points of picture composition are (1) field of view, from XLS to XCU, (2) organizing the screen area, which includes the structuring of the two-dimensional field of the television screen, (3) organizing screen depth, the creation of the illusion of a third dimension on the two-dimensional screen, and (4) organizing screen motion, the way to make screen motion convincing and continuous.