We have two broad purposes for lighting: (1) to provide the television camera with adequate illumination so that it can see well-that is, produce technically acceptable pictures--and (2) to convey to the viewer the space, time, and mood of the event. Lighting helps to tell us what the objects shown on the screen actually look like, where they are in relation to one another and to their immediate environment, and when the event is taking place in respect to time of day, season, or weather conditions. Lighting also serves to establish illusion and/or the general mood of the event.
In this section, we will therefore consider:
1. The technical lighting objectives, which include baselight levels and techniques, contrast, shadow densities, falloff, contrast ratios, and skin tones.
2. The nontechnical objectives, which include form and dimension through lighting, illusion of reality and non reality, and mood.
3. The two basic types of illumination, directional and diffused light.
4. The tools with which we can accomplish our objectives--the lighting instruments and control equipment.
How to light, the actual lighting techniques, will be the subject of Section 6.
Like the human eye, the television camera needs light in order to see and function properly. Unlike the human eye, the television camera is much more demanding as to the amount of light, the color of the light, and its relative harshness and direction.
While, for example, we may see quite well with only a flashlight as the illuminating source or under extremely bright sunlight, the camera may be allergic to both these types of light. The flashlight may not radiate enough light for the pickup tube to give off sufficient electricity. The resulting television picture will lack signal strength and consequently suffer from an excess of video noise, called picture snow. Bright sunlight, on the other hand, may be too much for the camera to handle.
At best, the picture will look washed out; at worst, the superabundance of light will destroy the camera pickup tube.
A lamp, which appears to the eye to give off a perfectly white light, may look so red to the camera that the resulting picture will have a reddish tint on the color monitor. Another lamp may produce light that looks to the camera quite bluish, although our eyes again perceive it as normal white light.
A harsh light, or a light coming from an unusual direction, may produce shadows that conceal rather than reveal the actual shape of an object.
The television camera demands, therefore, that we control carefully the illumination of an object or a scene. This control we achieve through lighting.
======================
Barn Doors -- Metal flaps in front of lighting instruments that control the spread of the light beam.
Baselight-- Even, non-directional (diffused) level of studio lighting. Customary baselight levels: for standard three-tube Plumbicon color cameras, 200 ft-c (foot-candles)-400 ft-c; for image-orthicon monochrome cameras, 75 ft-c100 ft-c; for portable monochrome vidicon cameras, 100 ft-c-300 ft-c, with 200 ft-c-250 ft-c the norm.
Bias Lighting An electronic boosting of low light levels that enter the camera so that the pickup tubes can operate relatively noise-free.
Broad A floodlight with a broadside, panlike reflector.
C-Clamp A metal clamp with which lighting instruments are attached to the lighting battens.
Color Temperature -- Relative reddishness or bluishness of light, as measured in degrees of Kelvin; television lighting instruments have a range of 3,000°K-3,400°K, with 3,200°K the norm. Color temperature can be measured with a color-temperature meter.
Cookie (A short form of cucalorus, Greek for breaking up light, also spelled kukaloris.) Any cutout pattern that, when placed in front of a spotlight, produces a shadow pattern.
The cookie, usually made from a thin, cutout metal sheet, is inserted into a pattern projector.
Diffused Light--Light that illuminates a relatively large area with an indistinct light beam. Diffused light, created by floodlights, produces soft shadows.
Dimmer A device that controls the intensity of the light by throttling the electric current flowing to the lamp.
Directional Light--Light that illuminates a relatively small area with a distinct light beam. Directional light, produced by spotlights, creates harsh, clearly defined shadows.
Ellipsoidal Spotlight--Spotlight producing a very defined beam, which can be shaped further by metal shutters.
Floodlight--Lighting instrument that produces diffused light.
Fluorescent Light--Cold light produced by large, gas-filled glass tubes.
Fresnel Spotlight--One of the most common spotlights, named after the inventor of its lens, which has step-like concentric rings.
Gaffer Grip--A strong clamp used to attach small lighting instruments to pieces of scenery, furniture, doors, and other set pieces. Sometimes called gator clip.
Gel Short form for gelatine, a colored material that acts as color filter for lighting instruments. A red gel in front of a spotlight will color its beam red.
Since gels are sensitive to moisture and extreme heat, plastic gels, such as cinemoid, are generally used in television lighting.
Incandescent Light--The light produced by the hot filament of ordinary glass-globe light bulbs. (In contrast to fluorescent or quartz light.)
Incident Light--Light that strikes the object directly from its source. Incident light reading is the measure of light (in foot-candles) from the object to the light source. The footcandle meter is pointed directly into the light source.
Pantograph Expandable hanging device for lighting instruments.
Patchboard--Also called patchbay. A device whereby light cables can be routed to specific light controls.
Pattern Projector An ellipsoidal spotlight with a cookie (cucalorus) insert, which projects the cookie's pattern as shadow.
Pin To sharpen (focus) the light beam of a spotlight, either by pulling the light-bulb reflector unit away from the lens or by moving the lens away from the light bulb. The opposite of spread.
Preset Board A program device into which several lighting setups (scenes) can be stored, and from which they can be retrieved, when needed.
Quartz Light A high-intensity light whose lamp consists of a quartz or silica housing (instead of the customary glass) and a tungsten-halogen filament.
Produces a very bright light of stable color temperature.
Reflected Light--Light that is bounced off the illuminated object. Reflected-light reading is done with a light meter (most of them are calibrated for reflected light) that is held close to the illuminated object from the direction of the camera.
Scoop A scooplike television floodlight.
Scrim A spun-glass material that is put in front of a scoop as an additional light diffuser.
Softlight A television floodlight that produces extremely diffused light. It has a panlike reflector and a light-diffusing material over its opening.
Spotlight A light instrument that produces directional, relatively undiffused light.
Spread To enlarge (diffuse) the light beam of a spotlight by pushing the light-bulb reflector unit toward the lens, or the lens closer to the light bulb; the opposite of pin.
Tungsten-Halogen--The kind of lamp filament used in quartz lights. The tungsten is the filament itself; the halogen is a gaslike substance surrounding the filament.
======================
Technical Lighting Objectives
The technical lighting objectives are to provide enough light so that the camera can see well; to limit the contrast between highlight and shadow areas, or light and dark colors; and to produce white light that will not discolor the scene when it is lighted.
Hence, we will take a closer look at (1) operating light level: baselight; (2) contrast; and (3) color temperature.
Operating Light Level: Baselight To make the camera "see well" means to provide enough overall light, called baselight, so that the camera chain can produce pictures that are relatively free of video noise and color distortion.
As mentioned in an earlier section, every television picture has a certain amount of picture noise, generated by the mere movement of electrons. Most likely, you have seen the snow-like effect on the screen when the set is not properly tuned in on a particular station. When tuned care-fully, the strong signal will virtually drown out the video noise and the picture will appear clear.
The same problem occurs in television lighting.
If the operating light level falls below the light requirements of the pickup tubes and their associated electronic equipment, the noise will outweigh the picture signal; the picture will have an abundance of snow. When the picture noise outweighs the picture signal, we speak of a low (poor) signal-to-noise ratio. In a high (good) signal-to-noise ratio, the operating light level is sufficiently high so that the camera chain can produce a signal strong enough to make the picture noise no longer apparent. We measure the operating light level by the amount of baselight.
Baselight Levels Many an argument has been raised concerning adequate minimum baselight levels for various cameras. The problem is that base-light levels do not represent absolute values but are dependent on other production factors, such as lighting contrast, iris opening of the lens, and the general reflectance of the scenery. Also, such electronic developments as bias lighting boost low light levels electronically so that the camera can function in operating light levels that would ordinarily be too low for the pickup tubes.
Nevertheless, through experience, general baselight levels have been established that prove satisfactory for most ordinary television productions. These are: For the standard three-tube Plumbicon color camera: For the I-O monochrome camera: For portable monochrome vidicon cameras: 200 ft-c-400 ft-c (foot-candles), with 250 ft-c the norm 75 ft-c-100 ft-c 100 ft-c-300 ft-c, with 250 ft-c the norm Generally, the video engineer will have less trouble producing high-quality, crisp pictures when the baselight level is fairly high and the contrast somewhat limited than under a very low baselight level with high contrast lighting.
Also, if the baselight levels are too low, the lens iris must be wide open in order to allow as much light as possible to strike the camera pickup tubes.
But, since the depth of field decreases as the lens opening increases, a lens whose iris is set at its maximum opening will give you a fairly shallow depth of field. Consequently, focusing becomes a noticeable problem when baselight levels are low.
If you need a large depth of field, high baselight levels are prerequisite.
A set whose colors and texture absorb a great amount of light obviously needs more illumination (higher baselight level) than one whose brightly painted surface reflects a moderate amount of light.
Baselight Techniques You can achieve a sufficient baselight level in two quite different ways.
First, you can establish a basic, highly diffused illumination through floodlights, upon which you then superimpose the spotlights for the specific lighting of people and set areas.
Second, and this is generally done more often, you light the people and specific set areas as carefully as you can with spotlights, and then add fill light to reduce harsh shadows, without initially worrying about the baselight level. Once you have completed your lighting, you take a general baselight reading of the set, hoping that the light spill and reflection off the scenery and the studio floor will have established quite incidentally a sufficient baselight level. If not, you can then add some floodlights in specific areas in order to raise the operating light level. This technique seems to create the most plastic, exciting, and expressive television lighting so far achieved. Unfortunately, it demands a little more skill and time than the baselight-first method. On remote locations, where time and lighting facilities are limited, establishing the baselight first is definitely the more practical method.
Contrast
The control of contrast is closely tied to (1) shadow density, (2) falloff, (3) contrast ratio, and (4) skin tones.
Shadow Density
The color camera has some trouble reproducing shadow areas. If the shadows are dense, the camera may fail to reproduce all the shadow detail, and the colors in these areas will often look unnatural and distorted, especially on color sets with high color intensity.
Contrary to lighting for monochrome television, where deep shadows can be accommodated by the camera, lighting for color calls for less dense (dark) shadows, especially if the viewer is expected to make out reasonable detail within the shadow area. You should, therefore, pay special attention to making overly dense shadow areas somewhat translucent through a generous amount of diffused fill light. Such lighting is especially important on performer's faces. Be careful, however, not to eliminate the shadows altogether; otherwise you may end up with a picture that looks much too flat, especially on a black-and-white receiver.
Falloff
As defined earlier, falloff describes the speed with which a light area changes into the darkest shadow area. In fast falloff, the change from light to dark shadow is very abrupt; in slow falloff, the change is more gradual. Sharp corners have a fast falloff; a rounded surface has a slow falloff.
In color television, a slower falloff is desirable. A lightening of the shadow areas results inevitably in a slowing down of falloff.' Again, this does not mean eliminating shadow areas. A good television picture needs shadows, even fairly dark ones.
Slowing down simply means to lighten up the very dense shadows to such an extent that detail can still be seen in them, and that the colors in the shadow area can be identified.
[ Herbert Zettl, Sight-Sound-Motion (Belmont, Calif.: Wadsworth Publishing Co., 1973), pp. 23-26.]
-------------------------------
5.1 The strict adherence to the 20:1 contrast ratio, however, still does not guarantee a balanced color picture. If you start out with a "black" (any color of your darkest area) that is fairly bright, your "white" (the brightest area in your picture) may be much too bright for the system to handle adequately, although this light color is only 20 times brighter than your black. Or, conversely, you might have as your brightest spot a rather dark color, which would make any other color that is 20 times darker much too "black." When this happens, an inattentive or insensitive video control operator might electronically "pull the whites" down to a manageable level, thereby destroying the middle and lower brightness ranges in your picture, or "stretch the blacks," thereby causing the lighter colors and picture areas to lose detail and to bloom.
To achieve a balanced color picture, you need to establish reference points for the darkest and lightest areas in your scene. These are called reference black and reference white. You can establish them simply by finding the colors that reflect the least light and the most light. Theoretically, absolute black would reflect nothing; you would have a reflectance of zero percent. Pure white would reflect all the light; you would have a reflectance of 100 percent. In practice, of course, there is no color material that absorbs or reflects all the light falling on it, nor is there any camera system that would accurately respond to these extreme values. The actual light reflectance lies somewhere near them.
For color television, the reference black should not go below 3 percent reflectance and the reference white should not go beyond 60 percent (which is in accordance with the contrast ratio: the white is 20 times lighter than the black). An example may help to relate these concepts for you. Let us assume that you are asked to establish reference white and reference black in a scene in which a performer wearing a yellow shirt and a medium-gray suit stands in front of a dark blue background. For convenience' sake, let us also assume that the key and fill lights falling on the performer total 400 ft-c. You measure this light intensity by pointing a foot-candle meter into the lights from the performer's position. This way you are reading the incident light, which in our example is at a level of 400 ft-c. Most foot-candle meters are incident light meters (see a). In order to measure the reflected light, you must use a reflected-light meter (most common photographic light meters can measure reflected light) and point it close to the lighted object, such as the performer's yellow shirt (see h). If you have lighted the subject properly, your meter might read 240 ft-c, the ideal 60 percent reflection of your original 400 ft-c falling now established your white reference point. You then measure the darkest spot in your picture, probably the dark blue background. If this background happens to reflect 12 ft-c, which is the lower 3 percent limit of the 400 ft-c of main illumination, you have established your black reference.
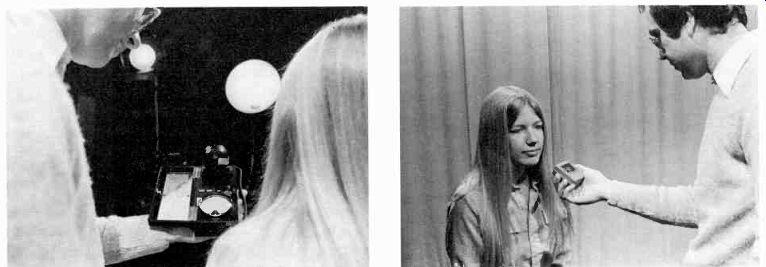
a. Incident Light Reading: Light meter is pointed into the lights.
b. Reflected Light Reading: Light meter is pointed close to the lighted object, thereby measuring the light reflected by the object.
---------------
---------------
5.2 The color camera reacts somewhat like color film. If you use outdoor
color film (daylight) and shoot indoors with it (assuming that corrective
devices, such as filters or blue flash or blue indoor lights, are not used),
you will end up with extremely reddish pictures. The reverse is true when
using indoor film (tungsten) for shooting outdoors; everything will have a
bluish tinge. This color distortion occurs because outdoor film counteracts
the very high color temperature of outdoor light (quite bluish) with slightly
reddish colors. When used indoors, where the light is reddish anyway, everything
turns orange. Indoor lights, on the other hand, are made to counteract the
reddish indoor lights with slightly bluish colors. When used in the blue light
outdoors, everything takes on a slightly greenish-blue tinge.
-----------------
Contrast Ratio
Although the Plumbicon pickup tube can tolerate a great contrast (you can shine your camera into the studio lights on a long shot, for example, without doing harm to the tube), a somewhat limited contrast will nevertheless enhance your color pictures to a great extent. Apart from a few sparkling highlights, such as the light reflected off jewelry, the brightest area in your picture should not exceed a contrast ratio of 20:1 (the brightest area in the picture is twenty times lighter than the darkest area). Some video engineers like to stretch the acceptable contrast ratio to 30:1. If you exceed this brightness spread, you run the risk of severe color distortion.
There are two ways of achieving contrast ratio: (1) You adjust your picture in such a way that you can discern the dark colors (or the darker portion of the grayscale), thereby making the whites, or light colors, uniformly bright. The light, washed-out colors will then tend to lose detail. In extreme cases, or especially in black-and-white television, the light areas will begin to "bloom," to glow as though they were actually emitting the light themselves. (2) You adjust the picture for the light areas, but then the dark colors tend to look uniformly dark, if not muddy. But don't be too much of a slave to all these contrast ratios. If you light sensibly for color, which means that you lighten up somewhat the very deep shadows with fill light, and if your overall baselight level is not too low, you should not have too much of a problem with contrast. In any case, check your monitor.
Some people get so involved with contrast ratios, color temperatures, and all sorts of numbers that they forget entirely the most important final criteria for television lighting-criteria that are aesthetic rather than technical. A critical look at the color and monochrome monitors often tells more about the quality of your lighting than readings of a variety of meters and scopes do. If the picture looks good-that is, if it looks as you intended it to look-your lighting is correct. As in all artistic endeavors, the technical aspects should become an aid rather than a master to your creative expression. In television lighting, as in all other aspects of television production, your major guide is still your aesthetic sensitivity and, above all, common sense.
Skin Tones--The only standard reference we have for adjusting the color scheme on the home receiver is the performer's skin tones, inaccurate as it may be. Obviously, the skin tones should be reproduced as faithfully and as naturally as possible. One of the chief ways of preserving the natural skin tone throughout a scene is to light all performers as evenly as possible. Even if the performer is to walk from a bright scene to a dark one, such as from a brightly illuminated living room to a moonlit balcony, her or his face should not change drastically from light to dark. Indeed, to achieve the difference between living room and balcony lighting, you wouldn't have to touch the lighting on the face at all. All you would have to do is to change the background lighting from light to dark. Also, in maintaining skin tones, try to avoid color reflections on the face from clothing and scenery. In a normal scene, don't use colored lights (lights that have color gels, or cinemoid filters) on a performer, as helpful as they may be for special effects of background lighting, or you will certainly destroy the very much needed color reference for the viewer.
Color Temperature--Color temperature is a standard by which we measure the relative reddishness or bluishness of white light. You have certainly noticed that a fluorescent tube gives off a "colder" light than a candle. The fluorescent tube gives off a bluish light; the candle a more reddish light. This difference can be precisely expressed in degrees of color temperature. You can also observe the change of color temperature by carefully watching a light being dimmed. When the lamp is on full, you see a bright white light that looks something like the sun at high noon. But when the lamp is greatly dimmed down, the light begins to take on a reddish tinge, similar to the red sun at sunset.
Whereas the monochrome camera is relatively insensitive to color temperature, the color camera is greatly affected by it. What exactly is color temperature? What does it have to do with temperature if it is a measure of the relative reddishness or bluishness of light? Color temperature is measured in degrees Kelvin (K), which stand for actual temperatures. As you know, the hotter a flame gets, the bluer it becomes. The same is true of light. The hotter the filament of a lamp (such as a quartz lamp) gets, the whiter, and even bluer, the emitted light becomes. The Kelvin scale has been devised by heating a theoretically totally light-absorbing filament, called "black body," from absolute zero to various degrees centigrade. If the black body is heated to 3,200°K (3,200 degrees from absolute zero), it radiates a fairly white light, with just a little reddish (warm) tinge. If you now take a quartz lamp and adjust it in such a way that its light approximates as closely as possible that of the black body with a color temperature of 3,200°K, you can rate the quartz lamp as having a color temperature of 3,200°K-assuming that it receives its full voltage (not dimmed in any way). As soon as you begin to dim this quartz lamp, however, its color temperature begins to decrease, causing the color of the light to get redder. If you boost the voltage beyond the one for which the instrument is rated, the lamp will get hotter, the color temperature will increase, and the light will get bluer.
While this change of color can hardly be noticed in direct observation, the color camera reports it quite readily by producing a distinct color tint (reddish or bluish) over the entire picture.
Especially in the lower ranges of light intensity (when the light is dimmed down extensively), the orange glow of the lower color temperature shows up quite prominently. This suffusion is especially distracting when it occurs on performers' faces.
Generally, the illumination for color television is kept within a 3,000°K to 3,400°K range; with 3,000°K and 3,200°K the preferred color temperatures. Almost all quartz lighting instruments are rated at 3,200°K. Some lighting experts warn against any dimming on performers and performing areas, since the lowering of the color temperature will discolor the skin tones. However, practice has shown that you can dim these lights by a good 200°K, especially in the upper intensity ranges, before the color change becomes too noticeable on the monitor. Even so, dim the performing area lights only when you have to balance your overall lighting, and refrain from dimming the lights on performers while the show is in progress.
Nontechnical Lighting Objectives: The nontechnical, or aesthetic, lighting objectives are (1) to indicate form and dimension, (2) to create an illusion of reality or non-reality, and (3) to indicate mood.
Form and Dimension
Since the television screen has only two dimensions, height and width, the third dimension, depth, must be created by illusion. A proper control of light and shadow is essential for the clear revelation of the actual shape and form of three-dimensional objects, their position in space and time, and their relation to one another and to their environment. In fact, it is often the shadows that indicate the form and dimension of an object rather than the light. You will find, therefore, that the purpose of lighting is more frequently the control of the placement and the relative density of the shadow than the creation of bright picture areas.
(See 5.3 and 5.4.) The emphasis or de-emphasis of shadows on a surface of an object will also help to sharpen, or reduce, the textural characteristics of the object. Lighting that emphasizes shadows can make a relatively smooth surface look richly textured, or a relatively rough surface rather smooth.
----------
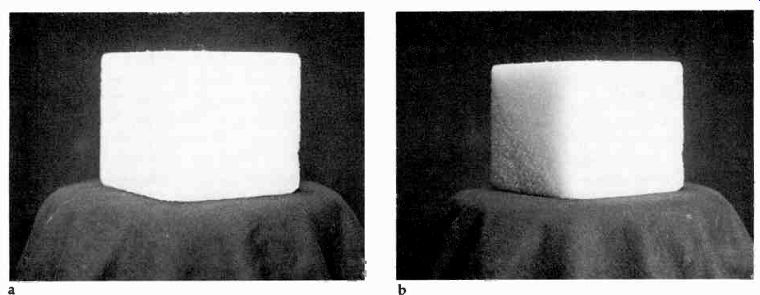
5.3 Indication of Form and Dimension through Shadows: (a) It is often the
shadow that reveals the true shape of the object. In this picture it is difficult
to tell whether the object is a flat figure or a cube. (b) Darkening of the
shadow area makes it immediately apparent that the object is a cube.
Reality and Non-reality
Lighting helps to achieve an illusion of reality or nonreality. It aids in setting a specific time and place. For example, long shadows suggest late afternoon or early morning; harsh, bright light helps to establish a sun-flooded outdoor scene.
The periodically flashing light as seen through the closed Venetian blinds from the inside of a motel room will give us a quick clue as the kind of establishment, if not the whole neighborhood. A windowless interior rather brightly lighted can give the impression that it is still daylight outside.
But the same interior with rather low-key lighting (high-contrast and low overall light level) suggests nighttime.
Special lighting techniques can also help to create the illusion of a specific source of illumination.
For example, many lighting instruments may be needed to give the impression that a scene is lit by a single candle.
Illogical or special effects lighting can create the illusion of nonreality. For example, an extremely low-contrast scene that is purposely washed out may provide us with an environment as unreal as one in which the contrast is purposely pushed beyond the acceptable limits. We are greatly aided in special effects lighting by electronic manipulation, such as polarity reversal, for example, where all the dark areas turn light and the light areas turn dark. You will find more information on special effects in Section 11.
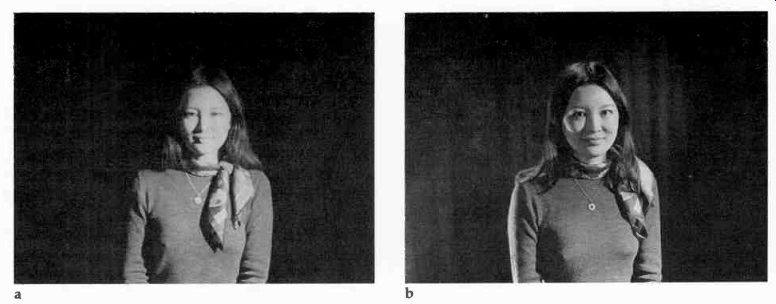
5.4 Spatial Articulation through Shadows: (a) How far is this person away
from the background? Without a separation of her shadow from the dark background
(background shadow), it is difficult to judge her position accurately in relation
to her environment. (b) With a special light separating the shadows, and another
light giving some definition to the background, we have now a clearer idea
as to her spatial position.
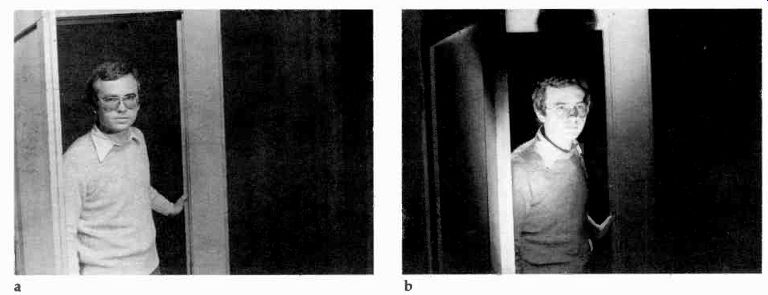
5.5 Mood through Shadows: (a) Lighting from above, whereby the shadows fall
in the customary below-the-object position, gives the scene a normal appearance.
(b) Lighting from below creates an unreal, mysterious mood. We perceive the
shadows in what seems to be an unnatural position.
Mood
Next to sound, lighting is one of the chief means of creating a desired mood. Various psychological effects, such as gaiety, mystery, or gloom, can be achieved through lighting techniques. (See 5.5.) The long shadows looming in the deserted street suggest danger; the reflection of water and the shadows of leaves dancing on a face or a wall suggest happiness and calm. Intense lighting from the back tends to glamorize the fashion model.
Lighting from below eye level can create a mysterious mood. Since under normal conditions we experience the principal illumination as coming from above, we expect the shadows to fall below the object. A reversal of the shadows immediately suggests something unusual. If all the other production elements-set design, color, sound, actions-are in harmony with the special lighting effect, the mysterious mood is firmly established.
Note that one production technique, such as lighting, is usually not strong enough alone to establish a feeling of nonreality or mystery, for example. We usually need to have all other production elements work in unison to achieve the desired effect.
Types of Illumination In all photographic lighting, including television, we use two types of illumination, (1) directional and (2) diffused.
Directional light illuminates only a relatively small area with a distinct light beam. It produces well-defined shadows and causes fast falloff, which means that the light area changes rather abruptly into the dense shadow areas. Thus we use spotlights, which emit a directional beam.2 Diffused light illuminates a relatively large area with a wide, indistinct light beam. It produces soft, rather undefined, shadows and causes slow falloff which means that there is a low contrast between light and dark, and that the light changes gradually into soft, transparent shadow areas.
Thus, we use floodlights, which emit a diffused beam.
Before you can immerse yourself in lighting for form and dimension, reality and nonreality, or mood, you should acquaint yourself first with the necessary tools of lighting. They include (1) studio lighting instruments, (2) portable lighting instruments, and (3) lighting control equipment. As with any other piece of equipment, your learning of the lighting tools will be facilitated greatly if you use them right away in simple lighting exercises.
-------------------------
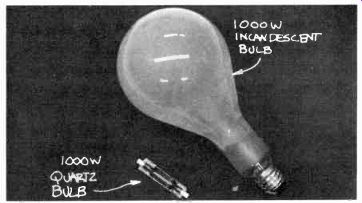
5.6 Most lighting instruments used in television studios have quartz, or
tungsten-halogen, lamps. The more common, though less accurate, name "quartz'
refers to the lamp itself, which is made out of quartz or a silica, glasslike
material. Tungsten-halogen refers to the lamp filament. But you will also
find instruments with the older, familiar incandescent light bulbs, very much
like the bulb you use in your home.
There are, however, some distinct advantages in using quartz lights in television production over the traditional incandescent lights.
The illumination efficiency of quartz lamps is extremely high. Under ideal conditions, a quartz lamp may produce twice the illumination of an incandescent bulb of the same wattage. You need, therefore, fewer quartz instruments, or instruments of a lower wattage, than you would incandescent lights for the same amount of illumination. Also, because of the superior light output of the quartz instruments, their size and weight are less than those of equivalent incandescent instruments. Since the quartz lamp itself is quite small, the housing for the lamp is smaller than that of incandescent instruments of equal wattage.
The light output of the quartz lamp does not decrease with age. Incandescent bulbs, however, gradually blacken with carbon and thus decrease in light efficiency. Also, the color temperature of the quartz lamp remains unchanged during the entire life of the bulb, while the incandescent bulbs, because of carbon blackening, may change color temperature considerably during their life.
Unfortunately, the quartz instrument is not without disadvantages:
(1) The life of the quartz lamp is about half that of the incandescent bulb. It is rated for a maximum of 150 to 500 hours, depending on the size and type of instrument used. (2) The quartz instruments get extremely hot and also radiate more heat than incandescent lights. This characteristic can become rather annoying to studio crews and performers, and it is fairly destructive to such standard light attachments as barn doors, scrims, and color gels. Often a scrim, which lasts for months on an incandescent instrument, will be burned up by a quartz lamp within weeks.
In some of the older quartz instruments, especially the ones that do not use the relatively large quartz globe, the light beam is still rather difficult to control. Although the narrowing and spreading of the beam is possible, it cannot be shaped as precisely as the incandescent light beam. When the spotlight with a horizontal lamp is pinned to a narrow beam, the light tends to concentrate on the rim of the beam, leaving a "blind" or dark spot in the middle of whatever happens to be lighted. Also, it produces an abundance of spill. The blind spot is especially noticeable and vexing when the light is concentrated on a face, for example, and the spill makes precise light control difficult.
You will probably find that quite a few stations still use both types of lights, quartz and incandescent, in some combination. The reason for using both lights is most often economical; as long as the old incandescent lights still do the job, nobody is going to throw them away. Some lighting experts, however, combine the two lights for aesthetic reasons. They like to use the incandescent instruments in areas where high control is imperative and where a slightly less brilliant light is desirable, and the quartz instruments in areas that need more general, but intense, illumination.
--- Comparison of Incandescent and Quartz Lamps: Quartz lamps are smaller and more efficient than incandescent lamps.
------------------------
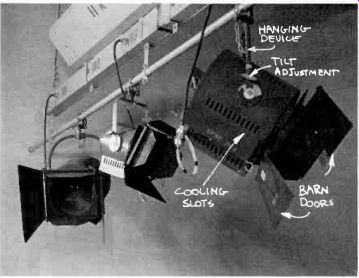
5.7 Fresnel Spotlight.
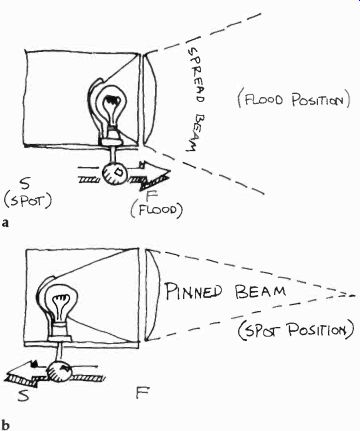
5.8 Beam Control of Fresnel Spotlight: (a) In order to spread the beam, turn
the focus spindle or focusing loop so that the bulb-reflector unit moves toward
the lens. If the lighting instrument has an outside indicator, the indicator
should move toward F (for "flood" position). (b) In order to pin,
or focus, the beam, turn the focus spindle or focusing loop so that the bulb-reflector
unit moves away from the lens. The focus indicator should move toward S (for "spot" position).
Studio Lighting Instruments
All studio lighting is accomplished with a variety of spotlights and floodlights. These instruments (sometimes called luminaires) are designed to operate from the studio ceiling. Although they are seldom moved from one studio location to another, their size and weight are still important production factors. The lighter and smaller quartz instruments are, therefore, preferred in most studio productions to the rather bulky incandescent lighting instruments.
Since the types, application, and basic operation of the quartz lights are quite similar to those of the incandescent, we will not make any differentiation in our discussion of the instruments themselves. Just realize that in general the incandescent instruments are heavier, larger, and bulkier than the quartz instruments of equal wattage, and that the mechanisms for adjusting the light beams differ slightly.
Spotlights You will find that most studio lighting can be accomplished with two basic types of spotlights (1) the Fresnel spotlight and (2) the ellipsoidal spotlight.
The Fresnel Spotlight
Named for Augustin Fresnel, who invented the lens used in it, the Fresnel spotlight is the most widely used in television studio production (See 5.7). The Fresnel spotlight is relatively light and flexible. It has a high light output, and its light beam can be made narrow or wide by a spot-focusing device. The spotlight can be adjusted to a "spread" beam position, which then gives off a rather wide, flooded beam; or it can be "pinned" to a sharp, clearly defined light beam. There are several ways of spreading (adjust to a wide, flooded beam), or pinning, or focusing (adjust to a narrow, clearly defined beam) a Fresnel spotlight.
The most common method is to push or pull the bulb-reflector unit inside the light instrument toward or away from the lens. To spread a spotlight beam, turn the focusing spindle or focusing loop in such a way that the bulb-reflector unit moves toward the lens. To pin, or focus, the beam, turn the spindle or focusing loop so that the bulb-reflector unit moves away from the lens. (See 5.8.) Whenever you adjust the beam, do it gently.
You can't very well adjust a light beam with the instrument turned off. But when the bulb is turned on, it is highly sensitive to shock. In order to protect the hot lamp as much as possible from any damaging jolt, two further focusing devices have been developed.
On the back of some smaller quartz fixtures, you will find a lever that can be moved horizontally-or, in other models, turned clockwise or counterclockwise-for quick spreading or pinning of the beam. This device is called a sweep focus (see 5.9). In order not to move the hot lamp at all, some lighting instruments focus by having the lens move toward or away from the fixed (and spring-mounted) lamp. In this way, called the "ring-focus" method, you can adjust the drag of the focus ring so that you can focus the instrument with a lighting pole from the studio floor, even after the lamp has been on for several hours. (See 5.11.)
--------------------------
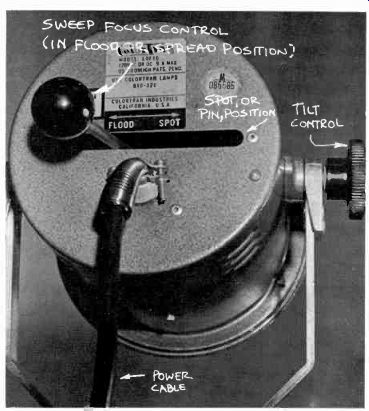
5.9 Sweep Focus: The beam can be spread or pinned by moving the sweep knob
horizontally to flood (spreading) or spot (pinning) position.

5.10 The most prominent manufacturers of professional television lighting
equipment are Berkey ColorTran, Century Strand, Kliegl, and the Mole-Richardson
Company. Their various instruments all have trade names. A 1,000-watt Molequartz
Baby-Baby Solarspot may be quite similar to the Color-Tran Quartz King dual
1000, for example. It makes more sense, therefore, to label lighting tools
according to their function rather than name of manufacturer. Each manufacturer
issues periodically a rather complete catalog of its latest lighting equipment.
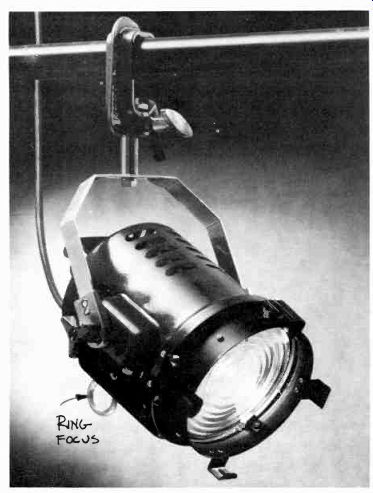
5.11 Ring-Focus Mechanism: By turning the ring (often with a lighting pole
from the floor), you can either spread or pin the light beam.
--------------------

5.12 The range of spotlights is from 150 watts to 10,000 watts (10 kilowatts).
In motion pictures, where you might have to boost even the superpower of the
sun with artificial light sources, even larger instruments, such as the high-intensity "brutes" are
used. These brutes generate light by an intensely hot carbon arc.
When classified by lens diameter, you will find 3-inch Fresnels (150 to 250 watts), 6-inch Fresnels (500 to 1,000 watts), 8-inch Fresnels (1,000 to 2,000 watts), 10-inch Fresnels (2,000 to 2,500 watts), and 12-inch Fresnels (2,500 to 5,000 watts).
-------------------------
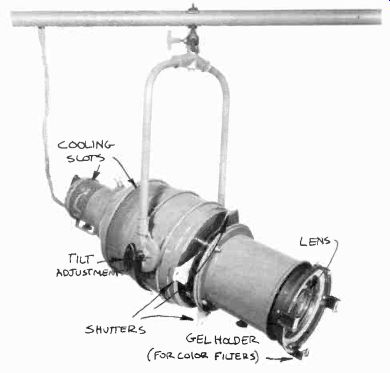
5.13 Ellipsoidal Spotlight.
--------------------------
Fresnel spotlights come in different sizes, depending on how much light they are to produce.
Obviously, the larger instruments produce more light than the smaller ones. The size of Fresnel spotlights is given in the wattage of the lamp, or the diameter of the lens.
What size of lighting instruments you should use depends on several factors: (1) the type of camera used and the sensitivity of the pickup tubes, (2) the height at which the instruments are suspended, and (3) the reflectance of the scenery, costumes, and studio floor.
Color cameras generally need more light than monochrome I-O cameras. The lower the lights are relative to the scenery and action areas, the less light you need. And highly reflecting scenery, costumes, and studio floor need less light than if they were dark and absorbent.
In most television studios, the largest Fresnel spotlights rarely exceed 5,000 watts. Generally, the most commonly used Fresnels are of the 1,000-watt and 2,000-watt variety. For maximum lighting control, most lighting technicians prefer to operate with as few as possible, yet adequately powerful, lighting instruments.
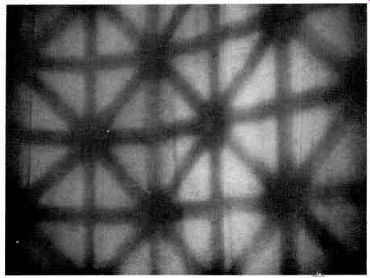
5.14 "Cookie" Pattern on Cyclorama.
The Ellipsoidal Spotlight This kind of spotlight can produce an intense, sharply defined light beam. For example, if you want to create pools of light reflecting off the studio floor, the ellipsoidal spot is the instrument to use. Even in their pinned, or focused, position, the Fresnels would not give you that sharp an outline.
As with the Fresnel, you can pin and spread the light beam of the ellipsoidal. Similar to the ring-focus Fresnel, you push or pull the lens away from the lamp, rather than moving the lamp. Because of the peculiarity of the ellipsoidal reflector (which has two focal points), you can even shape the light beam into a triangle or a rectangle, for example, by adjusting four metal shutters that stick out of the instrument (see 5.13). Some ellipsoidal spotlights can also be used as pattern projectors. In this case, the lighting instrument has a special slot right next to the beam-shaping shutters, which can hold a metal pattern called a cucalorus or, for short, cookie. The ellipsoidal spot projects the cookie as a clear shadow pattern on any surface. Most often, it is used to break up flat surfaces, such as the cyclorama or the studio floor. (See 5.14.)
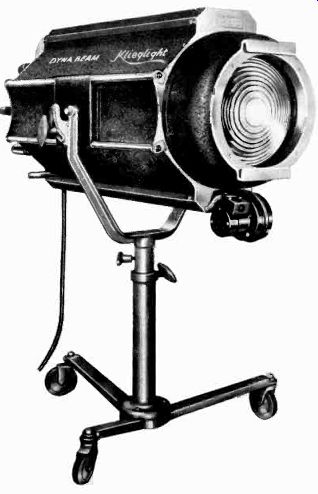
5.15 Sometimes you may find that a television show requires the use of a
follow spot, a powerful special effects spotlight that is used primarily to
simulate theater stage effects. The follow spot generally follows action,
such as dancers, ice skaters, or single performers moving about in front of
a stage curtain.
The follow spot has controls through which you can simultaneously pan and tilt the instrument, spread or pin, and shape the light beam, all while following the action.
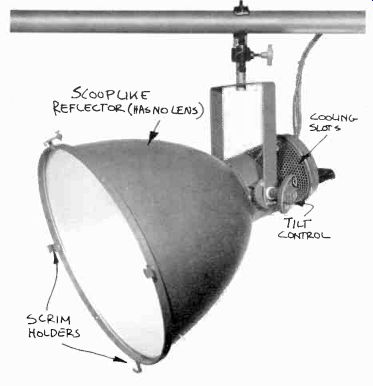
5.16 Scoop.
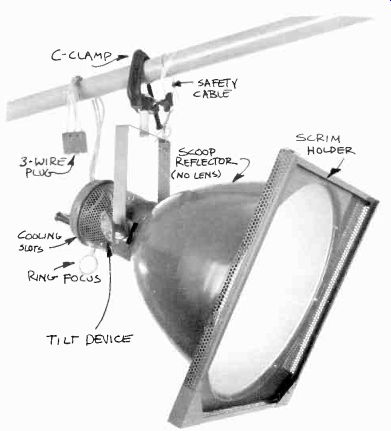
5.17 Ring-Focus Quartz Scoop.
Ellipsoidal spotlights come in sizes from 500 watts to 2,000 watts, but the most commonly used is the 1,000-watt. The ellipsoidal spot is generally used, not for the standard television lighting, but only when specific, precise lighting tasks have to be performed.
Floodlights--Floodlights are designed to produce a great amount of highly diffused light. They are principally used to slow down falloff (reduce contrast between light and shadow areas) and to provide baselight.
Since even in floodlights the spread of the beam should be somewhat controllable so that undue spill into other set areas can be minimized, some floodlights, like spotlights, have adjustable beams.
----------------

5.18 Most scoops range from 1,000 watts to 2,000 watts. Scoops are also classified
by the diameter of the scoop reflector. Thus, we have 14-inch, 16-inch, and
18-inch scoops. The 14-inch and 16-inch scoops with 1,000-watt lamps are most
often used in television lighting.
-----------------
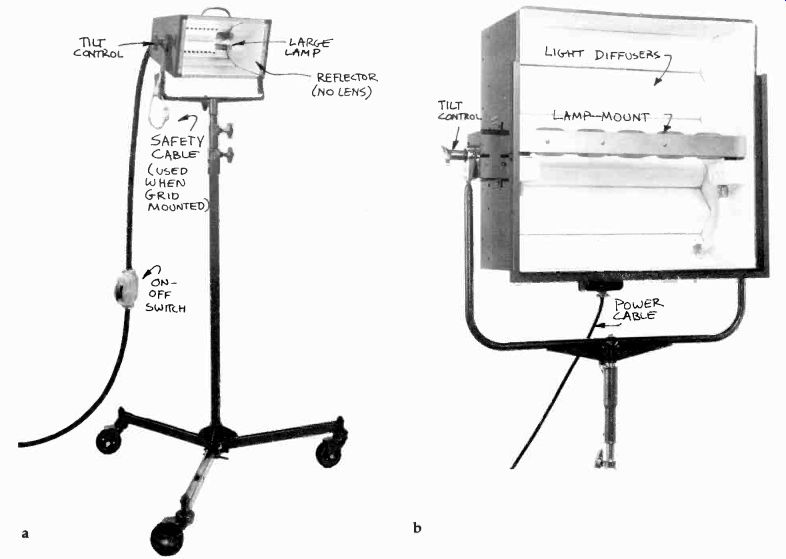
5.19 (a) Small Broad. (b) Large Broad.
There are four basic types of floodlights: (1) the scoop, (2) the broad and softlight, (3) the floodlight bank, and (4) the strip, or cyc, light.
The Scoop Named for its peculiar scoop-like reflector, this floodlight is one of the most versatile and popular. Like most other floodlights, the scoop has no lens.
There are fixed-focus and adjustable focus scoops.
The fixed-focus scoop permits no simple adjustment of its light beam. Pinning the beam is not possible at all. You can, however, increase the diffusion of the light beam by attaching a scrim in front of the scoop. A scrim is a spun-glass material held in a metal frame. Although the light output is considerably reduced through their use, some lighting people put scrims on all scoops, not only to produce highly diffused light but to protect the studio personnel in case the hot lamp inside the scoop shatters. (See 5.16.) Some of the quartz scoops have adjustable beams, from medium-spread positions to full flood. The adjustable scoops are especially handy for filling in shadows in precisely defined areas.
(See 5.17.)
The Broad and the Softlight
The broad (from broadside) and softlight instruments are used to provide extremely diffused, even lighting.
------------

5.20 The most widely used broads in television lighting range from 600 watts
to 1,000 watts. Soft-lights range from 1,000 watts to large 8,000-watt units;
the 1,000-watt-2,000-watt units are generally used in television lighting
and the larger ones for motion picture work.
The high-efficiency quartz lamps are, of course, the ideal light source for all floodlights, especially the broads and softlights. All softlights have a permanently attached scrim, sometimes called "silk-diffuser." Some softlights have fluorescent tubes instead of quartz lamps. However, these can be used only in location shooting, where the general lighting comes from overhead fluorescent tubes. Thus, the softlights match the overall lighting in color temperature.
-------------
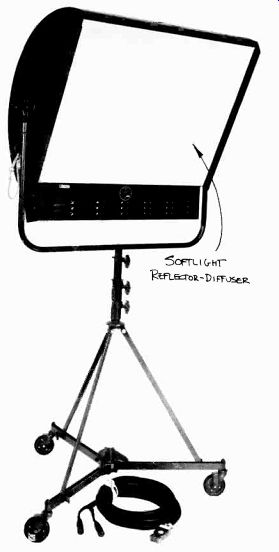
5.21 Softlight.
Broads act like a series of scoops. They illuminate evenly a rather large area with diffused light, with some provision for beam control. (See 5.19.) Some broads have barn doors to block gross light spill into other set areas; others have even an adjustable beam, similar to the adjustable scoops. They are sometimes called "multiple broads." Softlights, on the other hand, are used for extremely diffused, even lighting. If, for example, you want to increase the baselight level without in the least affecting your specific lighting (highlights and shadow areas carefully controlled), you can turn on a few softlights. They act like fluorescent tubes, except that they burn with a lower (3,200°K) color temperature. (See 5.21.) The Floodlight Bank This consists of a series of high-intensity internal reflector bulbs arranged in banks of six, nine, twelve, or more spots. The floodlight bank is mostly used on remotes as daylight booster. Because they are large and awkward to handle, you will not often find them in studios.
For studio lighting, the softlight outperforms the floodlight bank, at least in operational ease. (See 5.22.) The Strip, or Cyc, Light This is commonly used to achieve even illumination of large set areas, such as the cyc (cyclorama) or some other uninterrupted background area. Very similar to the border or cyc lights of the theater, television strip lights consist of rows of from three to twelve incandescent or quartz lamps mounted in long, boxlike reflectors. The more sophisticated strip lights have, like theater border lights, glass color frames for each of the reflector units, so that the cyc can be illuminated in different colors. (See 5.23.)
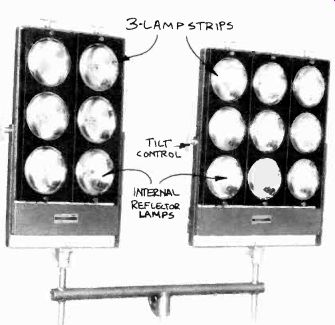
5.22 Floodlight Bank: The floodlight bank consists of at least six individual
internal reflector lamps, stacked as two three-lamp strips. Larger banks stack
three, four, or even five three-lamp strips for a total of nine, twelve, or
fifteen internal reflector bulbs.
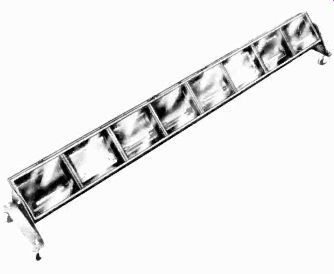
5.23 Strip, or Cyc, Light.
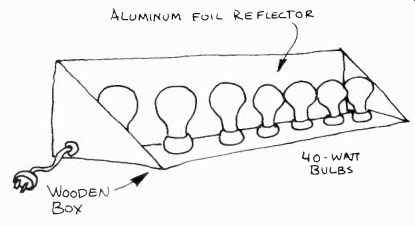
5.24 Simple Strip-light.
Homemade versions of the strip light are often quite adequate for routine cyc lighting. The reflector is a simple wooden box (made of 1 X 8 boards), and illumination is provided by a series of simple (40-watt or 60-watt) frosted household bulbs. (See 5.24.) You can use strip lights also as general floodlights by suspending them from the studio ceiling, or you can place them on the studio floor to separate ground rows from the cyclorama, or pillar and other set pieces from the lighted background. Strip lights are ideal instruments for silhouette lighting (where the background must be evenly illuminated, with the foreground pieces remaining unlit).
Portable Lighting Instruments
Obviously, you can use studio lighting instruments on remote location. However, you may find that they are too bulky to move around easily, that their large three-pronged plugs or twist-lock plugs do not fit the household receptacles, and that, once in place and operating, they do not provide the amount or type of illumination you need for good remote lighting. Besides, most studio lights are suspended on the overhead lighting grid. To take them down each time you have to light a remote telecast not only wastes valuable production time, but more important, robs the studio of valuable lighting instruments.
Special portable lighting packages have, therefore, been developed that can fulfill the basic lighting requirements for simple productions away from the studio. You will find that the basic requirements for remote lighting are (1) a great amount of illumination with as few instruments as possible; (2) compact instruments that take up very little room, and that can be set up and struck (taken down) with minimal time and effort; and (3) instruments that can be operated with household current without danger of overloading circuits.
Even in studio lighting, such portable units can prove extremely helpful, especially if your studio is rather small or if your studio ceiling is too low for overhead suspension of lighting instruments--as in a converted classroom, for example. As with the studio lighting package, the portable lights are grouped into (1) spotlights and (2) floodlights.
Spotlights
Portable spotlights are designed to be light, rugged, efficient (which means that the light output is great relative to the size of the instrument), easy to set up and transport, and small enough so that they can be hidden rather effectively even in cramped interiors.
The two most frequently used are (1) the external reflector spotlight and (2) the internal reflector spotlight.
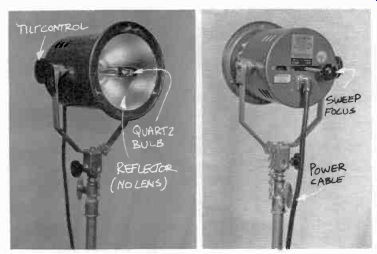
5.25 External Reflector Spots.
The External Reflector Spotlight
Mainly because of weight consideration and light efficiency, this spotlight has no lens. We use the term "external reflector" so as to distinguish it from the small Fresnel studio spot (which, of course, can also be used on remote location) and the internal reflector spotlight, which we will discuss below.
The lack of a good lens makes the beam of the external reflector spot less precise than that of the Fresnel spot. But in most remote lighting tasks, a highly defined beam would offer no particular advantage. Since you will usually have to work with a minimum of lighting instruments on remote location, a fairly flat, yet even, illumination is often better than a dramatic, yet extremely spotty, one. Still, even on remote location, you should try to light as precisely as possible without sacrificing a sufficient operating light level.
The external reflector spot makes fairly precise lighting possible. You can pin or spread the beam of the high-efficiency quartz lamp through a sweep-focus control lever or knob in the back of the instrument. (See 5.25.)
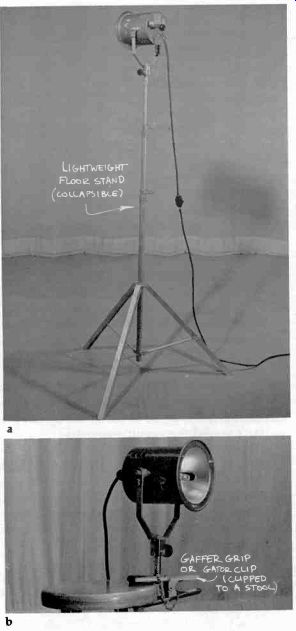
5.26 (a) External Reflector Spot on Stand. (b) External Reflector Spot with
Gaffer Grip.
Unfortunately, the pinned beam is not always even. When you have to place the lighting instrument rather close to the object, you may notice (and the camera will surely notice) that the rim of the beam is quite intense and "hot," while the center of the beam has a hole, a low-intensity dark spot. In extreme cases, especially when lighting a face, this uneven beam may look as though you had forgotten to turn on one of the instruments. By spreading the beam a little, however, you can correct this problem rather easily.
All external reflector spotlights have a special bracket for floor mounting on a lightweight stand (see 5.26a) or on a heavy clip, called a gaffer grip, or gator clip (see 5.26b). Most external reflector spotlights can be plugged into a regular household receptacle. Be careful, however, not to overload the circuit; that is, don't exceed the circuit's amperage.
The smaller Fresnel spotlights are, of course, also used in remote lighting. Make sure in such instances that they are equipped with special mounting devices for fastening them onto lightweight mounting stands, and that you have light-plug adapters for plugging the instruments into the household receptacles.
Internal Reflector Spotlight
This spotlight looks like an overgrown, slightly squashed household bulb. You have probably used it already in your still photography. The reflector for the bulb is inside the lamp. All you need for using this kind of spot is a light socket and a clamp with which to fasten the bulb onto a chair, a door, a windowsill, or a small pole. Because internal reflector spotlights are usually clipped onto things, they are often called clip lights.
You can use clip lights to light small areas easily and also to fill in areas that cannot be illuminated with the other portable instruments. The clip light is an excellent device to provide additional highlights and accents in areas whose lighting looks too flat. (See 5.27.) Internal reflector spots come in a variety of beam spreads, from a soft, diffused beam to a hard, rather precisely shaped beam. For even better beam control, as well as for the protection of the internal reflector bulb, the lamp can be used in a metal housing with barn doors attached (see 5.28). While most internal reflector spotlights are incandescent lights, there are also a number of high-intensity quartz lamps on the market, one of the most popular being the "sun gun" (see 5.29).
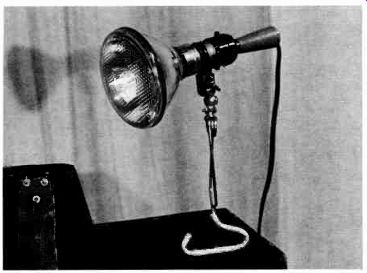
5.27 Clip Light.
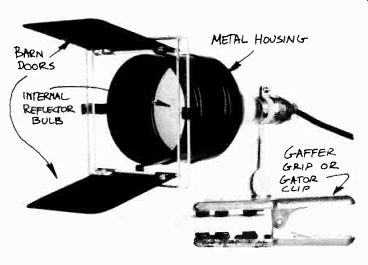
5-28 Clip Light with Metal Housing and Barn Doors.
Floodlights
Since the principal objective in most remote lighting is adequate, even illumination, floodlights are often the more efficient, though not necessarily the more versatile, of the portable lighting instruments.
Unless you work in a large room, such as a gymnasium or the town hall, the studio scoops usually prove too heavy and bulky for remote use. The relatively light and highly efficient broads and softlights are, therefore, preferred for this kind of work. Most of these instruments have a two-way switch for low and high intensity, and can be mounted easily on lightweight, collapsible tripods. If you need to light a very small area, you can use a nook light, which is a very small floodlight. Like the internal reflector spot, the nook light can be attached to a piece of scenery or furniture. However, since it gives off a relatively great amount of diffused light, it is an ideal instrument for filling in small shadow areas. (See 5.30.)
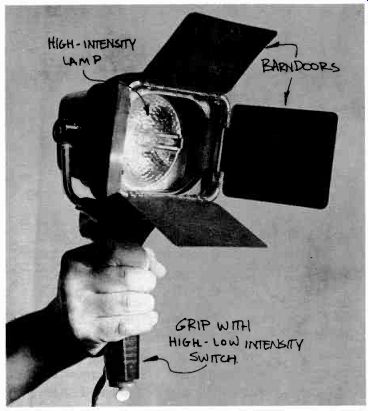
5.29 Sun Gun with Barn Doors.
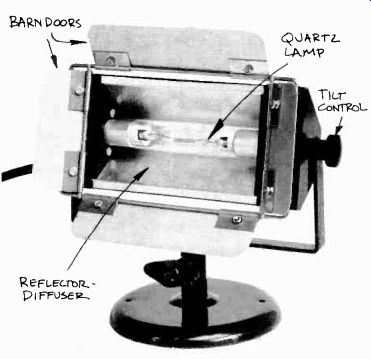
5.30 Nook Light.
Portable floodlights, like spotlights, usually come with three-wire extension cables that fit ordinary household receptacles. Some of the extension cables have on-off switches next to the instruments, making it unnecessary to unplug the instrument each time you want to turn it off. By the way, there are three good reasons why you should keep portable lighting instruments turned off as much as possible: (1) You will prolong the life of the bulb. (2) You will keep the performance areas as cool as possible; the excessive heat radiation of the quartz instruments makes working in cramped quarters especially uncomfortable. (3) You will conserve energy. (Note: Wear gloves when handling instruments that are turned on.)
Lighting Control Equipment
Television operation, especially in small stations, necessitates extremely flexible lighting equipment for several reasons: (1) Constantly moving television cameras and microphone booms make any permanent lighting setup on the studio floor impossible. (2) When only a small amount of lighting equipment is available, what there is must be flexible enough to provide adequate light for every corner of the studio. (3) There is rarely enough time or manpower to design and execute a proper lighting plan for each television production. The lighting setup must be flexible enough to allow one person to change the studio lighting with speed and the least effort.
The necessary control and flexibility of light is achieved primarily by three methods: (1) directional control, (2) intensity control, and (3) color control.
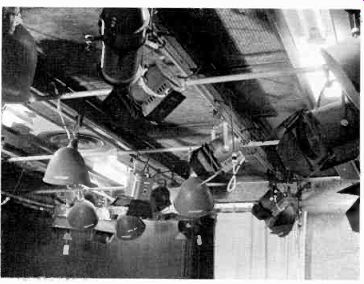
5.31 Pipe Grid: The pipe grid consists of rather heavy pipe strung either
crosswise or parallel and mounted from 12 to 18 feet above the studio floor.
The height of the grid is, of course, determined by the studio ceiling height, but even in rooms with low ceilings, the pipe should be mounted approximately two feet below the ceiling so that the lighting instruments or the hanging devices can be easily mounted onto the pipe.
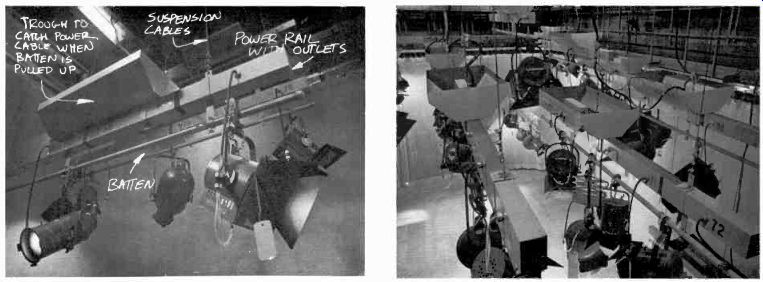
5.32 Counterweight Battens: The counterweight battens can be lowered and
raised to any desired position and locked firmly into place. The battens and
the instruments are counterweighted by heavy steel weights and moved by means
of a rope-and-pulley system or individual motors. The advantage of counterweight
battens over the pipe grid system is that the instruments can be hung, maintained,
and adjusted to a rough operating position directly from the studio floor.
However, even this arrangement does not altogether eliminate the use of a
ladder.
Especially in small studios, the studio floor is rarely sufficiently clear of cameras, microphone booms, or scenery for the battens to be lowered all the way to comfortable working height. You will find that after having adjusted the lighting instruments as to direction and beam focus, you will still need a ladder or the lighting pole for the accurate final trimming once the battens have been raised to the proper position.
Directional Controls
Directional controls for lighting instruments help you to mount the instrument in a given position, point the lighting beam in a given direction, and keep the beam from spilling into unwanted areas.
Thus, we have four basic directional controls: (1) basic mounting devices, (2) basic hanging devices, (3) mounting devices for floor or portable lights, and (4) barn doors.
Basic Mounting Devices Studio lights are hung from either fixed pipe grids or counterweight battens, which can be lowered and raised to a specific vertical position. (See 5.31 and 5.32.)
Basic Hanging Devices
The lighting instruments are either directly attached to the light batten by a C-clamp, or hung from the batten by hanging devices that enable you to vary the vertical position of the instrument without raising or lowering the battens. If you have a fixed pipe grid rather than the movable counterweight system, these hanging devices are especially important. The most common are the pantograph, the sliding rod, and the telescope hanger. (See 5.34 through 5.39.) Mounting of Floor Lights While in motion picture production a large part of the lighting is done from the studio floor, television resorts to such lighting only occasionally. As pointed out before, the moving television cameras require that the studio floor be kept uncluttered. Also, the danger of having the lights picked up by one of the cameras is much too great to make lighting from the floor a viable production technique. But you may find that you will need to supplement the overhead lighting with some floor lights.
Floor lights are usually mounted on vertical roller-caster stands that can be vertically adjusted up to eight feet. Such stands can hold any type of lighting instrument-scoops, broads, spots, and even strip lights. The more elaborate ones have a light switch attached to them so that you can regulate the floor instrument without having to go through the dimmer control. (See 5.40 and 5.41.)
Barn Doors
These are movable metal flaps that can be inserted into a special slot in front of any spotlight. They are intended to block the light very much the same way as you shield your eyes from the sun with your hand.

-----------------
5.33 There are further rail-type mounting devices for lighting instruments, which are highly specific in their application. Generally, a sliding track (which can even carry the electric current) is attached directly to the ceiling, and the lighting fixtures slide along the rail into limited horizontal positions. The principle of the rail-type mounting is quite similar to the traverse rod on which household curtains are hung and moved along. The double disadvantages of such mountings are the high installation cost and limited positions of the lighting instruments. However, in the conversion of low-ceilinged classrooms into small television studios, rail-type mountings sometimes prove to be the most effective lighting arrangement.
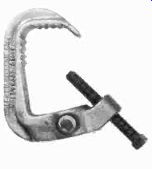
-------------5.34 C-Clamp: With the C-clamp, you can securely attach even
the heaviest lighting instrument to the mounting pipe. A bolt at the bottom
of the C-clamp enables you to swivel the instrument into the desired position.
For increased safety, secure each instrument directly to the grid by a small
chain or cable.
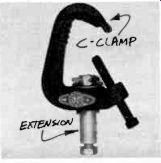
5.35 C-Clamp with Extension: Some C-clamps have a small extension hanger
attached, which makes the turning of the lighting instruments a little easier
than with the standard C-clamp.
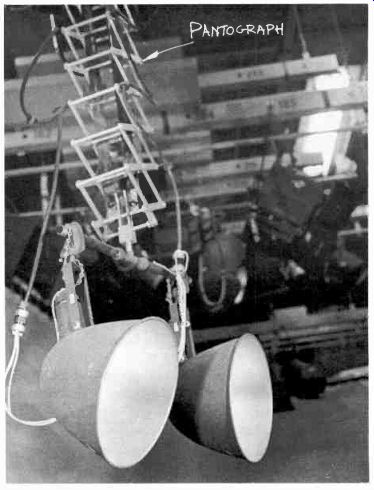
5.36 Pantograph: The most versatile and most frequently used hanging device
is the pantograph. This is a spring-counterbalanced hanger that can be adjusted
quickly and easily from the studio floor to any height within its more than
sufficient 12-foot range. Depending on the lighting instrument attached to
it, you need one or two sets of springs for counterbalancing. Heavier springs
permit the mounting and counterbalancing of other equipment, such as a studio
monitor. In most studios, where the grid height rarely exceeds 18 feet, you
can pull the lighting instrument down to almost floor level, make the necessary
lighting adjustment, and push the instrument back into the desired position,
all in a matter of seconds. Even if you have counterweight battens, you can
still use pantographs to make some of your lighting instruments even more
flexible.

5.37 Sliding Rod: The sliding rod is another hanging device that allows vertical
positioning of lighting instruments.
However, in the up-position, the sliding rod needs a considerable clearance between grid and ceiling; otherwise it cannot be pushed up high enough. An additional problem is that any adjustment has to be made from the grid, which requires a bulky ladder and much time.

5.38 Telescope Hanger: The telescope hanger is similar to the sliding rod,
except that the rod telescopes into itself when the hanger is pushed up. Thus
the telescope hanger needs little clearance between grid and ceiling.
-----------------

5.39 The ideal hanging devices are, of course, motorized telescope hangers
or winches for each instrument. Occasionally you will find such an extravagant
hanging system in large television production centers. For small station operation,
such devices are much too costly and really not necessary.
-----------------
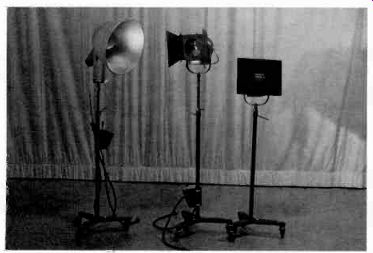
5.40 Floorstand: The floorstand can support any type of lighting instrument,
and can even be adapted for an easel stand.
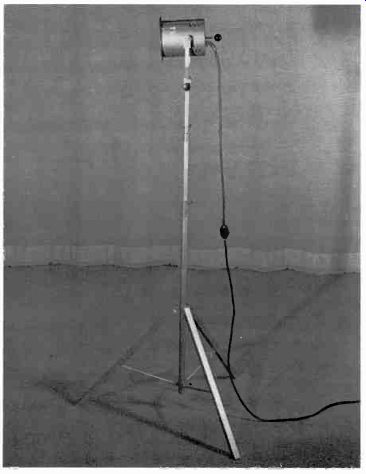
5.41 Collapsible Floorstand: Portable lights do not require as heavy a floorstand
as studio lights. For all portable lighting instruments, special collapsible
stands have been developed that telescope from a 2-foot minimum to an over
8-foot maximum height.
On some models the legs can be extended individually so that the light remains level even if standing on steps or uneven ground.
This admittedly crude beam control method is extremely effective if you want to block certain set areas partially or totally from illumination. For example, if you want to keep the upper part of some scenery dark, without sacrificing illumination of the lower part, you simply "barn-door" off the upper part of the beam. Or, if you want to eliminate a boom shadow, you may be able to do so by partially closing a barn door. (See 5.42 and 5.43.) Since the barn doors slide into their holders rather easily, they have a tendency to slide out of them just as readily. Make sure, therefore, that they are chained to the instrument so that they can't drop on you, especially when you are adjusting them from the studio floor with a light pole. Also, barn doors get very hot. Wear asbestos gloves if you handle them while the instrument is turned on.
We have already mentioned the spun glass diffusers, or scrims, which you may put in front of the floodlights in order to diffuse the beam even more than in its extreme flood (spread) position.
Intensity Controls
The simplest way of controlling light intensity is obviously to turn on only a certain number of lighting instruments of a specific size (wattage). Unfortunately, since television lighting techniques and the delicate control of shadows call for light to come from very specific directions, it is not always possible to turn a light either on or off simply because the camera receives too little or too much light. With a dimmer, you can easily manipulate each lighting instrument, or groups of instruments, to burn at any given intensity, from zero (off position) to full strength.
Although dimmers are technically quite complex, their basic operational principle is simple: by allowing more or less current to flow to the lamp, the lamp burns with a higher or lower intensify. If you want the lighting instrument to burn at full intensity, the dimmer lets all the current flow to the lamp. If you want it to burn at a lesser intensity, the dimmer reduces somewhat the voltage that flows to the lamp. If you want to dim the light completely, called a blackout, no current-or at least an inadequate current-reaches the lamp.
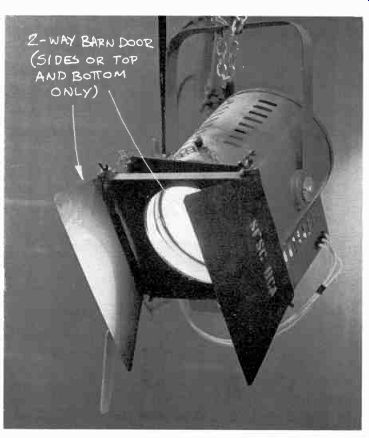
5.42 Two-Way Barn Door: The two-way barn door has two movable metal flaps.
They can be attached to the lighting instrument so that they block either
the top and bottom part of the light beam or its right and left spread.
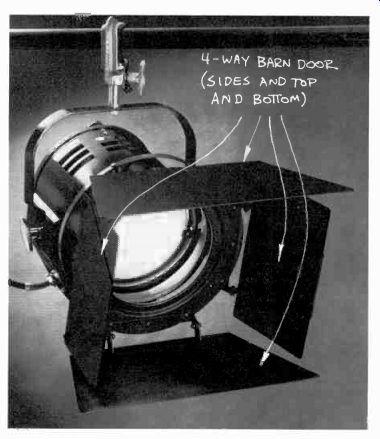
5.43 Four-Way Barn Door: With the four-way barn door, all four sides-top
and bottom, and left and right sides-of the beam spread can be blocked simultaneously.
5.44 Dimmer Calibration: At a dimmer setting of 0, no current flows to the lamp; at a setting of 10, the full current flows to the lamp, and the lamp burns at full intensity.
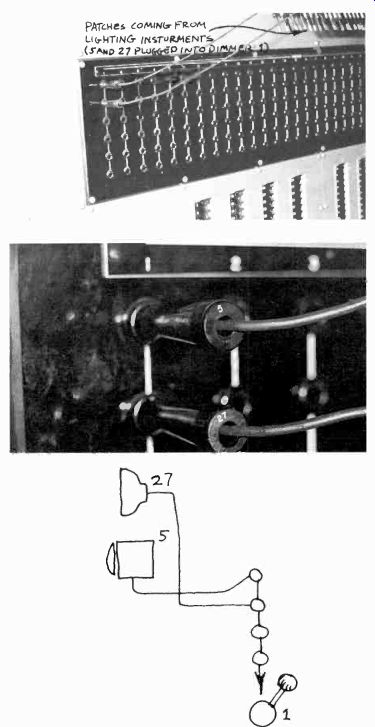
5.45 Patching: As you can see, the patches for the lighting instruments No.
5 (spot) and No. 27 (scoop) are both patched into dimmer No. 1. Consequently,
both lighting instruments respond identically to any No. 1 dimmer setting.
All dimmers, regardless of make and relative complexity, are designed to fulfill these principal functions: (1) Contrast control: Through dimmers, we can control even the most subtle differences between light and shadow areas. The subtle manipulation of falloff requires their use. (2) Light changes: Dimmers enable you to change quickly and easily from one type of lighting in a particular area to another. Also, with the use of a dimmer board and its related equipment, you can light several studio areas at once, store the lighting setup in the preset board, and activate any part or all of the stored lighting information whenever necessary. (3) Special effects lighting: With the help of the dimmer board, you can achieve a variety of special effects lighting (such as silhouette, or a series of pools of light) without affecting the standard lighting setup in any way.
Three features of a good dimmer system are especially important in the context of the major functions just mentioned: (1) the calibration of the individual dimmer, (2) the patch board, and (3) the preset board.
Calibration
Each individual dimmer has a calibration from 0 to 10. At the zero position, the lighting instrument is dimmed down completely; consequently, it emits no light. At the 10 position, the lighting instrument receives its full current and burns with maximum intensity. The dimming steps between 0 and 10 are generally large enough to be detected readily by the camera. (See 5.44.)
This calibration is particularly useful in the initial setting of light intensities, and in recording and repeating the rehearsal lighting ,intensities for the final telecast.
-----------------------------
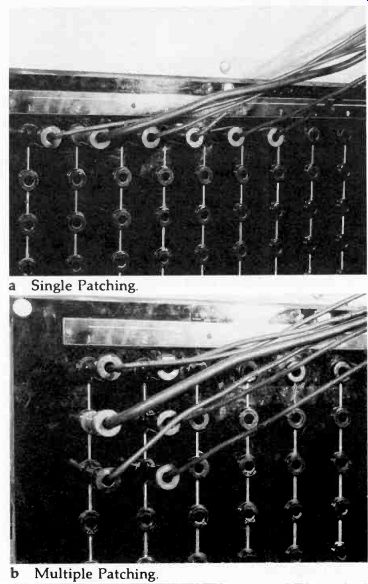
5-46 Let's try to patch some instruments so that you can effect a simple
lighting change for a specific studio area. First, you light the designated
studio area A with three spotlights. These happen to be plugged into the batten
outlets Nos. 5, 12, and 18.
Since all the spotlights should turn on and off at the same time and burn at the same intensity, you can patch them into the same dimmer, dimmer No. 1.
Now, let's assume that you want to change from this rather harsh spotlighting to a softer floodlighting of the same area. You will now pick three scoops that will illuminate area A from the direction of the spotlights. These scoops happen to be plugged into the batten outlets Nos. 6, 13, and 19. You look for the patch cords Nos. 6, 13, and 19 at the patch-board and plug all three patches into the dimmer No. 2 receptacles.
If you bring up dimmer No. 1, area A is illuminated with three spotlights. If you now want to change to the diffused lighting of the scoops, you simply bring down dimmer No. 1 (which turns off the spotlights) and bring up dimmer No. 2 (which turns on the scoops). If you bring up dimmer No. 2 while bringing down dimmer No. 1, your light change will be very gradual, very much like a picture dissolve.
If you want to control each light separately, so that you can balance the intensity of each of the six lighting instruments (the three spots and the three scoops), you will have to assign a separate dimmer to each instrument. Therefore, spot No. 5 will be patched into dimmer No. 1; spot No. 12 into dimmer No. 2; spot No. 18 into dimmer No. 3; scoop No. 6 into dimmer No. 4; scoop No. 13. into dimmer No.
5; and scoop No. 19 into dimmer No. 6. (See a.) Unless you have further sophisticated grouping or preset facilities, you will now have to work all six dimmers simultaneously to effect the simple lighting change in area A. As you can see, without a preset board, it is often more practical to patch several lighting instruments into a single dimmer than to use a separate dimmer for each one. (See b.)
a. Single Patching.
b Multiple Patching.
---------------------------
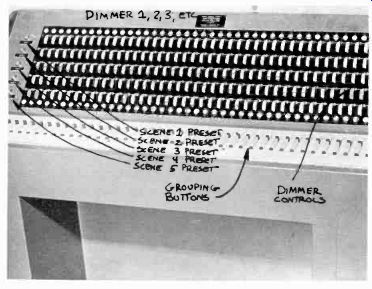
5.47 Five-Scene Preset Board.
The Patchboard Sometimes called a patch bay, this device connects lighting instruments to dimmer control. Regardless of make and design, all patchboards work on the same principle: to connect widely scattered instruments to a specific dimmer, or separate dimmers, on the dimmer control board. Most of the important lighting instruments in the studio terminate at the patch-board. Let's assume that you have fifty overhead lighting instruments in your studio. Let's further assume that each one of these has its corresponding patch. Each of the fifty outlets on the light battens is numbered, and the patchcords for each light have corresponding numbers. (Don't number the instrument itself, since, if you were to shift the instrument into a different position, your patch-cord number would no longer correspond with the lighting instrument.) Now, for example, if you want to patch instrument No. 5 (a spotlight plugged into the No. 5 batten outlet) and instrument No. 27 (a scoop plugged into the No. 27 batten outlet at the other end of the studio) into dimmer No. 1, you simply take the patchcords No. 5 and No. 27 and plug them into the receptacles for dimmer No. 1. Depending on the rated power of the dimmer, you may plug several lighting instruments into a single dimmer. If you now bring up dimmer No. 1 at your dimmer board, both instruments, spotlight No. 5 and scoop No. 27, will light up simultaneously (see 5.45). The patchboard thus allows many combinations of specific lighting instruments from different studio areas so that they can be controlled individually or in groups as to their intensity.
The Preset Board
This is a storage device for several different lighting setups. Whether mechanical or computer assisted, the preset board can memorize the lighting setups for several scenes. You can, for example, use one instrument, such as our spotlight No. 5, and preset it so that it will operate at full intensity in scene 1, at one half intensity in scene 2, at three-quarters intensity in scene 3, and at full intensity again in scene 4, even though it is patched into only one dimmer. The preset board stores the different settings of dimmer No. 1 (full, 1/2, 3/4, full) and relates this information to the lighting instrument according to whichever scene (1, 2, 3, or 4) is activated.
Most sophisticated preset boards have further grouping devices, which make your light combinations even more flexible. For example, the grouping buttons allow you to preset within each scene special lighting effects, such as silhouette lighting.
All you do in this case is group all the floodlights together that illuminate the background while keeping the other lights completely dimmed down. (See 5.47.) Highly sophisticated dimmer systems are computer assisted. Special punch cards (similar to the familiar IBM cards) contain the necessary dimmer information (as gained during rehearsal) and activate even the most complicated dimmer operations with ease and reliability.
Color Controls
Color control in lighting includes (1) color temperature control, and (2) actual production and manipulation of colored light.
Color Temperature Control
We have already discussed how different lamps may burn at various color temperatures, and how dimming affects color temperature. To repeat: the most common methods of controlling color temperature are (1) to use lamps in your lighting instruments with a uniform Kelvin rating, such as 3,200°K; (2) to dim not at all, or only slightly, the lights that are used for the principal performance areas; (3) to use color correction filters, and color temperature correction circuits in your camera chain, if available.
An additional color control, which is frequently used in motion picture lighting but only occasionally in television, is to put a variety of color temperature correction filters directly in front of the lighting instruments. If the color temperature is too high (light too bluish), you use an orange filter in front of the lighting instrument to lower the color temperature. If the color temperature has to be boosted (to bring indoor light sources to match the cool outdoor light, for example), you need a blue filter.3 Colored Light Control You can produce a great variety of colored lights simply by putting a colored filter-colored gelatin or the more durable plastic, such as cinemoid-in front of the lighting instrument. Again, do not use colored light in performance areas, at least not if you intend the scene to look normal. Limit it to background lighting, or use it for special effects.
As you remember from our discussion of how the camera works, colored light mixes additively, not subtractively as paints do. In a colored light mixture, red and green gives off a rich yellow, not a muddy brown as paints would produce.4 Summary Like the human eye, the television camera needs light in order to function effectively. The control of light is called lighting.
Objectives for lighting may be either technical or nontechnical.
The technical lighting objectives are (1) to achieve the proper baselight level, which means to provide enough light so that the pickup tube or tubes and the electronic accessories can function with some degree of efficiency, (2) contrast, which refers to a basic limit between highlight and shadow areas, or light and dark colors, and (3)
color temperature, which refers to the relative reddishness or bluishness of white light as produced by the lighting instruments.
The nontechnical lighting objectives are (1) to indicate form and dimension, (2) to create the illusion of reality or nonreality, and (3) to indicate mood.
These three objectives require the careful control of shadows.
There are two types of studio lighting instruments: (1) spotlights and (2) floodlights. Both can have either quartz (tungsten-halogen) or incandescent lamps. The most prevalent spotlights are (1) the Fresnel spot, and (2) the ellipsoidal spot. The most common floodlights are (1) the scoop, (2) the broad or softlight, (3) the floodlight bank, and (4) the strip, or cyc, light.
Portable lighting instruments include small external and internal reflector spotlights, and floodlights.
Lighting control equipment consists of directional controls, intensity controls, and color controls.
The directional controls include (1) basic mounting devices, (2) basic hanging devices, (3) mounting devices for floor or portable lights, and (4) barn doors. The most common intensity control is the dimmer. Color control includes the control of the color temperature through the use of variously rated (in degrees Kelvin) lamps and correctional filters, and the actual production and manipulation of colored light through color filters.