Success with your compact disc player depends on how well it is integrated with the rest of your hi-fi system. A haphazard ar rangement will yield inferior results, and you won't be able to enjoy the full capabilities of the player. Many potential problems can be completely avoided by proper placement and hookup of your CD.
If your player is giving you problems, check this section first. It provides details on how to properly install, adjust, and use a compact disc player. CD isn't necessarily a difficult technology to use; on the contrary, it’s quite simple. Never theless, a compact disc player is different than any other piece of hi-fi gear youVe ever owned, and there are tome special considerations to keep in mind.
UNPACKING
If you have yet to buy or unpack your CD player, here are some quick tips to keep in mind.
Concealed Damage
When unpacking your CD player from its box, be on the lookout for concealed damage. This is breakage that you can't see on the outside of the box but becomes apparent when you take the player out of its shipping container. If the player has been damaged, return it immediately to the dealer. Exterior damage is a good indication that internal components are damaged, too.
Save the box and all packing material, at least until you've had the player a month or so. Most mechanical and electrical problems will arise in this time, and you'll need the box to return the player for warranty repair.
Transit Screws
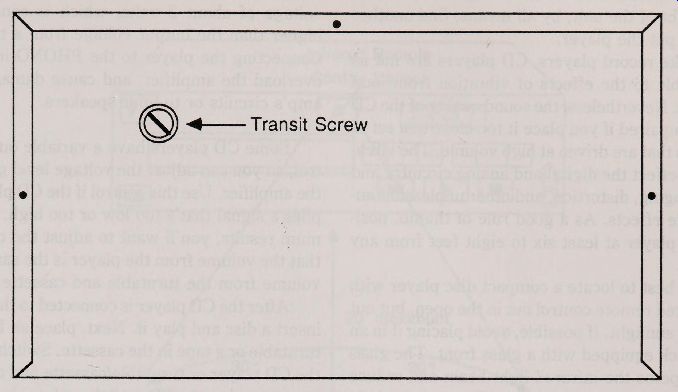
Fig. 4-1. Most home players are equipped with one or more transit screws.
Be sure to remove or loosen them before using the player.
This next point is important, nearly all CD players are equipped with one or more transit screws which are located on the baseplate (bottom) of the unit (Fig. 4-1). These screws anchor the pickup and other internal moving parts during transit. If the transit screws are not removed prior to installing the player, the machine won't work.
Compact disc repair technicians claim that failure to remove the transit screws account for the majority--over 60 percent--of the service calls they get. Most service centers don’t charge forthis kind of mistake, but you can avoid the hassles of return-ing the machine by following the directions packed with the player. On many machines, the instructions for the transit screws are duplicated on a sticker placed on the rear or underside of the player.
The transit screws on some CD players are designed so that they can be loosened, but cannot be removed, (these are called captive transit screws) with others, you must take out the screws entirely.
If the player doesn't provide a recept acle for the screws, save them in a place where they won’t be lost. You will need to reinsert the transit screws should you transport or ship the player at some fu ture time.
INSTALLATION
Keep these installing tips in mind when adding your compact disc player in your audio system.
Ventilation
Unlike your hi-fi amplifer, compact disc players do not generate a lot of internal heat, but it is still important to avoid obstructing the player’s vent ilation slots. A player that gets too hot will performer ratically.
The laser diode is designed to operate over a very limited temperature range, and is extremely susceptible to operating temperatures over 100 degrees or so. If the laser gets too hot, its light output becomes uneven, which can cause mistracking and excessive unconcealed errors. If this happens, check to see if the player has become overly warm.
Turn it off for an hour or two and test it again. It should return to normal after cooling.
Placement
The optical pickup used in CD players for the home generally do not use damping or shock ab sorbing materials. This makes them much more prone to mistracking caused by external jolts than car and portable players, which are specifically designed to withst and this kind of treatment. You should always place a home CD player on a level shelf or platform that’s free of vibration and shock.
Be sure that the shelf can adequately suppor tthe player. If it looks like the shelf might break under the weight of the unit, by all means, find another place to put the player.
Unlike record players, CD players are not as suscept ible to the effects of vibration from loud speakers. Never theless, the sound quality of the CD can be impaired if you place it too close to a set of speakers that are driven at high volume. The vibration can effect the digital and analog circuitry and cause ringing, distortion, and other unpleasant audible side effects. As a good rule of thumb, posi-tion the player at least six to eight feet from any speaker.
It is best to locate a compact disc player with an infrared remote control out in the open, but out of direct sunlight. If possible, avoid placing it in an audio rack equipped with a glass front. The glass may disperse the infrared light beam and reduce the effectiveness of the remote. This is especially true if the glass is smoked. You may need to keep the glass front open when operating the player with the remote.
Be sure that the player is within range of the remote (usually 20 feet or less), and that you can aim the remote control transmitter in a direct line more or less-t o the player. The remote may notwork if it is used at angles greater than 30 degrees off to either side of the front panel of the player (Fig. 4-2).
Hookup CD players are relatively easy to connect to audio amplifiers. Just stretch a stereo cable from the AUDIO OUT connectors of the player to the CD, AUX, or TAPE inputs of the amplifier (Fig. 4-3).
There are some important points to remember to avoid problems.
Always turn the amplifier off before attaching any cables to it. Turn everything in your hi-fi system off. During installation, you may ground out an input to the amplifier simply by touching the end of one of the cables. If the volume on the amp is set too high, you run the risk of over loading and damaging the amplifier’s electronics.
Never connect a CD player to the PHONO inputs of the amplifier. CD players have an output voltage of about 2 volts, which is considerably higher than the output voltage from a turntable.
Connecting the player to the PHONO input may over load the amplifier, and cause damage to the amp’s circuits or to your speakers.
Some CD players have a variable output control, so you can adjust the voltage level going into the amplifier. Use this control if the CD player sup plies a signal that’s too low or too high. For opti mum results, you’ll want to adjust the control so that the volume from the player is the same as the volume from the turntable and cassette player.
After the CD player is connected to the system, insert a disc and play it. Next, place an LP on the turntable or a tape in the cassette. switch between the CD player or turntable/cassette and adjust the output level on the CD until the volume is the same.
Unless you have a high-end turntable or cassette player, you'll quickly note how good the CD player sounds!
If the TAPE and AUX inputs on your amp are already taken, you can still use the CD player by adding a selector switch. These are available at many electronics stores. They let you select from several inputs and route the signal to one output.
You could connect the CD player and the tape player, for example, to the switch, then route the switch to the LINE input of your amplifier (Fig. 4-4). Be sure the selector you use is int ended for audio use, and has adequate internal shielding.
Cables
Use only shielded cable designed for audio ap plications. The cables should be the highest quality you can af ford. If the player comes with its own cables, inspect them carefully. If they feel or seem cheap, purchase a new set. The few extra dollars are well worth it.
Avoid the use of adapt ers on the cable ends as they can pick up extraneous hum caused by nearby alternating currents. A number of CD players use gold-plated audio plugs. We personally feel the gold-plating does little to improve the overall sonic ...

Fig. 4-2. Effective use of the remote control requires you to be within
20 feet of the player and no more than 30 degrees off to either side of
the remote control sensor.
... quality of the average player. However, many au diophiles swear by them, and say that the small added expense is well worth it. Supposedly, the plating provides better sound and you get the maximum benefit from using cables with gold-plated connectors. Decide for yourself.
Cable Routing
If you're like most hi-fi enthusiasts, you prob ably have a tangle of wires behind your stereo system. For better sound spend a few moments to ''dress" the cables so that they are neater. This not only makes troubleshooting problems easier, it reduces the chance of ac-induced hum ent ering signal cables and amplified by the system. Keep these points in mind.
Use cables that are just long enough to do the job.
If the cable is a bit long, loop it gently and wrap it toget her using masking tape or, better yet, a plastic tie wrap (available at hardware and elec tronics stores).
Whenever possible, keep signal cables and ac cords away from each other. Avoid looping ac cords, because this sets up an inductive field, like an elect romagnet or motor, that can increase hum.
If signal cables and ac cords must be routed near each other, cross the two at right angles. Avoid running signal cables and ac cords parallel.
Checkout
After installation is complete, plug the CD player in a wall socket. (Note, as illustrated in Fig. 4-5, the polarization of the plug and socket.) Most ...
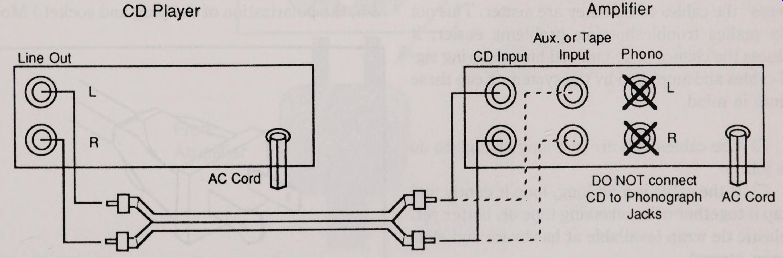
Fig. 4-3. Recommended connection diagram between CD player and amplifier
/ receiver.
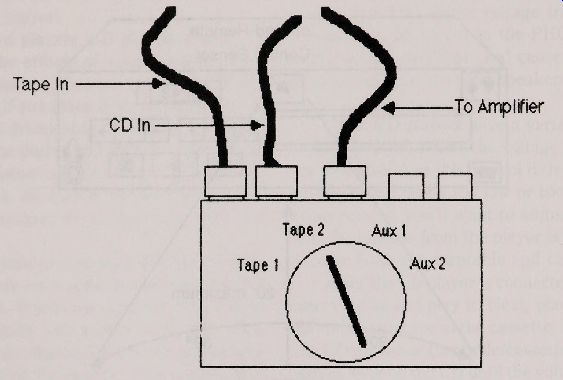
Fig. 4-4. Use a select or if you run out of inputs on your amplifier.
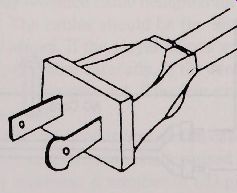
Fig. 4-5. A polarized ac cord, now used on most electrical devices sold
in the U.S.
...electrical devices sold these days have polarized plugs--one prong is slightly larger than the other. They are designed to fit only one way into the wall socket. If the electrical outlets in your home are not equipped with polarized outlets, be sure to orient the power cable from the CD in the same direction as the power cable from the amplifier (Fig. 4-6). By retaining the proper polarization for the two components, you eliminate the possibility of a ground loop and you won't be bothered by the effects of ac-induced hum.
Turn down the volume on the amplifier, then apply power to the amp and CD. Select the C on the amplifier, insert a disc, and play it. Slowly turn the volume up to a comfortable listening level. It will take a few seconds for the disc play to start, so be patient.
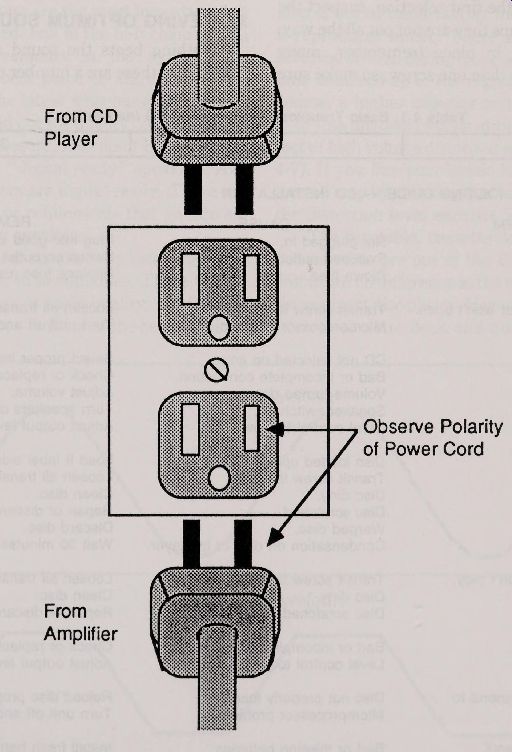
Fig 4-6. To help reduce hum, be sure to orient the plugs from your CD
and amplifier the same way in the wall socket.
Unlike cassette decks and turntables, you won't hear much (if any) background noise before the song plays. Don’t be tempted to adjust the volume to the proper listening level by judging the amount of hiss you hear through the speakers. If your amp has any power at all, when the music finally starts you’ll be jolted out of your chair! Wait until the music begins, THEN turn up the volume.
Check all of the front panel controls. Skip through the selections to make sure the pickup in the player can access the entire width of the disc.
If your player stops or skips after playing only the first few minutes of the first selection, suspect the transit screws. Perhaps they are not out all the way, in place (remember, many machines have more than one screw, so make sure or a screw still you get them all).
IF SOMETHING GOES WRONG
You've connected your CD player to your amplifier, did everything that you thought you should do, but it doesn't seem to work. Table 4-1 is a quick troubleshooting guide you can use to help right the mistake. These problems assume a simple cause.

---------------------- Table 4-1. Basic Troubleshooting Guide: CD Installation.
-----------------------
BASIC TROUBLESHOOTING GUIDE -CD INSTALLATION
-----------
PROBLEM
Won tturn on.
Load drawer or door won topen.
No sound.
Will not play disc.
Por tions of disc won tplay.
Sound is distorted.
Player does not respond to push buttons.
Remote does notwork.
-------CAUSE
Not plugged in.
switched out let.
Blown fuse.
Transit screw in place.
Microprocessor problem.
CD not selected on amp.
Bad or incomplete connection.
Volume turned down.
Speaker switch off.
Level control too low.
Disc loaded upside down.
Transit screw in place.
Disc dirty.
Disc scratched.
Warped disc.
Condensation on disc or in player
Transit screw in place.
Disc dirty.
Disc scratched.
Bad or incomplete connection.
Level control too high.
Disc not properly loaded.
Microprocessor problem.
Bad or missing batteries.
infrared light path blocked.
----REMEDY
Plug into good electrical socket.
switch on out let.
Replace fuse (usu. internal).
Loosen all transit screws.
Turn unit off and on again.
Select proper input on amplifier.
Check or replace cables.
Adjust volume.
Turn speakers on.
Adjust output level on CD.
Load it label side up.
Loosen all transit screws.
Clean disc.
Repair or discard disc.
Discard disc.
Wait 30 minutes to dry..
Loosen all transit screws.
Clean disc.
Repair or discard disc; skip track.
Check or replace cables.
Adjust output level on CD.
Reload disc properly.
Turn unit off and on again.
Install fresh batteries.
Unblock path (including glass).
------------
------------
System Quality
For a diagnosis of more serious problems, see the troubleshooting flowcharts in Section 9.
ACHIEVING OPTIMUM SOUND
Nothing beats the sound of a compact disc player. Yet there are a number of ways you can improve the sound to achieve maximum performance from the player. Invariably, the music you hear from your CD will interest you in upgrading your hi-fi system. Unless you have the ultimate stereo gear, you'll always feel there is some way you can improve the sound by replacing this speaker or that amplifier. Before you rush out and spend a few thousand dollars on an audiophile hi-fi system, consider these points.
The loudspeakers are the most important, but most often neglected, link in the hi-fi chain. If you make any improvements in the system, the speakers are the best place to start. You don’t necessarily need the latest whiz-bang speaker design, but you should opt for quality components in a well-designed enclosure. And don’t be fooled into spending extra for “ digital ready" speakers. Any good pair of speakers are digital ready. There are no special designs or refinements that go into socalled digital ready speakers.
You can test your speakers by listening to the CD with a good pair of headphones. There will always be a difference in sonic quality, but if there is a marked variance-in favor of the headphones the speakers are probably low in quality. If the speakers are good, you will prefer to listen to the music through them and not the headphones.
Whether or not the speakers are good quality, you should make sure they are rated to match your amplifier. Don’t use speakers that are rated for a maximum of 50 watts on a 100 watt-per -channel amp. This is true even if you regularly listen to music at low volumes.
The amplifier should be good quality, with low total harmonic distortion (THD). The power of the amp is not as important as the clarity with which it reproduces music.
There should be no noticeable hiss or hum during quiet sections when the vol ume is turned up to the regular listening level. Of course, a higher capacity amp will be able to deliver less distorted music at high volumes. The effeet of high volume distortion is called clipping (Fig. 4-7). If you like your music loud, don't overdrive a small amp by cranking the volume up so high that the distortion level exceeds 50 percent! The turntable, cassette deck, and other components that are out of the CD-amplifier-speaker link make no difference in the quality of sound from the compact disc player. If you are happy with your present cassette deck and turntable, keep them.
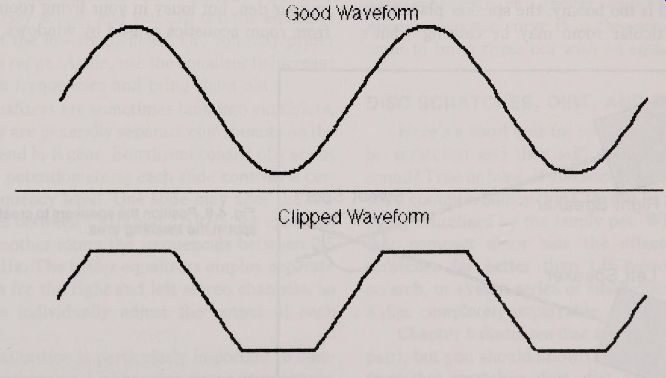
Fig. 4-7. Driving the amplifier at full volume can cause clipping, which
is a severe form of distortion.
Speaker Placement
Almost as important as the quality of speakers in a hi-fi System is where they are located in the room. There are many do's and don’ts regarding proper speaker placement, and you can ruin the sound from even the best hi-fi’s by carelessly tossing the speakers in the corners of the room.
It’s best to consider the listening room as an extension of the loudspeaker cabinet. In fact, the rich, full sound you hear from a good set of speakers comes not from the speaker enclosure, but the sound reverberating throughout the room. Other considerations:
Position the speakers so that they are directed to the cent ral listening point in the room, this point shouldn't be any closer than about eight feet from the speakers. Any closer and the direct sound from the speakers will overpower the room acoustics. The spot where the sound from the two speakers meet is called the “ sweet spot " (Fig. 4-8), and is where the illusion of the stereo image is the greatest.
Position the right and left speakers evenly they are positioned on the long wall of the room.
If the sound is too boomy, the speaker placement in that particular room may be causing what’s so that they are the same distance away from the sweet spot. This increases the stereo image.
Speakers almost always sound better when known as standing waves. Try a new location.
Place speakers from six to eight feet away from each other. Placing them closer toget her diminishes the stereo effect ; Further apart creates a sonic ''hole" in the stereo effect.
Avoid placing the speakers in the corner of the room. This greatly diminishes smooth frequency response.
Keep speakers off the floor, particularly if the floor is carpeted.
It’s best to position the speakers two to three feet from all walls. The closer a speaker is placed to a wall, the more bass it produces. This tip can't always be observed, but try to follow it as much as you can.
If hanging speakers on the wall, use mounting brackets designed for the job, and be sure to use the proper anchoring hardware. Avoid placing the speaker too close to the ceiling, where it will unnaturally reproduce the bass range.
If the stereo image is blur red or lacking depth, there may be excessive mid and high frequencies. Dampen these by placing a wall hanging or other soft, absorbing material on the wall between the two speakers.
Some room sizes are better than others.
Your compact disc player may sound much better in your den, but lousy in your living room. Apart from room acoustics caused by windows, drapes, Spot "...
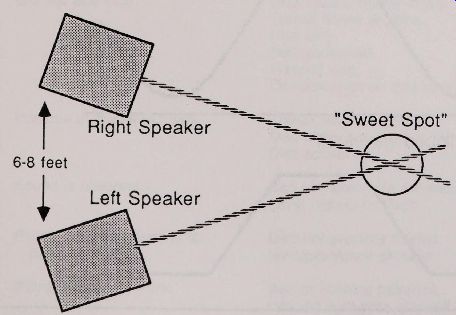
Fig. 4-8. Position the speakers to create a sweet spot in the listening
area.
--------------------------------

Table 4-2. Ideal Dimensions for Listening Rooms.
...carpeting, and the like, the room dimensions play an important role. (See Table 4-2 for dimensions for the ideal CD listening environment.) Equalization Basically speaking, equalization is electrically alt ering the music so that it sounds as much like the original recording as possible. Equalization is necessary to adjust for the frequency response of the amplifier and speakers, and to balance the room acoustics. Equalization is also used to tailor the sound to your personal tast es. You may prefer a more bassy sound, and you can use the equalizer to boost the low frequencies. Or, you may prefer the high range. Again, use the equalizer to increase the high frequencies and bring them out.
Equalizers are sometimes built into amplifiers, but they are generally separate components on the higher-end hi-fi gear. Equalizers consist of a series of slide potent iometers; each slide controls a cert ain frequency band. One slide may alter the frequencies between 1 kHz and 2.5 kHz, for example, while another alt ers the frequencies between 2.5 and 5 kHz. The better equalizers employ separate controls for the right and left stereo channels, so you can individually adjust the output of each speaker.
Equalization is particularly important to compact disc listeners. Unlike other stereo components, like a cassette deck or turntable, the frequency response of the CD player is reasonably flat over the entire audio range. You may not be used to this, and the sound from the CD may seem overly bright.
Until you get accustomed to the new sound, you can use the equalizer to "tone down" the sound.
Unfortunately, you'll have to reset the equalizer when you go from CD player and cassette deck or turntable, because they all have different response curves.
You might want to use the equalizer to balance the sound from your speakers to match the room acoustics. In fact, the better the speakers, the more you’ll have to tailor the music with an equalizer.
Good speakers have a greater range and flatter frequency response curve than cheaper ones. You’ll want to bring these out with an equalizer.
DISC SCRATCHES, DIRT, AND DEFECTS
Here's a short quiz for you: compact discs can be scratched and they still deliver clean, sharp sound? True or false. If you said false, you’re right.
It’s a common fallacy that CDs can be played after being brut alized by the family pet. While it’s true that compact discs hide the effects of minor scratches far better than LP records, a large scratch, or even a series of small ones, can make a disc completely unplayable.
Section 5 discusses disc upkeep (and even repair ), but you should know right off about the effects that scratches, dust, dirt, fingerprints, and warpage cause on CD sound quality. All can cause the player to fail, so if your CD is notworking properly, suspect the disc first. Check your playe against a known good disc. If the problem goe away, the disc is probably bad and should be repaired or replaced.
Scratches
Small scratches that occur radically along the bottom of the disc (that is, from center to edge) pose the least problem to the player. If the scratch is less than about 1mm wide, and doesn't dig to deeply into the plastic layer, the player will all bu ignore it, and any error present will be completel concealed. Scratches that occur parallel to the edg of disc, (Fig. 4-9) trace the same path as the pit encoded on the disc. This means more successiv pits may be obstructed. The error may not be completely concealed, and the audio output may pop or skip.
The deeper the scratch, the more chance tha an audible error will occur. Scratches on the surface of the disc are pret ty much out of focus to the photodetectors. But deep scratches are more in fo cus, so they appear larger to the laser. More data can be blocked, so an audible error may occur.
Scratches on the top (label) side of the disc even shallow ones, can ruin the disc. The plastic layer on the top is extremely thin, so it doesn’t take much of a scratch to gouge into the aluminum stamping that contains the digital information.
You should avoid all scratches on the top.
Dirt and Dust
A speck of dust on the bottom surface of the disc will appear one millionth its original size to the laser. This makes small dirt and dust particles prac tically invisible to the compact disc player. Al though a small accumulation of dust and dirt won't noticeably affect your discs, they can event ually create scratches, which cause more damage, and hence more unconcealed errors. Keep your discs clean by wiping them with a dry, unt reated cloth (Fig. 4-11). Always wipe from the inside of the disc to the outside, not along the circumference of the disc. A lint less cloth works better than a cotton rag, because it won't leave behind small bits of fabric.
(See Section 6 for more information on rout ine disc care.)
Radial Scratch Scratch Parallel Fig. 4-9. Radial and parallel scratches. Parallel scratches cause the greatest damage to discs.
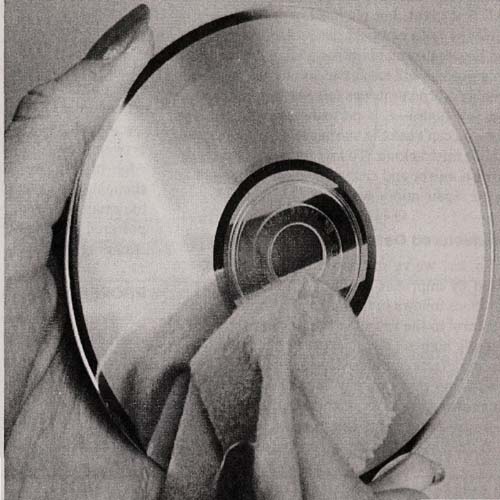
Fig. 4-10. Before use, wipe the disc with a clean, lint less cloth.
------------------------------------ Mih
Fingerprints
Fingerprints are really pools of skin oil, and they greatly affect the playability of a compact disc player. As you know, the compact disc System works by reflecting laser light from an aluminum stamping sealed in the disc to a series of photodetectors. Skin oil is partially reflective, and it acts to bounce some of the laser light back into the photodetectors before it ever gets to the aluminum stamping. The result : Lost data or a weak signal.
Both can cause mistracking, loss of sound quality, and unconcealed errors.
A light coating of skin oil acts to dif fuse the laser light. The return on and off beam reflected from the aluminum stamping is dif fused, so the light is considerably weaker than it should be. The player will try to correct this by boosting the light output of the laser. This makes the laser diode work harder than it should, which could conceivably short en its life span.
For maximum sound quality, your discs should be absolutely free off ingerprints. Clean them regulady with a recommended compact disc cleaner. Warpage LP records can be played with even a great amount of warpage. The needle simply rides up and down the waves of the warp. The sound may not be all that great, but playback is possible.
Not so with compact discs. Any warpage be yond the small amount Introduced in the manufac turing process will cause the disc to fail. If the disc is visibly warped-it was left out in the open sun for a few hours-it is permanently ruined. Even when you can’t see the warpage, it may be enough to cause mistracking. To test for warpage, lay the disc on a mirror and check for gaps. You might be able to repair minor warpage.
Manufactured Defects
So far, we've discussed disc faults that are caused by improper handling (the proper way to treat discs follows in this section ). Although quality control in the manufacture of compact discs is presently high, all discs have several hundred permanent defects in them. These are manufactured defects, and they range from mistakes in the aluminum stamping to air bubbles in the plastic coating to off -center discs (see Fig. 4-11).
If there is a consistent error on a disc, and close inspection does not reveal a scratch or a piece of dust, suspect a defect in the disc. Most record stores have a refund policy where they will replace a defective disc free of charge.
You can see some manufactured defects simply by looking at the disc. Shine a light at the disc at a 45 degree angle, and closely examine the bottom side. Air bubbles will appear as small dark spots in the plastic. If the aluminum stamping is off center with respect to the plastic shell of the disc, you'll see a marked variance in the distance between the edge of the stamping and the outer edge of the disc (Fig. 4-11). Errors in the disc stamping are generally not visible, because they are too small to be seen with the naked eye (even high powered microscopes don’t always reveal gross stamping errors).
off Centered Stamping
Air Bubbles in Plastic
Fig. 4-11. Two not -so-common but usual defects in compact discs: off centered stamping and air bubbles.
Bottom View Un-encoded Area Encoded Area
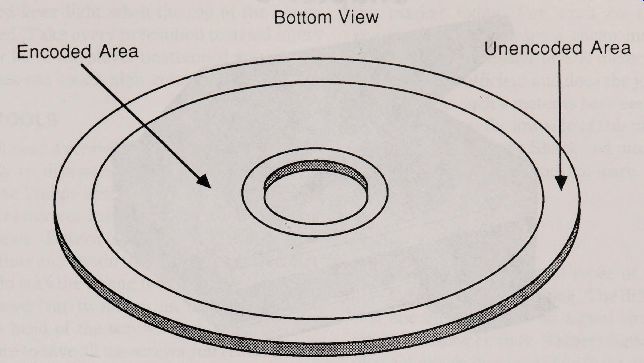
Fig. 4-12. The unencoded area appears as a distinct band on the outer
bottom edge of the disc.
PROPER DISC HANDLING
Your compact discs will last the lifetime they were designed for if you follow these rules:
Always return the disc to the jewel storage box after playing.
Never stack two or more discs on top of one another. If the discs slide around, the silk screened label on one disc may scratch the bottom of the disc above it.
Some CD enthusiasts stack two discs in the player. The extra thickness from the disc on to is supposed to ensure better clamping insidethe player. We don't recommend this. The discs slid over one another, and the silk screened label from the lower disc will invariably scratch the bottom o the other disc. The extra weight of the two disc can also cause premature failure of the disc spindle motor.
Handle the discs by the inside hub an edges only.
If you look closely at the bottom of the disc, you'll generally see a pronounced band towards the outside edge. As the data on a compact disc is recorded from the inside to the outside, this band represents the blank, unencoded portion of the disc (Fig. 4-12). If you must touch the disc by the surface, limit it to this band only.
Clean your discs regularly following the in structions provided in Section 6. If a disc becomes scratched, and no longer plays properly, see the section on disc repair in Section 6.
= = = =