An ounce of prevention is worth a pound of cure. The saying applies in many walks of life, and it definitely goes for compact disc players. A few wellspent moments keeping your CD player in topnotch condition goes a long way. You’ll save money in the long run and enjoy your CD player investment more.
In this section, you'll learn how to give your compact disc player a rout ine Preventative main tenance checkup. This includes the player, the player’s remote control, and your collection of discs.
You'll also learn how to test the player for proper operation, and how to repair moderately damaged discs.
FREQUENCY OF CHECKUP
The Preventative Maintenance (PM) interval for your CD player varies depending on many fac tors. Under normal use, you'll want to give the player a PM checkup every 6 to 12 months. By normal use, we mean a player operated in an average household environment, not on a factory floor or at the beach. You may need to perform the PM checkup on a more timely basis if your player is subjected to environment al extremes, or is exposed to heavy doses of dust, dirt, water spray (especially salt water ), airborne oil, and sand. A chart of sug gested PM intervals for machines that receive light, medium, and heavy use appears at the end of this section.
How do you know if your CD player needs a Preventative Maintenance checkup? Experience is your only guide, but if you have not yet gained the experience in how often the player needs rout ine Maintenance, you can’t judge if the service interval is required. As you become acquainted with your compact disc player, you will get to know when it needs a checkup. In the meantime, here are some clues that can point you in the right direction:
The outside of the player is covered with caked-on dirt, dust, or other grime. If the outside is dirty, so is the inside.
The summer has come and gone and you feel the player has seen all the good times with you. Was your portable player buried in the sand at the all-night beach party? It might still play, but this doesn't mean that it’s clean.
There are more disc errors, including gross mistracking, than there used to be. Something is amiss inside the CD, but not serious enough to impair playback entirely.
The player makes unusual sounds during disc loading and playback.
None of your CDs skip, they just don't sound as good as they used to. The music is weak or is missing its normal full body.
A WORD OF CAUTION
It’s important to remember that unless you are an aut horised repair technician for the brand of player you own, taking it apart to perform the preventive Maintenance procedures out lined in this section will probably VOID THE WARRANTY.
Most compact disc players have a warranty period of a year or so (some more; some less), and you might as well take advant age of it. There is usually no reason to perform a PM checkup within the warranty period.
One exception to this is if the player has been accident ally damaged by water, dirt, or sand, and although it still plays, you’d feel better if it were cleaned. Factory warranty service does not cover this type of cleaning, and you'd pay handsomely for it. The cleaning and *'repair" cost may well exceed the price you paid for the machine. In this case, there's Nothing stopping you from doing the work yourself. If your CD is subjected to heavy abuse, check the procedures in Section 7.
PERSONAL SAFETY
If your CD is an ac operated home model, removing the cover exposes 117 volts of alternating current. Given the right circumstances, this current can kill you. Remember to unplug the unit at all times when you are not actually testing its operating. Even with the power switch off, but the player still plugged in, the electricity is still pres ent at the terminals near the unit’s power supply.
Warning signs that appear on the back of ac operated CD players, and in their manuals, say
there is potential dangerous voltages inside. When you see the tr iangle and light ning bolt sign, as shown in Fig. 6-1, heed them. The other warning sign, the tr iangle and exclamation point, also shown in the figure, says that you should refer to the owner’s manual before operating the equipment.
Few people actually do this, but, it’s still a good idea.
The laser used in compact disc players is low power, but its pencil thin, focused beam can cause eye damage if you look directly into the objective lens when the machine is on and working.
The laser emits a beam in the infrared light spectrum and is invisible. To paraphrase an old saying, " what you ...
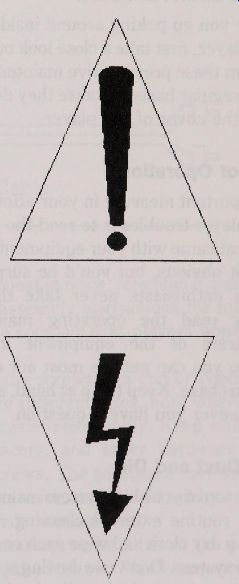
Fig. 6-1. Observe all safety warnings outside and inside the compact disc
player.
... can’t see won't hur tyou," does NOT apply to the laser diode in a compact disc player.
For Safety's sake, turn the player off and unplug it when performing the rout ine Maintenance procedures out lined in this section. If the CD must be plugged in and switched on for a particular test, always assume that the laser is functioning, even when a disc is not in the player. Therefore, cover the objective lens with a piece of stif fpaper to block the beam. Don't use tape as the sticky adhesive can gum up the surface of the lens, and cause you additional trouble. Remember to take the paper off when you insert a disc for playback.
WARNING: Do not perform the steps in this section unless you feel conf ident in your ability and have observed all safety precautions.
GENERAL MAINTENANCE
Before you go poking around inside the compact disc player, first take a close look outside. You can perform these Preventative Maintenance steps on a more regular basis, because they do not ent ail removing the cover of the player.
Manuals of Operation
An important measure in your ef for ts to minimize CD player troubles is to read the instruction manuals that came with your equipment. This may sound a bit obvious, but you' d be surpr ised how many hi-fi enthusiasts never take the time to thoroughly read the operating manuals. The manufacturers of the equipment include the manuals so you can get the most out of your expensive purchase. Keep them at hand, and refer to them whenever you have a question.
Exterior Dust and Dirt
On the top of your hi-fi system maintenance list should be rout ine external cleaning. Every few days, take a dry cloth and wipe each component of your video system. Don’t use dusting sprays; these actually at tract dust, luring dirt back onto your equipment. Use a soft, sable painter’s brush forthose hard to reach places. Be sure to clean the vent ilation slots as these are favorite hiding places for dust.
If you need to get rid of stubborn gr ime, apply a light spray of regular household cleaner onto a clean rag, then wipe with the rag. Never apply the spray directly onto the player, as the excess can run inside. Never apply a pet roleum-based solvent cleaner as it might remove paint and melt the exterior plastic parts. Some plastics, when in contact with a pet roleum-based solvent, let off highly toxic fumes.
Cables
The cables and connectors hooking the compact disc player to the amplifier must be in good shape. Be sure the cables are on tight and that none of them are damaged. Many hi-fi enthusiasts have a tangle of cables behind their stereo gear, and just one bad wire or connector in the bunch can cause grief.
If you suspect that a cable may be bad, or causing interference and hum try a replacement to see if the problem is solved.
Alternatively, you can use a volt -ohm meter, as shown in Fig. 6-2, to test the continuity of the cable. At tach the test leads to the center conduc tor of both ends, and take a reading. The meter should read 0 ohms. Do the same for the outer conductor.
Check also that the cable has not shorted by applying the test leads to the inner and outer conductors on one end of the cable (be sure not to hold onto the metal probes of the test leads you might get false readings). The measurement should read infinite ohms (open circuit ).
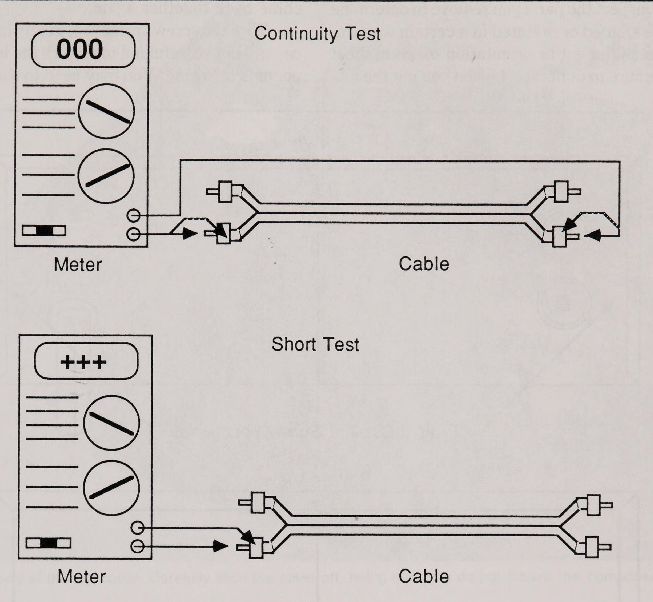
Fig. 6-2. The method of testing an audio cable for continuity and shorts.
INTERNAL PREVENTATIVE MAINTENANCE
To gain access inside the player, it should be removed from its location in your hi-fi system.
Disassemble the player only in an open, well illuminated work area.
Disassembly
Disassembly of most compact disc players simple and straight forward. The typical ac operated home unit is composed of a top and bottom piece; you loosen two or more screws and remove the top portion of the cabinet. The screws are usually located at the rear and bottom edges of the player, as shown in Fig. 6-3.
You should not loosen every screw you see, especially those on the bottom center portion of the cabinet, because they may anchor the internal components to the base plat e. Be particularly wary of screws located immediately under the disc loading door (other than transit screws), as they may very well hold the delicate transport and pickup mechanisms in place. Loosen one screw at a time and attempt to remove the top cover (or at least see if it is coming loose). If a screw seems to hold an internal component in place, re-tighten it and try another.
Basic disassembly instructions for many ac operated home compact disc players appear in Section 10.
Save the screws in a cup or container. If the screws are different sizes, note where they came from for easier reassembly. Keep washers, grom mets, spacers, and other hardware with their related screws. The additional hardware has been used for a reason, and should not be omit ted when the player is reassembled.
If necessary, write a list of the parts you move, and the order in which they were removed.
If a certain screw has a rubber washer, a metal washer, and a locking washer on it, write down the order in which they are assembled on the screw.
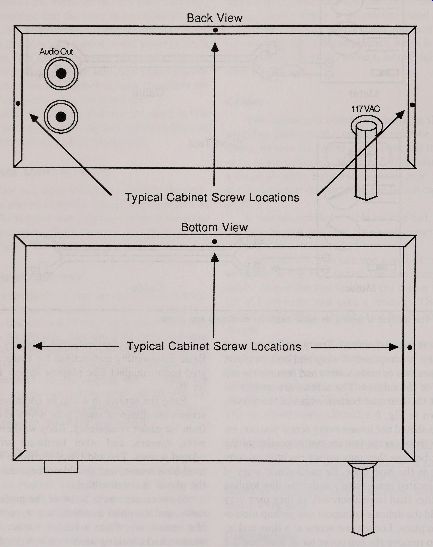
Fig. 6.3
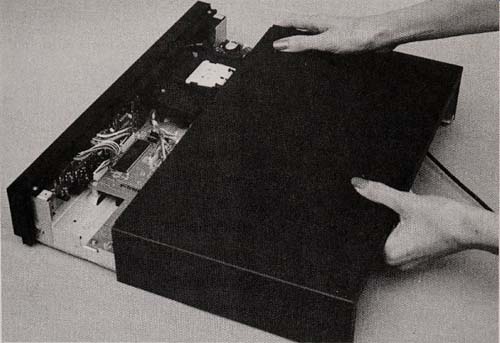
Fig. 6-4. Removal of the top cover. Carefully slide the cover off, being
sure you do not disturb the components inside the player.
Carefully inspect the parts you remove to determine if they are aligned or or iented in a certain way. In dicate the alignment or or ientation on your sheet so you are sure to duplicate it when you put the machine back toget her again.
With the screws removed, gently lif toff the top cover, being careful not to disturb the internal components or wiring. You may need to slide the cover back before taking it off, if the cover tucks under a lip in the front panel (Fig. 6-4).
With most players, the interior will be sparse and unimpressive-that’s both the beauty and mys tique of compact disc! They are simple and complex at the same time. The relative emptiness of the cabinet makes working on them that much easier. Portable and automotive compact disc players, because of the close proximity of parts, are some what harder to work on.
Once the cover is off, you should not at tempt to disassemble anything else inside the machine, except where noted below. This is especially true of the drawer disc loading mechanism and the pickup, which are aligned at the factory with special tools. Loosening the wrong screws can skew the orientation and position of critical components.
This may require a service technician (which is expensive) and a special alignment jig (which you cannot easily get for yourself ) to correct the mistake.
About static electricity---static electricity build-up in your body may harm the integrated circuits and other components on the main circuit board. Do not touch any part unless you have first drained the static electricity rom your body. If you plan to handle the circuit boards, use a grounding strap around your wrist.
The strap is available at most electronics supply stores. Follow the instructions supplied with it for proper use.
Preliminary Inspection
Take a few moments to acquaint yourself with the inside of the player. Note the position of the optical pickup, the main circuit board, the auxiliary boards for the front panel, indicator, and headphone (if any), the routing of the cables, and the incoming power supply lines. Figures 6-5 through 6-9 show the innards of a typical late-model CD. Be particularly wary of the power supply board or power supply section on the main PCB. The filtering capacitors (which usually look like tall cans) retain some current even when the player is turned off and unplugged. Avoid touching the leads of the capacitors and make sure that you do not short the leads together. You may damage the capacitor and components on the board.
Front loading disc players---those with drawers or doors---obviously have more complex loading mechanisms than their top-load cousins. There is more to look at in a front -load machine and consequently more points that may need preventative care.
Note the type of pickup mechanism--slide (linear skate) or swing arm. Slide mechanisms often need a light dab of lubricant to keep the pickup moving smoothly back and forth along the length of the rails. Swing arm pickups generally do not require any type of lubrication.
There is little, if any, adjustment or calibration that you can-or should-do once inside the compact disc player. Potentiometers on the main circuit board are factory set and require an oscilloscope or special test circuitry for proper adjustment.
Rollers and Belts
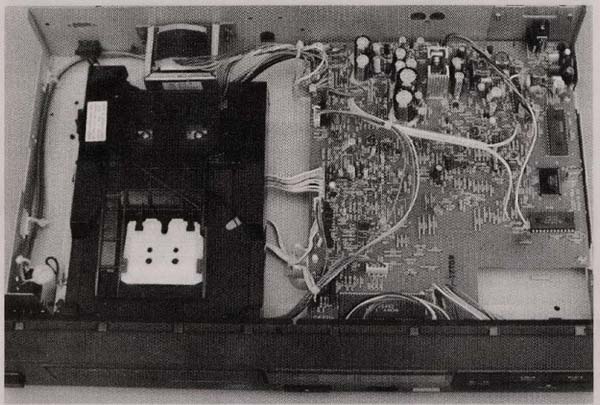
Fig. 6-5. The inside of a typical compact disc player. Not much, right
?! Many players have even less inside them.
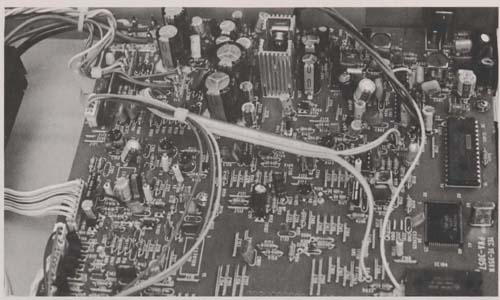
Fig. 6-6. The main PCB. This board also contains the power supply circuits.
Note the two heat sinks supporting the voltage regulators (back center
of picture).
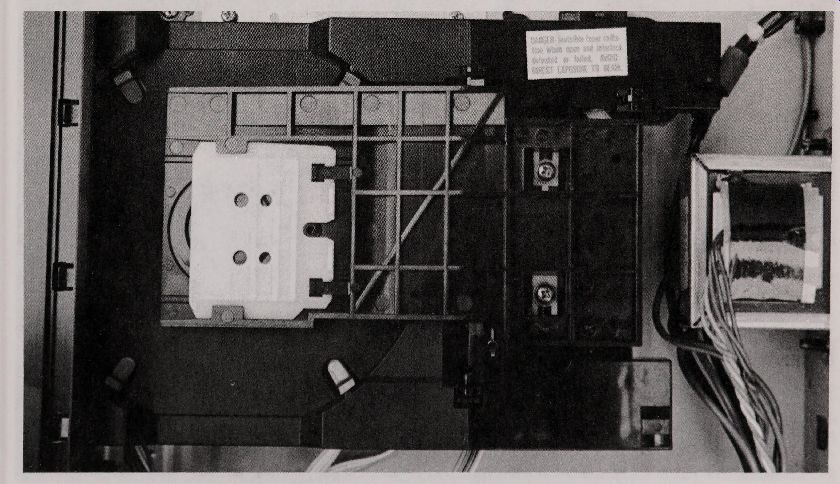
Fig. 6-7. The disc loading mechanism. On the top is the flapper (also called the clamper or chucker ).

Fig. 6-8. The optical pickup, nest led under the loading mech anism. Nothing
in the pickup is serviceable; the entire mod ule must be replaced if bad.
Note the slide rails on the front and the back of the pickup.

Fig. 6-9. The transformer and power connections to the main PCB.

Fig. 6-10. Or ientation of the belt in a typical disc loading mechanism.
The belt is easy to replace, but you must get to it first. Avoid disassembly
of the internal parts of the player ; use dent ist's picks or other small
tools to replace the belt.
Visually check the rollers and belts used in the disc turntable mechanism and (sometimes) disc loading mechanism. If worn or cracked, they should be replaced. You can replace the belts yourself. Ob tain the service lit erature for your player from the manufacturer, ident ify the part by its part number, and order it from the manufacturer. Dent ist’s picks, which you can buy at most electronics and surplus out lets, let you more easily remove and install belts that are hard to reach. Figure 6-10 shows a typical belt configuration as used in the disc spindle mechanism.
Rubber rollers and belts that are slipping can be cleaned with a special cleaner. The non-slip cleaner is available at Radio Shack and most elec tronics stores. Apply it to the belt or roller with a cot ton swab or sponge applicator, as shown in Fig. 6-11. The cleaner takes a few moments to dry, so wait two or three minutes before operating the machine.
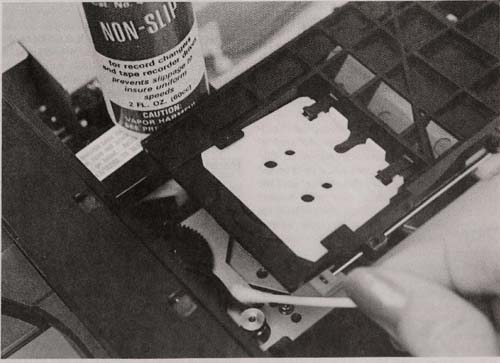
Fig. 6-11. Applying non-slip cleaner to the disc loading belt.
Avoid the use of solvent-based cleaners on rub ber parts, as these chemicals can prematurely dry up the rubber, or worse, melt it. Never apply a lubricant of any kind to a roller or belt as this will defeat their purpose. If the rubber squeaks, it’s an indication that something is not properly aligned, or that the roller or belt needs replacement.
Topical Cleaning
Dust, dirt, and nicotine from cigaret te smoke can accumulate in the interior of the CD player and should be removed. Use a soft brush to wipe away excess dust and dirt. If there is a lot of sediment, use a small hobby vacuum cleaner.
Remaining dust and other junk may be blown out of the insides of the player. Purchase a small can of compressed air at a photographic shop (about $3) and liberally squirt it inside the machine. That should free just about everything that shouldn’t be there. Remember to keep the can upright, as the propellant might drip out. As much as possible, po sition the air flow so that debr is is blown out of the player, not deeper inside! The use of household cleaning sprays should be avoided, as these not only can leave a residue that impairs the proper operation of the player, but are water based, and might short out the circuitry.
Do not use a cleaner that contains a solvent of any kind, and DO NOT clean the machine with an oil less lubricant such as WD-40 or LPS. These sprays are non-conductive and will cause the player to fail completely.
You can clean nicotine sediments and caked on dirt using a cleaner recommended for application on mechanical and electronic components. Figure 6-12 shows such a cleaner being used on the main PCB board (apply the cleaner only until the player has cooled down after use). Some cleaners have a built -in degreaser that disperses oil build-up; these are fine for use in your CD player, as long as they are designed for direct application onto elect ronic parts. What ever cleaner you use, make sure it leaves no residue after drying (which usually takes less than 15 seconds). If the cleaner leaves a noticeable residue, it is unsuitable for use inside your compact disc player.
The cleaner is available at most electronics stores, and usually comes in spray form. The spray comes out fast, so you can use the pressure to dislodge stubborn gr ime. Most cans come with an extension spray nozzle tube. At tach the tube to the spray button, and squir tinto hard to reach places.
Prior to cleaning, be absolutely sure the disc player is unplugged from the wall out let. Never use the spray where there is live current. You could receive a shock or start a fire. After cleaning, wait at least three minutes for all the cleaner to evaporate before applying power to the player.
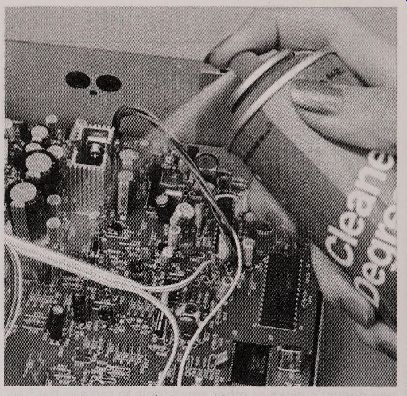
Fig. 6-12. Use a can of cleaner / degreaser spray to remove deposits of
gr ime, nicot ine, and other cont aminants that have set tled on the internal
components. Use only a non-residue cleaner designed for use on electronic
and mechanical parts.
Electrical Contact Cleaning
It’s rare that the electrical contacts inside the player will need cleaning. However, exposure to outside elements can quickly oxidize plated elec trical contacts (now you know why you should never place your CD near an open window where it might be exposed to the damp outside air ). The contacts can also be cont aminated by an accumu lation of cigaret te smoke.
If you see a heavy amount of oxidation or nico tine, carefully disconnect the wire leading to the contact and clean the contact with a commercially available contact cleaner. Clean the exposed part of the wire in a similar fashion. If there is a heavy build-up of oxidation, scrape it off with an orange ...
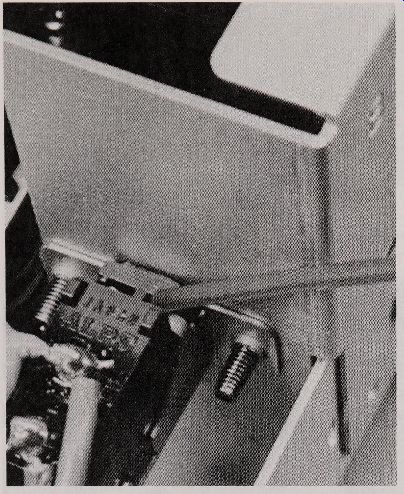
Fig. 6-13. Use the extension tube to spray the cleaner into hard to reach
places, like the contacts of a switch.
... stick or nail file, then use the cleaner.
Most contact cleaner is in spray form, and the spray may squir tthe cleaner to an overly large area.
If you don't want this, spray the cleaner into a cott on ball or swab, then use the cot ton as an applica tor. Be sure to leave no lint from the cot ton on the contacts. If cot ton threads are a problem, purchase some sponge-t ipped applicators. Most electronics and many record stores sell them. For very hard to reach places, use the extension nozzle tube. Figure 6-13 shows spraying the contacts of a dirty power switch.
Lens Cleaning
If there is any measurable amount of dust, dirt, nicot ine or other cont aminants in the inside of the player, you can bet there is a coating on the objective lens of the optical pickup too. With top loaders and drawer -type front loaders, the lens points up, so dust and debr is can set tle on it easily (with door-type front loading players, the pickup is mounted on a ver tical plane, and is not as susceptible to sett ling cont aminants).
You must find the pickup first. With many drawer -type players, a disc flapper, also called the chucker or clamper, obstructs the pickup from view. You can usually gain access to the pickup simply by opening the drawer. Don’t manually open the drawer as it is on a geared track and you may strip the gears if you force it. Plug in the player, turn it on, and open the drawer in the normal fashion with the open/ close switch. Once the door is open, turn the machine off and unplug it for Safety’s sake.
The flapper pops up for disc insertion and is spring loaded. It pops back down when a disc is in place. So if the pickup is still partially covered by the clamping flapper, you can gently lif tup the flap per from the front, as shown in Fig. 6-14.
The flapper can be removed if absolutely neces sary, but you should use caution (unlike other components of the pickup mechanism, the flapper is not critically aligned). With most CD players, the flap per is at tached to the main portion of the pickup mechanism by one or two screws. Slowly loosen the screws and carefully remove them from the player (don't drop them into the machine!). Remove the flapper. The spring will come loose, so grab it and keep it handy for reinstallation.
With the objective lens exposed, blow excess dust from it using a small bulb blower, available at photographic stores. If the lens is still dusty or dirty, apply lens cleaner to a small piece of lens tissue or to a cot ton swab (Fig. 6-15). A small amount of the cleaner is more than sufficient ; there is no need to drown the lens in cleaning fluid. NEVER use lens tissue or the swab without moist ening it first with cleaner, and DO NOT apply cleaner directly to the lens. Wipe with a dry tissue or swab.
The objective lens in portable and top-loading CDs is typically accessible without removing the top cover of the player. This makes the lens more susceptible to dust, gr ime, and fingerprints, but it also makes cleaning it easier. If you own a porta ble or top-loading player where the objective lens is easy to reach, make it a point to clean the lens at least every 6 to 12 months.
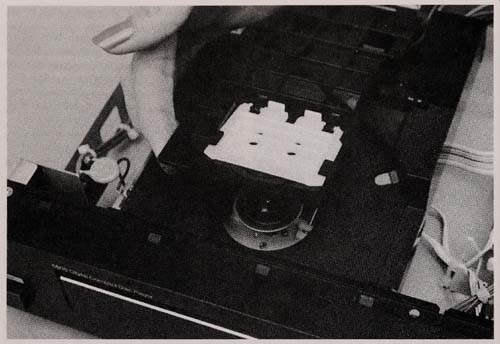
Fig. 6-14. Lif tthe flapper gently to gain access to the pickup or disc
spindle.
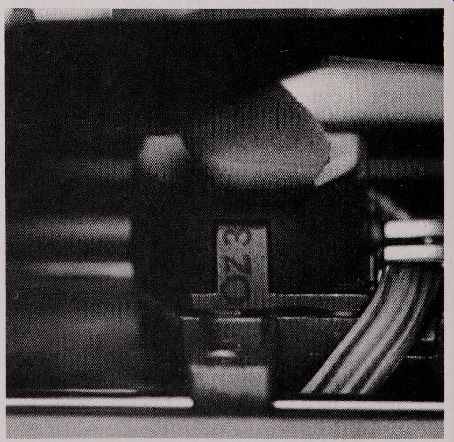
Fig. 6-15. Clean the objective lens of the optical pickup with a suitable
swab and cleaner.
Oiling and Lubricating
Compact disc players generally do not require much in the way of lubrication, because it has so few moving parts. But the handful of mechanical parts in a CD player are either moving, spinning, or sliding. To keep the player in top working shape, you should lubricate these parts at every major PM interval; more if you use your player out doors where it is subjected to extremes in temperature or excess dust and dirt. You should also lubricate the mechanical parts if you clean the machine with a spray cleaner / degreaser. The cleaner acts to strip any oil or grease off from the moving parts, and using the player without lubrication may wear it out prematurely.
Here's a good rule of thumb to remember when lubricating your compact disc player :
If it spins, oil it.
If it slides or meshes, grease it.
Light machine oil is the best lubricant for spinning parts, such as the bearings of idlers and rollers.
You should never use a spray-on lubricant, such as WD-40. Apply the oil only to the rot ating part, not the entire shaft or roller. More is not necessarily better. Never apply oil directly to a motor. For small parts, apply the oil with a syr inge applicator, as shown in Fig. 6-16.

Fig. 6-16. Small parts may need occasional oiling.
For best results, use an oil and applicator designed for small mechanical parts.
A non-pet roleum based grease is the best lubricant for sliding and meshing parts, the bulk of which are found in the pickup assembly and disc loading mechanism. This includes cams, bell cranks, gear surfaces, and levers. As with oiling, apply only a small dab of grease. Spread the grease by moving or sliding the part back and forth a few times.
If the part can't be easily moved, or is geared down and won't budge, power the player and insert a disc. To spread the grease, cycle the loading drawer or other mechanism by using the front panel controls of the player.
Swing arm pickups generally don't need any type of oiling or lubrication, but slide pickups do.
With slide pickups, the optical assembly slides along two metal rails, which should be kept lubri cated to assure smooth travel.
With the pickup exposed (remove the flapper if necessary), apply a small amount of grease or oil to each rail. You can't manually slide the optical pickup back and forth.
Insert a disc, turn the machine on, and advance the pickup along the rail by pushing the track buttons on the front panel of the player. Go back and forth several times to spread the grease evenly. Inspect that no grease has accumulated at the end of the rails. If so, remove it.
Some players have a mechanical interlock att ached to the cabinet that disables the player elec tronics if the top cover is removed. If the top is off your player, and the disc won't turn when you push the Play button, check to see if there is an interlock switch on the cabinet. If the switch is the microsized leaf type, depress it to engage the Play mode. If the switch is magnet ic, place a small mag net on the sensor, or place a wire jumper between the switch contacts.
Front Panel Controls
The front panel operating controls seldom need Preventative care, unless the player has been sub jected to heavy doses of dust, dirt, damp air, and cigaret te smoke. You can clean the bulk of the control switches with a brush or compressed air. The control panel in most players use sealed membrane switches, so the internal switch contacts are not affected by dirt (the membrane switches are located behind the actual switch button, which you push when operating the player ).
If the switches in your CD are the regular open contact type, you may need to apply a small amount of electrical contact cleaner to dispel the dirt.
Again, you need not perform this procedure unless the player has been exposed to heavy amounts of cont aminants or the controls are notworking properly.The contact cleaner dr ies quickly, and with out leaving a residue. You should wait several minutes after cleaning, nevertheless, before you turn the machine on and at tempt to use it. Never clean the switch contacts when the machine is turned on or plugged into the wall socket.
Final Inspection
Before you replace the top cover, double-check your work. Like the bumbling surgeon who leaves objects inside people after an appendix operation, don't leave tools, hardware, used cot ton swabs, or cleaning supplies inside the chassis of the player. Check to make sure that you have properly replaced ALL parts. Failure to properly replace the loading flapper, for example, may cause considerable damage to the disc and player when a disc is loaded.
Reassembly If all looks sat isfactory, replace the top cover and reassemble the player with the screws you removed. Be sure the cover is aligned properly be fore tight ening any of the screws. If the cover will not fit under the lip in the front panel, use a rubber mallet to gently pop it into place (never force it ). When all the screws are in place, tight en them lightly.DO NOT over -t ight en, or you might strip the threads of the screw and chassis.
Checkout
After every PM interval, check the player for proper operation. You should use one known good disc and a test disc (either a commercial disc or one you’ve made). Keep these operational points in mind during the checkout process:
The disc loading door or drawer operates smoot hly, and accepts the disc as it should. Simi larly, the disc is properly ejected.
The first selection cues up and plays prop erly from beginning to end.
Pressing the track switches advances through all of the selections on the disc.
All front panel indicators operate normally.
All the function buttons on the front panel of the player and the remote-control work as they should.
The audio output is normal, without any noticeable errors (except, perhaps, with the test disc).
MAINTENANCE LOG
You may wish to keep a log book of all the maintenance checks and cleaning you've performed on your compact disc player. Use the sample log
form that appears in Appendix e, or make your own. In your log, be sure to note the exact checks
and Maintenance procedures you performed, and when you performed them. If you have replaced any parts (like rollers and belts), note their part numbers in the log, and troubles you may have had when installing them. By keeping a thorough log, you can better est imate the timing of the preven tive Maintenance intervals for your specific player.
REMOTE CLEANING
A number of compact disc players are equipped with wireless infrared remote control units.
These allow you to change selections or skip through songs at high speed from the comfort of your easy chair. Because the remote control can be taken anywhere in the house, it’s often subjected to a lot more abuse than the other components in your hi-fi system. You may pride yourself in a clean compact disc player, but the remote may be filled with dirt, gr ime, and sticky syrup from a spilled soda pop.
Exterior Cleaning
Cleaning the remote control is straight forward and easy. Start with applying a damp cloth to the outside and remove exterior dirt and gr ime.
Battery Compartment Cleaning
Remote controllers are battery operated. Given the right circumstances, all batteries can leak, and and can impair proper operation of the controller.
the spilled acid can corrode the electrical contacts
If your remote control is operating sporadically, this may be the problem.
If the batteries have leaked, or if the battery contacts have become only slightly dirty, clean them as follows. You can also use this procedure for cleaning the battery compartment in portable CDs.
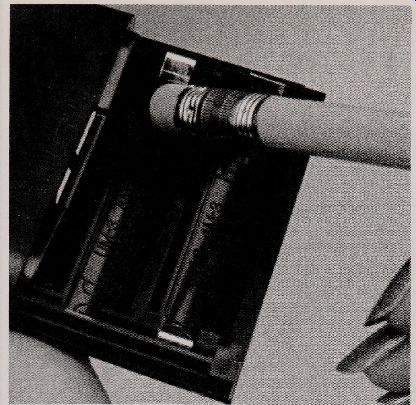
Fig. 6-17. You can clean the battery contacts in a remote control (or
portable player ) with a pencil eraser. Blow out the eraser dust when you
are through.
Carefully remove the batteries and discard them. Immediately wash your hands to remove any acid residue. Battery acid burns.
Wipe off the battery acid residue with a damp cloth, and remove as much of the excess from the contacts as you can.
Remove the remaining residue by rubbing the contacts with the tip of a pencil eraser. Blow the eraser dust out of the battery compartment when you are through (Fig. 6-17).
Test the controller with new batteries. If the battery leakage is more extensive, you will have to take more drastic action. Refer to Section 7 for more details on how to clean heavy deposits of batt ery acid.
Interior Cleaning
To clean the inside of the controller, you must disassemble it by removing the screws holding the two halves of the controller toget her. The screws are small and you will need a set of jeweler’s screw drivers to properly remove them. Some screws may be insidiously hidden in the battery compartment, under the manufacturers label, or even beneath the thin metal cover on the front of the unit, When the screws have been removed, separate the two halves. Clean the inside of the controller with a soft brush or can of compressed air. If liquids have been spilled inside the controller, spray the inside of the controller with a suitable cleaner / degreaser.
With most remote controllers, the circuit board is at tached to the front panel and must be removed if you want to access the front switches. With the controller resting on a flat surface, remove the circuit board screws carefully and gently lif toff the control board. The plastic pushbuttons may be loose, so be sure not to knock them out of place when you remove the board (if so, putting them back isn't hard, but it can be time consuming).
Clean the switches and front side of the circuit board with a spray from the can of cleaner / degreaser, as shown in Fig. 6-18.
Remote Control Testing
Let’s say you've replaced the battery in the remote controller and you've cleaned it inside and out.
It still doesn't seem to work. Since the infrared light from the controller is invisible, it’s difficult to test whether the controller is indeed working or if the problem lies in the CD player itself.
Many remote controllers have visible LED in dicators that flash when you push a button on the transmitter. The LED is typically connected along with the high-output infrared LEDs that send the remote control information to the player. You can be fairly certain that the controller is operating properly if the visible LED flashes.
The infrared LEDs in your remote controller will not last forever. It’s possible (but not likely) that one or all of the high-output infrared LEDs have gone out. If only one of the several LEDs that are typically built into the controller is faulty, you should still be able to operate the controller, but you may have to get in close to the player.
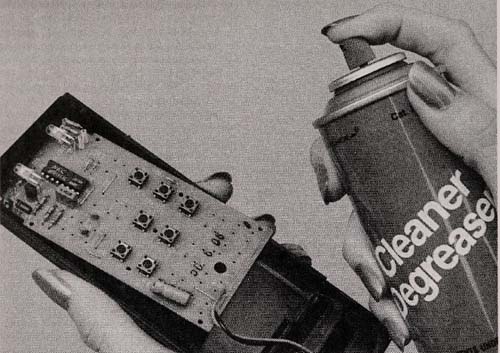
Fig. 6-18. The switches and printed circuit board of the remote can be
cleaned using a suitable cleaner / degreaser.
The laser sensor described in Section 5 is one way to accurately test the controller. This sensor is sensitive to any infrared light source, and it will register the light emitted by the remote controller as easily as it does to the light generated by the laser diode in your compact disc player.
To use the sensor, position it closely to the front of the controller and start pushing buttons. If the LED on the sensor lights up, the controller is good.
The fault probably lies in the player. If it does not light up, double-check the operation of the sensor and try again. If the LED on the sensor still doesn’t light up, it is fairly certain the remote control is at fault.
There are a variety of reasons why a remote control does not operate properly, and none of them have anything to do with a faulty controller or sensor in the CD player. If you are having trouble with your remote control, and have performed the rout ine cleaning out lined here, check the remote control troubleshooting charts in Section 9 for more information.
DISC MAINTENANCE
One of the greatest myths sur rounding digital audio is that the compact discs can be scratched and mar red, and still deliver clean, cr isp sound. Don't you believe it ! Every scratch on the disc can conceivably contr ibute a little to diminished sound quality. The benefit of the compact disc medium is not that scratches can't harm the disc, but that small scratches do not create the crackly surface noise that’s so annoying in LP records. To realize the full benefit of CD technology, the disc must be reason ably cared for.
Data dropouts caused by small scratches are corrected automatically by the redundant informa-tion encoded on the disc. Larger scratches, or even small ones that run parallel to the edge of the disc, may cause larger dropouts that can’t be entirely corrected by redundant data. The lost music must be ar tif icially recreated by the player, and depending on the error, and the quality of the error correction circuits in the player, the effect of the scratch may indeed be audible.
Fingerprints pose an even greater problem, be cause the oil in the fingerprint is semi-reflective to laser light. The fingerprint can therefore reflect the beam, jumbling the data and causing very noticeable errors in the music. A fingerprint smudge can diffuse the laser light, which also causes errors.
Dust, dirt, hair and other foreign objects, however small, can contribute to a decrease in sound quality, given the right circumstances.
A scratch on the top of the disc, even a relatively light one, can result in a completely unplay able disc. The top of the disc is coated only with a very thin layer of protective plastic. Immediately underneath this thin layer is an even thinner (0.11 fim) aluminum stamping that holds the disc data.
A scratch of any size at all (even, 1mm size) that extends into the aluminum stamping could very well permanently ruin the disc. Now do you see why it pays to treat your discs with care?
Proper Disc Care
We've mentioned this in ealier sections, but it’s worth stating again. Your best hedge against the effects of unpleasant compact disc errors is to keep all your discs in the jewel boxes they came in (you paid over 50 cents for the box in the cost of the disc, so use them!). When you finish with a disc, replace it immediately in the jewel box. Don't carelessly throw the disc on the table and don’t pile them up on the player. If you lose a jewel box, you can buy a replacement at most any record store.
If you have a portable or automotive CD player, and you car ry your discs with you, you may not want to lug the bulky jewel boxes with you. That’s perfectly acceptable, but protect the discs in sleeves. The sleeve, available at most any record store, is made of spun polyester, so it doesn't shed paper bits or fibers onto the disc.
Disc Cleaning
You can clean discs manually or with a specially designed mechanical disc cleaning device. Both methods yield the same results, although the mechanical cleaner is a little easier to use.
You should never use a mechanical cleaner device, cleaning solution, or cleaning cloth designed for vinyl LP records. Cleaning products for LP records have a different chemist ry that can actually harm the plastic coating of compact discs.
Mechanical cleaning devices for LPs clean parallel to the edge of the record-that is, with the grooves. Cleaning a compact disc in this manner increases the chance of a long scratch, one that goes in the same direction as the encoded pits. This can cause an audible error because more pits are affected, and the error correction circuits can't compensate for it. Radial scratches, those that occur at right angles to the direction of the pits, do not pose as serious a problem.
The best cleaning solution for compact discs is a mixture of isopropyl alcohol and tr ichlo rof luorot hene. The latter ingredient is best known as Freon TF. This mixture is commonly available, if not specifically packaged for compact discs, then as a cleaner for photographic lenses and computer disk drives. Read the contents to make sure.
Apply the cleaner with a chamois or soft, clean sponge material. Wipe from the inside to the outside of the disc-never around the circumference of the disc. Fingerprints and gr ime may require a few extra drops of cleaner. The cleaner does not harm the disc in any dose, so don’t be af raid to use oo much. For most applications, however, a little cleaner goes a long way.

Fig. 6-19. Applying an alcohol/ Freon solution on a disc prior to cleaning.
Mechanical cleaners for compact discs work in a variety of ways, most involve applying cleaning solution to the disc, as illustrated in Fig. 6-19, and urning a crank, which spins a cleaning wheel over the disc. Be sure to follow the directions included with the cleaning device. Misuse can damage the disc. The cleaning solution dr ies quickly, but if you’ve used too much, it may pool up on the surface of the disc. Be sure the disc is dry before you put it back into its jewel box or insert it into the CD for playing.
Because of the type of plastic used to manufacture compact discs, they actively at tract dust and other part icles. Yet you should NEVER use an antistatic spray on a CD. Use of an anti-static spray, or a cleaner with anti-static chemicals in it, may damage the disc. If you are plagued by dust contaminating your discs, wipe them with a soft, dry, lint less cloth immediately prior to play (Fig. 6-20). Wipe the disc from the center to the edge. You can purchase a lintless cloth at most photographic stores. Be sure you get the kind that is NOT treated. Some lint less clot hes are treated with antistatic solution-you want to stay away from them.
Disc Repair
Despite even the most careful handling pract ices, compact discs can and do become seriously damaged. If one of your discs has been scratched to a point where it cannot be played on the CD without error, there is a chance that you can repair it and make it playable again.
Inspect the scratch, and decide if it’s on the top (label) or bottom (play) side of the disc. If the scratch is on the top of the disc, and it’s deep, there's really Nothing you can do. The scratch has obviously gouged into the aluminum stamping and has dest royed the data tracks.
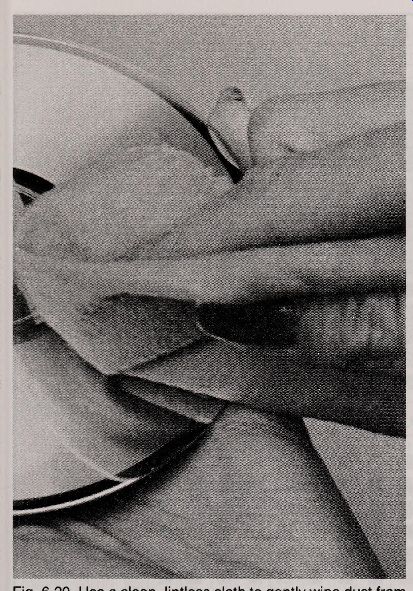
Fig 6-20 Use a clean, lint less cloth to gently wipe dust from your compact
discSp Wipe from the center of the disc to the outside, never along the
circumference as you would with an LP.
If the scratch is on the play side, and does not extend to the signal layer, you can smooth it out using a rubbing compound designed for car paint.
This method is not foolproof, and should only be used on a disc that’s otherwise unsalvageable.
Apply a very small amount of rubbing compound to a clean, damp clot h, then slowly rub the scratch with a back and forth motion with the cloth or your fingers, as shown in Fig. 6-21. For best results, rub at right angles to the disc edge, to min imize scratches that occur parallel to the data tracks. Go over the spot several times in light, gen tle coats. When you think you've reduced the scratch (you probably won’t eliminate it alt oget her ), clean the disc as usual and play it in your machine.
If mistracking still occurs, try using the rubbing compound once again.
Warpage A warped compact disc is a sad thing. Unlike conventional LPs, a warped CD can’t be played be cause of the close focus tolerance of the optical pickup. A very small amount of warpage is common in all CDs, Introduced in the manufacturing process, but the amount is extremely small in hu man standards. You can’t see it with the naked eye.
Slight warpage can be repaired under certain circumstances, and make an unplayable disc play able again. You can test for warpage by laying the disc on a mirror or piece of window glass. Gently rock it back and forth to see if you can feel any movement. When pressed against the mirror, you can often see where the disc deviat es from the surface of the glass.
In some instances, you can reduce or eliminate warpage by warming the disc and applying pressure to it for a period of time. A number of CD enFig. 6-21. Scratches in the plastic layer can sometimes be reduced by gently rubbing the disc with a rubbing compound

Chart 6-1. Recommended Preventative Maintenance intervals for a CD player
receiving light, medium, and heavy use.
Use the chart on the bottom to mark the PM intervals for your machine.
= = = =