If an accident happens to your compact disc player--you spill your cup of coffee into it, for example--there is no need to panic. By following some simple cleaning and checkout procedures, you can reduce or eliminate potentially costly repairs.
This section discusses first aid treatment for a number of accidents, and how you can repair all or nearly all of the damage yourself. Even if your CD player is presently working fine, read through this section to acquaint yourself with the recommended procedures. You never know when they’ll come in handy.
TOOLS AND SAFETY
Most of the repair procedures require disassembly of the player. If you haven’t done so already, please read Sections 5 and 6 for more information on how to take your CD apart, and what tools you need to do the job right. Pay particular attention to the safety points in Section 6. Failure to treat the power supply and laser diode built into your CD player with respect may cause bodily harm.
The steps out lined in this section are designed to help you minimize the damage of accidents, not make them worse. If you are not confident in your ability to perform some of the repair procedures, or lack the proper tools and cleaning supplies, then by all means don’t do them. When in doubt, refer to a qualified technician.
DROPPED PLAYER
Compact disc players are not meant to be dropped off bookshelves, stereo racks, tables, or car seats, but it happens. A drop onto soft carpeting may only shake up the player a bit, but not cause serious internal injury. A harder impact, however, may break or bend the cabinet, or chip off a piece of the front panel.
A cracked cabinet or other broken piece on the exterior of the player can usually be mended with a strong adhesive. If the part is plastic, just about any clear glue recommended for use on plastic will suffice. After gluing, hold the pieces together with your fingers until the adhesive sets, or tape the pieces together like a surgical suture until the glue is completely dried.
Checking for Internal Damage
After a player has been dropped, even if there is no visible damage, inspect is carefully. Don't test it by plugging it in and playing a disc. You may cause additional damage.
You can quickly check if parts have come loose inside the player by unplugging the unit from the wall socket and gently shaking it. If you hear rattles, you can bet something is bouncing around that shouldn’t. Even if you don't hear loose parts, it’s a good idea to disassemble the player before attempting to use it. Follow the disassembly instructions provided in Section 6.
When the top cover of the cabinet is removed, look for the loose parts and ascertain where they came from. If the broken piece is plastic, glue it back on with a suitable cement. Broken metal parts are harder to mend, but there are a number of adhesives for metal that might do the job. The alignment of internal parts is often critical to the operation of the compact disc player, so make sure you glue the repaired piece on straight.
While the top is off, visually inspect the interior of the player for hidden damage-things other than completely broken pieces. Pay particular at tention to circuit board(s), the disc loading mechanism, and the pickup mechanism. If any part of the pickup mechanism looks broken, bent, or out of place, you should return the player to a qualified repair center. If the broken pickup cannot be serviced, it must be replaced, and replacement requires exact alignment using special tools.
Check the printed circuit boards inside the player. If you see any hair line cracks, it’s a bad sign.
A broken printed circuit board must be replaced.
Using the player as it is may cause more damage, because components may be shorted. You could conceivably burn out the laser diode, power supply, motors, and other costly parts by at tempting to operate the player with a faulty circuit board. Fortunately, however, it takes a very healthy jolt to break a circuit board, so it is not a common occur rence.
Broken Wires
A strong enough impact may cause electrical wires and connectors to break or come off. Some times, the connector, like the one in Fig. 7-1, is just jostled in its socket. Look very carefully at these, because some connectors may look fine from the outside, but electrical contact inside has been bro ken. Press all the connectors firmly into their sockets just in case. If the connector has come out all the way, you can plug it back in to its respective socket. Broken wires leading to connectors and boards must be resoldered. If the solder joint is accessible, and does not require precision work, you can do the work yourself. If you are unfamiliar with proper soldering techniques, refer to Appendix G for a quick lesson.
If more than two wires have come undone, and it is not obvious where they go, consult the schematic diagram for your player, if available, or...
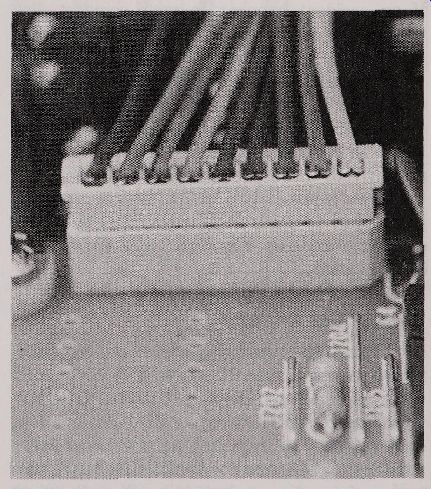
Fig. 7-1. After a fall or heavy jolt, press down all connectors to make
sure they are properly seated.
... return the player to a service shop. Don’t take chances. If two wires are loose, you have a 50 percent chance of soldering them back properly. You also have a 50 percent chance of soldering them back in the wrong place. Not particularly great odds, considering what is at stake.
Leakage Current Test
Prior to turning on your CD player, even if you do not take it apart to inspect for internal damage, be sure to check for possible leakage current. This test determines if any part of the ac line has come in contact with the metal cabinet or base. It is a safety check to prevent a potential shock hazard.
You'll need a volt-ohm meter to perform the test.
With the CD player unplugged, short the two flat prongs on the end of the ac cord, as illustrated in Fig. 7-2. On the meter, select the k-Ohm function and a range of no less than 1,000 kOhms. Connect one test lead from the meter to the jumper on the ac cord. Connect the other test lead to any and all bare (not painted) metal parts of the player. For a typical CD player, the meter will read about 500 to 1,000 kOhms--if you get any reading at all.
A reading substantially lower than this is a good indication that the power supply has come into contact with the metal parts of the player. If this hap pens, inspect the power cord as it leads into the player, as well as the on/ off switch, the transformer (usually bolted onto the back of the machine), and the wires leading from the transformer to the printed circuit board. If the wires are broken, or are shorted to the cabinet, repair the fault before using the player.
Not all exposed metal parts of the CD will return a high value. Touching the center conduct or of one of the audio output connectors could yield a very low resistance, of 40 or 50 kOhms. This is normal with some machines.
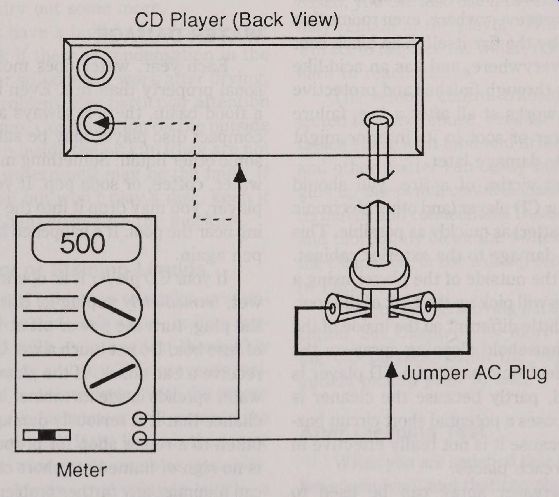
Fig. 7-2. Using a volt -ohm meter to test for possible leakage current.
FIRE DAMAGE
Fire damage includes the effects of both the heat and the smoke of fire. Intense heat can totally destroy the CD player, of course, but even moderate heat (150 to 175 degrees) for even a short period of time can cause considerable damage to the player’s electrical and mechanical components. After a fire, check for obvious damage to plastic parts If a disc was in the player, remove it and inspect it for warpage or other damage. If it is warped, then there is a good indication that the other plastic parts inside the player are warped as well. Disassemble the machine and inspect it thoroughly.
Minor warpage of plastic parts, as well as expansion of metal parts, during the heat of a fire can throw components out of alignment. You can test this by playing a disc from beginning to end (you can skip through the selections to save time). If the pickup is out of alignment, playback will be impaired for at least some portions of the disc. Perform this test only after thoroughly inspecting the player and being certain that powering it up won’t cause additional damage.
Smoke Damage
Many people erroneously think that heat from a fire causes the greatest damage. Insurance companies will tell you that smoke, not heat, is worse Why? The smoke gets everywhere, even rooms that were not touched by the fire itself. The black soot of smoke cakes everywhere, and has an acid-like effect that can eat through finishes and protective layers. If the CD works at all after a fire, failure to remove the layer of soot in its interior might cause considerable damage later. If you are the victim of a fire, you should promptly clean your CD player (and other electronic gadgets for that matter ) as quickly as possible. This minimizes smoke damage to the exterior cabinet Thoroughly wipe the outside of the player using a damp sponge. This will pick up the bulk of the soot. Matters are a little different on the inside of the player. Using a household cleaning spray on the mechanical and electronic parts of a CD player is not recommended, partly because the cleaner is water-based, and poses a potential short circuit hazard, and partly because it is not really effective in cleaning hard to reach places.
A cleaner / degreaser spray can be used to thoroughly clean the inside of the player. Spray the cleaner heavily to remove the soot. Use the extension spray tube (usually included with the can) to get hard to reach places. The cleaner evaporates after five or 10 seconds. If soot remains, spray again. If the smoke build-up is heavy, spray the cleaner on and brush it off with a small painter’s brush.
The cleaner / degreaser leaves no residue, but it may remove the lubrication on some of the mechanical parts in the player. After using the cleaner / degreaser, lubricate the player, if necessary, following the instructions provided in Section 6.
If you're not sure if a part needs oiling or greasing, try using the player for a while. Watch its operation carefully to see if lubrication is called for.
You'll have to leave the top cover of the player off to do this. Some CDs have an interlock switch that cuts power to the machine when the top cover is off. If your unit has an interlock switch, it must be defeated before you can play a disc.
The objective lens in the optical pickup will need a complete cleansing as well, following the lens cleaning procedure discussed in Section 6.
WATER DAMAGE
Each year, water does more damage to personal property than fire. Even if you don’t live in a flood basin, there is always a chance that your compact disc player may be subjected to milk, or some other liquid. Something may spill into it, like water, coffee, or soda pop. If you have a portable player, you may drop it into the water while lounging near the pool. It’s happened before, and it’ll happen again.
If your CD player is ac operated, and it becomes wet, immediately unplug it. If it is unsafe to reach the plug, turn the power off at the circuit breaker of fuse box. Do not touch a wet CD player ; you may receive a bad shock. If the player shorts out when water spreads inside its cabinet, there is a very good chance that it is seriously damaged, and should be taken to a repair shop for proper service. If there is no sign of immediate short circuit damage, you can minimize any further problems by following the steps below.
Removal of Excess Liquid
Of first importance is to soak up the excess liquid. Use paper towels to blot up the extra. If you feel any liquid has seeped into the player, you must disassemble it and remove the standing water from the inside as well.
If the player was dunked into fresh water, you need only to wait until the remaining moisture evaporates. Some water may be trapped under components, so even if the surface of the circuit board and internal parts are dry, there still might be water lurking underneath. You may use a hair dryer--on low or no heat--to help speed up the drying process. Do not dry with high heat, as you may warp some parts. Even after the water is gone, some moisture may still be present, particularly on smooth metal parts and around the optical pickup area. Allow another two to three hours for condensation to evaporate.
You can test for remaining moisture by placing the player in a plastic garbage bag. Seal the end and place the bag overnight in a warm but dry place. If there is moisture remaining in the player, condensation will form inside the bag. It’s a clue to let the player dry out some more.
Some players have a built-in dew-circuit that prevents playback if there is condensation in the unit. If your player still doesn’t work after drying, this may be the problem. Pay particular attention to the optical pickup. Condensation on the outside of the lens, or even inside the pickup (they are not always sealed or waterproof ) may be the fault. If the player turns on but won't play a disc, keep it on for a while to help evaporate the moisture.
Removing Sticky or Staining Liquids
If the player was subjected to sticky or staining liquids-which include salt water, coffee, sugary soda pop, and milk-you need to thoroughly clean the player inside and out. This prevents residue from the liquid from interfering with the proper operation of the unit (salt water will corrode the metal parts, for example). If the liquid is thick, use a damp sponge to wipe up as much as possible.
Thoroughly spray the player with a cleaner / degreaser. Apply the cleaner / degreaser heavily until all signs of the residue are gone.
Because the cleaner / degreaser is non water based, you can also use it to remove any water that may remain in the player. The cleaner / degreaser will act to displace the water, removing it from even hard to reach places.
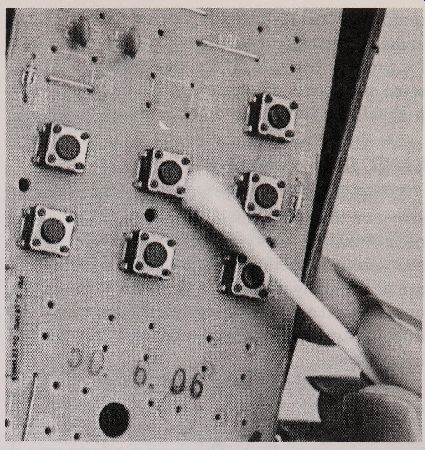
Fig. 7-3. Use a swab to clean caked-on grime or dirt from around the
switches and other components on the remote control PCB.
The remote control transmitter is often subjected to heavy abuse, because it can be placed on tables along with food and drink. Crumbs, liquids, and other matter can easily fall in the cracks and gum up the switch contacts inside, or short out wire terminals and connections. Disassemble the remote, and thoroughly clean the switches. You can spray the cleaner on, or use a damp cotton swab, as shown in Fig. 7-3.
After cleaning, moving parts may require lubrication. See Section 6 for more details on lubricating CD players. Clean the objective lens in the optical pickup prior to use.
After Cleaning Test
When you are satisfied that all the moisture has been removed, and that the player has been properly lubricated and cleaned, perform a leakage current test. If the leakage test proves negative, plug in the unit and turn it on. Test the player completely for proper operation. If the test proves positive, some moisture is still present inside the player, and it should be allowed to dry out more.
SAND, DIRT, AND DUST
The optical pickup in a compact disc player is sensitive to even a small amount of dirt. Players used outside in dusty or sandy environments are susceptible to premature failure, especially if they are accident ally dropped in the sand at the beach or carried on a long distance desert hike, where the dust from the great out doors permeates everywhere.
Removal of every last speck of sand, dirt, and dust is critical to ensure proper operation of the player, and to prevent possible damage to the optical pickup and discs. This is particularly true if the player is filled with gritty sand. A soft brush can be used to wipe away the bulk of the sand, or if there is lots of it, you can use a vacuum cleaner with a brush attachment. Remaining sand, dirt, and dust can be removed from the cabinet, chassis, and interior with a tac clot h, designed for wiping away sawdust from woodworking projects. Tac cloths are available at any hardware store.
Even though the visible dirt and sand may be gone, there still may be an accumulation of micro sized particles of dust. You can clean the entire inside of the player by liberally squirting it with your trusty can of cleaner / degreaser. The fluid cleans quickly, leaving no residue. The cleaner / degreaser is a solvent, but it is not petroleum based, so it will not harm metal or rubber parts.
Sand and dirt have a way of getting into the most unusual places. Be sure to inspect the headphone and audio output jacks on the player. Grit inside will prevent proper electrical contact, and you may not get any sound from your player. You can clean the jacks with a swab soaked in alcohol (see Fig. 7-4). Clean both the inside and outside.
You may need to oil and lubricate the spinning and sliding parts in the player after cleaning. Follow the directions out lined in Sections 5 and 6.
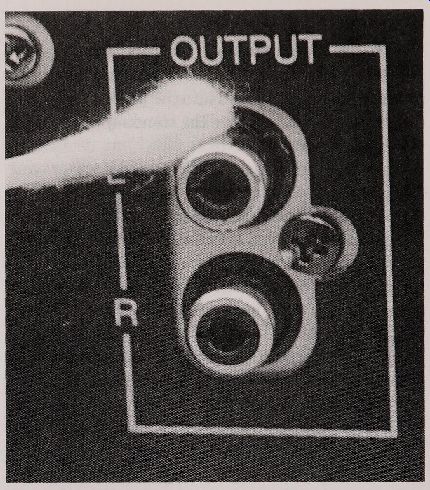
Fig. 7-4. Sand and grit can be removed from around and inside the output
terminals (and headphone jack) with a swab dipped in cleaner.
FOREIGN OBJECTS
Just about any service technician of audio and video equipment will tell you that a good portion of machine repairs are caused by people inserting '' foreign objects" into the mechanism. Horror stories of this sort abound, and most are innocent mistakes caused by children. How about the one where a five year old boy stuck a peanut butter sandwich into the disc drawer, because the wanted to know what kind of sound it would make? Or the time when a young girl used her father’s compact disc player as a piggy bank? She put all her extra pennies, nickels, dimes, and quarters into the ventilation slots of the player. She had amassed quite a savings until the player suddenly went on the fritz.
This kind of accident is best avoided by warning young children that the compact disc player is not a toy. You can make your own rules in your home, but if you allow your children to use or even touch the CD player, spend a few moments instructing them on the right and wrong way to play discs. Children are naturally curious about things, especially something new like a CD player, and you'll greatly reduce the chance of a serious accident if you provide adequate do’s and don’ts ahead of time.
Despite the best efforts, warnings, and rules on your part, foreign objects may still get lodged in side the player. Some might even be your fault. When this happens, immediately turn off the player and unplug it. If the object cannot be completely retrieved, disassemble the player and remove it. Sandwiches, cookies, candy, and other objects often leave their mark even after you have removed them. You can use a brush or vacuum to remove the crumbs. Heavier or stickier sediments will require removal with a squirt from the cleaner / degreaser.
LEAKED BATTERIES
Portable compact disc players, when used outside, as well as remote controls for home players, run off battery power. Given the right set of circumstances, even the best made battery may leak.
The acid from the battery oozes everywhere, and not only blocks electric current, causing failure, but corrodes the inside of the battery compartment and the battery terminals.
Your best defense against leaking batteries is to remove them if your player or remote is not used for a long time. Batteries tend to leak the most when they fail to conduct electricity, so a battery that sits, unused, in a portable or remote has a very good chance of leaking. If the batteries are still good when you take them out (you can test them with a battery tester or volt-ohm meter ), use them in something else.
If storing batteries--new or used--keep them in a cool dry place. You can greatly prolong the shelf life of batteries by storing them in the refrigerator (not freezer ). Again, batteries can leak just about everywhere for any reason, so to prevent contaminating your food with battery acid, wrap them up in a sealed food storage bag.
Removing Battery Acid
Should the batteries leak in your portable or remote, remove them immediately and throw them away. Avoid excessive contact with the battery acid as it can burn skin. Use a lightly dampened cloth to remove the excess battery acid deposits from the battery compartment. If the batteries leaked only a little bit, there may not be any deposits in the compartment or on the terminals. If the terminals look clean and bright, install a new set of batteries and test the unit.
If there is excessive battery acid deposits, clean the entire compartment with isopropyl alcohol or a can of cleaner / degreaser. Use a cotton swab to scrub the cleaner on the terminals. You can remove any remaining battery acid deposits by rubbing the surface of the contacts with a pencil eraser.
= = = =