The word "troubleshooting" means aiming at trouble and firing away until you hit the bullseye. In a more practical sense, troubleshooting means locating and eliminating sources of problems, but doing so in a logical and predescribed manner.
Troubleshooting is the basis of electronic and mechanical repair, and a thorough grasp of its tech niques and procedures is important. Just as you can’t hope to shoot at a target with a blindfold around your head, you cannot wildly at tack a problem in your compact disc and pray that you luck onto the solution. Troubleshooting lets you approach the problem from all angles, and zero in on the cause, with the least amount of wasted time, energy-and most of all-money.
This section details the concepts behind CD player troubleshooting techniques, and how to ap ply them to actual hands-on procedures. If you are already familiar with electronic and elect romechanical troubleshooting, the information in this section may seem old hat to you. If so, skip to the next section. It contains troubleshooting flowcharts that you can use to pinpoint common problems with your compact disc player. If you are not already fa miliar with basic troubleshooting techniques and procedures, be sure to read this section, as it contains useful information you won't want to miss.
THE ESSENCE OF TROUBLESHOOTING
You can better understand the role that troubleshooting plays in the repair of compact disc player ailments by using a more familiar concept: figuring out what’s wrong with the family car. Let’s say you go out to your car one morning, turn the key, and the car won’t start. The battery turns the engine, but even after 10 or 15 tries, the car simply won’t start, and every minute you spend cranking the engine is every minute you are late for work.
You could open the hood, tear out the engine and rebuild it, or you could replace random parts, thinking that it’s got to be one of them that’s causing the problem. You know better of course, and you stop and think for a minute: why won’t the car start? The engine turns over, so you can rule out a bad battery. But the problem could be in the ignition system, the fuel lines, or a number of other sub-systems.
In fact, there are several possible causes:
The engine is flooded.
The spark plugs are fouled.
The engine isn't getting gas.
The engine timing is off.
The spark isn't strong enough.
There is no spark.
The engine isn't getting enough air because the choke is closed.
Once you have identified the possible causes, you can take corrective steps on a one-by-one basis. Start with the most common or probable cause, then work your way down. In most cases, failure to start the engine is caused by flooding. To remedy this, you open the hood and remove the air filter and perhaps a couple of spark plugs. The gas evaporates and you start your car. If the problem still persists, you go to step two, and so forth.
We've just out lined the basic three step process to troubleshooting, and it applies to compact disc players just as it does to hard-starting cars.
Step 1. Analyze the symptom ("car won't start but engine turns over") and develop a list of possi ble causes.
Step 2. Ar range the causes in order, from the most likely to the least likely.
Step 3. Start at the top of the list (most likely cause), and by a process of elimination, inspect, test, or otherwise rule out each possibility until the problem is located.
Once the problem has been found, you can clean or repair the faulty component.
TROUBLESHOOTING FLOWCHARTS
It’s sometimes easier to visualize the troubleshooting process by using flowcharts. These are graphic represent ations of the possible causes and their solutions. The exact form of the flowchart can vary, but the basic information they contain is the same.
One example of a troubleshooting flowchart is shown in Chart 8-1. The chart is labeled with the problem (or symptom), which in this case is, "Engine Turns Over Butwon’t Start." Below the tit le is a set of boxes. The boxes are stacked ver tically, and each box on the lefthand side contains a possible cause for the malfunction, usually a bad or dirty part or sub-System. The boxes are organized from the most likely to the least likely, so you won't waste your time with an unusual fault when the actual cause is really quite common.
In each level are two or three boxes. These boxes contain the suggested remedy, and in some cases, the procedure for testing the suspected part or sub-system.
Arrows connect the boxes in such a way that by thinking of the boxes as questions, you can an swer them simply with a Yes or No response, and navigate yourself around the chart. Each No answer to a possible cause brings you down to the next level. Answer Yes to a cause, and you move later ally as you make tests and repairs.
In actual practice, however, you don't really know where the problem originat es until you test each possible cause. At each level you initially answer with a Yes response, until you have the op por tunity to test it out. If the test proves negative (not the cause), you move down to the next level.
USING THE TROUBLESHOOTING CHARTS IN SECTION 9
The troubleshooting flowcharts in Section 9 follow the same form and logic as our example above. If your player isn’tworking properly, find the chart that most closely matches the symptoms of the player. Some players may exhibit multiple symptoms, and you may need to consult several charts as you at tempt to pinpoint the cause.
Once you've ident ified the proper chart to use, start at the top level, and work your way down, eliminating those causes that you're sure are not the source of the problem. Double-check your work, to make sure you haven’t missed something, and don’t forget the obvious. By far, the majority of problems with compact disc players are caused by seemingly innocent things, like a scratched disc, a dirty switch, or a select or on the player or amplifier that’s not set correctly.
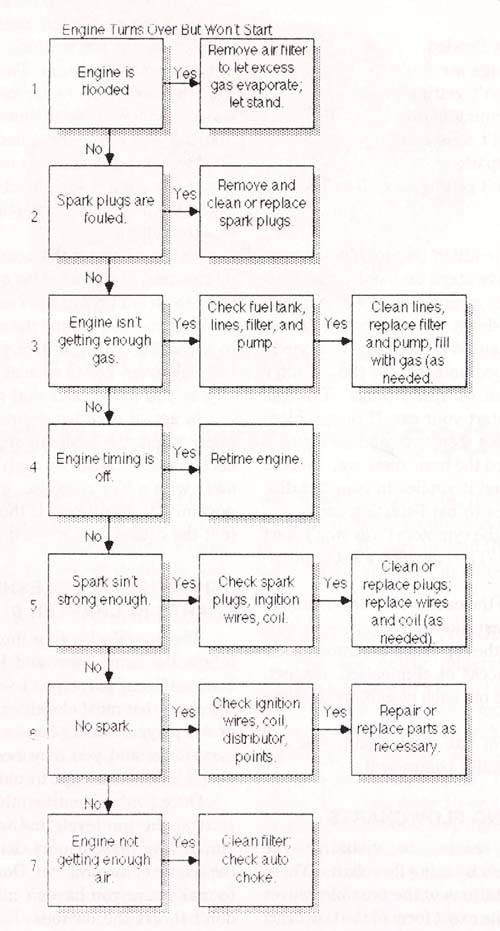
Chart 8-1. Sample of a troubleshooting chart.
What ever you do, avoid the temptation to tear your CD player apart before you adequately ident ify the cause. Dissassembly and removal of any part, even the top cover, should only be done until after you’ve eliminated the other causes. Remember that some of the components in CD players cannot be repaired or replaced without special tools and techniques, so make it a point to not remove any parts unless you absolutely have to.
WHAT YOU CAN AND CAN'T FIX
You can try to fix anything in your CD player.
It’s yours, you own it, and you're free to do any thing you like with it. Many problems are easily handled by the home technician, and there is no rea son why you should not diagnose and repair them yourself. However, there are a number of malfunctions that are best left to a repair technician, who has access to the service lit erature and special alignment and test jigs for your player.
Here is a general list of the components and as semblies you can fix in your CD yourself, and those that should be referred to a qualified technician.
This list is not absolute by any means. Your level of expertise, and the amount of service material and tools you have or can obtain, greatly inf luence the types of repairs you can perform.
What You Can Do:
Clean and inspect the lens and optical pickup assembly.
Clean the exterior and interior to remove dust, nicotine, and other cont aminants.
Clean and replace belts and rubber rollers.
Inspect and replace springs.
Lubricate gears, shafts, and other moving parts to prevent them from grinding.
Replace or resolder broken wires.
Clean or replace dirty or broken switches, including front panel switches.
Test for proper operation of the drive spindie and loading mechanism motors, and replace them if necessary (these usually do not require cr itical alignment ).
Replace the main printed circuit board (PCB) and ancillary boards (special handling of the boards required).
Replace common electronic components (resistors, capacitors, diodes) on the PCBs, but only if original value is known.
What You Should Not Do:
Disassemble the optical pickup.
Adjust the optical components inside the pickup.
Align or replace the optical pickup assem bly (always a critical adjustment ).
Adjust trimmer potent iometers on the main PCB, without the use of a schematic and an oscil oscope.
Remove, replace, or align the disc loading mechanism (usually a critical adjustment ).
Replace integrated circuits, transistors, or any other component where an exact replacement or subst it ute cannot be guarant eed.
WHAT TO DO IF YOU CAN'T FIX IT
Should you find that repairing your CD player is beyond your technical expertise and resources, don't fret. Make a note of the problem and the sus pected cause, reassemble the player, and take it to be serviced. By performing the basic troubleshooting procedures ahead of time yourself, you make the repair tech's job that much easier.
You may not get a reduction in the labor charge, but you may find the problem is fixed prop erly the first time around, with no costs added be cause of " additional work "
the technician found was necessary after the machine was opened. A player that must be returned to the service shop ime and again is often the result of a communicaions problem between you and the repair technician.
Some repair techs and service centers frown on consumers repairing their own CD players. But if you've followed the directions in this guide and in the manufacturer’s literature, and used the rightools and cleaning supplies, you've done Nothing hat the service shop would not have done--and charged you handsomely in the process. When performed properly, rout ine Maintenance and troubleshooting procedures do not harm the compact disc player.
Avoid a repair shop that adds an additional service fee simply because you' ve opened the top cover and made some preliminary tests. Unless you have broken the player even more, the service fee is completely unnecessary, and probably illegal. After all, an automotive garage would not add $50 to their price of a tune-up because you changed the oil 1,000 miles ago.
If you are sure that the fault lies in a component that cannot be repaired, and replacement does not require critical adjustment, contact the manufacturer and ask for a parts list (if you don’t already have it ). Identify the faulty component and order a replacement. Most manufacturers that sell replacement parts to the public ask for payment in advance, and the easiest way to do it is by credit card. Few will ship COD.
If the manufacturer proves uncooperative, what then? Try to obtain the part from a repair center aut horised to work on your brand of player (in this case, " authorized" simply means that the repair center has an open channel for replacement parts).
The shop may tack on a small service fee, which is understandable.
Receiving the replacement parts from the manufacturer or a repair center may take as little as a week or as long as several months. At the worst, the broken part must be ordered from some warehouse in Japan, and it seems as if they ship it to the U.S. by sailboat. You've heard of the slow boat to China; in the case of replacement parts for CD players, it’s the very slow boat from Japan. Owning an American-made or European-made player is not a guarantee that parts will arrive any sooner, however.
Keep records of when you ordered the part, and if you've written any follow-up letters or phoned the manufacturer directly. Ask for the names of everyone you speak with, and write them down.
You never know when this additional information will come in handy.
TROUBLESHOOTING TECHNIQUES
Effective troubleshooting depends mostly on common sense, but here are some tips you’ll want to remember.
Write Notes
Write copious notes. Write everything down, including how you removed the top cover, volt-ohm meter readings you made, visual observations, parts you replaced--in short anything and everything. By keeping notes, you will not only be able to retrace your steps should you get hung up on a particular fault, but you’ll be able to better deal with recuring problems. The Maintenance log in Appendix E provides blanks for notes; use additional sheets of blank paper if necessary.
Use the Proper Tools
Refer to Section 5 for more information on the proper tools to maintain and service your CD player. Don’t make do with a tool that was not designed for the job. If you don’t have the required tools and supplies already, spend a little extra on them. The maintenance and troubleshooting proce dures out lined in this guide require only the most basic hand tools and test equipment. Expensive items like oscilloscopes, function generat ors, and frequency count ers are not required unless you opt for more detailed troubleshooting of your own.
Use Your Volt-Ohm Meter Correctly
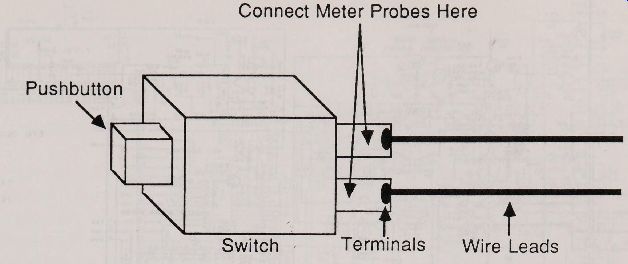
Fig. 8.1
A number of troubleshooting procedures require you to test the suspected component or assembly with a volt-ohm meter.
Be sure to use this piece of equipment correctly, or you may wind up missing a potential fault, or replacing components that are perfectly good.
To test continuity, select the resistance function on the meter. If the meter is not auto-ranging, choose an initially high resistance range, on the order of 10,000 ohms or more. Attach the two meter leads (or probes) to either side of the switch, wire circuit, or connector you are testing, such as that shown in Figs. 8-1 and 8-2.
Generally, continuity is a ''go/ no-go" test. You will either get a reading of 0 ohms, which means that the circuit or connection between the two test leads is complete; or infinite ohms, which means that the circuit is broken, or that the connection between the two test leads is open.
A reading of 0 ohms is exactly what you want sometimes, like when you are testing the closure of a switch or a length of wire to make sure it is not broken inside. Other times, 0 resistance means that something is shorted out, which is an unhappy situation. Likewise, a reading of infinite ohms (which meters display in a variety of ways), may be correct for a given test ; 0 ohms for another test.
The troubleshooting charts in Section 9 provide more details on the typical readings you should get for any given instance.
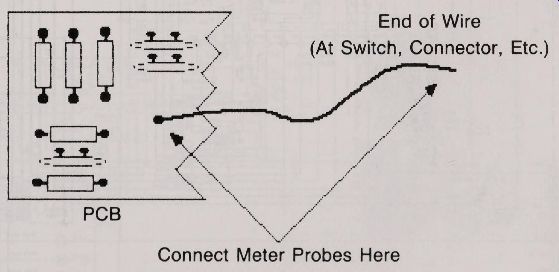
Fig. 8-2. Test for internal breakage in wires by connecting the VOM to
either end. --Connect Meter Probes Here
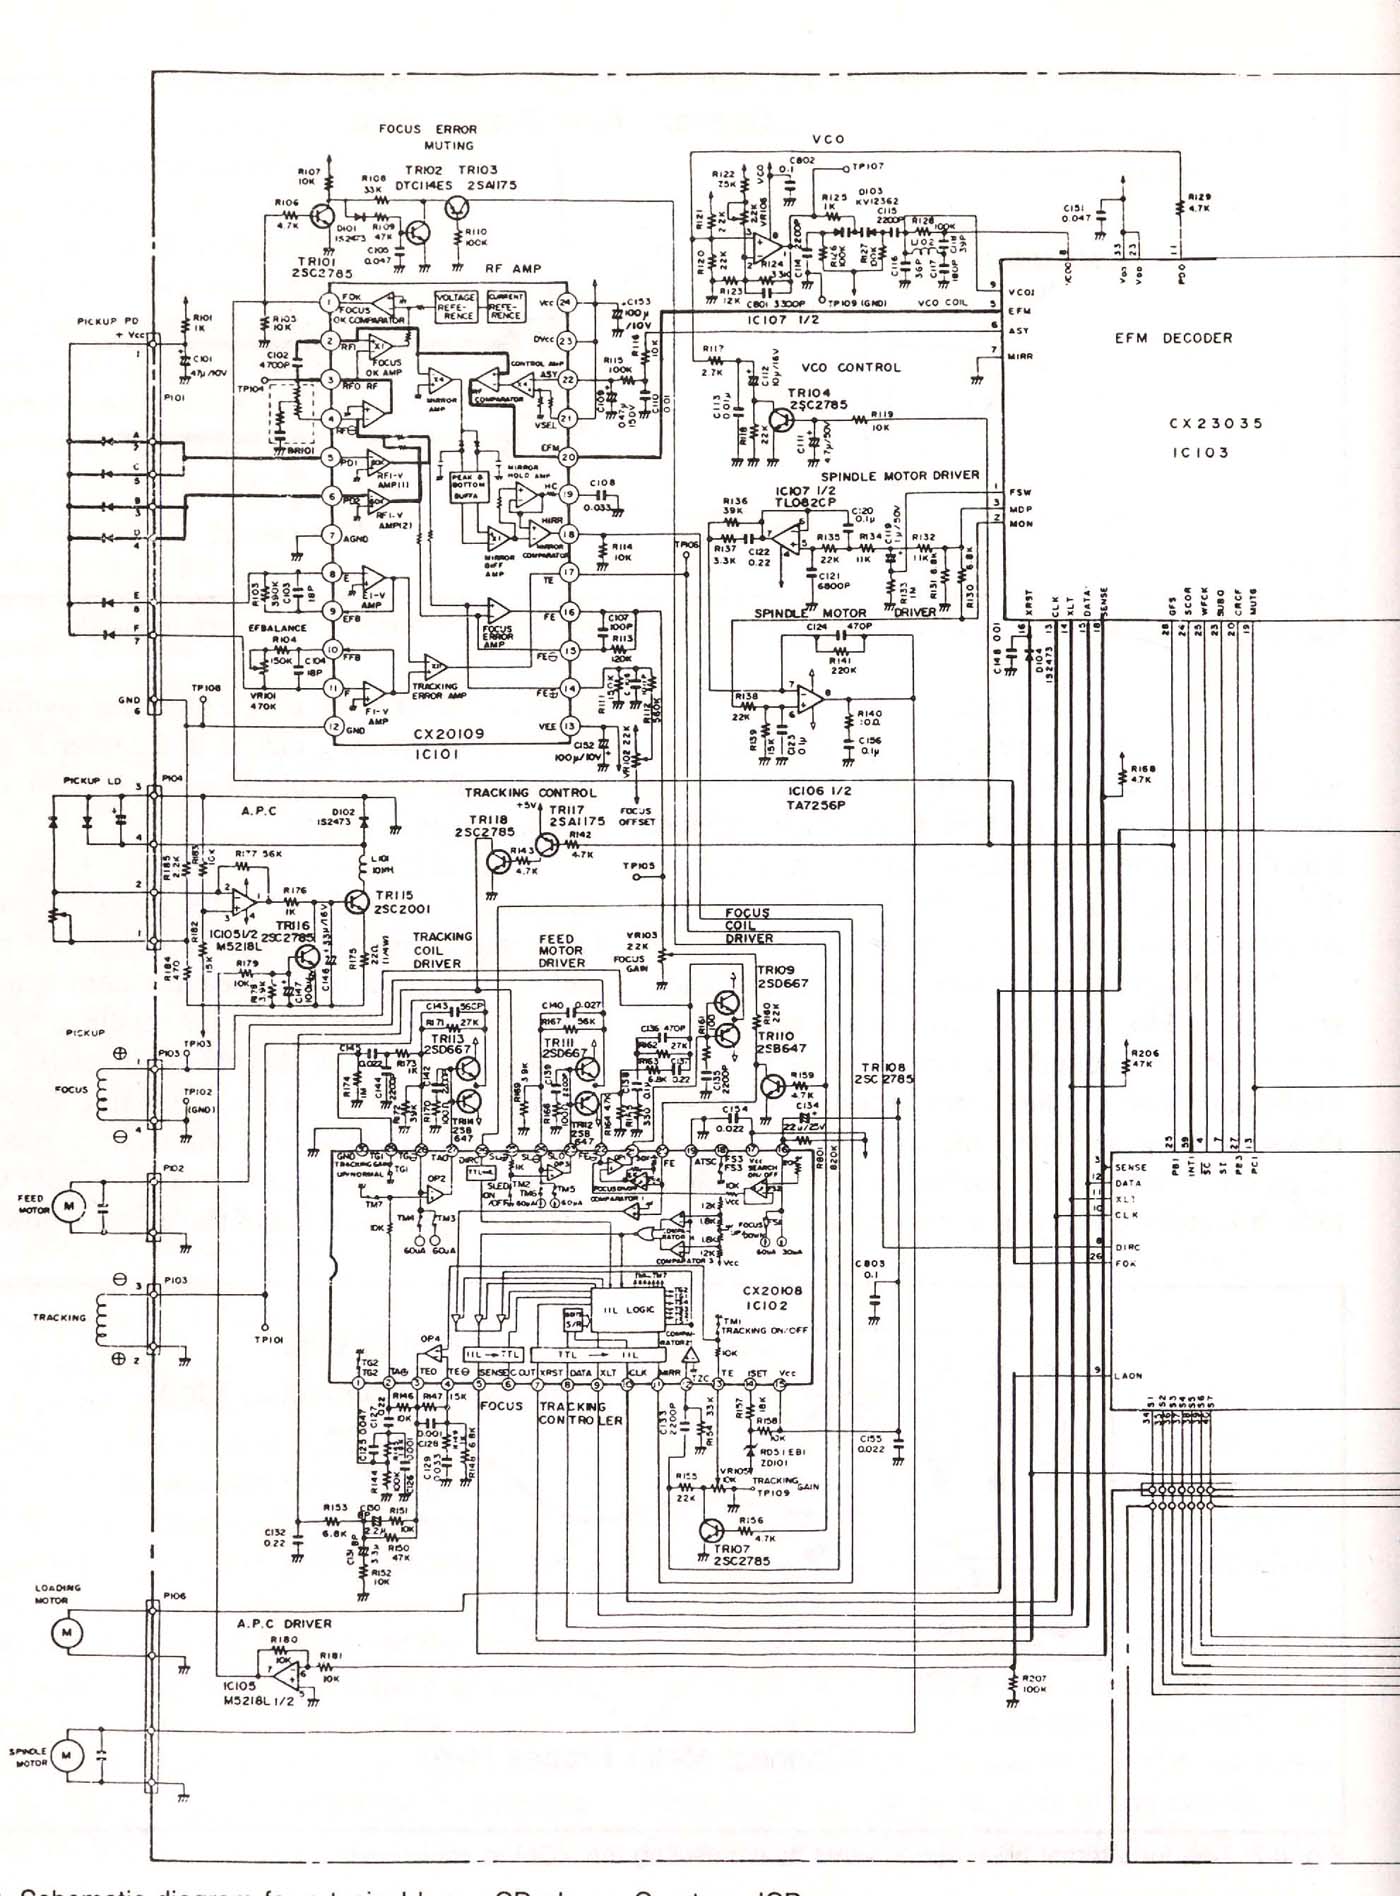
Fig. 8-3. Schematic diagram for a typical home CD player. Courtesy JC
Penny.
When using the meter, make sure that you do not touch the metal part of the probesYour body has a natural resistance, however high, and you will add or subtract it to the measurement you're trying to take. Always take your readings by grasping the test leads by the plastic insulator.
Volt -ohm meters test more than continuity, of course. For example, you will want to use the ac and dc voltage functions to test for proper voltage levels going into and out of the player’s power supply. Be sure to select the correct function before you connect the test leads to the live circuit. With many meters, connecting the leads to a dc voltage when the unit is dialed to ac may burn out a fuse or cause internal damage.
If the meter is not the auto-ranging type, always choose a range higher than the input voltage. If you are not sure of the voltage level, choose the highest one first, then work down. Most digital meters have built -in over load protection to prevent damage by choosing a too-low range. However, the needle in an analog meter can be permanently bent or broken if you accident ally choose a range that’s too low, and the meter violently swings to the end of the scale.
GOING BEYOND THE FLOWCHARTS
Few compact disc players are designed exactly alike. Differences between brands, even between models of the same brand, require slightly different troubleshooting procedures. Use the flowcharts in Section 9 as a starting point only. The design and const ruction of your CD player may require ad ditional troubleshooting steps. If possible, refer to the schematic or service manual to your machine.
A sample schematic, for a basic 3-beam CD player, is shown in Fig. 8-3. It will often detail testing points or procedures that are unique to the particular model.
In other cases, the design of your player may not require that you perform some troubleshooting procedure. For instance, if your player is a top loader, it lacks a disc drawer / door loading mechanism, so problems with this assembly are of no concern to you. Likewise, car CD players will lack any type of power transformer, so it is not necessary to test it if you are having trouble with powering your unit.
To keep the charts as simple as possible, we've limited them to reflect problems inherent in front loading ac operated home models. If you own a portable or car CD player, allow for the design difference in your troubleshooting procedures.
= = = =