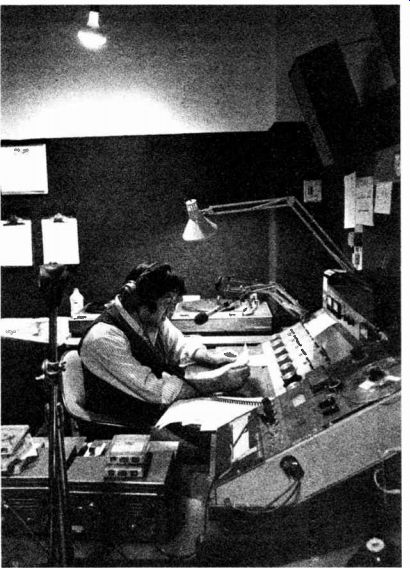
THE RADIO BOARD
When you walk into a room, one of the first things you might do is flip up the switch on the wall to turn on a light. Then you may walk over to a box and turn a knob which starts the radio.
If it's a hot day, you might push a button to start the air conditioner. During the course of the day, you push buttons or flip switches in a steady stream, and each time some one specific thing happens. If you could collect in front of you all the switches you touch in a day, you would probably be amazed and a little overwhelmed at the number and at their apparent complexity. So when you first face a radio control board, you may likewise be amazed and a little overwhelmed. But it's just a collection of a bunch of switches, each one of which does one specific thing. And just like the lights, the radio, and the air conditioner are different things serving one purpose (that of satisfying you), so the radio board takes a number of different things, like records, tapes, and microphones, and pushes them into one output-the sound on the air. You know how to handle all the switches you encounter so as to satisfy the one person you are, so now let's approach the various switches on a radio board and see how to satisfy the one sound we want on the air.
Do you know of any machine that doesn't have an off-on switch? That, then, is where we start with an audio board.
Somewhere on the board will be a switch we have to activate in order to hear anything which goes through all the other switches. It's called the master gain switch because it controls the gain, or volume, of everything else. But the switch may not look like the sort of thing you are used to. Remember that on your radio you turned a knob to turn on the set. You may be facing an array of knobs here too. Or you may have knobs which move back and forth in a straight track. Both types are switches. The turning knob is called a pot, short for potentiometer, and works just like the knob on your radio. As you turn it clockwise, the sound level goes up.
The other knob is called a slider, for obvious reasons, and will generally have a numbered scale printed alongside it.
Needless to say, the zero position is for no sound at all. Locate the master gain switch, whether it turns or slides, and put it about halfway up. You've just turned on the board. However, that doesn't mean you'll hear anything. You have some switches to turn on yet. Find a knob labeled monitor gain. Turn it about halfway up. That turns on the speaker, or monitor, so you will hear what goes on the air.
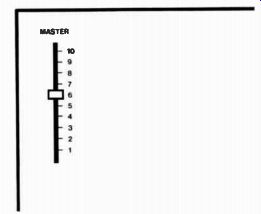
Fig. 1 Radio board.
What you hear over this monitor that's now turned halfway up will depend on another switch more like the types you're used to in that it's like the light switch on the wall. It's just labeled monitor, and it clicks into positions like a wall switch but generally has more than just two positions. It can be off or in program or in audition. Flip it into program; we'll talk more about what these two names mean later on. Next, locate a switch called the output switch. Like the one we just flipped, this one has three positions. But this one controls the entire board, putting everything on the audition or the program line instead of merely on the monitor. Again, put it into the program position.
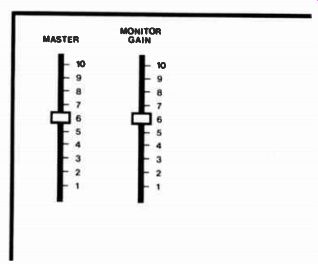
Fig. 2 Radio board

Fig. 3 Radio board
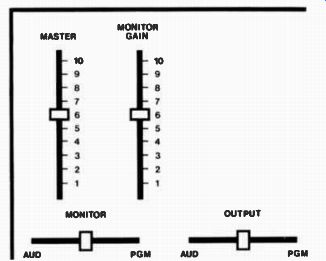
Fig. 4 Radio board
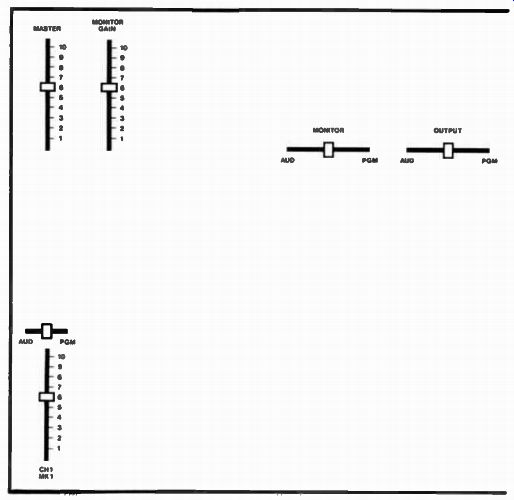
Fig. 5 First channel
Switches like these, that work like light switches, are generally referred to as keys. So you flip the key into program, audition, or whatever you want.
So now you have turned up the master gain control, the monitor gain control, and put the monitor key and the output key into program. But you still don't hear anything. All you've done so far is get the board ready to put sound on the air. Now we have other switches to move so as to allow sound to come into the board.
Where will the sounds come from? You can have someone, even yourself, talking into a microphone, or have a record playing, or have an audiotape running. Those, in essence, are all your sound sources, but they can do a great variety of things for you. Let's start with a microphone.
On a bendable metal tube above the audio board a mike is pointed at you. Generally, the switches which control it are the first ones to the left. If you turn the pot or push the slider up halfway, will you then hear yourself talking into it? No, for a couple reasons. The first is because there is yet another switch to click on. That's the key above the pot or slider that can click to the left or the right and that must be put in the "program" position, generally to the right. To the left is "audition," and in the middle is "off." The second reason is that, even with the key on program, that particular mike won't be heard over the control-room monitor the way other sound sources will be. If that mike could be heard, the mike would pick up its own sound from the monitor, feed it back to the monitor, pick it up again, and so on. That's feedback-more on that later. But if there is a speaker outside the control room, people listening there can now hear you talking into the mike. So for one simple sound you had to handle six switches. But for each additional sound, you will need to handle only a couple more switches.
Those two will be the one at the top, which must be put into program or audition, and the pot or slider. Let's simplify at this point and talk of sliders only, even though what we say will refer to pots as well. Technically, both the turning and sliding knobs are pots because both are potentiometers. They both can vary the electrical potential of a circuit, but in conversation, most people call the turning knobs "pots" and the sliding ones "sliders." So that's what I'm doing.
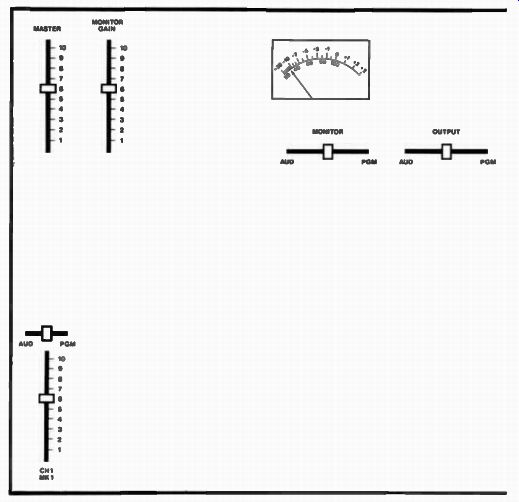
Fig. 6 VU meter
As you talk into the now working mike, you notice a needle on a gauge jumping around. That gauge is called a VU meter, for volume units. As your voice gets louder or softer, the needle goes higher or lower. You see the red portion of the scale. The needle isn't supposed to go over into that red portion except very quickly and very seldom. How can you stop it? Move the slider back toward zero, and the needle drops down. I said "the slider" because there are two you can move-the one for the mike and the one for master gain. If everything on the board is running loud, pull the master gain slider back. If the one mike is too loud, pull just that slider back. Obviously, the reverse is true too. If the person talking has a soft voice, push the mike slider up. If it's up all the way, push the master gain slider up. That move can be a problem though. Suppose you have one soft voice on a mike and you push up the master gain slider. Then the other mikes, the records, and the tapes will be louder. So each individual slider for the other sources may have to be brought back.
Always remember you change everything when you change the master gain. Generally, try to keep the peaks of sound from voices no higher than 100 on the scale of the VU meter and the sound of music no higher than 80. That's because so much sound energy goes into music that it will seem as loud at 80 as voices do at 100. Sounds that go over 100 get distorted, so except for a sudden cough or drumbeat, keep every thing under 100.
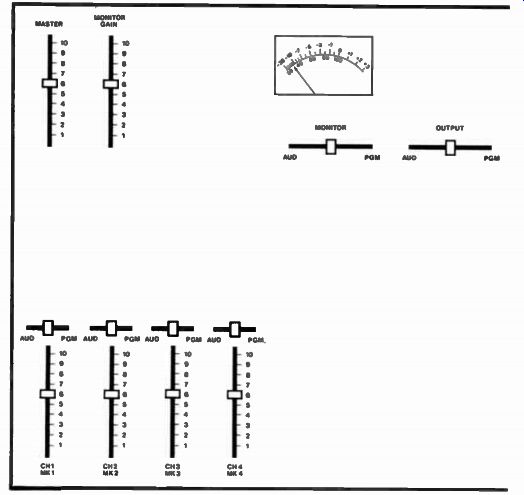
Fig. 7 More channels
The next three sliders on the board are also for mikes, but these are for the studio, not for the person at the board.
The board with the mike is in the control room and is separated from the other mikes, which, for a couple of reasons, stay in the studio. First, you may want to set up any number of actions or activities in the studio while someone else goes on the air. Since the mikes are in a separate room, you can talk and arrange things while the technical control and the playing of records or tapes goes on in the control room. Second, the mikes in the studio would cause feedback if they were brought into the control room, but the mike in there has been specially prepared not to do that. What is feedback? It's that loud squeal we've all heard over loudspeakers. What happens is that sound goes into the mike and is sent out to a speaker, in our case, the monitor in the control room. Then the mike picks up that sound (its own) and sends it back to the speaker, which sends it out to the mike, which picks it up and sends it back to the speaker, which sends it out to . . . . It feeds back upon itself and gets louder with each cycle. The mike in the control room, though, feeds into a special circuit which kills the monitor. So when you use that mike, the monitor doesn't play anything.
That breaks the cycle. The studio mikes break the cycle by being in a room where they don't pick up the monitor. But as far as the board is concerned, there's no difference from one mike to the next. They all operate the same way: flip a key and move a slider. There's an advantage to you, though, as the board operator. You can talk into the mike there and introduce the people in the studio. Then you can kill (shut off) your mike, signal the people in the studio through the control-room window, and turn on their mikes. Now you are free to watch the levels on the VU meter. If you were part of the discussion in the studio, you couldn't do that, and the sound might get distorted or be too low to hear. If the people in the studio are doing a drama, you can sneak in the sound effects from the mike over in the corner and bring it in just till it's loud enough, some thing you couldn't judge from the studio.
The next slider is for a turntable. If you're going to play a record, you have to have a turntable, and so you have to have a slider. This slider operates like the others-flip the key at the top and move the slider to the proper level as judged by the needle on the VU meter. The turntable itself is generally located to one side or the other, and just far enough away so you don't bump it with your elbow. Now what's the next slider? Another turntable, and that explains why there are two of them sitting there. With two sliders for two turntables, you can do things like start a record on one, push the slider up, start a record on the other, and push its slider up while pulling the slider for the first one down. That way, the sound gradually shifts from one record to another. That is called a segue (segway). You segue from one piece of music to another by having the sounds overlap for a bit in the middle. Or you can cut instantly from one record to another by having both sliders up but only one key on top flipped. To change, close one key and open the other, and you will instantly go from one to the other (provided your reaction time is fast).
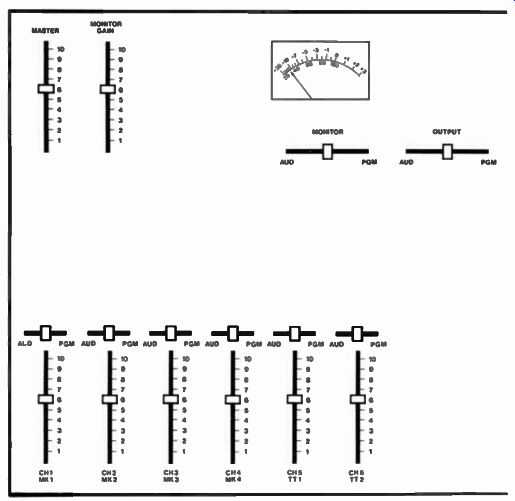
Fig. 8 Turntable channels
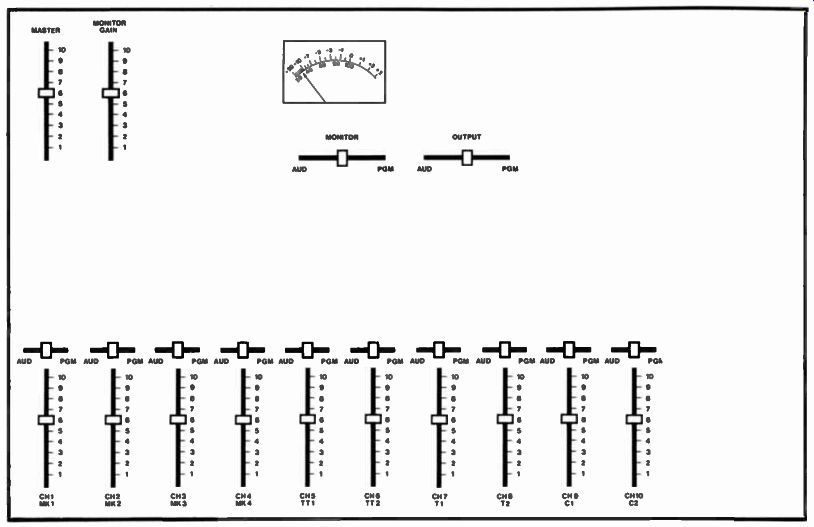
Fig. 9 Cart machine channels
At this point, what can we do? With the control room mike open, we can introduce a record, have it playing in the back ground by holding the slider low, then bring it up full as we quit talking. Be sure to close the mike key so you don't say something you shouldn't after you're through with the intro.
That's a familiar pattern we have heard on a lot of music and talk stations. The D.J. intro's a record, then plays it-all by using just a couple of switches.
The rest of the sliders are easily explained now that we have the pattern down pat. The next two, sliders 7 and 8, are for the two tape decks. For reel to reel tape, we have two machines we can play on, and each one has its own key and slider. The next two, sliders 9 and 10, are for the two tape cartridge machines. They are somewhat like cassettes in that the tape is totally contained inside a plastic case, but unlike cassettes, the tape is in a continuous loop. By putting electronic beeps on the tape, you can get it to stop automatically so it doesn't go on running. These carts, as they are called, have varying amounts of tape on them, enough for :20, :40, :70, 3:00, 5:00, or really almost anything you want. And as with a single 45 record, just one thing is recorded on them. You may have a jingle ID on a short :20 (or even a :10) cart, a :30 commercial on a :40, and so on. With the two cart machines, we can go directly from that jingle ID to the :30 commercial without stopping to pull one cart out and put another in. We just go to the other machine for the second cart.
That leaves the last two sliders and keys. They are all purpose and can control a number of things, depending on what you select. If you have a second studio, its output may come through one of them. If you carry news from a national net work, those reports will probably come in through them. A field reporter at election headquarters downtown may be on one slider or the other. But which one? Up above these two sliders and keys you will see five more switches. On some boards you have push buttons, and on some others you have dials that click around to five numbered positions. But on this board, it's five keys. The first key controls network news, let's say. The second, studio B. The next is the downtown remote line, and so on. Flip any key up and the sound it controls goes into the first remote slider, number 11. Flip it down and the sound goes into the second, number 12. So you can get two remotes at once on the air. Or, depending on what's happening, you could put all five keys up and get all five remotes on slider 11. Chances are, though, that would result in chaos.
As you pushed these various sliders up and down, you may have noticed some of them move farther down than zero. With a bit of a pop, they click into a position below the fully off position. That's a cue position, and when the slider is moved that far, regardless of whether the key is in audition, program, or off, the sound for that particular channel is sent into a separate system called the cue system. You'll even spot a slider called the cue slider, and as you push it up, any sounds coming through that cue system will be made louder.
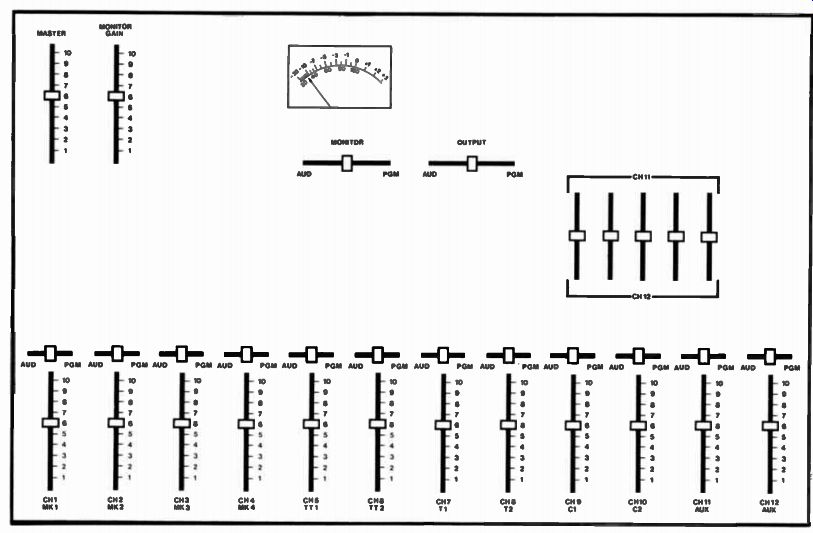
Fig. 10 Extra channels
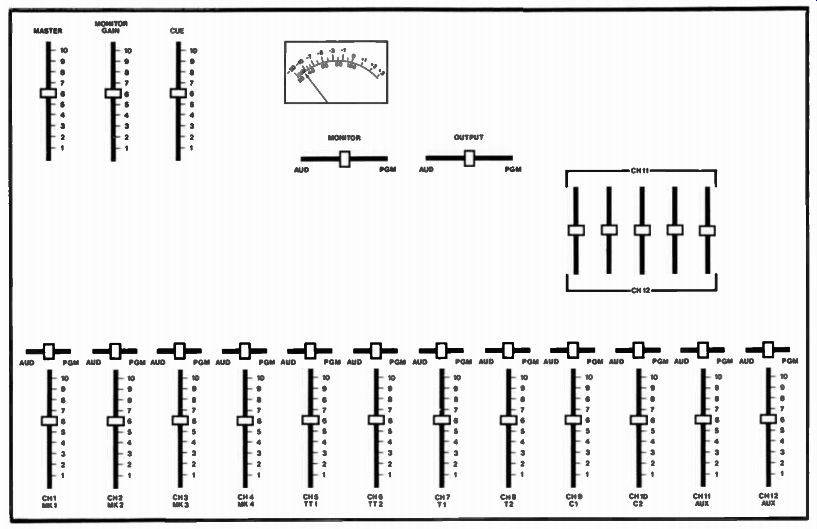
Fig. 11 Cue control
You'll hear them through a speaker located generally to the side of the board or directly in the middle of the front. Here's the point. If you have one record on the air, you will want a way to be sure you are at the beginning of the next one you will play. You can't use the normal program position for this second turntable as that would send the sound out on the air. So you have a second channel called a cue channel to allow you to cue up the record while it's off the air. Click the slider for that second turntable into the cue position, push up the cue slider, and the sound comes from its own speaker. If listening to an other speaker could cause problems (you might have to have your mike open for some reason), there is yet another way.
There's a headset jack on the board, plus a slider for its volume, plus a switch to let you feed the program, audition, or cue line into that headset. That way, you alone can listen without any sound going out into the control room.
You know what cue is, but what's the difference between program and audition? I've mentioned that the key should be put in the program position. So long as the output key for the entire board is in program, that's the line that will go out on the air. However, now go to the monitor selector key and put it in "audition." The control room speaker goes dead. Flip a key to "audition" and whatever is on that channel will now come out over the monitor. The original sound will still be going out over the air, but you are hearing a different sound source over the speaker. That's somewhat like the cue system except you now control the loudness by pushing up the specific slider, not the one slider in the cue system. Even without the use of a VU meter (which is still giving a reading of what's on the air), you can come pretty close to setting a good level just by using your ears. Here's an example of why this set-up might be useful.
Suppose you know a major news story was to be fed down one of your remote lines in the near future, but you don't know exactly when. You announce over the air that you will shortly cut to Reporter So-and-so giving the report. Then you put on a record. You flip the remote line on audition, change the monitor over, and set the slider at a good level by listening to what sounds right. When the report comes on, you merely flip the key to "program" and kill the key for the music. Your level is preset. Had you done it through the cue system, you would have had to move the slider up, thus getting a weak start. Or suppose something goes wrong with the electronics of the program line. You can flip the output key to "audition," reverse your keys, and still go on the air. Sometimes, audition can be a lifesaver.
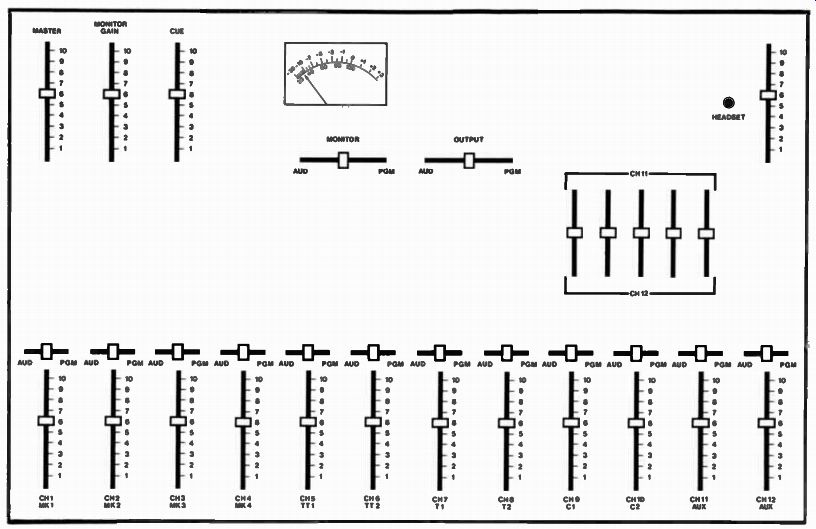
Fig. 12 Headset control
One key remains. Not all boards will have it. But any board for an FM station probably will. It's the stereo-mono key. Up till now we've been talking about mono sound-one sound going through one channel to one speaker. For stereo, almost everything doubles. Flip this key into stereo and suddenly you can send out two channels from stereo records or tapes.
You'll get different sounds from left and right speakers. As for records and tapes, you need do nothing else for stereo sound but flip that one key.
But what about the microphones? With records and tapes, someone else has already set the balance of loudness between the two channels, but with microphones, you're responsible for that. So you'll need another set of keys, one above each mike.
By putting the key to the left, that mike's sound goes in the left channel only. Put it to the right and the sound goes to the right. Leave it in the middle and the sound is evenly split between the two channels. So with the board in stereo, you can "place" a person on a mike to the left, right, or center of the sound spread. If you were recording a symphony orchestra, you would need a board more complex than just this three-spot arrangement, but for most stations, you'll find this gives you all the flexibility you'll need.
A stereo board will have a second VU meter, so you can read the level for each individual channel. So with a little sharp listening and proper slider settings, you can get a good stereo sound. Each channel can be individually controlled by you, and can be balanced just as you like. After all, you're running the show.
And just what kind of show can you run? Suppose you work for a local radio station and you are just coming on duty. The preceding show comes from another control room. You have a live news special coming from your studio, so you'll handle the station break and the show from here as soon as an engineer gives you the signal your studio has been put on the line. So you have to set some things up in advance. Here's what you have to have ready to go on the air. You start with a commercial, :30, for Icy Cola. That's all on a cart. Following that is a :30 spot for a local merchant running a sale "this weekend only." It's got music in the background and you will be reading the copy over it, so that means you'll need a record ready for the music. Next is an ID, and that is also on a cart.
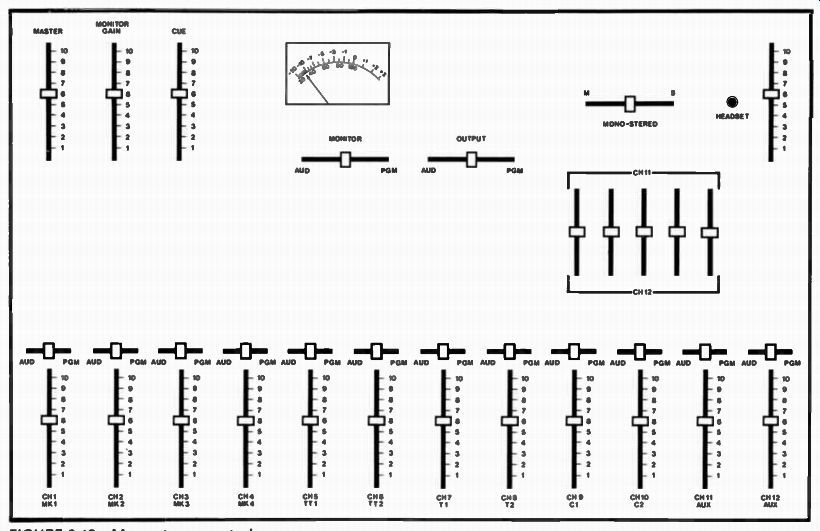
Fig. 13 Mono-stereo control
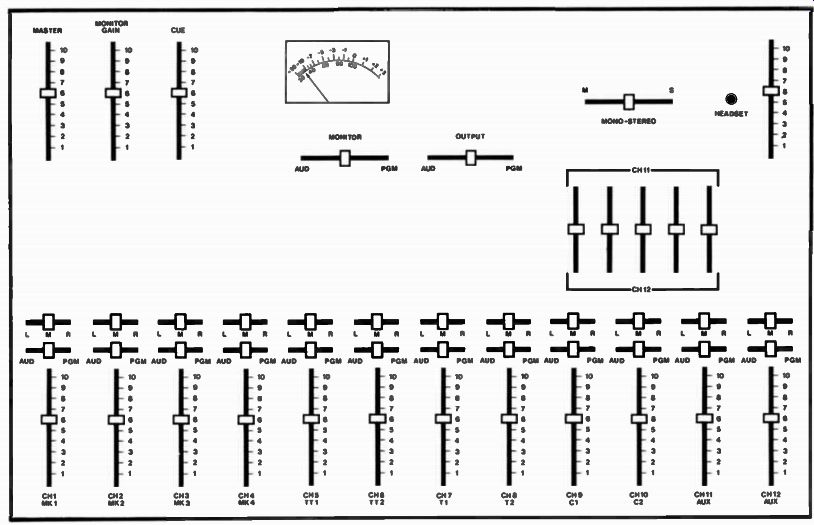
Fig. 14 Stereo positioning

Fig. 15 Full board
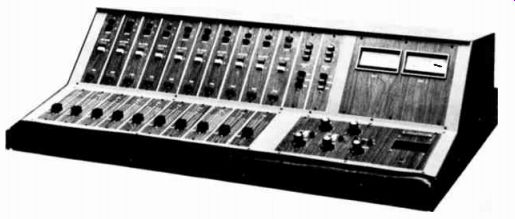
Fig. 16 A mono radio board
Then the news special begins. It has a theme, also on a cart, but the introductory copy changes every week so you will be reading that over the theme. Then the news person in the studio starts in. Part of the special includes reel-to-reel tape which has been edited by the news department. So where do you start? Come into the control room early, so you can check every thing out. Push the master gain up about halfway. Flip the monitor key to "program." Push up the monitor slider. Flip the output key to "program." Now you can check out the levels of the various sound sources, but nothing will go on the air as the engineers have not yet made this studio live. Have the newsperson go into the studio and sit in front of the mike.
Check to see where the mike is plugged in, that is, into line 2, 3, or whatever. Go back in the control room, flip the key for that mike to "program," and move up the slider. Give a signal for the newsperson to start reading the script, and adjust the slider to give the right level. Remember the moving needle of the VU meter should go no higher than 100. Shut off that mike by flipping the key to the middle and by signaling the newsperson to stop reading. Don't kill the mike by pulling the slider down unless you also mark the level by putting a grease pencil mark on the board or write the level down on a piece of paper. Otherwise, why check for a level at all? Next, turn on your mike: slider 1, key to program, slider pushed up. Read part of your copy and check your level. Shut off the mike and put on the record. That will be on slider 5 or 6, depending on which turntable you use. Flip the key, move the slider, and get a level. Then put the tone arm back to the start and cue up the record. We'll discuss exactly how to do that when we discuss turntables in detail. Once that's set, you can leave the key either off or on "program." No sound will come through till you start the record, so you are safe either way. You have three carts to play, first the Icy Cola, then the ID cart, and then the theme music. But you have only two cart machines. That's OK though, because one plays at the very first and the third one plays quite a bit later. So put the Cola cart in one cart ma chine, flip the key and push up the slider, start the cart, and check the level. Again, we will talk more about carts a bit later on. Now you are just worried about getting through a station break and a program opening. Put the ID cart in the other machine, flip the key to "program," raise the slider, and check the level. Carts will run after the recorded material on them is finished, that is, until they get back to the beginning.
Let them go to that point; that automatically cues them up again. Then remove the Icy Cola cart and put in the theme music cart. Check it for level. The two carts will probably have two different levels, so you will want to make a note somehow of what each level is. If you are marking the board with a grease pencil, a "C" for Cola and a "T" for theme would do it. The same holds true for a written note. The Cola cart may have a level of 6 (the slider is pushed up to that number on the scale beside it), while the theme runs at 7 1/2. This is information you will need. Once you have set the theme level, let it recue, then take it out and put in the Cola cart again, as it runs first. Be sure to set the right level. Now put the reel-to-reel tape up on the tape deck. (Once more, we'll get into tape deck details later on.) Here, the newsperson may be able to help you, or hopefully you can read the script the news department gave you to tell what part of the tape you are to use and what it contains. Flip the key, open the slider, turn the tape deck on, and check the level. Once you have it, go back to the start and cue up the tape. You are set for all your levels. Now you wait for an engineer to tell you your studio has been put on the air.
That may be by a headset line, a red light going on, a hand signal through a window, or any number of ways. But once the signal is given, here's what happens.
Flip the first cart machine's key to "program" (if you didn't leave it there) and start the cart. The Icy Cola commercial runs.
You take a look at the clock so you will know when it will run out (:30). Check to see the turntable key is in "program." Put one hand on the turntable off-on switch and the other on the key for your mike. When the Cola commercial stops, start the turntable. Move the slider down now, open your mike, and start to read the local merchant's copy. The music started full, but it has to be a good deal softer so you can be heard. There fore, you have to pull the slider down. The two sounds together--your voice and the music-should not total over 100 on the VU meter. While you are reading, the Cola cart will recue to its beginning. Keep reading, but reach over and remove it from the machine. Put in the theme cart and reset the level on the slider.
Now get ready to kill the record and hit the ID cart machine.
Be sure the key is in "program." Don't worry about your mike, as you can simply shut up. When you finish the commercial, kill the music by flipping the key off, and hit the ID cart ma chine. While the :10 ID in running, check the other cart machine.
Is the key right, and the level up? That's the theme for the show. When the ID finishes, start the other cart machine. Don't worry about the ID cart, as there's no sound on the rest of it anyway. The theme music is up full, so take it down the way you did the record and read your opening copy over the music.
Your mike has been open since the commercial you read, so you don't have to worry about keys. Get ready with one hand to signal the newsperson in the studio and with the other to take out the music.
But how will you get the studio mike open? You can assume that once you give a signal to stand by, the newsperson won't be talking, so open the mike. If, before the show, you have told the person you will open the mike as soon as you give the stand by signal, you can be reasonably certain you won't catch any extra sounds from out there. Now you have that essential second hand free. When you finish reading the introduction, signal the newsperson and kill the music. Now kill your mike, as you have nothing left to say. Follow the script so you will know where the reel-to-reel tape comes in. Check to see the key and level are right and get set to start it. At the right moment, start it and kill the mike in the studio. If you don't kill that mike, the monitor in the studio won't work (that's to prevent feedback) and so the news person won't hear what's going on the air. As long as a mike in the studio is live, the monitor is dead. Hence no feedback, but also the people out there can't hear the show.
In an instance like this, hearing the show is essential, so when the newsperson stops talking, kill the mike. The monitor will come on, and the show can be heard. Also, coughing or clearing the throat might be essential, so give the newsperson a break.
And so you got through maybe as much as 3:00 of material.
It's all a matter of switches and dials.
I've been talking about a particular radio board as if all boards were exactly the same. They aren't. What I've described is generally the same as all boards, but the details of almost every board in existence are different. Each station or radio operation will have specific things the board should do which other operations won't need. So the boards either get modified by the manufacturer or by an engineer working for the buyer so as to fit particular requirements. Many stereo boards, for example, have not only a stereo-mono key, but a stereo-left or a stereo-right position as well. That is, the sound you pick up in stereo right may be only the right channel and that's all you would send out. Or it may be that stereo right puts all sounds into the right channel, which is being broadcast. It depends on what is wanted. All boards will work basically in the fashion I have described. So basically you can work any board you walk up to. The only way to find out about the peculiarities of a particular board is to have someone familiar with it point them out to you. They will all be in the "flip a key, move a slider" tradition though, so you'll feel right at home.
Now let's take a closer look at some of the elements which feed into this radio board. First off, let's see what microphones are like.
MICROPHONES
Broadcasting equipment is almost always involved in the changing of energy from one form to another. Sound, for example, is a movement of molecules in the air. Radio gear changes that movement into a form of electricity. That electrical energy gets changed around, sent out as "electromagnetic waves," picked up by your receiver and changed back into electrical energy, and then changed back to a movement of air molecules. So the whole process is changes from one form of energy to another.
The technical concern is that the changeover creates as ac curate a pattern as possible. If the changeover takes a note, say B-flat, and changes it to an electrical wave one-inch high once and one and one-eighth inches high the next time, then the changeover isn't giving an accurate pattern. You might end up with a B-flat and a C when both notes are supposed to be the same. All the transformations from one form of energy to another are called by one name-transduction. Change air molecules into electrical energy and you have transduced the sound into electricity. Engineers are concerned that transduction be clean, accurate, and introduce as little extra material as they can manage.
In audio, the first step in this transduction process is changing the sound, those moving molecules of air, into electrical energy. That's done with a microphone. Microphones are machines that move with the air, and that movement creates an electrical flow. That seems impossible, but it works. There are four different types of microphones, all of which can do exactly this. They are called dynamic, ribbon, crystal, and condenser.
Crystal microphones are cheap and not very good in sound quality, so you seldom run into them in any situation where good sound is a requirement. They work like this: a diaphragm is fastened to a small piece of a crystal-not glass, but a crystal like a crystal of salt. The diaphragm is very thin, and when the moving air of sounds hits it, it moves too. That movement twists the crystal a bit. Certain crystals give off electrical impulses when one side moves and the other doesn't. So the sound moves the crystal, which twists a bit and gives off electricity. More sound, more twisting, more electricity. Less sound, etc. Certain ceramic elements have been made that act like these crystals, so you often run into ceramic mikes now instead of crystal ones. The principle is the same, and unfortunately the quality is about the same, although that may improve with a bit of research. With either one, it's a way to change sound into electricity.
The next way is with a dynamic microphone. Again, sound moves a diaphragm. This time the diaphragm is connected to a small coil of wire. A coil of wire moving in a magnetic field will give off an electric current. So you put this small coil between the poles of a magnet and you can once again change sound into electricity.
A ribbon microphone, in essence, combines the diaphragm and the moving coil. A thin ribbon of metal is put between the poles of a magnet. It moves as sound hits it, and just like the coil of wire, it gives off a current. Once more, sound is converted into electricity.
Finally, we have the condenser microphone. Here you feed electricity to the mike. The diaphragm is not very far from another metal plate, and electricity can flow across the diaphragm to the other plate. As sound hits the diaphragm, it moves closer or farther away from the plate. That makes it easier or harder for the flow of electricity to continue. So sound here creates a difference in the flow of electricity, and that creates as good a pattern of changing sounds as any of the other systems.
Each system has some advantages and some shortcomings.
Crystal, as I mentioned, isn't too strong on quality. But the low price is a particular advantage for some situations. Most home recordings don't need great fidelity, and most people won't lay out hundreds of dollars for a mike, so crystal is perfect for the home sound movies or a small cassette recorder.
It's also subject to humidity changes, to heat, and to shock (like being dropped). So it's fairly fragile.
Dynamic mikes, on the other hand, are rugged. You can't pound nails with them, but an accidental drop probably won't destroy them. It may, but it probably won't. They respond to frequencies in a particular way, though. They pick up low notes from all around them, but high notes will only be picked up from one particular direction. If a dynamic mike were turned slightly away from a soprano, you would lose much of the value of her voice. A baritone would be fine though.
The ribbon mike can carry this one step further. For sound sources close to the mike, bass notes are emphasized. All the other frequencies are reproduced very well by ribbon mikes.
Sopranos and violins sound very good over a ribbon mike. So do bass drums. But put an announcer with a thin voice close to this mike, and the bass qualities get more emphasis than is realistic. That, of course, can be an advantage to the guy with the not-so-hot voice. Generally, though, the good fidelity of these mikes is their strong point. They are somewhat more fragile than dynamic mikes, and if you have them outside, they respond a lot more to wind noise. They are generally pretty bulky mikes too.
Finally, we come to the condenser mikes. Their frequency response is quite good, good enough that they are very popular for accurate music recording. But they are fragile. They never belong outside, and they should be protected from shocks and bounces. But being careful is a small price to pay for their accuracy.
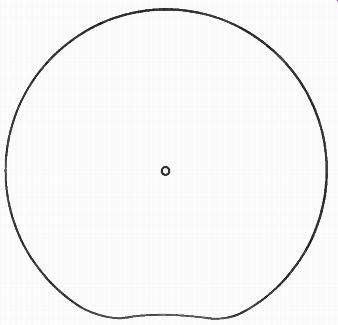
Fig. 17 Omnidirectional pick-up pattern

Fig. 18 Bidirectional pattern Fig. 19 Cardioid pattern
I've made some reference to how microphones pick up sounds-high notes from one direction only, bass notes emphasized from close in. The areas from which mikes pick up sounds is another of their characteristics. This is referred to as their pick-up pattern, and the basic patterns are named omni directional, bidirectional, cardiod, and unidirectional. If you know a little Latin, the meaning of all these patterns will be obvious. "Omni" means "all," so that pick-up pattern is from all around the mike. Crystal and dynamic mikes often have this pattern.
"Bi," of course, means "two," so these mikes pick up in two directions, generally from directions opposite each other.
This is a common pattern for ribbon mikes.
"Cardiod" is related to the heart, so the pattern is heart shaped. Condenser and dynamic mikes often use this pattern.
Finally comes the "uni," or "one" directional mike. Ribbon and dynamic mikes can be unidirectional. If the mike is extremely unidirectional, it is sometimes called a shotgun mike because it looks like a shotgun and has to be aimed right at the person speaking in order to pick up the sounds. You probably have seen these long mikes at presidential news conferences where one reporter is picked up from way back in the crowd just by aiming the mike toward that specific location.
That's one advantage of a shotgun mike-you can pick up someone from quite a ways away.
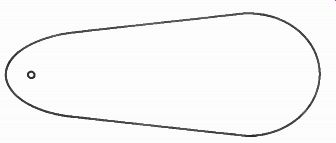
Fig. 20 Unidirectional pattern
No one type of mike has a monopoly on a particular pick-up pattern. Mikes can be built on various principles and with various pick-up patterns so as to meet certain requirements.
On the other hand, not every type of mike can have every pattern. A ribbon mike will inevitably lose fidelity as a person walks around to the side of it and is then talking to the edge and not the flat side of the ribbon. It can't possibly move well with a voice from edge-on. That's why ribbon mikes are generally bidirectional; they work off both sides of the ribbon.
By knowing what setting you have, where people will be, what other sounds will be around, whether some frequencies need to be damped down or others emphasized, and whether high demands of accuracy are essential, you can pick the mikes or mike you need to use. You can tell people where to stand and where to move. You can make someone seem a long way off by having them "off mike." Have a person stand at the edge side of a ribbon mike when s/he starts talking, then move around to the front side of the mike, and s/he can sound like s/he is walking up from yards away when in reality s/he is only moving a couple feet and is never any farther than a foot away from the mike.
Mikes generally are mounted somehow. We've all seen speakers on a platform raising and lowering a mike stand; that's one sort of mike support. A heavy base directly beneath a mike is common for a desk support. The reporter's hand is the most common support for the interview mike. In any case, all these mikes have a cord running from them to a connection some where. In the studio, it's in the wall. Out in the field, the re porter's mike cord goes into the portable tape machine. This cord can be disconnected from the wall or the tape machine.
Quite often it can be disconnected from the mike itself. One end or the other of the connection will have a series of pins in a metal sleeve. They are arranged in a particular pattern. Don't try to cram together the cord and mike, or the cord and tape machine. Look at the pattern of the pins and line them up with the holes of the connection. When you are taking off the cord, somewhere there is a tab to push or a slider to pull back. That releases the tension on the connection and makes it very easy to separate the two. Also, after you have pushed the tab or slider, pull them apart by holding the metal sleeves. Don't pull on the wires as that only pulls apart the connection inside the sleeve and you're left with loose wires in one hand and the still-connected sleeves in the other.
Sometimes, if you place two mikes of the same type fairly close together, they will interact with each other and give you a boomy, hollow sound. Using different mikes that don't share the same pick-up patterns or frequency characteristics will eliminate the problem. So will moving the similar mikes farther apart. Other problems you should rapidly learn to avoid come from the clowns who whistle into mikes, yell, or tap them with pencils. These are all sudden, high-level sounds which cause the diaphragms to move rapidly and extensively. And that can tear them loose from their supports, thus destroying the mikes.
Mikes, with all their foibles, strengths, and problems, are only one source of sound for the board. They may be basic in that all other sources use them at the beginning, but by the time we come to the board, we encounter the tapes and records that were made using the mikes to pick up the sound. So as far as we are concerned, mikes are only one of our sound sources.
There are others-records for example. Records are too familiar for me to need to say anything about them. You probably handle records regularly. But there is an aspect of the equipment that goes with records that we need to talk about.
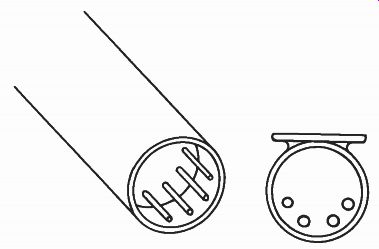
Fig. 21 Connector and outlet
TURNTABLES
Go put on a record, then come back and read this.
You just dealt with a turntable, and I'm sure it was a very familiar experience. You put a record on it and turned some sort of switch. That one switch may have started the record turning and at the same time started the tone arm over toward the first grooves. Or it may simply have started the record turning, leaving it up to you to place the tone arm on the record.
The latter method is what you'll encounter in a broadcast studio.
The gear will be familiar, but with some few extra considerations to keep in mind.
For example, you'll never find a changer in a broadcast studio. The turntables there handle one record at a time, not a stack. The station's concern is double-both the quality and the durability of its equipment. With a changer, the tone arm has to accommodate differing heights. With one record, the arm may slant down a bit. With five, it may be tilted up. All this changes the geometry back at its pivot point. That can cause a lot of design problems, so it's simpler just to figure on one record at a time. That way, the arm always plays at the same angle. With fewer problems, fewer considerations have to be taken into account, and hence the design can be simpler. A simpler design means fewer problems with the equipment. Re member, this equipment is going to be in use in some stations as much as twenty-four-hours-a-day, seven-days-a-week. It has to be rugged and reliable. So one record at a time, and a tone arm you place on yourself, not some system that moves it over for you. Basic.
But an equally important consideration is the quality of the sound. Broadcasters know their signal gets degraded (their word) by passing through even the finest of equipment. Think of it this way. Take a perfectly clear piece of glass and put it between you and some object. You can still see the object plainly. Now add another pane of glass. And another. And an other. And another. As you go on with this process, the object remains visible, but it does get dimmer and dimmer. Even the most transparent glass affects the "transmission" of sight. So the broadcaster figures the same way. S/he therefore tries to put out the best signal possible at every point in the system.
As with any reach toward perfection, it's ultimately the little things that count.
So with the studio turntable and tone arm, you'll be dealing with a familiar piece of equipment, but one you'll probably have to regard a bit more carefully in ways that may seem minor.
But those are the little things that matter. Obviously, you'll want to be careful of the needle, or stylus, to see it doesn't get hit or dropped which might chip it or break it off. But don't do something like running a fingertip over it to see if you have sound. That puts a lot more force on it than even the loudest passage of music. It also leaves a deposit of oil which will then be transferred to the grooves of the record. You also have to be careful when you cue up a record--but more of that later on.
The turntable itself may seem like there's nothing you can do to hurt it. You either turn it off or on and that's it-but not quite. You can select one of three speeds (generally) at which it can run. Or you can leave it in neutral with the engine running, much like a car. It's getting into the right gear that's the problem. Think of the turntable as a wheel. Inside the rim of this wheel is a group of three smaller wheels. Depending on what speed you pick, one of these three wheels will be put in contact with the rim of this turntable-wheel. As the smaller wheel turns, the rim turns with it, thus giving you the speed you want. Now suppose the rim is sitting motionless but the engine is running. That means the three little wheels are all turning but not touching the rim. If you pop the turntable into a speed, one of the wheels will be put up against the rim. As with any moving object and stationary object, when they first meet, something slips. That means you wear a bit of the rubber off the little wheel (which is usually rubber covered) as it slides on the rim at first. So put the turntable in gear before you turn on the engine. Don't waste the durability this equipment is built for.
When you're through with the turntable, don't just turn it off. Put it in neutral so the little wheels aren't touching the rim.
If you leave a wheel pressing against the rim, this can eventually cause flat spots on the wheel. The rubber gives, but the metal of the rim doesn't. So leaving rubber pressed against metal causes flat spots. That can cause an uneven turning of the turntable as the little wheel goes from flat, to round, to flat.
Think about how smooth your car ride would be if your tires were square-an extreme example of flat spots-rather than round. That's the idea of what can happen with a turntable.
Now let's get back to cueing a record. You want to be able to start exactly at the beginning of the music. But since the first few grooves are silent, how do you get beyond them? Put the turntable slider down into cue, turn up the cue monitor loud enough, put the tone arm on the record, put the turntable in gear, and start the motor. The record starts to turn, but there is no sound yet. As soon as you hear the first sound, flip the turntable into neutral and stop the turning of the record with your free hand. Do this gently so the stylus doesn't pop out of that groove. You're very close to the first sound, but not exactly there. Since the turntable is in neutral, you can spin it backward. Do that until you don't hear any sound at all. When you think you are sitting on the first sound, and you can rotate the turntable back and forth to make sure, then go on back about one-third of a turn for a 33, a half turn for a 45, or a full turn for a 78. Turn the motor off and put the turntable in gear.
Your record is now cued, ready to start on the first sound. But, you say, you're back from that first sound a little way. Yes, be cause the turntable won't instantly come up to speed when you start it. If you were resting on the first sound and started the turntable, you would get a "wow," a kind of wobbly, low-pitched sound that builds up to the proper pitch as the record gets up to speed. To avoid this, you give a bit of silence at the beginning so everything is up to speed by the time the sound is reached.
The silence only lasts for a split-second anyway.
There are two ways to start a record once it's been cued.
Move the slider up out of cue, turn the motor on; and since the turntable is in gear and ready, it will come up to speed and hit the music almost immediately. But some people believe they can shorten that "almost" by another method. With one hand, they gently lift the record by pressing an edge up a bit.
The record is now off, but infinitesimally off, the turntable at one point. With the other hand, they start the motor. The turntable starts turning, but under the raised record. Yes, it does rub a bit on the record, but the record is tougher than the surface of the turntable, so nothing is hurt. The turntable is now up to speed, so to start the record they just release their hold. The record drops on a spinning surface and almost immediately starts turning at the same speed. It slips a bit at first, which causes a bit of a delay, but these people feel this delay is shorter than waiting for the whole thing, turntable included, to get up to speed. So they don't have to turn back quite so far when they are cueing up records. This method, for obvious reasons, is referred to as a slip cue. Try both ways and see what you think.

Fig. 22 A magnified view of a quad disc groove. The small waves give third
and fourth channel information; the major sidewall movements give stereo
information.
Now that I've told you all that, let me tell you that some times you can't cue a record at all. You have to be content with a bit of silence before each record. The reason goes back to those little differences that make for better quality. If you are working in a stereo set-up, the stylus and the cartridge it's in are more delicate than they are in mono. The reason is the record groove the stylus runs in. For mono, both sides of the groove are the same; as one side waves left, so does the other side. The stylus has to respond to this leftward wave and nothing more. But in stereo, the sides may be doing opposite things. The left side may be a singer's voice and may wave to the right. Meanwhile, the right side may be the orchestra and at that point may wave to the left. So the stylus has to move in opposite directions on its opposite sides. To pull off that trick, it has to be in an extremely flexible mounting and free to move a lot. If you try rotating a record backward under a stereo stylus, the poor thing will try to follow, but will just end up bending back its fragile support. Suddenly your stereo stylus is crumpled and angled wrong to play. So with a stereo pick-up, you just have to put the tone arm at the first of the record and suffer through the little bit of silence. Always check, then, to see if your stylus and cartridge are mono or stereo.
Ask an engineer, the production manager, or the program director. But check first.
If you don't want the silence, you may want to record the music on tape, and edit it down to the first sound. Therefore, our next concern is with the various kinds of tape recorders.