by Dr. Frank P. Maloney
 -
-
-ty and the cross-modulation rejection of the tuner will be reduced some what. Second, baluns (devices used to convert a 300-ohm balanced transmission line to a 75-ohm unbalanced line) may exhibit significant losses if they are not terminated in 300 and 75 ohms. Lastly, antennas which are not nominally 75 ohms will produce standing waves on a 75-ohm transmission line. These standing waves adversely affect "stacking," the use of two or more identical antennas in order to increase gain and provide nulls to reject interfering stations. In this article, the design for an FM antenna which exhibits a good match to 75 ohms, as well as moderate gain and directivity, will be presented.
It is certainly true that the single most serious limitation to high-quality FM reception is the twin-lead dipole antenna. It is all too common to find a $500 tuner or receiver using a 394 twin-lead antenna taped to the rear of a bookshelf. These antennas suffer greatly from impedance variations and lack of directivity. To test how closely a twin-lead dipole antenna matches a 75-ohm transmission line over the 88 to 108 MHz FM band, the antenna was taped midway up a large wall in a stone house, and its impedance measured. The data in Fig. 1 show the voltage standing wave ratio, VSWR, as a function of frequency. A VSWR of 1.0 indicates a perfect match to a 75-ohm transmission line, and a VSWR less than 2.0 is usually considered acceptable. Notice the extreme mismatch over the band. Similar but not identical results are obtained with different placement of the dipole. Further, the lack of directivity, or ability to discriminate against signals coming from various directions, can worsen multipath problems. (Multipath is the reception of a given FM station from two different directions, usually the direct path and a reflection from a large structure. The two signals, which have travelled different path lengths, combine to cause amplitude modulation distortion.) Clearly, the dipole antenna is not the best for use with a quality tuner.
By investigating the literature concerning antennas [7-11] and reviewing the commercial realizations of these designs, we have formulated a design philosophy for an improved log-periodic dipole antenna (LPDA) for the FM band. Our philosophy is this:
a) We provide the details for the construction of an indoor as well as an outdoor antenna. The indoor model is simpler and cheaper to construct, and it is easily mounted and rotated in an attic. The outdoor model can be mounted high enough to provide superior reception. The raw materials for both are easily accessible.
b) The impedance must be nearly 75 ohms across the FM band. To accomplish this, we employ multiple feeders. Although this is slightly more expensive than using open-wire cross-feeding, as commercially available antennas use, the multiple feeders provide a substantially lower VSWR [10]. Ac cording to Bantin and Balmain [9], the feeders should be terminated in their characteristic impedance. This further lowers the VSWR by eliminating re flections on the feeders.
c) We use an additional dipole element at the low-frequency end of the antenna, which will serve as an active reflector at the low-frequency part of the FM band, keeping the gain high and improving the front-to-back ratio. Many FM stations in this frequency region operate at greatly reduced effective radiated power, and their reception requires additional effort on the part of the antenna.
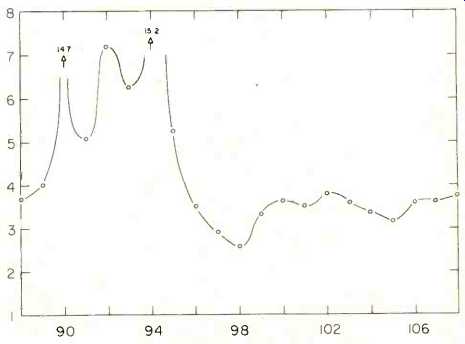
Fig. 1--The voltage standing wave ratio, VSWR, of a twin-lead dipole antenna
as a function of frequency in MHz over the FM band.
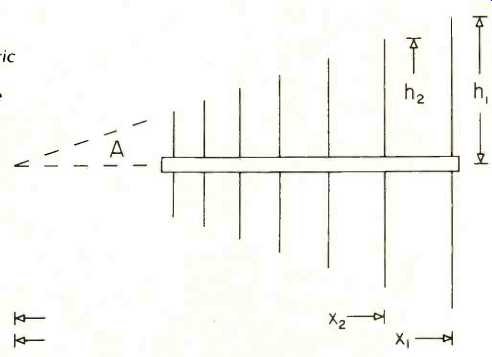
Fig. 2--The geometric parameters of a log-periodic dipole antenna (LPDA).
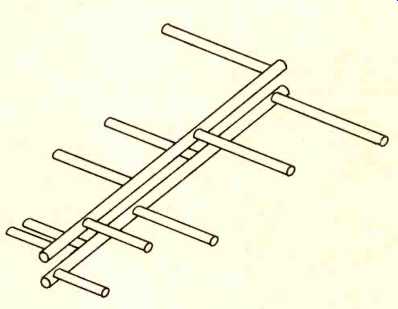
Fig. 3--A perspective view of an LPDA showing the arrangement of the dipole
elements.
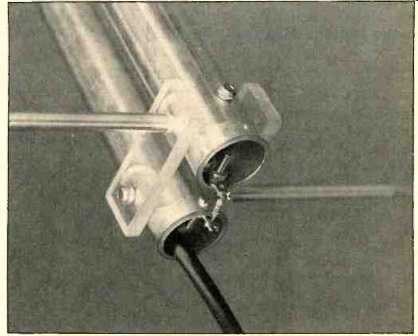
Fig. 4--The by end of the LPDA showing the transmission line feed point construction.
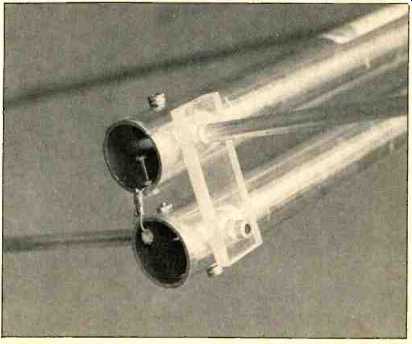
Fig. 5--The h1 end of the LPDA showing the 100-ohm resistor.
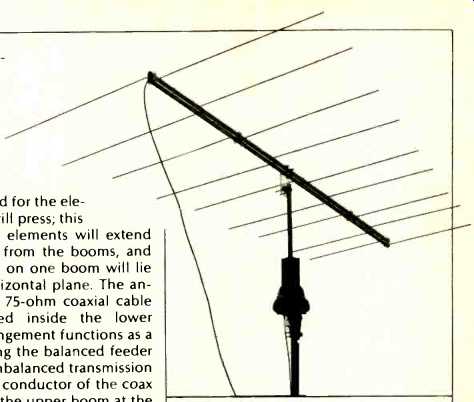
Fig. 9--The completed outdoor LPDA.
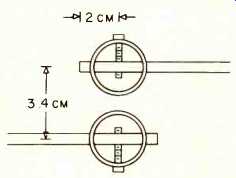
Fig. 6--Detail of the boom-element construction.
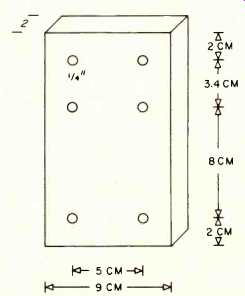
Fig. 8--Detail of the phenolic block used to attach the booms (upper four
1/4-inch holes) to the mast (lower two 1/4-inch holes).
TABLE I
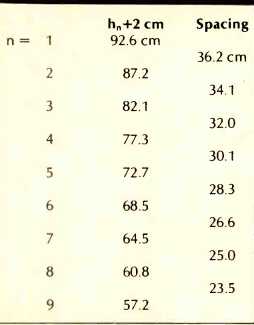
d) Most commercial antennas are designed to be shipped folded. The difficulty with such a design is that its success depends upon a friction fit be tween feeder and dipole for r.f. electrical continuity. In time, the contact oxidizes, yielding a rectifying junction. Our philosophy is that the metalworking required in the outdoor model provides for an antenna with superior weathering capabilities. This capability justifies the slightly increased cost and complexity.
e) The design must be amenable to duplication. That is, a second antenna, built within normal construction tolerances, must exhibit nearly identical characteristics (impedance, gain, position and depth of nulls). There are two reasons for this. First, if two antennas are to be stacked, they must be nearly identical in order for the advantages of stacking to be realized, and second, you, the reader, must be confident that the antenna you construct is as capable a structure as the ones described in this article.
A typical LPDA, shown in Fig. 2, is fully characterized by these parameters:
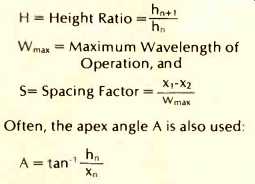
It is clear that H and A (or H and S) set the size, and therefore the gain and cost, of the antenna. Following DeVito and Stracca [10], we chose:
S=0.10, H=0.94, so A= 8.5 degrees, which will provide between 8 and 9 dBi of gain.
From Carrel [8], we find that the total number N of elements is 8. However, in order to increase the forward directivity of the antenna at the lowest frequency we will add an additional element, resonant at 82.73 MHz. This will make h2 resonant at 88 MHz. So we compute the element heights h and the spacings for N=9 elements. These are shown in Table I. Additionally, 2 cm are added to each of the element lengths in order to extend the elements through the feeders.
Outdoor Model Construction
The feed boom arrangement is somewhat different from other antennas (such as Yagi types) and is shown in Fig. 3. Elements are staggered on the two booms in order to properly phase the dipoles. The booms are drilled for the elements using a drill press; this insures that the elements will extend perpendicularly from the booms, and all the elements on one boom will lie in the same horizontal plane. The antenna is fed by 75-ohm coaxial cable which is routed inside the lower boom. This arrangement functions as a balun, converting the balanced feeder booms to the unbalanced transmission line. The center conductor of the coax is connected to the upper boom at the h9 end (Fig. 4). The shield is connected to the lower boom at the h9 end. The coax exits the boom at the h, end and is not electrically connected there, al though it would be wise to provide some manner of strain relief. At the h, end, the two booms are connected together by a 100-ohm, 1/4-watt carbon resistor (Fig. 5). This resistor properly terminates the feeder booms, which act as a 100-ohm transmission line for the dipole elements. It is best to surround all electrical connections to the antenna with noncorrosive RTV sealant to prevent weathering. The electrical connections to the antenna are made with #4-40 stainless or brass hardware.
The elements are held in place in the booms by drilling and tapping the elements to accept a #6-32 screw. The booms are drilled to accept the 1/4-inch diameter elements and the screws at right angles to these elements; see diagram (Fig. 6).
To properly space the booms at 3.4 cm center-to-center, eight plexiglass spacers (Fig. 7) are placed against both sides of the feeder booms, over the h3, h7 and h9 elements. The booms are spaced and connected to the mast by the phenolic structure shown in Fig. 8.
The mast, if metallic, must not contact the lower boom. In extremely windy areas, you may wish to use two such structures, on either side of the booms.
The booms are drilled to accept the 1/4 inch brass bolts. The completed antenna is shown in Fig. 9.
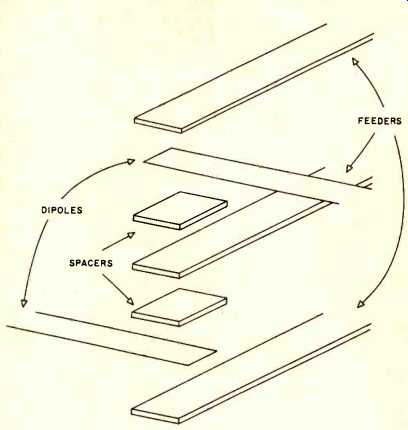
Fig. 10--The feeder-dipole-spacer sandwich.
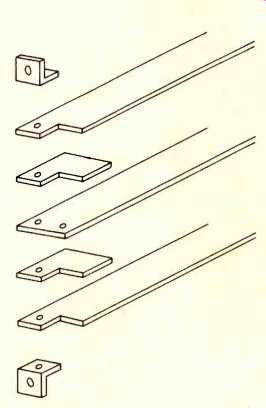
Fig. 11--Detail of the end construction of the feeder bars. The offset hole
in the center feeder for the #4-40 screw is for the connection of the resistors,
at the h, end, and for the RG 58 cable, at the h9 end.
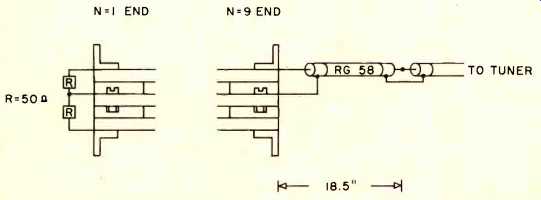
Fig. 12--Electrical connections to the feeders.
If you wish to construct the model for attic placement, you will need three lengths of 0.75 x 0.125 x 96 inch aluminum bar stock, available at most hardware dealers, for the feeders. The middle bar serves as a ground reference. The three feeders are spaced by 0.125-inch thick by 1-inch square plexiglass spacers. The dipole elements are formed from aluminum foil or, better, aluminum foil duct tape. The adhesive side of the foil tape adheres to the plexiglass spacers, not the feeders. This sandwich of aluminum and plexiglass is shown in Figs. 10 and 11, and is held together either with nylon screws through the sandwich or with nylon cable ties around the sandwich. The use of the center aluminum feeder bar as ground reference reduces its terminal impedance from 75-ohm balanced to 37-ohm unbalanced. To match this 37-ohm impedance to the 75-ohm transmission line, we use a one-quarter wavelength section of 50-ohm cable, RG 58 (not foam dielectric), shown in Fig. 12. The h1 end of the feeder assembly is terminated by a pair of 50-ohm, ¼-carbon resistors.
The ends of the feeder bars and the free ends of the dipole elements are attached to lengths of 1 x 2 inch fur ring strips, two of 96-inch length, one of 72-inch length, and one of 44 ½-inch length. The angle brackets shown in Fig. 11 attach the feeder bars to the frame, and the free end of the dipole elements may be tacked to the frame. The entire structure may be perched, suspended, or rotated in the attic by any means which you may find convenient.
Measurements
We subjected the antennas to a number of tests in order to verify their performance. It should be stated that neither antenna was tuned or other wise adjusted to achieve these specifications. First, we measured their impedance and converted the impedance to VSWR; the results are shown in Fig. 13. Notice the much improved performance over that shown in Fig. 1. Second, we measured the gain at three frequencies--88, 98, and 108 MHz--by using a standard gain dipole. The results were 8.5, 9.5, and 9.0 dBi for the outdoor model, and 8.5, 9.0, and 9.0 for the indoor model at the respective three frequencies. The ac curacy of those measurements is ±1 dB. Clearly, the antennas are achieving the design target for gain. Lastly, we measured their azimuthal power pat tern at 88 and 103 MHz under conditions similar to actual home use, and not inside an anechoic chamber. The results, again with an accuracy of ±1 dB, are shown in Fig. 14; the data for the two models were nearly identical. Notice the depth of the nulls at about ± 90 degrees. These positions can be used to null out interfering stations. Further, the front-to-back ratio is about -20 dB.
These antennas have been in use for about a year and have provided a vast improvement in the FM performance of our audio system. In tests, the combination of an inexpensive tuner and the LPDA consistently outperformed a very expensive tuner and the twin-lead dipole. With local stations, multi-path distortion was measurably lower and cross-modulation interference was nonexistent with the LPDA. With distant stations, the LPDA provided superior signal-to-noise ratios and a complete absence of alternate channel interference. The combination of a more expensive tuner and the LPDA was quite superb. Further, three other LPDAs have been constructed, all exhibiting characteristics nearly identical with the first. We would certainly en joy hearing from readers who build the antenna or who have questions regarding this article.
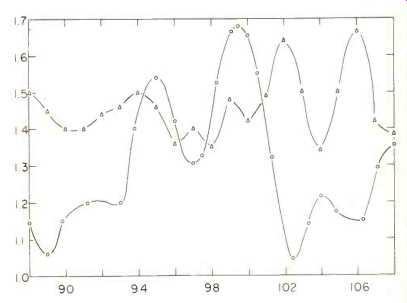
Fig.
13--The VSWR of the LPDA as a function of frequency in MHz over the FM band.
The circles denote the outdoor model, the triangles denote the indoor model.
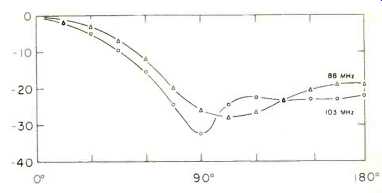
Fig. 14--The azimuthal power pattern, in dB below the maximum, as a function
of azimuthal angle in degrees.
Acknowledgements
I wish to acknowledge the efforts of Messrs. R.J. Maloney, M.K. Hart, R.S. Flagg, and H.H. Bradley for their efforts directed toward the development of these antennas.
References
1. Salvati, M. J., "What Kind of FM Antenna is Best for You?" Audio, Jan., 1978, pg. 30.
2. Salvati, M. J., "Transmission lines and Signal Distribution," Audio, Feb., 1978, pg. 54.
3. Salvati, M. J., "Reception Problems," Audio, March, 1978, pg. 36.
4. Salvati, M. J., "Complete Antenna Systems," Audio, April, 1978, pg. 42.
5. Salvati, M. J., "Special Antenna Techniques," Audio, Jan., 1979, pg. 42.
6. Modafferi, R., "Kill FM Interference with Two Antennas," Audio, Jan., 1980, pg. 68.
7. Isbell, D. E., "Log-Periodic Dipole Arrays," IRE Transactions on Antennas and Propagation, Vol. AP-8, May, 1960, pp. 260-267.
8. Carrel, R. L., "The Design of Log-Periodic Antennas," 1961 IRE International Convention Record, Vol. I, pp. 61-75.
9. Bantin, C. C. and K. G. Balmain, "Study of Compressed Log-Periodic Dipole Antennas," IEEE Transactions on Antennas and Propagation, Vol. AP-18, March, 1970, pp. 195-203.
10. De Vito, G. and G. B. Stracca, "Comments on the Design of Log-Periodic Dipole Antennas," IEEE Transactions on Antennas and Propagation, Vol. AP-21, May, 1973, pp. 303-308.
11. Butson, P. C. and G. T. Thompson, "A Note on the Calculation of the Gain of Log-Periodic Dipole Antennas," IEEE Transactions on Antennas and Propagation, Vol. AP-24, Jan., 1976, pp. 105 106.
PARTS LIST
*Should you experience difficulty obtaining such a small quantity of the RG 58 cable, send $1 to: Communications Electronics, 672 Sproul Rd., Bryn Mawr, Pa. 19010. They will send, via first-class mail, the cable and the two resistors.
(adapted from Audio magazine, Jan 1981)
= = = =
Also see: