
Manufacturer's Specifications
Frequency Response: 20 Hz to 18 kHz,-±3 dB; to 19 kHz with CrO2 tape: to 21 kHz with metal tape.
Harmonic Distortion: 0.5%.
Signal/Noise Ratio: 60 dB; 75 dB with Dolby C NR.
Input Sensitivity: 70 mV.
Output Level: Line, 410 mV; headphone, 1.3 mW at 8 ohms.
Flutter: 0.028% wtd. rms, ± 0.08% wtd. peak.
Fast-Wind Time: 90S with C-60 cassette.
Dimensions: 17.3 in. (440 mm) W x 4.1 in. (105 mm) H x 14.6 in. (372 mm) D.
Weight: 19.1 lbs. (8.6 kg).
Price: $799.95.
Company Address: P.O. Box 6010, Compton, Cal. 90224.
The GX-R99, Akai's top-of-the-line cassette deck, offers many performance and convenience features, including what the manual calls a "four-way approach to best recording." The first part of this approach is the Super GX 3-Head Quick-Reverse System. The three-head configuration, of course, provides off-the-tape monitoring while recording; it also allows head design to be optimized for the separate record and playback functions. Akai states that the heads, made of glass and crystallized ferrite, have wide dynamic range and excellent resistance to wear. The record and playback heads share a small platform which rotates when the tape reverses, allowing recording as well as playback in both directions. Precisely placed stops ensure good alignment in forward and reverse play.
The second part of the four-way approach is the closed-loop, double-capstan, direct-drive transport. The two capstans are of slightly different diameter to prevent resonance buildup, but the transport is otherwise symmetrical for uniform transport performance in both directions. An "inverse-current" chrome-plating process gives the capstans a harder, slightly rougher surface than usual, for greater durability and a better grip on the tape.
The third part of Akai's approach is the unusual and sophisticated CRLP (Computer Recording Level Processing) system. It does more, much more, than simply adjust levels: CRLP will set the optimum record EQ and bias for the tape being used, measure the tape's MOL characteristics at 400 Hz and 8 kHz, and set the recording level to the maximum possible without causing undesirable distortion and tape saturation. It will do all this with the push of a single button in less than 15 S. The bias and EQ tuning is particularly speedy, taking just 2S or so, even with two rechecks of the adjustments. This all sounds a bit fantastic, but as my measurements showed, CRLP does indeed do marvelous things.
The fourth special feature is what Akai calls their High Tuned DC Amplifier. The use of coupling capacitors is minimized and many high-quality devices are used, including some custom-made components. Amplifier operation is stable, due in part to the high-speed tracking regulator in the power supply. The Dolby NR block is separated from the main amplifier block to eliminate mutual interference.
Control Layout
At first look, with the power turned off, the front panel of the GX-R99 looks very neat and perhaps a bit too simple, with relatively few pushbuttons and no controls or indicators in evidence. However, when the "Power" button at the upper left is actuated, the large center panel, which had appeared black, illuminates to show the unit's many indicators and annunciators. (At this point the display format reflects the way the deck had been set when it was turned off.) Just below this panel is what appears to be a horizontal black bar labeled "CRLP" and bearing a small pushbutton labeled "Open/Close." A light push causes a drawer to move out from the front panel, revealing an array of light-touch switches with good-sized push pads. (These will be discussed later, in conjunction with the display panel.) At the upper left of the display is a pair of large, bluish-white arrows that show the direction of record/play. Just to their right, an annunciator set shows exactly what has been selected with the Dolby NR switches ("On/Off," "B/C," and "MPX Filter On/Off") that are located in the bottom row of pushbuttons just to the right of the display panel. To the right of these annunciators is the "Rev Mode" indicator, which illuminates, as needed, to show continuous play (the power-on condition), forward and reverse record/play, and single-direction record/play. The tape-reverse button is to the right of the display, just above the counter-mode control buttons; these are labeled "Reset," "Mode" (for selecting four-digit tape counter, elapsed time, or remaining time), and "Tape" (for setting "C90/C60/C46/LC46" in the remaining-time mode). The counter itself, with a counting-mode indicator, is in the upper-right corner of the display panel. In the remaining-time mode, the counter first shows "C90," and "Tape" is used to step to another length, if needed.
After the cassette has been in record/play for a short time, an internal calibration process leads to the display of the remaining time in minutes and seconds. Both remaining- and elapsed-time modes retain a basic calibration even in fast-wind, making this useful combination of features even more valuable.
Just below the counter control buttons are two others: "QMSS" (Quick Memory Search System) and "IPLS" (Instant Program Locating System). When in record or play mode, a push of "QMSS" will rewind the tape to counter zero and switch the deck into play mode. Pushing "IPLS" will enable the deck for fast-winding, which is started with a push of the transport-control button to advance to the beginning of the next selection or to return to the beginning of the present selection for automatic playback. When engaged, "IPLS" appears in the display panel, just below the large direction arrows mentioned earlier. This is a nice touch, serving to remind the user that in this mode only the directions of fast-wind are referenced to the direction of record/ play at the time. Pushing the play and fast-forward buttons at the same time obtains "Intro Scan," which fast-winds to the beginning of a selection, plays 10S, fast-winds to the next beginning, and so on.
There are many other things which appear on the display, and they are perhaps best explained in conjunction with a discussion of the switching contained in the "CRLP" drawer.
To the left are eight switch pads for control and display of levels: "Level/Balance," "Level-/ + , Balance UR," "Manu. Off (CRLP)," "Memory A," "Memory B," "Peak NU," and "Spectrum." Below the reverse mode and counter displays are a horizontal scale and bar display for either "Vol" from "0" to "10" or "BAL" from "L" to "C" to "R," with four steps each side of "C." Once "Level/Balance" has been used to select one of these, "Level-/+ , Balance UR" can be pushed down on the left for reduction in volume, or to shift the balance to the left channel. A quick push will get one reduction/shift step; a longer one gets a series of steps. Similarly, a push down on the right will either increase volume or shift balance to the right.
If a particular level setting is worth keeping, a push of "Memory A" (or "B") will store (for recall later) that setting a very useful feature for repeated recording from the same FM station, for example. A small, red LED in each memory button indicates if it has been selected. The record levels can be controlled automatically with CRLP (more on this later), but for manual control it is necessary to push "Manu. Off (CRLP)." It's not as confusing as it sounds, for "Manu." lights up when actuated, and "Off (CRLP)" tells the user that if "Manu." is off, CRLP will control levels.
The "PeakNU" and "Spectrum" buttons provide selection among three metering modes. With "VU" the two horizontal bar-graphs are for left and right channels, with the scale from "- 30" to " + 8" in between. The segments are bluish white to "0" and red above that. In "Peak" mode, the scale is shifted to show levels 8 dB higher, with markings from "- 17" to "+ 15." Selecting "Spectrum" gets an automatic switch to peak dynamics, but the upper bar-graph is now used to show levels in a band around 400 Hz, and the lower one shows the levels around 8 kHz. At the left end of the scales, "M. Low" and "High" appear in red, along with "Spectrum"-reminding the recordist of the special nature of this function. If the deck is in record mode, two little light squares appear along a dashed red line, with "MOL" and an arrow at the end. These squares show the maximum record levels for acceptable distortion for both low and high frequencies. (This outstanding feature will be discussed further below.) To the left of the MOL-limit line are annunciators for the tape type: "Norm/CrO2/Metal." In the right-hand section of the "CRLP" drawer are the "Rec Operation" switch pads: "Rec Pause" (with red status light), "Auto Mute," "Fader," "CRLP Rec," "Play" for either direction (with flashing arrow to match expected direction of recording), "AT Bias" for stepping from "Std" to "Under" to "Over" bias (each with its own indicator), "Monitor Tape/Source" (with helpful annunciators above the left end of the meter display), "Rec Cancel," and "Blank Search" (which has a red indicator).
Here are a few brief comments on some of these functions before a more detailed discussion of CRLP. A push of "Fader" when in "Rec Pause" will initiate recording with a fade up from zero to your preset recording level. When it is pushed during recording, there will be a down fade, followed by an auto-mute of 4 S and a return to "Rec Pause." Pushing "Rec Cancel" during recording will rewind the tape to the beginning of the just-recorded section, mute the recording for 4 S, and then put the deck in "Rec Pause." "Blank Search" initiates a fast-wind to locate the next blank section on the tape which is at least 3 minutes long, then automatically puts in a 4-S auto-mute section with a stop at that point. If no such open portion is found on the first side of the tape, the deck will automatically continue the search in the reverse direction.
For all of the useful features described above, the best is yet to come, for CRLP is a marvelous system. The whole process starts with a push of "Eject" on the left side of the bottom transport-control bar. ("Stop" is at the right of this bar, with fast-wind and play-direction control bars above; all three bars are at the far right of the front panel.) After the tape has been dropped into the carrier, the auto-tuning procedure begins when you push "Rec Pause." The cassette compartment closes automatically and the calibration recording begins, while a "Tuning" annunciator flashes in the display. In just a few seconds, the record sensitivity bias and EQ are adjusted for the best results, and a steady "Tuning" display shows that the process is complete. In this short time, analysis is also made of the 400-Hz MOL for a 3% distortion limit and of the saturation limit at 8 kHz. The little squares of the MOL display show the results of this speedy and very useful calibration. In recording, "Rec" appears, right under "Tuning."
If the deck is set for automatic level setting (non-manual), the level will be set automatically with 10 S of music and will reduce the level later if there are further increases in the music. If the content of the program is such that there is a desire to shift the MOL to closer match the high-frequency content of the music, "AT Bias" can be set to "Under" or "Over" for recalibration. The new MOL display will show the new low- and high-frequency limits. With the meters switched to "Spectrum," the actual 400-Hz and 8-kHz levels can be compared to the limiting levels. Because of the speed of the CRLP calibration, checking the possibilities is very convenient. Level setting, whether automatic or manual, is referenced continually to the distortion and saturation limits in the recording.
The cassette compartment at the left of the front panel can be pushed closed, but it is much easier to push the button for the mode desired and have it close automatically.
Between the compartment and the "CRLP" drawer are the pushbutton switches for "Timer Start" and "Rec/Play." Pushing down a little hinged flap on the lower right of the front panel reveals the headphone jack and the horizontal-slider, output-level control. The gold-plated, stereo in/out phono jacks and a socket for the optional remote control are on the back panel.
I removed the steel top and side cover of the GX-R99 for a look inside. The soldering was generally excellent, with flux restricted to some points that had been hand-soldered.
There were two large p.c. boards, somewhat larger than half-chassis size, stacked one above the other and containing most of the circuitry. Quite a few discrete transistors were noted on the top p.c. board, which was a bit springy.
There were also other cards for motor control, power supply, etc. All parts were identified by number. There were five fuses in clips, more than in a typical deck. The GX-R99 was very quiet in all modes--it was one of the quietest decks I have ever checked--and the drive had fairly rigid construction. The chassis was quite rugged, with three front-to-back rails at the sides and near the center.
Measurements
In my first check, the playback responses showed a high roll-off at the highest frequencies. Cross-checks with other alignment tapes and in the reverse play direction confirmed the initial results. There was no evidence of damage to the head mounting from shipment, but realignment was made for both directions, after which very good results were obtained with both equalizations. (The reader should be aware that misalignment can occur before putting any deck to use--it's best to have the dealer check/correct before purchase.) Tape play speed was about 0.7% slow, and level indications were slightly low (about 0.5 dB).
The Akai CRLP system did an excellent job of matching a great many tapes. The best results were obtained with TDK AD-X (Type I), Maxell UD-XL II (Type II), and Sony Metallic (Type IV). Very good results for Type I tapes came from BASF Pro I Super, Fuji FR-I, Konica GM-I, Maxell UD and UD-XL I, Memorex MRX1, Nakamichi EXII, Sony AHF and BHF, TDK AD, and Yamaha NR and NR-X. For Type II tapes, substantially all formulations yielded very good results; for Type IV tapes, BASF Metal IV, Denon DXM, Konica Metal, Magnex Studio 4, Maxell MX, Nakamichi ZX, TDK MA-R and Yamaha MR were very good.
The record/playback responses were run at Dolby level and 20 dB below that, both with and without Dolby C NR, with the best-performing tapes of each type. Figure 1 shows the responses using pink noise as the source, and Table I lists the-3 dB points using a discrete tone. The results were fairly good at 0 dB, but not impressive. At-20 dB, the results were excellent, and the Dolby C NR tracking was outstanding.

Fig. 1--Record/playback responses to pink noise, with (solid traces) and without
(dashed traces) Dolby C NR, at Dolby level (top traces) and at-20 dB (bottom
traces), for TDK AD-X (Type I), Maxell UD-XL II (Type II) and Sony Metallic
(Type IV) types (top to bottom in each set). Vertical scale: 5 dB/div.

Fig. 2--Level variations for 17-kHz tone in record/ playback mode (top) and
straight playback (bottom). Scales: 10 dB/ div. and 1 S/div.
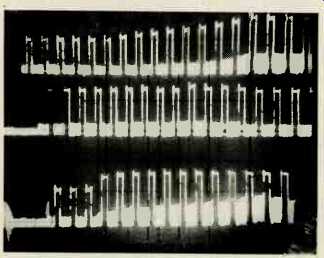
Fig. 3--Input/record levels for 500-Hz tone burst without (top) and with (center)
CRLP. Bottom trace shows CRLP action with the source level increasing from
30 mV to 5 V. Scales: 40 dB/div. and 5 S/div.
Level variations made it difficult to find the high-frequency-3 dB point in record/play mode, especially at 17 kHz. The effect diminished above and below that frequency, and disappeared entirely during playback with the recording circuits turned off. The variation was 30 dB or more (Fig. 2) during record/play, but in straight playback mode the level variations were very minor. I concluded that there was some form of coupling between the record and playback heads or circuits.
Table II shows a number of record/playback characteristics, with results from very good to excellent. The bias in the output during recording was very low.
Table III lists the figures for HDL3 (third-harmonic distortion) for the three tapes, with Dolby C NR, from-10 dB to the point where HDL3 equals 3%. The distortion at 0 dB was quite low for TDK AD-X and Sony Metallic, but not so for Maxell UD-XL II.
Table IV shows the signal-to-noise ratios for the three tapes, with and without Dolby C NR, for both IEC A and CCIR/ARM weightings. The results are very good, and a match for most premium-priced decks.
Table I-Record/playback responses (-3 dB limits).
Table II-Miscellaneous record/playback characteristics, using Dolby C NR.
Table III-400-Hz HDL3 (%) vs. output level (0 dB = 200 nWb/m).
Table IV-Signal/noise ratios with IEC A and CCIR/ARM weightings.
Table V-HDL3 (%) vs. frequency at 10 dB below Dolby level.
Table VI-Input and output characteristics at 1 kHz.

The levels of HDL3 from 50 Hz to 6 kHz, at 10 dB below Dolby level with Sony Metallic and Dolby C NR, are presented in Table V. These figures are quite good, but the rise in distortion for the higher frequencies is disappointing, albeit not unexpected with the earlier observation of the drooping 0-dB responses.
(Note: All tests were run with the "Std" setting of the "AT Bias" control. Slightly different results would have been obtained with the other two bias settings.) I decided to test the accuracy of Akai's CRLP MOL indications after calibration, using several different tapes and all three bias settings. The 400-Hz MOL indication was always placed at a level in the range of HDL3 equals 2.7% to 3.1%, and the 8-kHz indication was always as close as checking permitted to a level with 1 dB of saturation. This was a very impressive result, showing both consistency and accuracy in the measurement and display of these two parameters.
Miscellaneous input/output characteristics are presented in Table VI. Take note of the low line-output impedance, very tolerant of other equipment's input impedances. Incidentally, the headphone output (shown with the IHF-standard, 50-ohm load in Table VI) delivered 1.3 mW to an 8-ohm load, right to specification. The input-level attenuation, controlled in "Manual," was the same in both channels-within 1 dB for almost 80 dB down from no attenuation. The steps were about 0.25 dB down to-2, then 0.5 dB to-5, about 1 dB to-10, 1.5 dB to-15, 2 dB to-30, and 3 dB from there to maximum attenuation. I judged that an input level of 150 mV would make for good resolution on the level control when making adjustments. The output-level slider sections tracked very well over their entire range, with a narrow enough attenuation range (only 20 dB over most of its travel) to make precise adjustment easy. The balance control reduced level about 5 dB at either extreme. Levels were high for all of the phones I tried; some low-sensitivity phones might cause problems. The output polarity was reversed in "Source" but not in "Tape." The bar-graph meters had excellent resolution, with 24 segments for each channel and single-dB steps from "- 7" to " + 8." Almost all of these single-dB points were within 0.5 dB of actual, and all points were within 1dB, including "-25" and "- 30," where most meters show very poor calibration. In VU mode, the action was slightly slow, with 365 mS required for full response and with decay about 500 mS. In "Peak" mode, the response met all of the requirements for peak-responding meters, actually being on the fast side for response to a tone burst and the following decay. The meters showed correctly the effect of the burst being offset either in the negative or positive direction, proving they are true peak-responding meters-which most cassette decks' meters are not.
The measured flutter was very low, both in forward and reverse record/playback, 0.027% wtd. rms and ±0.042% wtd. peak. No tape-play speed changes were detected for line voltages from 110 to 130 V. Play-speed variations were within ±0.02% over a 2-minute period. The fast-wind time for a C-60 cassette was 95 S, slower than most decks, which might frustrate those in a rush. Loose loops were automatically taken up when cassettes were loaded. Mode changes, including the switch to stop mode when the tape ran out, took about 1S.
Use and Listening Tests
The owner's manual provides a great deal of detail on the GX-R99's many features, and there are numerous illustrations that support the text. There is good use of bold-face type and notes to aid the user.
All of the controls and switches were completely reliable throughout the testing, and I was constantly reminded of how well designed the control logic is. I found, for example, that the user can opt for flying-start recording (by pushing "Rec Pause" while holding "Play" down), but only if the tape in use has been calibrated-helpful, but not mentioned in the manual. I also found the "QMSS" will get a fast-wind back to "00.00" from any mode, another plus that's not mentioned in the manual. The GX-R99 "Auto-Monitor" seemed right so much of the time, automatically switching to "Source" with "Rec Pause," but going to "Tape" with tape movement in record or play modes.
The calibration/tuning with CRLP took about 3S unless level calibration was included. The level adjustment appeared to cover quite a level range, and I threw in a bench test at this point to verify what it was. The topmost trace of Fig. 3 shows the level from a 500-Hz tone burst as applied to the deck, with the level increasing about 30 dB over time.
The middle trace is the result of the action of CRLP, which kept the tone-burst record level at about 0 dB. The bottom trace shows the action on a burst that was increased in level from 30 mV to 5V, a range of 45 dB. The lowest levels were below the deck's sensitivity and could not be brought up further, but the increasing levels were controlled perfectly. I liked the use of manual level control as well, in conjunction with the excellent metering, including the very helpful spectrum and MOL display. I found all three counter modes helpful, and I really appreciated having the remaining- and elapsed-time modes-very few other decks have both. I was further impressed by the fact that the time modes kept a basic calibration during fast-wind, and I was pleasantly surprised when the remaining-time readout corrected itself shortly after a fast-wind to about 4 minutes from the end of the tape--finally showing "00.00" just as the tape heads reached the leader.
Playback was very good and quite satisfying, albeit not a match for my reference deck. When monitoring off the tape during recording, however, there was some veiling of high frequency details, due to the coupling effect mentioned earlier.
For test material, I used dbx-encoded discs, including recordings of Ravel's "Bolero" and Shostakovich's "Festival Overture," among others, by Morton Gould and the London Symphony Orchestra.
For a deck with many features and considerable sophistication, the Akai GX-R99 is easy and very convenient to work with. For the recordist who would benefit from its many features, especially the CRLP system, this deck should be included in any comparisons made among other multi-convenience decks at whatever price. For what it offers, the price of the GX-R99 is more than reasonable.
-Howard A. Roberson
(Audio magazine, Jun. 1985)
Also see:
AKAI GX-F66RC Cassette Deck (Equip. Profile, Nov. 1982)
Akai GXC-46D Cassette Recorder (Nov. 1973)
Akai AD-93 (DAT) Digital Audio Tape Recorder (Jun. 1988)
Ampex Micro 52 Stereo Player/Recorder Deck (Apr. 1970)
= = = =