
-------------
EDITOR'S NOTE: The Nakamichi folks have recently released a small booklet on the three-point recording system, entitled "The Nakamichi Live Recording System, "several parts of which are reprinted here. This technique makes use of a third or blend mic in addition to the more usual stereo pair to produce a greater sense of depth or space in the recording.
The system also allows a wider latitude in placing the basic mic pair to achieve the correct stereo or left-right image. While the basic technique calls for the use of a recorder with a third or blend mic input, tape decks with only a pair of inputs can be adopted to the technique if a mixer with a blend feature is used. The Nakamichi booklet also gives many valuable tips on relative levels and placement of mics for various instruments. It is available through the firm's dealers.
-----------
IN ORDER to understand the ad vantages of the three point pick-up system, it is necessary to be aware of the distinction between binaural and stereo. A good binaural recording makes a poor stereo recording and vice versa. The fact is that situations in which acceptable stereo recordings can be made with two microphones are severely limited in number.
The seemingly simple case of a solo instrumental performer on stage serves to illustrate this point. A recording made with two cardioid (uni-directional) microphones, when played back over monitoring loudspeakers, will in most cases approach one of two extremes depending on microphone placement: if the microphones were fairly close to the performer, the instrument will seem 10 feet wide; if they were placed farther away, there will be a left and a right but a hollow middle, creating the illusion that the performer is in two places at one time. A proper three point pick-up would produce a recording not only with correct left right perspective but with depth as well. The performer will be heard occupying the correct amount of space at the correct point on the stage.
The effect becomes easier to understand when one realizes that the success of binaural reproduction is largely dependent on certain psyco-acoustic phenomena. Stated simply, the human brain, when isolated from external factors as in binaural reproduction, is amazingly capable of filling in details. Stereo reproduction cannot take advantage of these psyco-acoustic effects. It becomes necessary, therefore, to take special steps in the recording process to insure that the sound, when reproduced over monitor loudspeakers, will be an accurate rendition of the performance.
Many amateur recordists will use multiple microphones (more than 3) in an attempt to produce a "professional" recording. While it must be acknowledged that certain situations call for multiple microphone techniques, it must also be pointed out that such situations are rare and that such techniques are quite difficult to master. Phase interference between microphones (resulting in peaks and cancellation of certain frequencies) becomes more of a problem as the number of pick-ups is increased.
Many professional live multi-mike recordings, in fact, suffer from this phenomenon and end up bearing little resemblance to the actual performance. With practice and experimentation the recordist will soon discover that the three point pick-up system is ideal for the large majority of live recording situations.
Microphone Choice
While perhaps it need not be said that a successful live recording invariably depends on the use of high quality microphones, a few general guidelines on the use of uni-directional (cardioid) versus omni-directional (non-directional) microphones in the three point system should be helpful to the amateur recordist. Cardioid is usually the choice for the two stereo microphones. In general, however, unless there is good reason to use cardioid microphones, omni-directional microphones are preferable as they will yield superior results. If wide separation is physically impossible, for example, directional microphones may be desirable to establish stereo left and right. Cardioid microphones will also help to suppress audience noise, very often a problem in live recording.
The blend microphone can be either uni-directional or omni-directional depending on the recording situation. An omni-directional microphone circumvents the proximity effect (boosting of lower frequencies) which one encounters when close-miking with a uni-directional unit. An omni-directional microphone also solves the problem of uneven sound caused by slight movements by an instrumental or vocal performer. It is occasionally necessary to suppress information behind the microphone. In such cases a uni-directional device must be employed. Most high quality uni-directional microphones, fortunately, are equipped with a switch able low-frequency attenuating network to minimize proximity effect.
There are a few select cases where proximity effect may actually be desirable. Here again, the uni-directional microphone is the solution (the attenuating network, if provided, should be bypassed, of course). If time permits, it is best to try both types and choose the one that yields the most natural sound.
The advanced recordist will most probably want to experiment with more sophisticated microphones, such as the super-directional (shotgun type) or the super-non-directional (pinpoint pick-up type) microphone.
Super-directional microphones are not only useful for picking up sounds from a distant source but also for stereo pickup in halls or churches with excessive and prolonged reverberation, which tends to make recordings sound muddled and cavernous. Super-nondirectional microphones are highly refined omnidirectional microphones. The expert recordist will often use a pinpoint microphone in place of a standard omnidirectional unit, even though the former requires much more critical placement. The pinpoint microphone has the advantage of smoother high frequency response (almost no diffraction effects because of reduced pick-up element size) and truer omnidirectional response at higher frequencies.
It is usually the case, unfortunately, that monitoring during a live recording session must be performed with headphones. This causes no difficulties for the binaural recordist, but the stereo recordist is confronted with the rather complex problem of creating a tape which will faithfully reproduce the performance over stereo loudspeakers while monitoring on-location with headphones. Clearly there is no substitute for experience in this matter. The seasoned recordist is able to extrapolate the binaural information and thereby position the microphones and set levels to produce a perfect stereo recording.
It should be pointed out, nevertheless, that choice of headphones can have a profound effect on the end result. Certain headphones are not suited to the purpose of on-location stereo monitoring because of their physical and/or acoustical characteristics. Open-air type headphone provides no isolation from external sound making it relatively difficult to monitor live recordings unless the recordist situates himself in a rather soundproof room. Generally poor results in terms of balance can be expected when one monitors with headphones which have boosted low and high frequency responses (in other words a suppressed midrange). It is much more preferable to use headphones which have slightly attenuated responses at the lower and higher ends of the audio spectrum.
Finding the optimum positions and setting the levels for proper balance among the microphones are the most important and the most difficult tasks in live recording. There are numerous factors to be taken into account. Type of instrument, type of ensemble, type of microphone, and acoustical characteristics of the room or hall (which are affected by factors such as size, shape, material, size of audience, etc.) are but a few of the details which must be considered in positioning the microphones. Once the microphones are optimally located, the levels must be set so as to achieve the most natural balance between the stereo and blend microphones. It would be impossible to postulate exact microphone locations and level settings for any given recording situation. If it were possible to do so, live recording would not be quite so enjoyable.
There is regrettably little time, however, for one to experiment with microphone placement and level setting at an actual performance. The successful live recordist, therefore, relies heavily on experience gained from past recordings and on knowledge gained from those sessions in which there was ample time to experiment.
The following examples of specific recording situations are intended as a guide. Combined with the availability and proper use of top-performing equipment and some time to experiment with the variables, these diagrams and suggestions should enable the serious amateur to produce highly successful live recordings.
Piano Solo
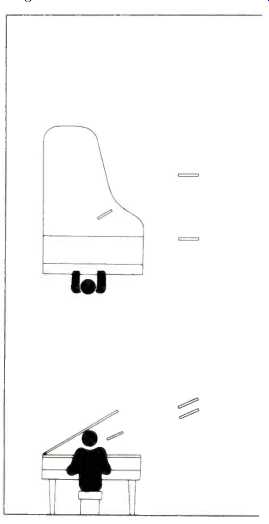
In recording a solo performance the blend microphone is used to pick up the primary sounds emanating from the instrument while the stereo microphones are used to pick up the piano's natural ambience and room reverberations.
Blend mic: Place the microphone to pick up direct sounds from the piano as shown in the diagram. This microphone must be placed rather close in order to capture the percussive qualities which lend clarity to the piano. If the microphone is placed too close to the strings, however, single notes will stand out and the resulting recording will sound uneven. Correct placement can actually depend on the composition being performed! If the piece limits playing to the lower half of the keyboard, for example, the microphone should be placed farther away from the keyboard than usual.
Stereo mics: Placement of these microphones depends largely on room acoustics. As a general rule of thumb, they should be at least 6 ft. high and 3 ft. apart. The axis formed by the two microphones, however, should always be parallel to the strings (perpendicular to the keyboard). To give an example of how room acoustics affect placement, it can be stated that a large hall would call for the stereo microphones being positioned farther away and more toward the keyboard than they would be for a smaller hall or room.
Levels: The blend microphone is the main source. The stereo microphones, therefore, should not be allowed to overpower the blend mic.
Vocals with Piano Accompaniment
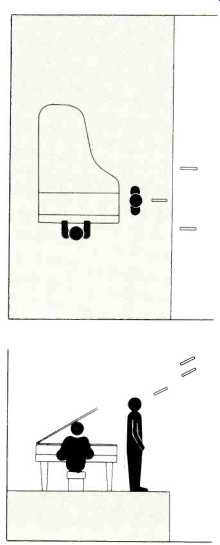
The main source is the vocalist and the blend mic is once again the primary pick-up.
Blend mic: Place the mic at a level just above the vocalist's head. Be careful not to place it too close. It is highly recommended that a windscreen be used to minimize pops and blasts. A dynamic microphone is generally preferable to a condenser type for vocal recording.
Stereo mics: These must be positioned to pick up the piano accompaniment in addition to the reverberant sounds. Placement will once again largely depend on the room or hall acoustics.
Levels: The balance between the vocals and the accompaniment can be controlled quite well by adjusting the level of the blend mic with respect to the stereo mics. The level of the accompaniment should generally be between 45-50 percent of the vocal level. If the blend mic is too high, the recording will sound monaural and balance will suffer. If the stereo mics are too high, the result will be a muddy sound, lacking localization of the vocalist.
Vocal Quartet With Piano Accompaniment
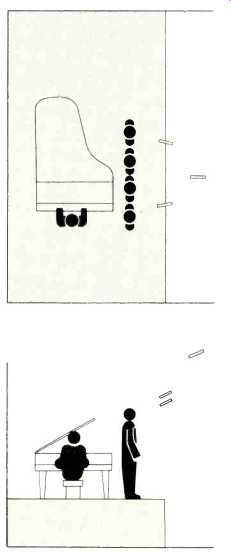
In the examples given earlier the blend microphone performed the primary function of picking up the direct sounds from the solo instrument or vocalist. In the following example, the stereo microphones must take over this function since the main source, the vocal quartet, is spread out and requires increased coverage.
Blend mic: This must not be set too close to the singers. Place the mic at least 2 ft. higher and 3 ft. farther away from the soloists than the stereo mics.
Exact placement will, of course, depend on the room or hall. Be careful not to place this mic too far from the stage as it must pick up the piano accompaniment.
Stereo mics: Use the guidelines given for the blend mic in the example of the vocal solo with piano accompaniment.
Levels: Since the stereo mics are the primary pick-ups, levels must be set so that the blend mic does not overpower the direct sounds from the vocalists.
String Quartet
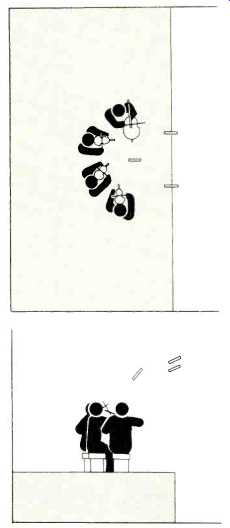
Recording a string quartet calls for microphone placement quite different from that of the preceding example. There are several reasons for this. There is, firstly, no piano accompaniment; secondly, balance among the instruments is more likely to be a problem than in the case of the vocal quartet. There is, thirdly, the added requirement of picking up instrumental ambience as well as the room or hall ambience.
Blend mic: Start with this mic in a central position with respect to the four instruments. If a problem with balance exists, the mic should be placed toward the weaker instrument.
The mic should be placed high enough to clear the heads of the players. If the mic is placed too low, the music stands will interfere with pickup of direct sounds from the instruments.
Stereo mics: Place these microphones according to the room or hall acoustics. They will generally be placed higher than the blend mic and at least 3 ft. from the front-most players.
Levels: Although the blend mic is picking up the direct sounds from the instruments, care must be taken to avoid setting this mic too high in level as the resulting sound will be overly monophonic. Start with roughly equal levels for both the blend and stereo mics.
Jazz Trio
Many of the basic principles underlying the previous example apply to this case as well.
Blend mic: This mic should initially be set in a central position (usually near the drums) and then repositioned, if necessary, to achieve proper balance. It should be placed high enough to clear the cymbals of the drum set.
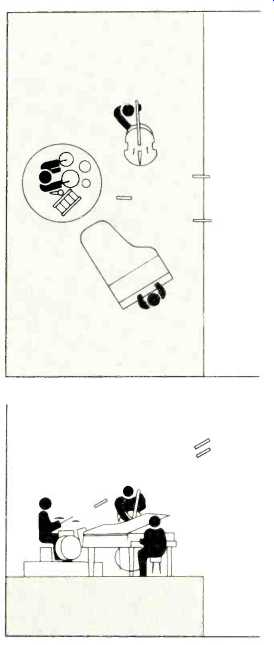
-------------Stereo mics: The spacing and distance from the ensemble of
these mics will of course depend on room acoustics, but the spacing between
the instruments will also be a factor. If the piano and bass, for example,
are set very far apart, the stereo mics will have to be separated a little
wider, placed a bit lower and closer to the ensemble than if the group were
compact. Care should be taken, though, to avoid placing them so close that
the recording loses "liveness" or the sense that the trio is performing
in a room or hall.
Levels: Follow the guidelines given in the previous example.
Church Choir with Organ
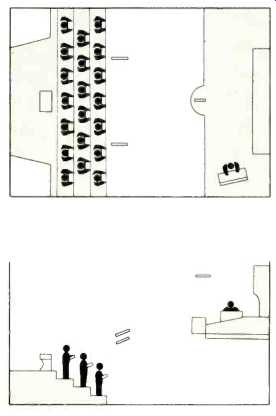
Because of the highly reverberant acoustical nature of most
churches, critical microphone placement becomes particularly difficult.
Blend mic: Use this mic to pick up direct sounds from the organ. Distance from the pipes, height, and lateral position will depend on the characteristics of the church and the organ. Under most circumstances, an omni-directional microphone would be preferable.
Stereo mics: Place these mics in front of and above the choir. Experiment carefully with placement to achieve a full, rich sound with the right amount of reverberance. The mics must be close enough to capture the diction and far enough to avoid highlighting individual singers.
Levels: Balance between the organ and the choir can be easily achieved by the proper setting of levels.
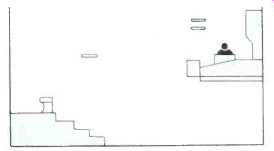
Church Organ Solo
Most church altars are constructed in such a way that they make ideal pick-up points for reverberant sound.
Blend mic: Place this mic facing the altar. Experiment with height and distance to obtain a broad reverberant sound free from harshness caused by local resonances.
---------------------
Stereo mics: Position these mics to pick up direct sounds from the organ pipes. They must be close enough to capture all the overtones which give the various stops their particular sound qualities.
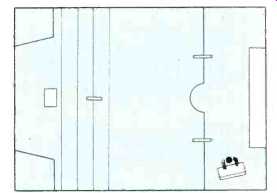
Levels: Relative levels will vary greatly according to the acoustical
properties of the church and organ. Keep in mind that the stereo mics are
the primary pick-ups.
Outdoor Recording
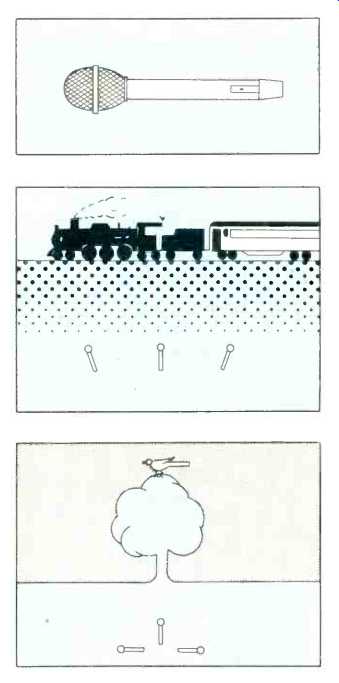
Windscreens are a must for outdoor recording. In some cases
the standard windscreen supplied with the microphone may be inadequate. If
so, take the thick part of a nylon stocking and wrap it tightly around the
standard windscreen.
Moving sound sources: Place the left, blend, and right microphones in line along the axis of motion. Spacing of the mics will depend on the speed of the source. The faster the source, the farther apart the microphones should be. When recording a fast moving steam locomotive, for example, if the mics are placed too close together, there will be very little stereo effect.
Static sound sources: Place the three microphones in a horizontal plane fairly close to each other at 90 degree angles to each other. When recording sounds, such as bird or insect noises, which tend to come from all directions, three cardioid microphones placed in this manner will yield a very natural stereo effect.
Levels: In each case above, set levels to obtain the most realistic balance and separation.
(Audio magazine, Dec. 1975)
Also see:
Microphone SENSITIVITY Ratings (Dec. 1976)
Miking the PRO Way (Nov. 1977)
Time Delay for Ambience by Len Feldman (Dec. 1976)
= = = =