WHETHER you're a professional technician installing hi-fi equipment as part of your regular work, or a do-it-yourself sturdily coping with your own installation problems, you need to know some fundamental things about cabinets and built-in furniture. If you don't, sooner or later the lack will cost you--merely in miserable sound reproduction if you're lucky, in expensive damage to furniture if you're not. Even if you never expect to build so much as a rabbit hutch from scratch, a modest knowledge of furniture construction will enable you to get better sound from an installation and avoid wasted time and costly errors. And, if you're a home owner specifying what you want in your own setup, it will help you to explain what you want and to get it.
The installer's point of view
You probably won't be called on actually to build the furniture that houses the hi-fi equipment, although in many cases you may be asked to make recommendations as to what sort of cabinet to buy or have built. You certainly will be required to fit the various components of the system into the available cabinetry and spaces, subject to the client's preferences where function permits a choice.
And you probably will make all the holes for inter-component cabling and ventilation, and perhaps also mount the speaker or speakers, pad and brace the enclosing box, and so on.
Style and construction
Ideally, as we have seen in Sections 10 and 11, the styling of furniture intended to house hi-fi equipment should be planned so as to place it in a definite relationship to the furnishings that will surround it. Excellent theory, but before we can install any equipment the theory must be translated into tangible objects; the actual furniture. In other words, the styling ideas will have to take form via available methods in available materials before you'll have the physical spaces in which to do an installation.
This may sound like a roundabout way of saying something very elementary. It is not. If you have seen, as the writers have, many ideas that were beautiful on paper but couldn't be built practically, you'll readily agree.
Style and construction are, then, directly dependent on each other. You cannot laugh off the fact that so much authentic period furniture is still around by blaming it on pure snobbery or nostalgia. A great deal of it was put together by people who knew how to fuse design ideas, materials and construction methods into objects that were structurally sound and eminently capable of serving the purposes for which they were intended.
Hi-fi furniture, particularly the speaker enclosure, is required to serve purposes for which the furniture of no prior period was intended. It is necessary then, to suit the materials and construction methods to the use.
We are fortunate in having at hand materials and technologies that were not available to our predecessors, and for hi-fi purposes it's a good thing that this is so. We need them. As an example, for both equipment and speaker enclosures, modern plywood is a vastly more reliable material for large panels than the solid lumber of former times, even if solid lumber were available in wide stock any more.
When working with modern or contemporary styles, you'll have much more flexibility in choosing both materials and construction methods than is possible in period reproduction. In any of the highly developed period styles, both the materials used and the manner in which the various parts were joined was very thoroughly standardized. If, in making a reproduction, you stray very far from the materials and methods used in the originals, the feeling of authenticity will quickly be lost.
But in the variations of modern styling, neither materials nor methods are standardized. In fact, one of the most interesting aspects of Modern is that it has been so highly experimental, and that so many new materials and methods have been introduced.
This is not by any means an unmixed blessing. The correct use of methods and materials that have previously withstood the test of time gives one a reasonable assurance that they will do so again. But the use of new methods and materials does not always provide the same guarantee.
The choice of materials and construction methods to be used is thus primarily influenced by two factors. First, they must be appropriate to the styling of the design and, second, they must be appropriate to the use. As an example, we shall see a bit further...

Fig. 1201. Details of veneer-core plywood construction.
...on why a large speaker enclosure constructed with butt joints and fastened with nails is bound to produce trouble, while an equipment enclosure built this way could be reasonably satisfactory.
Plywood construction
Whether your hi-fi housings are free-standing furniture or compartments built into a wall, the basic construction material will be wood.
Wood comes in one of two forms; either as plywood or as solid lumber. Lumber needs no explanation, but plywood does. There are two basic types of plywood construction; veneer core and solid core. One good reason for knowing one from the other is that they differ appreciably in cost.
Veneer core consists of a number of thin layers of wood laid one on top of the other with the grain of each layer running at right angles to that of the last one, as shown in Fig. 1201. The various layers are solidly glued together under heavy pressure to form the final panel. The construction illustrated is typical of a 3/4-inch-thick panel. Other thicknesses are obtained by in creasing or reducing the number or thickness of the various layers.
Solid-core plywood is made by laying, edge to edge, strips of solid lumber, generally 3 inches wide, and then gluing on cross-band veneers and face veneers, as shown in Fig. 1202.
Of the two constructions, solid-core results in the better material for cabinet purposes, but it is also more expensive.
The main advantages of solid-core are that it is more stable, that is, it resists warpage better, and there is far less tendency for the face veneers to transfer surface ripples from the grain of the core material. These surface ripples are often difficult for the nonprofessional at woodworking to detect in the raw panel, but they'll show up when the piece is finished, particularly if a high-gloss finish is used.
Where the job calls for the best, be sure to specify the use of solid-core plywood for all large surface areas and you'll avoid some possible trouble getting the final finish to the desired degree of smoothness. By the same token, where cost is primary, change over to veneer-core and save something on the material. The fact that solid-core is better doesn't mean that veneer-core is a poor, weak or unreliable material. Quite the contrary.
Plywood grades
While construction is one major factor in the ultimate cost of plywood, there are also two others. One is the grade of surface or, more properly, face veneers; the other is the species of wood.
Face veneers are graded according to the uniformity of grain and color and the presence or absence of various imperfections such as knots, pinholes, splits, mineral streaks and other flaws.
A panel that is good one face only, specified G1f, costs a good deal less than G2f, which is good on both faces. Here is where intelligent specification of materials can hold down cost without detracting from the appearance or structural soundness of the finished product. The outside surfaces of a speaker cabinet are readily visible and therefore require a good face veneer, but the inside surfaces certainly don't. For such uses, G1f is just as good as G2f, and cheaper. The mounting board of a speaker en closure is usually covered with grille cloth and neither face is visible. Obviously then, plain fir plywood is fully adequate.

Fig. 1202. Details of solid core plywood construction.
Differences in construction or wood species in a panel of given thickness will result in minor differences in the stiffness of the resulting panel and in the acoustic coefficient of absorption of its surface. However, these differences are so slight that there is no practical value to be gained from considering them.
As a general rule, style permitting, specify that plywood rather than solid lumber be used for all large panel areas in hi-fi cabinets, whether intended for equipment or speakers. Plywood is more resistant than solid lumber to the vibration in a speaker enclosure and to the heat in an equipment cabinet. In addition, it is far easier to maintain uniformity of grain and color with plywood.

Fig. 1203. A rotary cut (a) gives more attractive graining than the
plain slices (b).
Moldings, bases and legs must be in solid lumber, and any internal cleats or glue blocks should be also. An exact match in graining between parts made of plywood and others made of solid wood is very difficult, even though both are of the same species.
This results from the fact that the plywood maker can and often does cut through the log on a curve when making his veneers in order to expose beautiful graining figures. These do not appear when the log is sawed straight as is necessary when cutting solid lumber. Fig. 1203 shows examples of these differences in grain.
Even though an exact match in grain between solid and ply wood parts is unlikely, a little care in the selection of adjoining pieces that will show can keep the differences well within the range of acceptability. Remember also that a good deal can be done in finishing to smooth out differences that seem quite strong while the wood is still raw. A good deal more care must be taken when selecting lumber to be finished in the natural wood color than is necessary if the piece is to be stained or bleached. These latter processes are far more effective in obscuring minor material variations than a natural finish.
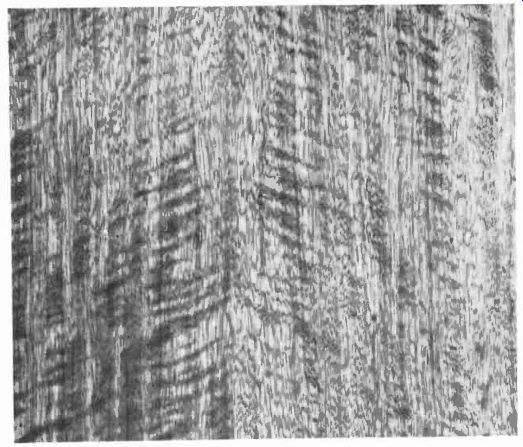
Fig. 1204. African mahogany has a rather pronounced grain and enjoys
fairly wide usage. (Hardwood Plywood Institute.)
Wood species
Contrary to popular belief, the species of wood chosen for a hi-fi cabinet will not have much effect on its construction or durability. It will, though, have a very large effect on the appearance.
This is why it is so important to use a species and finish color appropriate to the style.
The great English styles, Chippendale, Hepplewhite and Sheraton, used largely mahogany and occasionally walnut. French Provincial was generally in birch or fruitwoods. Early American furniture was largely pine. To reproduce a Sheraton piece in birch, or a French Provincial piece in oak, just wouldn't make sense.
To give even a moderately complete background in the various furniture styles and the wood species employed in making them would require a book by itself. Fortunately for our purpose, de tailed information in this area is quite unnecessary.
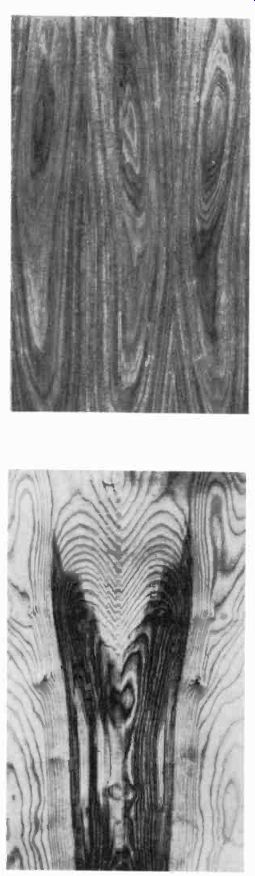
Fig. 1205. Walnut is an attractively grained wood that is very popular
with furniture makers. It is beautifully colored, very durable and
easy to work with. (Hardwood Plywood Institute.)
Fig. 1206. If a natural blond wood is needed, birch is just about the finest, in spite of the difficulties of working with it. (Hardwood Plywood Institute).
But you should at least know and be able to identify the four major hardwood species used in present-day cabinet work. You are very likely to have to change or add a control panel or changer mounting board in an existing cabinet from time to time.
If you know these four species of wood, you'll be equipped to deal with at least 90% of such cases, since at least that percent of the furniture you'll encounter will be made of one of these woods.
The four species concerned are mahogany, walnut, oak and birch. Mahogany is by far the most widely used. Technically, mahogany is a name that covers an extensive group of closely-related tropical woods. There are at least 37 in the group, but only two that need concern us--the African and Honduras mahoganies.

Fig. 1207. The even grain lines of comb-grain oak make it a very popular
wood for furniture. (Hardwood Plywood Institute.)
African mahogany (Fig. 1204) is a small-pored, close-grained wood of medium hardness. The grain figure consists of long straight stripes alternating light and dark that fade into each other at their edges. This type of figure is called a ribbon stripe and is characteristic of the mahoganies.
Honduras mahogany is very similar to African mahogany except that the ribbon stripe is not quite as pronounced, nor as even. Also, the pores of Honduras are somewhat coarser. African is the preferred variety but Honduras is less expensive, an un deniable attraction.
Walnut (Fig. 1205) is an extremely beautiful and popular wood. It also is of medium hardness, with a very fine pore structure. However, it has a far more pronounced and active graining figure than the mahoganies, and is preferred by many for this reason. Large swirling figures interspersed with areas of narrow pencil stripes are characteristic of this wood.
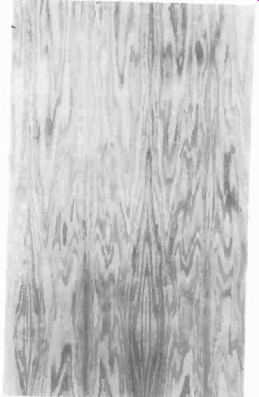
Fig. 1208. A gentle swirl in the graining figure is an identifying
feature of plain sliced oak. (Hardwood Plywood Institute.)
The swirl in the figure of walnut is the source of much of the beauty of the wood, but also can cause some nasty problems when matching. If you want to match a new control panel or door to an existing walnut cabinet, you may have some trouble finding a piece of wood with the correct grain and color for the job, so try to avoid such a problem if you can.
Birch is naturally a blond wood, although it is often stained to resemble mahogany or walnut. It is very hard, dense and extremely small-pored. Its hardness makes it very strong and durable, but by the same token more difficult to work than mahogany or walnut (in the solid lumber form at least). The graining figure swirls in a manner resembling walnut (Fig. 1206). This figure is very subdued if the wood is left in its natural color, but becomes more pronounced with staining. Stained birch has often been used to imitate walnut because the wood itself is less expensive. You might get fooled once by birch-stained walnut, but it won't hap pen twice. It is not that good an imitation.
Oak is another very hard, dense, heavy and durable wood. Aside from its tremendous durability, the attraction of oak as a furniture wood is a bit baffling. It is difficult to work because it is so hard, and it also has a very coarse pore structure, making finishing more of a chore. Comb grain or rift oak (Fig. 1207) has a very regular even pattern of narrow pencil stripes, making matching problems pretty negligible, an undeniable advantage over walnut.
Plain sliced oak (Fig. 1208) is characterized by gently swirling figures less pronounced than those of walnut. One of the most beautiful figures to be found in any wood is that of quartered oak.
It consists of longitudinal lines contrasted with strong radial lines called crossfire as shown in Fig. 1209.
In addition to the hardwoods mentioned thus far, two soft woods are worth remembering.
Probably you know both of them already. If you've done any installing you are bound to have used some fir plywood. This is a very useful material, so don't look down on it. If you are using anything else for concealed parts like baffle boards, backs and internal partitions in speaker enclosures, you're wasting money on materials. If you have a piece of walnut left over from building the speaker box, don't use it for the baffle! That wouldn't be too bright. You can use fir and save that walnut.
It might make a couple of player mounting boards when you need them.
The other soft wood to remember is knotty pine. You'll run into it a good deal in dens and playrooms, where it is used as paneling. If you have to build an installation into such a room, you may be stumped for a while unless you remember that knotty pine is available in plywood sheets for use where you require pieces larger than can be obtained in the form of solid lumber.
For surfaces where a good deal of abuse can be expected, don't forget the decorative possibilities available in plastic surfacing sheets such as Formica, Micarta, Nevamar, Textolite, Pionite and the others. These materials are obtainable in a variety of excellent wood grains, and also solid colors, although you might not think so after seeing the ghastly patterns commonly-used for the counters of one-arm lunches. These materials can be worked with ordinary woodworking tools and can be applied with a special contact cement to surfaces already in place.

Fig. 1209. Quartered oak displays one of the most beautiful and complex
graining figures to be found in wood. (Hardwood Plywood Institute.)

Fig. 1210. Tape recorders and record players are frequently mounted
on pull-out drawers. Two types of drawer slides that will do the job
are shown here. Be certain that the slides you select will support
the drawer and its equipment when fully extended.

Fig. 1211. Hinges come in a wide variety of shapes, but their selection
is largely last a matter of taste.

Fig. 1212. Carefully select knobs and drawer pulls to match decor
and furniture styling. A catalog or store display will be a helpful
guide in making a selection.

Fig. 1213. Legs, catches and casters will probably be encountered
before you're through with the installation. Here again, browsing through
a catalog or a store display will be helpful.
Hardware
Outside of fastenings, the hardware items most commonly required by the hi-fi installer are drawer slides, lid supports, hinges and knobs or pulls.
The drawer slides commonly used in hi-fi work are either 13 inches long with a 9-inch traverse or 15 inches long with an 11-inch traverse. They are rated to carry 40 to 50 pounds a pair. Two basic types are made. One is the side mount, intended to be attached to the sides of the cabinet; the other is the undercarriage slide intended to be attached to a shelf underneath the drawer (Fig. 1210). Try to use each as intended, otherwise the weight-carrying capacity will not be as rated.
In case you have a big load such as a large tape machine to be put in a pull-out drawer, very-heavy-duty slides can be obtained, with weight-carrying capacities up to 200 pounds a pair. In some localities you may have trouble finding these types in stock any where, but they can be ordered.
About lid supports, nothing much need be said except to be sure you use one strong enough to stand up under constant use.
We recommend that with all moving hardware, lid supports, slides, and hinges, that any error be on the side of using material that you know is too heavy for the job. The capacity of exhilarated people at a party to overload such devices is astonishing, to say nothing of the onslaughts of healthy children.
Fig. 1211 shows a few of the many hinges available. Here, the problem is often to find one that is strong enough without being too conspicuous. The piano hinge is, of course, the strongest, but it shows all the way along the door. The butt and Soss hinges are of about equal strength, and the Soss has the advantage of being completely invisible when the door is closed. Remember this when you are tempted to use a pivot hinge, the weakest of the lot, merely because it is inconspicuous.
Knobs and pulls (Fig. 1212) are of such infinite variety that your best bet is not to get embroiled in suggesting anything. Send the lady of the house down to a well-stocked hardware place and let her pick out what she wants.
There are various other pieces of hardware often used on hi-fi cabinets, but as an installer you will have very little to do with them. However, you should at least know what they are when you see them, so a few of the more common ones are illustrated in Fig. 1213.

Fig. 1214. The butt joint is one of the simplest ways of joining two
pieces of wood.
Other materials
You won't very often manage an installation without having to contend with grille cloth. The best cloths to use from a hi-fi functional viewpoint are woven specially for the purpose from mono-filament plastic yarns. The big snag here is finding a pattern that will satisfy esthetic requirements without being functionally bad.

Fig. 1215. Stronger than the plain butt joint, the shoulder butt joint
has less exposed end-grain surface and is thus easier to finish.
This is not always possible. From time to time, you'll have to settle for something that is acoustically less than ideal but, after all, why is there a treble boost on the preamplifier if not to be used?
For padding the inside of speaker enclosures a good many materials have been used such as felt, rock wool, Kimsul, cotton waste or fiberglass. We generally prefer fiberglass in the form of flexible blanketing. It gives the best absorption for the cubic volume occupied, and is very easy to handle. You can cut it to size with a pair of large scissors and staple it in place. Incidentally, it is said you can actually sharpen a pair of scissors this way.
Joints
Since most of your installations are going into cabinets of one sort or another, you'd best know a bit about how they are put together. Then, if alterations or new construction such as added internal shelves are needed, you'll know what can be done and what cannot.

Fig. 1216. Mitre joints are relatively easy to cut, although using
a shaper will result in a smoother and tighter fit. Using a spline
strengthens the mitre joint. Even better is the lock mitre but for
this you must use a shaper.
There are a number of ways of jointing a cabinet, depending on the tools available, strength required and appearance and cost factors. The least expensive joint, the simplest one and the one requiring the least equipment is the butt joint (Fig. 1214). All that is needed to make a decent butt joint is a smooth, straight cut on the ends of the pieces to be joined. One piece is placed so as to overlap the end of the other, and they are then fastened together with glue and either nails or screws. It is an easy joint, but has two disadvantages. It is the weakest of the various joints, and it leaves the end grain of the overlapping piece exposed. This is often esthetically undesirable.
The shoulder butt is a considerable improvement over the plain butt (Fig. 1215). It is a bit more complicated but not much, considerably stronger and much better-looking. It is made by notching out the end of the overlapping piece, then setting the end of the piece to be overlapped into the notch. The only problem is to cut the notch in the overlapping piece accurately. This can readily be done with a table saw, swing saw or router. But it is pretty difficult to do by hand.
The best joints to use for cabinet work are the several variations of the mitre (Fig. 1216). They make the cleanest, strongest and most professional-looking joints. The plain mitre reinforced with a glue block is the simplest but least desirable of the mitres. If the inside can be seen, the glue block doesn't look so great, and without it, the joint is considerably weaker. The two best variations are the mitre and spline, and the lock mitre. They are the strongest joints you can use, and the best-looking. The plain mitre, or the mitre and spline joints, can be made with nothing more than a table saw if it is accurate, but a lock mitre requires a shaper equipped with the proper knives. This isn't a joint you are likely to make yourself, but it is a good one to specify if you are having some cabinet work done.
The joints mentioned thus far are for outside corners. If fixed internal partitions are required, there are a couple of ways of ...

Fig. 1217. Use a dado or half dado for interior partitions or shelves.
The half dado, while requiring more work than full dado, does not weaken
cabinet side panels as much.
... doing it. One way is to butt them as shown in Fig. 1214. The other way is to slip the partition into a half or a full dado, illustrated in Fig. 1217. This is the method of choice if you are building a cabinet, but if you have to install a partition in an existing cabinet it's a devil of a job to cut the dadoes to receive the partition. It can be done quite readily with a portable router. If you don't have one, it probably wouldn't cost very much to have a cabinetmaker come in and do that part of the job.
Two other joints that you'll encounter from time to time are the doweled joint and the mortise and tenon (Fig. 1218). They are found most often in legs and bases and in the frames of doors with inset panels. Neither of these is a joint you should try for yourself. Leave them to a cabinetmaker. As we shall see in the next section, you can often repair one if it is loose, but don't try to make one from scratch unless you are sure you know what you're doing.
Fastenings
A large number of fastenings can be used in connection with the furniture end of installation work. Some you have been using for a long time, but others may not be as familiar. Fig. 1219 illustrates several types of nails. The cut nail (a) is presented only to caution you never to use it for anything around a cabinet. It is a flooring nail. The common or flat head nail (b) and the finishing nail (c) you probably know. The common nail holds better, but the finishing nail is less conspicuous. The spiral shank or screw-tight nail (d) and the anchor-fast (e) you may not know.
DOWEL MORTISE AND TENON

Fig. 1218. (a) The dowel joint requires precise alignment of holes.
(b) A mortise-and-tenon joint also requires exact cut ting and shaping,
but is much stronger than a doweled joint.
A hole is frequently drilled through the mortise and tenon and plugged with a dowel for added rigidity.
These can be used where you need better holding power than you get with an ordinary nail, but where you don't want to drive screws. The anchor-fast is reported to have even better holding power than a screw of comparable size. This can be a great little time and labor saver when assembling a speaker enclosure that requires a lot of screws. But don't anchor-fast the back or the baffle hoard into place. It may take a crowbar and sledge hammer if you ever have to get them out.
The three types of wood screws in Fig. 1220 will all be familiar but, for your own good, use them properly. Nothing looks cheaper and less professional than a flat-head screw that isn't countersunk, unless it's an oval head with no finishing washer.
You won't use bolts (Fig. 1221) much in connection with cabinets, but (again!) when you do, use the right ones. Don't attach a wrought-iron rod to the side of a cabinet with a flat-head bolt when the holes are not countersunk. And don't attach a brass rod with a chrome-plated bolt. Muff enough such details and the whole job begins to look slovenly.

Fig. 1219. Types of nails include (a) cut nail, (b) common nail, (c)
finish nail, (d) screw-tight nail and (e) anchor-fast nail.
Two fasteners you ought to know about in case you ever have to hang a cabinet or counter on a wall are rawl plugs and toggle bolts (Fig. 1222). Rawl and other similar plugs consist of either a fiber or metal plug used with a wood, sheet-metal or machine screw to fasten things to plaster, brick, masonry, concrete or cinder block. A hole is drilled in the wall of the size required to receive the plug, using either a carbide masonry drill or a star drill. The plug is inserted in the hole and the appropriate screw is driven into the plug to complete the fastening.

Fig. 1220. Commonly used wood screws are: (a) flat head, (b) oval
head and (c) round head.
The toggle bolt is used where there is internal open space in side the wall, as in a wall with wood of metal lath underlying a plaster surface. The toggle bolt is installed by drilling through into the internal air space, then inserting the toggle bolt with its wings folded. When the wings come clear into the internal space, they spring open behind the lath, permitting the fastening to be completed by tightening up on the external end of the bolt. This makes an extremely simple and very positive fastening, as a sizeable hole would have to be torn in the wall for the fastening to break out.
Caution: Be sure the unit you are mounting in this fashion is ready to go into place permanently. If you have to back out the screws to remove it, the wing nuts will fall down inside the wall and you will have to put in new ones in order to finish the job.

Fig. 1221. Bolts that may be needed for long reaches: (a) flat head,
(b) round head, (c) hex head and (d) carriage bolt.
Finishing
No discussion of the furniture aspects of hi-fi installation is complete without reference to furniture finishing. While it's un likely that you'll finish an entire cabinet, you may very well need to finish a new control panel, mounting board, drawer or other part involved in a cabinet revision. Also, you are bound to run into cabinets that need scratches or nicks retouched, a procedure covered in the next section. For these reasons it's helpful to know how the original furniture finish was done.
To say that the final sandpapering of the raw wood is the most important part of finishing would be an exaggeration, but only a slight one. It is impossible to get a really good finish on wood if the surface has not been adequately prepared. This means a really thorough sanding with papers as fine as 4/0 or even 6/0, depending on the kind of wood. The softer the wood, the finer the final paper. Most of this work can be done nowadays by machine. Fig. 1223 shows two types of acceptable portable machines. One is a belt sander and the other an oscillating sander. The oscillating types are okay if they have a straight back-and-forth movement, but stay away from those with an orbital movement, as part of their cycle takes them across the grain of the wood, and sanding for a furniture finish, should always be done with the grain only.
Never use a disk sander for furniture work, for the same reason.
Once the final sanding is completed, the actual finishing begins with the pre-coloring of the wood, except in those cases where the wood is to be finished in its natural color. To darken the natural color, you use stain; to lighten it, you bleach. Staining is quite simple and reliable; bleaching is not. If you need a blond color, why not use a wood that is blond to begin with? There are plenty of them. In addition to birch, there are limba, avodire, primavera and chen chen, to name a few. If for some reason it is absolutely necessary to bleach, go to a reliable finishing materials supplier for the materials and follow the instructions to the letter.
If staining is needed, there is no real problem except to get the color right. While quite a number of colors are available as standard mixtures, the exact color you need may not be among them. You can make up the color you need by thinning or mixing the standard colors. If you can take along a sample of the final color you need, your dealer can be very helpful in suggesting what and how to mix to get it.
Wood stains are of three types: alcohol, water and oil base. You are not likely to use alcohol stains. Again, if you tell the dealer what type of wood is to be stained, he'll be in a position to make a useful recommendation. In general, oil stains do not penetrate the wood as readily as water stains. Thus, on a very hard wood such as oak, you'll have better luck with the water type. On medium-hard woods like walnut or mahogany, either oil or water stains can be used. However, on very soft woods like pine, fir or ...

Fig. 1222. Use rawl plugs or toggle bolts when fastening anything
to masonry.
... poplar, you can control an oil stain more readily to avoid inadvertently getting the color too dark.
After staining, the next step is filling. This is done with a paste wood filler, the purpose being to fill the numerous tiny pores in the wood so that the final finish coats will go on smoothly. As with stains, fillers come in a variety of standard colors, which can in turn be mixed or toned to approximate more closely the color of the stained wood. On occasion, interesting effects are obtained by contrasting the color of the filler with that of the surrounding stained background.
After filling, the finish is built up by sealing with either shellac or lacquer, then applying two or more, usually more, final coats of either varnish or lacquer. Preferably, shellac should not be used for final coats as it is too soft.
Final coats are done best with a spray gun, as this method results in a smoother surface than can be obtained by brushing.
Spraying is also a great deal faster; consequently, it is the method used in finishing all commercially-built cabinets.
After the last finish coat, the better grades of furniture are rubbed down to produce the degree of sheen desired. The resulting finish can vary from a dull, satiny texture to a mirror-like high gloss, depending on the abrasives used for the rubbing. The very dull finish requires nothing more than a rubdown with 6/0 steel wool, while the very high gloss is produced with the aid of a special rubbing compound. Various other abrasives will result in textures in between.
After rubbing, the finish should be protected with a coat of good quality paste wax before the piece is put into service. Liquid waxes are all right for maintenance, but the original protective coat should be paste wax.
Since the very dull oil finish, particularly on walnut, is so popular these days, you might like to know how this is done. It is very simple. Linseed oil is used, heated to improve penetration. The oil is brushed on, then allowed to stand for about 20 minutes, after which the excess is wiped off and the piece is allowed to stand overnight. The process is repeated about three times to complete the initial oiling. From then on re-oiling is needed only once in 3 to 6 months.
What with woods, hardware and other materials, joints, fastenings and finish, we have covered the more important elements that go into the making of a hi-fi cabinet as it comes to you for an installation. There is much more to this subject than could possibly be included in a single section. If you are interested in obtaining more information, the subject is treated much more thoroughly in a previous book Hi-Fi Furniture, by one of the present authors. This guide is No. 79 in the Gernsback Library series.