BEFORE you put so much as a single cabling hole into a cabinet or other housing for the hi-fi components, there are a few things to be double-checked. It may sound silly, after all those cautions about measuring and fitting, but--will the components fit in the cabinet space?
This question is not nearly as ridiculous as it sounds, for a couple of things can happen to cause unhappy crowding or an outright impossible space problem. For one thing, people some times change their minds about components and order something that is physically bigger, after they've selected a cabinet big enough to hold everything they originally had in mind. Or they may even add another unit, without remembering that the cabinet ordered has no unallocated space left. Check to make sure everything will go in before you do anything to make an exchange for a larger-size cabinet impossible.
If the cabinet was made to order, perhaps to your own measurements, did the cabinetmaker misconstrue your figures, say taking inside measure (IM) as outside measure (OM)? If he did or you failed to indicate plainly inside or outside measurement, you may find yourself the not-very-proud owner of a cabinet you hadn't planned on buying. Again, before you cut any holes, make sure you can get everything into the furniture in a functional arrangement.
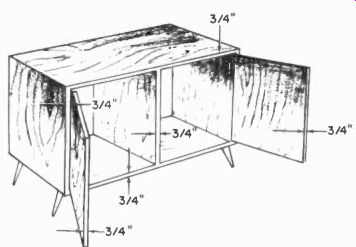
Fig. 1301. In good quality cabinets, the main structural panels should
be of 3/4" stock.
The main structural panels of almost all cabinets will be 3/4-inch thick, very likely of a finish-veneered plywood. Any main horizontal or vertical partitions will also probably be of this thick-ness (Fig. 1301). Any internal shelves for supporting tuners, amplifiers and such will probably be 1/2-inch plywood (Fig. 1302), although the turntable or changer cutout board should be 3/4 inch.
When you're sure there hasn't been a foul-up in the size and capacity of the cabinet or other enclosure, give it (or them) a very thorough inspection. It doesn't matter whether the cabinet is new or used, for equipment or speaker, nor whether it was originally built for hi-fi use or not; check it over carefully.
If it is a new cabinet, look for finish defects or evidence of transit damage, such as scratches, crushed corners, sprung joints or pressure marks. Check also the fit and smooth operation of moving parts such as doors, drawers, lids and all hardware.
In the case of a cabinet that you are supplying as part of the job, it is your responsibility to have any defects corrected. The manufacturer is responsible for any defects that existed when the piece left his plant but, as we have seen in Section 2, he is not generally responsible for transit damage, except when the merchandise is delivered by his own employees.
Where shipment and delivery were in the hands of a common carrier, the claim for damages is made against him and usually must be filed by you.
If a new cabinet was purchased by the client and turned over to you for installation, you have no responsibility whatever for any defects or damage occurring before it reached your hands.
However, you do have a definite responsibility to report to him immediately anything that is wrong. You certainly don't want to be blamed for damage you didn't cause, and you will be, if you don't start at an early date getting him interested in blaming somebody else.
A used cabinet should be gone over quite as thoroughly as a new one, if not more so. A used cabinet is bound to have some defects, so here you want to be particularly careful not to get blamed for any of them. Preferably, get the client to inspect the piece with you, list what you find and get him to initial the list.
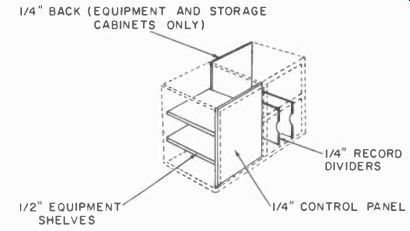
Fig. 1302. Cabinet panels that will normally be less than 3/4" thick.
This way, if there is any question later on, you are protected.
On a used cabinet, you are looking for the same defects as on a new one, plus use and age defects. By use defects we mean such things as nicks and scratches, burns, water or beverage stains and damaged hardware. Age defects include loose joints, loose or blistered veneer, loose legs and cracked, crazed or alligatored finish.
Later on in this section we'll discuss various cabinet defects in more detail, explain which ones you can repair, which ones a professional should repair for you, and which ones justify discarding the cabinet entirely.
But first, let's look at the various cutting, fitting, altering and adapting operations that may be necessary to prepare a cabinet for an installation.
Equipment cabinets
The first necessary step in connection with preparing an equipment cabinet is in making the cutouts. The control panel must be cut for the tuner or preamplifier controls, the mounting board must be cut for the record player, and you may need special holes for cabling and ventilation.

Fig. 1303. When drilling holes 1/2" in diameter or larger, use
a wood bit of this type. (Millers Falls Co.)
The handy-dandy tools you ought to have for these operations are a decent electric drill with an assortment of wood bits, and some sort of a saber saw. If you want to do it the hard way, you can use a bit and brace for the holes, and a keyhole hand saw for the cutouts.
The type of bit to use in your electric drill, particularly for holes 1/2 inch in diameter and up, is the sort shown in Fig. 1303, rather than regular twist drills. Twist drills will tear and splinter the back of the panel where the drill comes out a good deal more than a wood bit made with a rim cutter of one sort or another.
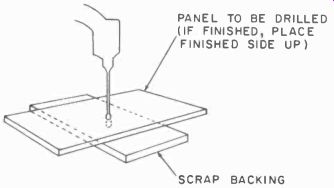
Fig. 1304. When drilling larger holes, always bark up the work with
scrap wood to reduce splintering on the other side.
When drilling holes larger than 1/4 inch in diameter, always back up the panel with a piece of scrap wood (Fig. 1304). This will greatly reduce the splintering of the back side of the piece being drilled.
If you must drill holes bigger than 1 inch in diameter, forget the bits and switch over to a hole saw or a fly cutter (Fig. 1305).
You can make holes up to 2 1/2 inches in diameter with a hole saw and up to 5 inches in diameter with a fly cutter, using nothing more than a 1/4-inch electric drill, hand-held. We don't recommend this procedure however, if you can possible mount the drill so you can use it like a drill press, or better yet, use an actual drill press for the job. With these devices, you'll get a much cleaner hole if you've a good, firm stationary mount for the drill that drives them.
When drilling holes in a finished panel, always drill with the finished side up so that, if there is any splintering where the drill goes through, it will be on the inside where it is not visible.
A variety of saber saws are on the market (Fig. 1306) but most of them have one thing in common. They cut on the "up" stroke.
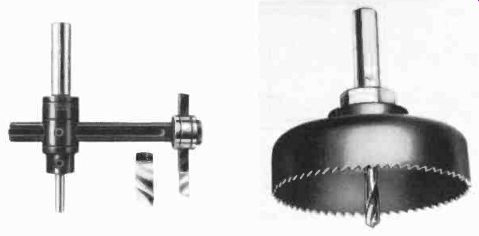
Fig. 1305. For extra large holes, (a) an adjustable circle cutter
or (b) a hole saw can be used. (The Stanley Works.)
This means that the face that is up when you are cutting is the face that will be subject to the most chipping and splintering.
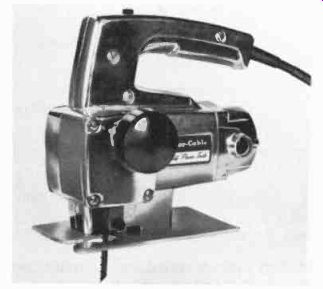
Fig. 1306. A sabre saw is used for curved or irregular cuts such as
turntable mounting boards, (see Fig. 1307). (Porter-Cable Machine Co.)
Therefore, whenever possible, try to keep the finished side down when doing a cutout with a saber saw, the opposite of the procedure recommended when drilling. And don't put the good face on a surface that will damage it while you're cutting it.
MINIMUM MOUNTING BOARD OUTLINE MAIN PLATE OUTLINE CUTOUT OUTLINE
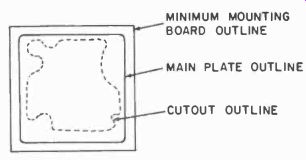
Fig. 1307. A typical record player template will show three outlines:
(1) the outline of the minimum size for the mounting board, (2) outline
of the record player main plate and (3) outline of the cutout to be
made for the record player. Be sure you use the right outline for your
cutout.
CENTER LINE CUTOUT MOUNTING LEVEL (SHELF TOP)
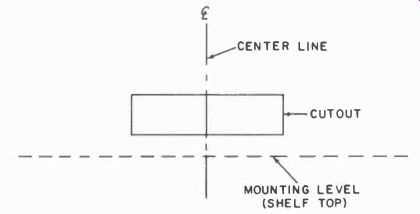
Fig. 1308. Typical tuner or amplifier template. The spacing between
the mounting shelf and cutout is fairly critical.
Did we mention that before you start to make a cutout you should remove the panel from the cabinet? Well, you should. It is very much easier to work on it, and we're firm believers in doing everything the easiest way possible. This is why we said in Section 12 that panels that will require cuts should never be glued into a cabinet, until they've been cut.
Unless you are going to mount a piece of equipment in some manner other than that intended by the manufacturer, you won't have any problem of figuring out what and where to cut.
The maker almost always supplies a template that shows the size, shape and location of all necessary holes. Almost always these templates are full size, so you can just tape them to the panel and proceed.
Locating the template on the panel initially is the only thing that might give any trouble. Be sure to center the changer or turn-table templates by the outline of the machine rather than by the outline of the cutout (Fig. 1307). With tuners or amplifiers, if you locate the line showing the mounting level correctly, every thing else will fall into place (Fig. 1308).
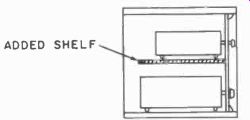
Fig. 1309. When a separate tuner and amplifier are "stacked",
it is best to insert a 1/2" plywood shelf to support the upper
unit.
Often, when tuner and preamplifier are stacked in the same compartment (Fig. 1309), it is necessary to insert a mounting shelf to hold whichever one is to be on top.
Plain old 1/2-inch fir plywood is excellent for this. The shelf is easily fixed in place by merely screwing a pair of 3/4-inch-square cleats to the sides of the cabinet. Just screw them in; don't glue them. If the components are ever changed, you might need to move the shelf up or down to accommodate the new parts.
If you have occasion to mount a record player drawer in a cabinet, the simplest and least expensive way to do it is to get one of the manufacturer's own bases for the machine, and mount it on a set of drawer slides. At times, the standard base won't fit, or you cannot get one in a color that is even remotely like what you need, so you'll have to make a drawer. This is very simple. All you need is a frame with a mounting board on top (Fig. 1310), which is in turn mounted on slides.
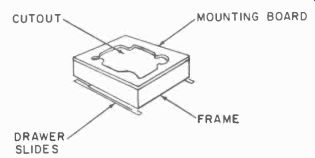
Fig. 1310. Complete record player mounting drawer. Slides can be mounted
on sides or bottom, de pending on cabinet design.
The chance that you will have to supply doors or lids for an installation is pretty slight, but what's worse is that you might be confronted with a cabinet like that in Fig. 1311. It is a perfectly good cabinet, but if it's to house hi-fi, it has to be completely fitted out inside. This isn't as frightening a job as it might appear at first. This might be done in a number of ways, depending on the equipment involved.
Fig. 1312 shows the same cabinet with a horizontal shelf for mounting equipment, control panel and molding, record player drawer and storage compartment. Fig. 1313 is the plan for this alteration.
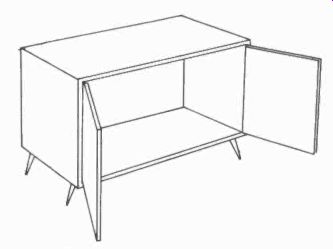
Fig. 1311. Standard storage cabinet before fit ting out for hi-fi
equipment.
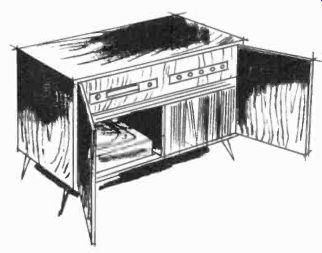
Fig. 1312. Cabinet shown in Fig. 1311 now fitted out with hi-fi equipment.
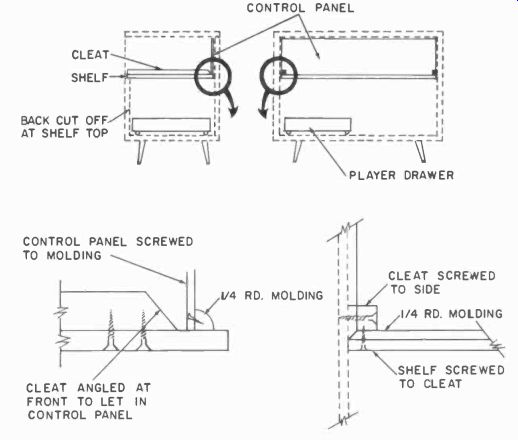
Fig. 1313. Details of alterations necessary to fit ordinary storage
cabinet for use as hi-fi equipment cabinet.
The first step is to take the back and the doors off the cabinet. You won't do any work on the doors, but it's better to take them off so they won't be flapping around in your way and get damaged while you are working. The back gets cut down to the height of what will be the top of the horizontal shelf. Now the shelf goes in and is secured with cleats to the sides of the cabinet. Note that the cleats are above the shelf. This is not the strongest way to mount the shelf, but it hides the cleats and, under average conditions, it will be plenty strong enough. If the equipment is so large that you won't have space enough for it between the cleats, you'll have to place the cleats under the shelf. But the idea is to hide them, if you can.
The molding around the inside front part of the upper compartment is installed to form a frame for the control panel. This molding is glued in, but the control panel isn't. Remember?
The record player drawer may be a standard manufacturer's base set on tracks, or you may make it up specially for the job as conditions dictate. You may or may not choose to separate the storage compartment from the player with a partition.
Apply a bit of finish to the front edge of the shelf, the molding and the control panel, and you're all set, except for reinstalling the back and the doors.
Be sure before you replace the back to make a hole behind the record player to pass the leads out. And don't be timid. Make that hole big enough to pass the power cord with its plug attached. As long as you keep it low enough, it won't show from the front.
In nine out of ten such ordinary examples, you'll have provided adequate ventilation for the tuner and other components by merely leaving the back of the upper compartment open. But the tenth time, you may be working with equipment that runs a bit hot. If so, either cut a large rectangular hole in the shelf under each component or perforate the entire shelf with a series of 1 1/2-inch round holes (Fig. 1314). This will allow air to circulate up from the compartment below, around the parts and out the back.
Ventilation is really quite simple in a free-standing cabinet where the back is not finished and goes against a wall. But if the back is to be finished and will be visible as in a room divider, it is another story.
Getting ventilating air in is not too difficult. You can usually bring it up from underneath the components through intake holes in the mounting shelf. The trick is to get it out again without making the back or the top look messy.
If the cabinet is high enough so that the top is above eye level, it's easy. Just cut an outlet slot in the top. This is too easy to happen often.
Usually the top is below eye level and visible. In that case, forget the top and concentrate on the back. Once in a while on a modern job, you can get away with a solid-color perforated Masonite back. It should be mounted on a snap-in frame so that there'll be no screw heads left showing. But generally, the client won't go along with it anyway. The lady of the house will also greet a plain perforated or expanded metal grille without visible enthusiasm. You might evoke something closer to a smile with a snap-in frame covered with grille cloth and possibly a decorative metal grille on top of the cloth. Another possibility is a snap-in frame with louvers. This can be finished to match the rest of the cabinet, and can be a very satisfactory solution indeed.
Ventilation can raise problems in built-in installations also. Again, you're more likely to have trouble locating outlets than intakes. You'll still be able to cut intakes through the mounting shelf in most cases.
The outlets will depend on whether the installation is built against the wall and attached to it or sunk into the wall. If it is sunk in, try to arrange outlets into the air spaces between the wall studs. This isn't ideal but it's usually adequate, if you can screen the openings. Another way is to put a louvered area above the equipment on the front as an outlet. ccasionally, a baby electric fan is needed in the equipment compartment to supply enough air circulation.
If the housing is built against the wall, louvers in front above the equipment are still good, or perhaps you can put louvers in a side and vent out that way.
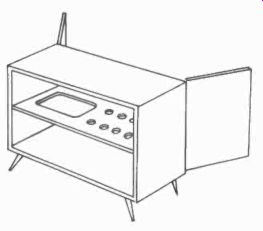
Fig. 1314. Equipment mounting shelf with air intake holes.
With both types of built-in housings, you can often cut holes into compartments adjoining the equipment on one or both sides and help yourself somewhat this way.
With furniture-finished cabinets, it is a good idea to make a standard practice of lining the inside top and sides of compartments housing heat-producing units (like amplifiers) with thin-sheet asbestos or ordinary kitchen aluminum foil. Very often, the finish over and around tuner--amplifier compartments will discolor or crack long before the finish on the rest of the cabinet lets go. Lining the compartment inside will afford a sizable degree of protection.
Granted doing the actual work isn't quite as simple as reading these few paragraphs, but at the same time, it really is not beyond the capability of anyone with average coordination and a moderately firm intent to complete the job.
Speaker cabinets
Cabinets that were manufactured as speaker enclosures will not require preparation prior to installation unless you plan to mount in them different sizes or numbers of speakers than the manufacturer intended. If so, you'll have to add adapter panels, or remove the baffle board, take off the grille cloth and recut to suit your requirements.
To recut the holes, your friend the saber saw comes in handy again. You might get hoodwinked into cutting a hole for a 15-inch speaker in 3/4-inch plywood by hand with a keyhole saw once.
You're not likely to let it happen a second time.
The only way you could get into any real work on a speaker cabinet would be if you have to adapt a cabinet that wasn't built for the purpose.
This kind of alteration is really much simpler than an equipment adaptation. When revising an existing cabinet into a speaker enclosure, stay with the principle of either an infinite or a reflex baffle. You are unlikely to make a successful horn out of some thing that wasn't meant for such use.
Fig. 1315 shows a common type of sliding-door storage cabinet and the same cabinet revised into a bass-reflex speaker enclosure.
This revision is particularly simple since no new exposed wood is required, and therefore, no finishing is involved.
The plan for the job is shown in Fig. 1316. The step-by-step ...
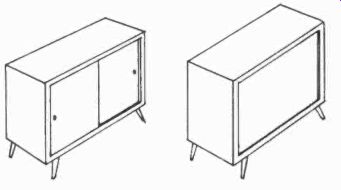
Fig.
1315. Common type of sliding-door cabinet, and the same converted
into a speaker cabinet.
... procedure is as follows: First, remove the doors and the back.
Install the 3/4-inch-square cleats all around the inside front and back, set in from the edges as shown to allow for the thickness of the front and back panels that will be screwed to them. Put in the four front-to-back corner reinforcing blocks with glue and screws. Cut the baffle board, stain the front black and staple the grille cloth in place.
The baffle board is installed by screwing through the front cleats from inside. This way the screw heads won't show.
Cut and fit the back, install by screwing to the back cleats, and you're all set.
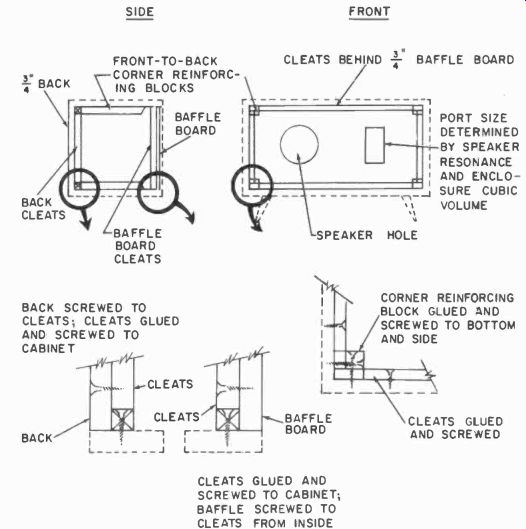
Fig. 1316. Details of conversion in Fig. 1315. New construction is
shown with solid lines.
Port size is determined on the basis of cubic volume of the particular enclosure and the resonance of the speaker. Tuning a reflex cabinet really accurately becomes rather complex. However, by correct use of a chart (see Fig. 804), you can get pretty close, close enough for most purposes.
Compute as accurately as possible the internal cubic volume of the enclosure in cubic feet. Then find out from the manufacturer's specifications what the resonant frequency of the speaker should be.
On the chart in Fig. 804 find the intersection of the cabinet volume with the resonant frequency. From here drop a vertical to the bottom of the chart, and you'll have the answer of the port area in square inches.
Note that speaker diameter has nothing to do with the case only the speaker resonance is important.
The port shape doesn't seem to be at all critical, but generally it is kept rectangular because this is the easiest way to figure the area accurately.
To make an infinite baffle out of the same enclosure, merely forget about the port entirely and thoroughly pad the whole interior.
In either case, some internal padding should be included. An infinite baffle is usually padded on all interior surfaces except the baffle board itself. The reflex would get padding on either top or bottom, one side and the back. We prefer Fiberglas blanket for this purpose, but other materials can be used.
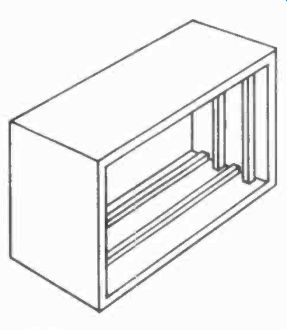
Fig. 1317. Add internal battens to large speaker enclosures to reduce
panel resonances.
A cabinet that is to house a large and powerful speaker, say 12 inches and up, should be braced or battened inside to reduce panel resonances. If the manufacturer left them out, you put them in. They can be made of 3/4 X 2-inch stock and should be edge-glued and screwed in place as in Fig. 1317. It is just as well if they are not evenly spaced.
With really large enclosures, 10 cubic feet and up, it is often desirable to cross-brace them inside with three 2 by 4's, top to bottom, side to side and front to back. The purpose is the same as battening to reduce panel resonances.
Repairs
Since with a new cabinet either the manufacturer or the carrier is responsible for any damage or defect, let one of them correct it or pay for having it corrected by a professional.
A used cabinet is another story. Here, you can often pick up a few extra dollars by repairing an old veteran so it can be put hack in service.
Hardware
On used cabinets, it is commonplace to find loose, bent or broken hardware of some sort. The best thing to do with it is throw it out and replace it with new hardware. Only in the case of genuine antique hardware that cannot be replaced nowadays should repairs be attempted. Such antiques can be fairly valuable so, if there is anything more than a mild bend to be repaired, give the job to a qualified metal worker. With all due respect to your own skill, you've a chance of hopelessly mangling the thing.
Loose hardware is a cinch. Probably all that has happened is that the screws holding it have stripped their threads in the wood.
Take the screws out, fill the holes with plastic wood and re-drive the screws just until the heads are flush. Don't overdrive them! Let the plastic wood harden thoroughly, and your hardware will be tight again.
Loose or open joints
This kind of problem can arise either from simple failure of the glue line, or warpage in the panels resulting in enough strain ...
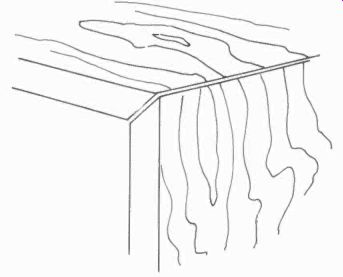
Fig. 1318. Open joints can often be repaired successfully.
... to spring the joint open (Fig. 1318). To repair it, first scrape as much of the old glue out of the joint as possible, using a sharp thin-bladed knife. Squeeze new glue into the joint (a squeeze glue container helps) , and apply plenty of pressure to hold the joint. closed while the new glue hardens. The ideal way of applying this pressure is with cabinetmaker's pipe or bar clamps.
Here is a simple trick for applying very respectable pressure without them (Fig. 1319). Run a heavy rope around the cabinet.
Place L-blocks and padding under where it touches the corners, otherwise you'll crush or mar them when you take up on it. Now slip a bar through the rope and start twisting it like a tourniquet.
You'll be pleasantly surprised at what a powerful squeeze you can get this way.
Loose legs
Since a majority of legs these days are secured with hangar bolts to metal plates on the bottom of the cabinet, a good many cases of loose legs can readily be cured by merely twisting the leg tighter into the plate. Sometimes, though, the leg is loose because the hangar bolt has stripped its threads in the leg or the leg has split.
The stripped thread can be repaired by taking the bolt out, inserting plastic wood, and running the bolt back in the same as for stripped screw threads. The split leg can be repaired with glue ...
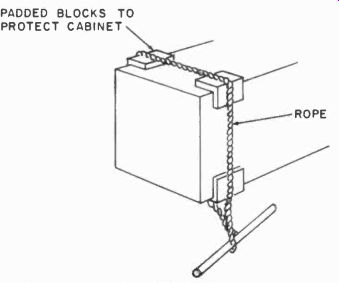
Fig. 1319. Rig for applying pressure to joints when no clamps are
available.
... and pressure, but in either case no repair is as good as replacing the leg. If you cannot find a leg that matches, this may mean re placing all four legs, but a set of legs isn't very expensive and then you'll have something you can rely on.
Other structural defects
There are various other structural defects you might encounter in a cabinet, depending on the style and construction methods used. In styles where they are used you might find loose doweled or mortise-and-tenon joints. A molding could be loose or broken, a panel could be split, veneer can loosen and peel, and internal partitions can come unglued.
Nine out of ten of these miscellaneous ailments can be cured with glue and pressure. Often, a bit of retouching of the finish is needed afterward.
Remember always to scrape away the old glue when re-gluing anything that has let go. Don't use nails for repairs if you can possibly help it. They look bad, and they don't hold well anyway.
If you have to use nails on a part that will be seen, be sure, at least, that they are finish nails (see Section 12). In places that are not seen, you can use screws to your heart's content or, if you're lazy, use anchor-fast nails--they'll hold just as well.
Finish retouching
This isn't anything you're going to want to do, but it's a handy thing to be able to do. You can actually save yourself a tremendous amount of time and aggravation, not to mention expense, if you can take care of minor retouching jobs yourself. This will require a small kit of materials, and a bit of practice, but it is nothing to be afraid of.
A finishing material supplier can assemble for you a kit of the materials you'll need. Following is a list of things that ought to be included:
Alcohol lamp and burn-in knife or
Electric burn-in knife
Stains (6 or 8 assorted colors)
Shellac sticks (6 or 8 assorted colors) 4/0, 6/0, and 8/0
Garnet papers 6/0 steel wool
Shellac
Denatured alcohol
Lacquer thinner
Rubbing compound Linseed oil
Powdered pumice
Paste wax
Soft rags and cheesecloth
Small sable touchup brush
Perhaps this looks like a fair number of items, but they are all small. You don't need very much of any one thing. Transferring the liquids to 2- or 4-ounce medicine bottles that can be readily refilled will help to keep the whole kit down to a very modest size and weight for easy portability. Now. with a kit in hand, let's look at some of the more common finish defects and injuries to see what can be done about them.
Scratches You won't find a piece of furniture that has ever been used without also finding some scratches on it. There may be only the fine hairline scratches that are the inevitable result of normal use, or there may be some fairly deep ones resulting from accidents or abuse.
The minor scratches can be quickly polished out with rubbing compound. It is amazing how tired a cabinet can look when there is nothing wrong with it beyond a multitude of little hairline scratches in the finish. And the extent to which a bit of rubbing compound can help you spruce it up in 15 minutes' time is even more amazing. Rubbing compound is for a gloss finish. For satin or dull finishes, use pumice and oil or 4/0 to 6/0 steel wool, de pending on how dull you want the end result to be. These days the duller finishes are very much in favor, which is nice because they are lots easier to work with than gloss.
Really bad scratches won't come out with mere rubbing. They'll have to be French-polished and then rubbed. There are also commercially formulated scratch-fixing liquids available if you care to look into them.
Depression injuries (nicks, dents, scars, gouges, crushes, etc.) With these kinds of damage, the injured area has either been crushed in or some material has been torn out. However, they all have one thing in common: the injury lies below the level of the surrounding surface.
Either burning-in or French polishing will be required to fill the affected area back up even with the surface around it. But before this can be done, any splinters, chips of old finish or foreign material must be removed from the spot, and any exposed raw wood stained to match the surrounding color.
Burning-in
Here is where shellac sticks are used with either the alcohol lamp and palette knife, or electric burn-in knife.
Heat the palette knife over the lamp until when you touch it to the shellac stick a bit of shellac will soften and come off on the knife. Knife the shellac into the hole to be filled and repeat the process, filling the hole a little at a time with shellac until you are back even with the surrounding surface. We're assuming you're using a shellac stick of an appropriate color for the job.
That's why you've got an assortment of colors.
Once the hole is filled up, if the repair is a bit bumpy on top, you can smooth it off with the warm knife before giving it a little French polish and rubbing out to complete the repair.
French polish
French polishing is a bit more tedious than burning-in, but sometimes it is preferable, particularly if the injury is wide and shallow rather than narrow and deep.
First, make a small pad of cheesecloth or gauze about 1 1/2 inches square and about 20 layers thick. Wet it with white shellac so that it's soggy, but not dripping. Now pull the corners together to make a round-ended pad and apply a few drops of linseed oil.
Rub the shellac into the damaged area with a brisk motion. Use very little pressure at first. In a few seconds, as the shellac starts to harden, gradually increase the pressure to about what you'd expect to apply when polishing hard wax. Keep rewetting the pad and repeating the process until you've built the shellac in the injured area up to the desired level. Now rub off with compound, pumice or steel wool, whichever will give you the right texture to match the surrounding surface, and you're through.
Burns
Burns are really just another type of depression injury. The only difference is that there will be charred wood and blistered or discolored finish around them that must be scraped away before you can start repairing. This can be done with any small sharp knife. After all the charred material is scraped away, you'll have to decide whether to repair by burn-in or by French polish. A fair rule of thumb is that if the hole is 1/8 inch deep or less, use French polish, if deeper, do a burn-in.
Cracked, crazed, or alligatored finish
These names describe the appearance of different kinds of over all deterioration of a finish. They each look a little different from one another and the causes differ, but to you they all mean the same thing. Hands off! If you must handle one of these conditions on a commercial basis, call in a professional finisher. If it's something of your own that you want to fool around with, that's another story. An overall French polishing will help tremendously if the finish isn't entirely shot. Or you could try one of the commercial scratch-fixing preparations, followed by an overall French polish. Occasionally, a cracked or crazed finish will respond to nothing more than a good rubdown with linseed oil.
Stains
The milky stains left in a finish by water or beverages can often be removed by merely rubbing out with compound, pumice or steel wool, whichever is appropriate to the texture of the finish.
If you don't get results pretty quickly this way, switch to chemical methods. Dampen a rag or pad very lightly with ammonia (or lacquer thinner for lacquer finishes) and brush it lightly and quickly over the stained area. If your pad is too wet or you're not quick enough, you could take the finish clean off the area, so be careful. If you do goof, you'll have to French polish the spot to get some finish back on it.
Refinishing
This is another operation that you should not try to do yourself on a commercial job. Call in a professional.
Again, if it is personal, you can't get hurt if the results are bad, so go ahead if you want to.
Refinishing involves exactly the same steps that were taken in applying the original finish with one difference, and it is a big one. You've got to get the old finish off! This requires a liberal supply of paint remover and a good deal of careful scraping. Once the old finish is off, wash the piece down thoroughly with turps or benzine, and sandpaper it as if it were new.
From here on, use the same procedures as for a new piece. You can expect just as good results if you did a complete job getting the old finish off, and sanded down well afterward.