By Larry Klein
Technical Director Klein congratulates Dr. Oskar Heil on the development of the Transar loudspeaker system
Electric-bass Input
Q. Is it harmful to play my electric bass through the microphone input of my 85-watt receiver? It seems to sound all right at all volume levels, and my speakers are well known for extended bass response, so that should be no problem.
MICHAEL AUBIN; Fremont, Calif.
A. assume that you know your bass does not have the same tonal quality through your hi-fi system as it does through a bass-guitar amp and speaker. The overload properties, resonances, frequency response, etc. of an electric-bass amp/speaker are all selected to provide special sonic effects, and thus normal "fidelity" rules don't apply.
As for what can go wrong, I don't think your amplifier will run into trouble, but be careful not to drive your speaker cones into excessive excursion. Since your guitar will produce a strong low E with a fundamental tone at 41.2 Hz, you can avoid woofer dam age by keeping your levels moderate. Do not turn up your amplifier's bass or loudness control in pursuit of a "gutsier" sound. however, if you can move your speakers easily, place them side by side in a corner. This will provide some bass enhancement withoutput ting additional stress on the speaker's cone-structures and suspensions.
Power Consumed
Q. Is there any way I can tell how much current my audio equipment draws?
ABRAHAM MOREL; Chicago, Ill.
A. Yes, and with most components fairly easily. You'll find a label on the back panel or underside of most current-consuming audio products that gives its power consumption in watts. Sometimes the information is provided in "VA" or volts/amperes, which is roughly the same as watts. In the absence of labels, you can assume the usual solid-state preamplifier draws perhaps 15 watts, a tuner perhaps 20 or 30 watts, and a turntable any where from 20 watts down to 2 or 3 watts for the direct-drive models. All of these figures are very low in respect to current consumption. However, some of the big three-motor open-reel decks may draw considerably more.
One rule of thumb you can use to estimate current consumption is to place it (your thumb) on the unit's case. In general, the hotter the unit the more current it is drawing from the a.c. line. An amplifier, whether power, integrated, or one of those found in receivers, is the big drawer in the crowd. With most amplifiers, the current drawn varies with the audio power output they are driven to. The more audio-signal wattage pushed out, the greater the line current drawn in. I checked my manual files and found these figures: a 25-watt-per-channel quad receiver drew 22 watts with no signal, 300 watts with full power output. A 20-watt-per-channel stereo receiver drew 20 watts with no signal, 85 watts at full power output. A 60-watt-per-channel stereo receiver drew 40 watts with no signal, 356 watts at full output power. A 350-watt-per-channel power amplifier drew 50 watts with no signal and 1,100 watts (!) at full output.
There are several variables (aside from speaker impedance) that affect the amount of current drawn by a component under no-signal and full-output conditions. Although use of a large number of pilot or indicator lamps, or a built-in oscilloscope display, will add watts to the no-signal rating, the major contributing factor is the power amplifier's class of operation.
Class-A operation is the least efficient mode in that it involves a large current flow through all the output transistors whether or not there's an audio signal present. With Class B there's a small "idling" current flowing under no-signal conditions, which increases with the signal level. A high-power Class-A amplifier used five or six hours a day might well cost you as much to run as your air conditioner, whereas the conventional Class AB, D, G, or H amplifiers typically cost perhaps as much as a 75-watt lamp bulb for the same operating time in normal home use.
Hi-fi Shock
Q. I would like your advice on a method to ground my stereo equipment. I live in an apartment building where the floors are marble. I usually get a slight shock on touching the turntable, tape decks, and receiver, but it depends upon the kind of shoes I wear.
There is no water pipe or other type of grounding device near the equipment or even within a reasonable distance.
RAYMOND K. PANCZYK, Pompano Beach, Fl.
A. The fact that you live in Florida pretty much rules out the possibility that your problem is caused by electrostatic shocks such as trouble drier areas of the country or where steam heat is used. What you need to do first is properly polarize the a.c. wall plugs of all your equipment. A neon tester (see illustration) available in most hardware stores will serve as a "hot" chassis indicator. It works like this: touch either one of the probes to an externally grounded point and the other to the chassis of any plugged-in component. If the tester lights, this indicates a voltage potential on the chassis which can cause a shock.
The test procedure is as follows:
1. Find an electrical ground. If any of your wall outlets accept three-prong plugs directly (without an "adaptor"), the off-center U shaped hole should provide this (it doesn't al ways). To check whether it does, insert one of the probe tips of the neon tester into the sup posed ground hole and plug the other probe alternately into the two other slots. If the U shaped hole really is an electrical ground, the bulb will glow when connected to one of the slots (it doesn't matter which) but not to the other. If it doesn't glow when connected between "ground" and either of the slots, the grounding connection has been omitted (this happens sometimes in older houses in which the, original wiring was not required to provide the additional electrical ground and the original wall outlet was later replaced with a modern, three-conductor receptacle even though no means of grounding it was available). If you don't have three-conductor outlets, however, you may have an electrical ground right at that same outlet box (this would be the case with premium-quality wiring done before 1962). To check for this, touch one test prod to the metal screw that holds the cover plate in place and insert the other alternately into each of the two regular plug slots (be sure you get through any paint on the screw so as to en sure a solid connection). If the light glows, that metal screw can become your grounded test point. If you can't find a ground this way, you'll have to run a wire to a ground clamp attached to a cold-water pipe (electrical supply stores have inexpensive ground clamps). This will then become your ground, but you should be careful not to touch it (or the wire coming from it) and your equipment simultaneously until everything is safely interconnected you could get a shock.
2. Unplug all audio cables as well as separate ground connections (if there are any) between the components (you don't need to disconnect your loudspeakers, however). Connect a length of insulated wire between one probe of the neon tester and the ground test point as shown. Make sure to wrap insulating tape around the probe/wire connection. With the component plugged in and turned on, see if the tester glows when its other probe is touched to the metal chassis of the component. If it does, reverse the component's a.c. plug in the wall socket and try again. This time it will probably not glow, in which case this is the way to leave the plug inserted for proper grounding. (Put a spot of paint or other mark on the plug and wall plate to insure pro per reinstallation if it is ever unplugged.)
3. Repeat this procedure with each of your components, including the turntable. If a given piece of gear doesn't light the bulb in either way, then it doesn't matter which way its a.c. plug is inserted. If it glows both ways, pick the position with the dimmer glow.
4. Reinstall the audio cables between the components (along with any separate ground wires you may have been using between chassis) and see whether your system as a whole would benefit in respect to shock (or hum) from a connection between the test ground point at the wall socket and the chassis ground terminal on your receiver or preamp.
Of course, if you have any components with three-prong plugs and your wall a.c. receptacles are grounded, this connection is made automatically through the line cord. In respect to hum testing, switch to phono playback, turn the bass up, the treble down, and set the volume at a level at which hum is clearly audible. If the additional ground to your test point gives you lower hum, make it permanent.
Whale Oil
Q. Recently I have been using Maxell audio tape and am very happy with its performance. Unfortunately, I have just heard that Hitachi, the producers of Maxell tape, use whale oil in their manufacturing process. Could you confirm or deny this for me?
KENNETH LIBBY; Kailua, Hawaii
A. I checked with Mazell's representatives in the U.S. anal they assured me that, unlike some yogurts, their tape includes absolutely no "natural" ingredients. In short, it's all "chemicals." Furthermore, my informant went on, Maxell's major executives in Japan are ardent conservationists and would be among the least likely to engage in such practices. I thus suspect the presence of some competitive snake oil in the whale-oil rumor.
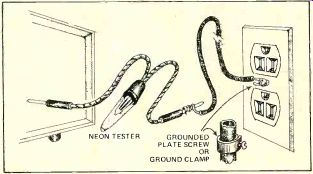
------- When handling the neon tester make sure not to touch the insulated
parts of the prods. The length and type of wire connecting to the external
ground point is not critical; ordinary speaker wire will do.
++++++++++++++
Also see:
A BEGINNER'S GUIDE TO HI-FI---Selecting equipment intelligently is something anyone can do ROBERT N. GREENE
Technical Talk, Julian D. Hirsch
I Remember Mono--An Audiobiography
Source: Stereo Review (USA magazine)